Cults

Tubes4shelves v1.0
by Cults
Last crawled date: 6 years, 2 months ago
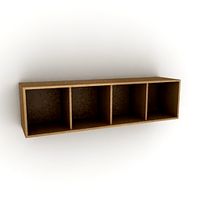
I just moved and I need storage shelf for my cellar, but sturdy and less than 1m70 in height.
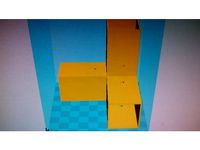
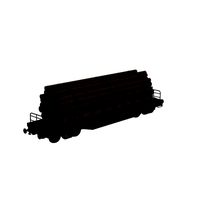
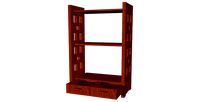
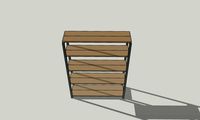
I wanted to make a storage shelf for heavy loads, based on PVC pipe, thinking that 3 pvc tubes in each other (diameters 16, 20 and 25) would make the whole rigid enough. Unfortunately this is not the case but it is already good for a first try! ;) One learns from his mistakes but also from the mistakes of others so learn from mine, that's why I share the file and the sources. As it is free, if you improve the concept everyone is winning.
The concept followed was to have a structure in pvc (IRL tubes of electricity) that supports the wooden trays, simple printed parts and all identical (without symmetries to check / respect), to have a shelf that can support heavy loads.
The wood (here the agglo), the size of the tray (120 * 60cm) and the fact of having made a structure only for 2 tray must play, but I expected better, waiting to find a solution to rigidify that. It is still 70 kg, it is encouraging for a v2.
The files are intended for pvc of 25mm in diameter, with 0,5 margin and wood screws of 3x20mm.
The openscad files can be edited to fit your dimensions.
Use the "test ring" file to test your tubes by playing on the margin.
Then use a tray to build the structure using the positioning tool. The positioning tool is used to mark the plate which gives the max length of the pvc tubes in length and width, as well as the position of the cleat to place the screws that fix the first rings.
The tubes are cut to the right lengths,
place the 2 rings required at each corner,
place the tubes with rings about every 40 to centimeters (attention to the direction),
the tubes are fixed to the rings , as well as the support rings in the lengths with the plank screw object or without using it only to mark the location of the screw,
the length is corrected if necessary and the support crossings are placed and screwed,
they are placed on the vertical tubes, at the bottom for the first and then horizontally for the next ones (using an object at each corner if one is alone),
each time the object "on" "which makes it possible to fasten the board with the tube,
and voila!
#DAGOCULTS
Similar models
thingiverse
free

Modular Shelf Connectors for PVC Tubing by TORCH
...n the base of the shelf supports.
this is a work in progress, and i'll add more file builds as i find them necessary to make.
thingiverse
free

Spool Wall Hanger by Cliffork
... a 1/4" u channel. an afterthough in making this i set the pvc in place with a set screw on each after the spools were hung.
thingiverse
free

PVC Lid and Cover for Storage Rack by fernandogarzaw
...this is what i came with. didn't find anything similar on thingiverse so i decided to post it. i...
thingiverse
free

PVC Art Shelf Brackets
... hole, use a 1" screw to hold it, turn it over and mark the hole on the second side, drill and now you have a straight hole.
thingiverse
free

Tape Holding Shelf Bracket, use with 6" dia PVC pipe to make shelf by dditzler
... too.
link to pvc pipe i used aproximately $9 usdhttp://www.homedepot.com/p/vpc-6-in-x-2-ft-pvc-dwv-riser-pipe-6006-2/202564459
thingiverse
free
Coupler for 1" Aluminum Square Tube (3-Way) by Cotton80
... support for the two horizontal tube sections.
disclaimer: use this object at your own risk. load test have not been performed.
thingiverse
free

1/2" to 1" filament spool support by lucascorato
...o 1" couplings on both endings).
i know it's kinda ugly and it could use less material, so please fell free to remix it!
thingiverse
free

Ghostbusters Belt Gizmo by azurial
...ploaded this to pinshape.com as an object for sale. if you like my work and would like to support me, please consider purchasing.
cults
free

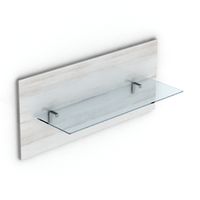
Model wall shelf (collection) #DAGOCULTS
...at least 70 * 70 cm.
however, a printer with a 20 * 20 cm tray is enough to print one of the four pieces of this shelf
#dagocults
thingiverse
free

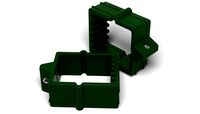
PVC tube corner connector
... corner connector
thingiverse
needed a pvc tube corner connector to make a "suprise" for sinterklaas so i designed one
Dagocults
cults
$1

kitab # dagocult
...dagocult the kit table that meets your specific need #dagocults ...
cults
free

Furniture sewing machine, #DAGOCULTS
...of long
- 2 wooden trunnions of ø20mm and 850 of long
- 1 wooden journal of ø12mm and 520 long
- 4 screws of 4x2m
#dagocults
cults
free
Model wall shelf (collection) #DAGOCULTS
...at least 70 * 70 cm.
however, a printer with a 20 * 20 cm tray is enough to print one of the four pieces of this shelf
#dagocults
cults
free

Kim Jung Supreme Leader Chair #DAGOCULTS
...er to be well laid as its printed upside down
i have added an atomic bomb foot stool to go as a set (could also be a side table)
cults
free

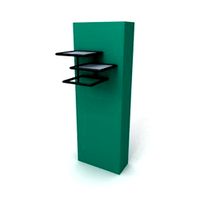
Custom-made figurine shelf (collection) #DAGOCULTS
...pieces of this piece of furniture fits perfectly together and allow them a perfect balance of this piece of furniture.
#dagocults
cults
free

Architect dream chair #DAGOCULTS
...ng to give me filament ???
happy to promote your filament on youtube or facebook, instagram whatever you like....
anyone???
cults
free

Model of an office
...laptop and a whole with screen, keyboard and mouse #dagocults ...
cults
$1

Dome Seat
...decided to make this to enter in to the #dagocults ...
cults
free

Hexagonal furniture
...hexagonal furniture cults #dagocults ...
cults
free

the lazydeskchair
...owner can customize the colors according to his tastes. #dagocults ...
Pvc
turbosquid
$39
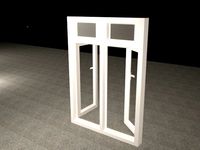
pvc window
...bosquid
royalty free 3d model pvc window for download as max on turbosquid: 3d models for games, architecture, videos. (1205578)
turbosquid
$19

window PVC
...bosquid
royalty free 3d model window pvc for download as 3ds on turbosquid: 3d models for games, architecture, videos. (1204830)
turbosquid
$15
PVC Band
...turbosquid
royalty free 3d model pvc band for download as ma on turbosquid: 3d models for games, architecture, videos. (1287079)
turbosquid
$3
Pvc taping
...bosquid
royalty free 3d model pvc taping for download as max on turbosquid: 3d models for games, architecture, videos. (1161550)
turbosquid
$1

PVC Fittings
... available on turbo squid, the world's leading provider of digital 3d models for visualization, films, television, and games.
turbosquid
$1

PVC elbow
... available on turbo squid, the world's leading provider of digital 3d models for visualization, films, television, and games.
turbosquid
free

PvC Window
... available on turbo squid, the world's leading provider of digital 3d models for visualization, films, television, and games.
turbosquid
$29

Pvc cabinet
... pvc cabinet for download as blend, dae, fbx, obj, stl, and x on turbosquid: 3d models for games, architecture, videos. (1669537)
turbosquid
$10

PVC PIPE FITTING
...d
royalty free 3d model pvc pipe fitting for download as skp on turbosquid: 3d models for games, architecture, videos. (1164250)
turbosquid
$17
Glass PVC Table
...ee 3d model glass pvc table for download as max, obj, and fbx on turbosquid: 3d models for games, architecture, videos. (1267063)
V1
turbosquid
$35

v1
... available on turbo squid, the world's leading provider of digital 3d models for visualization, films, television, and games.
3d_export
$10

street tree v1
...street tree v1
3dexport
street tree v1
3d_export
$5
potato v1
...potato v1
3dexport
turbosquid
$20

Kitchen V1
...bosquid
royalty free 3d model kitchen v1 for download as max on turbosquid: 3d models for games, architecture, videos. (1153622)
turbosquid
$12
sofa v1
...turbosquid
royalty free 3d model sofa v1 for download as max on turbosquid: 3d models for games, architecture, videos. (1283267)
turbosquid
$3

Chair V1
...urbosquid
royalty free 3d model chair v1 for download as fbx on turbosquid: 3d models for games, architecture, videos. (1486093)
turbosquid
$15

Cupboard v1
...royalty free 3d model cupboard v1 for download as max and fbx on turbosquid: 3d models for games, architecture, videos. (1444568)
3d_export
$5
tram v1
...tram v1
3dexport
3d_export
$8
lumber car v1
...lumber car v1
3dexport
lumber car v1 printable, low poly model.
turbosquid
$20

DELTALIGHT v1
...free 3d model deltalight v1 for download as max, max, and obj on turbosquid: 3d models for games, architecture, videos. (1630928)
Shelf
3d_ocean
$6

Shelf
...shelf
3docean
furniture shelf
a lowpoly shelf .
turbosquid
$7
Shelf
...helf, bookshelf,cafe shelf,decor, for download as max and ige on turbosquid: 3d models for games, architecture, videos. (1427685)
archibase_planet
free
Shelf
...shelf
archibase planet
shelf rack glass shelf
shelf - 3d model (*.gsm+*.3ds) for interior 3d visualization.
archibase_planet
free
Shelf
...shelf
archibase planet
shelf rack glass shelf
shelf - 3d model (*.gsm+*.3ds) for interior 3d visualization.
3d_ocean
$3
Shelf
...shelf
3docean
shelf
a high quality shelf with high resolution texture
3d_export
$5
shelf
...shelf
3dexport
shelf
3d_export
$5

Shelf
...shelf
3dexport
shelf
archibase_planet
free
Shelf
...shelf
archibase planet
shelf shelving glass shelf
shelf 1 - 3d model (*.gsm+*.3ds) for interior 3d visualization.
archibase_planet
free
Shelf
...shelf
archibase planet
shelfs shelving bookshelf
shelf - 3d model for interior 3d visualization.
archibase_planet
free
Shelf
...shelf
archibase planet
shelf shelving bookcase
shelf - 3d model for interior 3d visualization.
Tube
archibase_planet
free

Tube
...tube
archibase planet
paint tube stationery
tube - 3d model (*.gsm+*.3ds) for interior 3d visualization.
turbosquid
free
tube
...tube
turbosquid
free 3d model tube for download as c4d on turbosquid: 3d models for games, architecture, videos. (1378271)
archibase_planet
free
Tube
...tube
archibase planet
mascara cosmetics make-up
tube 1 - 3d model (*.gsm+*.3ds) for interior 3d visualization.
3d_export
$5
Tube pants
...tube pants
3dexport
tube pants
3d_export
free
Tube
...tube
3dexport
turbosquid
free
TUBE
...
free 3d model tube for download as blend, dae, fbx, and obj on turbosquid: 3d models for games, architecture, videos. (1672199)
turbosquid
$29

tube
...lty free 3d model tube for download as 3ds, obj, c4d, and fbx on turbosquid: 3d models for games, architecture, videos. (1442047)
3ddd
$1

perfume tube
...perfume tube
3ddd
тюбик
perfume tube, тюбик
3ddd
$1
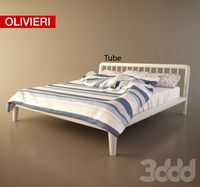
Olivieri Tube
...olivieri tube
3ddd
olivieri
кровать olivieri tube
turbosquid
$22

Tube
... available on turbo squid, the world's leading provider of digital 3d models for visualization, films, television, and games.
0
turbosquid
$12

Calligraphic Digit 0 Number 0
...hic digit 0 number 0 for download as max, obj, fbx, and blend on turbosquid: 3d models for games, architecture, videos. (1389318)
3d_export
$6

set-0
...set-0
3dexport
turbosquid
$6

hedge 0
...yalty free 3d model hedge 0 for download as max, obj, and fbx on turbosquid: 3d models for games, architecture, videos. (1450353)
turbosquid
$5

Nuber 0
...oyalty free 3d model nuber 0 for download as ma, obj, and fbx on turbosquid: 3d models for games, architecture, videos. (1564674)
turbosquid
$22

0.jpg
... available on turbo squid, the world's leading provider of digital 3d models for visualization, films, television, and games.
turbosquid
free

Steam Locomotive Fowler 4F 0-6-0
... available on turbo squid, the world's leading provider of digital 3d models for visualization, films, television, and games.
turbosquid
$10

Liquid Number 0
... model liquid number 0 for download as c4d, 3ds, fbx, and obj on turbosquid: 3d models for games, architecture, videos. (1689919)
turbosquid
$45

Dragon360_perspShape_tmp.0.jpg
... available on turbo squid, the world's leading provider of digital 3d models for visualization, films, television, and games.
turbosquid
$8

Rocks Debris 0
... available on turbo squid, the world's leading provider of digital 3d models for visualization, films, television, and games.
3d_export
$18

wood-guardrail-fence 0
...wood-guardrail-fence 0
3dexport
wood-guardrail-fence 0<br>3ds max 2015