Thingiverse
TronxyX5SApro Holder Capacitiv Sensor LJC18A3-B-Z/BX to original cover. by MakeDE
by Thingiverse
Last crawled date: 4 years, 7 months ago
I often have trouble with the aluminum based hot bed when calibration for the first layer. Therefore I want to change to glass bed with hopefully a better and flat surface.
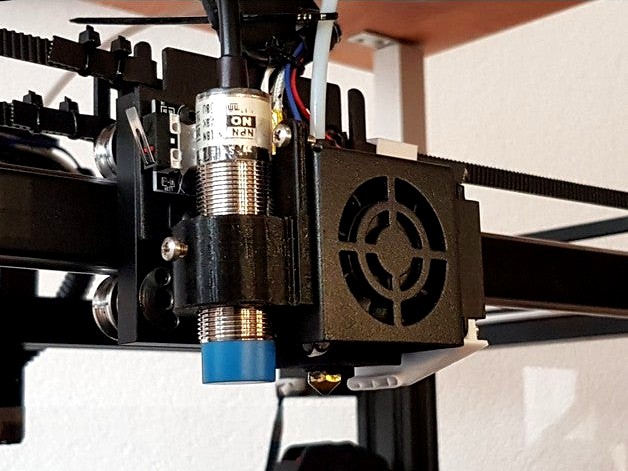
-- The intention is to design a holder which fits to the original hot end cover.
-- Position nearly the same place than the original one.
-- The original software should work without any modifications.
I used the LJC18A3-B-Z/BX with adjustable senor range 1-10mm.https://smile.amazon.de/gp/product/B072C35ZDC/ref=ppx_yo_dt_b_asin_image_o06_s00?ie=UTF8&psc=1
Data sheet:https://de.aliexpress.com/item/32787456276.html?src=google&albch=shopping&acnt=494-037-6276&isdl=y&slnk=&plac=&mtctp=&albbt=Google_7_shopping&aff_platform=google&aff_short_key=UneMJZVf&&albagn=888888&isSmbAutoCall=false&needSmbHouyi=false&albcp=12554800262&albag=127990761348&trgt=539263010115&crea=de32787456276&netw=u&device=c&albpg=539263010115&albpd=de32787456276&gclid=EAIaIQobChMIrrOZnOLn7wIVvBAGAB3-XA4sEAQYASABEgInFPD_BwE&gclsrc=aw.ds
Unfortunately the sensor has a 10kohm pull up to Vcc (brown). That means it is not a real open collector sensor with normally open NO design.
The Tronxy has 4,6V high level (sense) and Vcc=24V (in my 24V Tronxy) so it is necessary to add a pull down resistor of ~2,5kohm (black sense to blue RTN). I used 2,7kohm and got a high level of 5,1V (so the internal OV protection diodes should not see to much current).
Color and use of the wires are identical with the original sensor. So I cut the cable and joint the new Sensor with resistor near the hot end.
The holder is fixed only with one screw on the left side. So a second fixation is needed.
The holder is printable without support. Therefore I used the screw on the Top right just for a second fixation.
Additional Parts:
4*M4 x 8mm (two with spike)
The whole for the M3 screw is D=2.7mm for self friction and direct cutting with the screw except the left one ;-).
The two screws with spike fix the sensor at the winding of the sensor.
(don't use to much force, just check the begin of the moving of the holder)
P.S.: The pictures show the first version with only one spiked screw.
The original configuration file from TronXY has a big failure in the autoleveling section!!!
The sensing point does not fit to the position of the Nozzle!!! That's the reason why I had problems with the leveling and the first layer.
You need to change the configurationfile .gcode with the new position.
I added my configuration file. There is already space for improvement ;-).
Here is the interesting Part:
; The second zeroing speed when Z is zeroing, the speed is slower
M8016 I4
; ==================================
;;;;;;;;;;;;;;Number of leveling points,
;;;;;;;;;;;;;;;;;;;;;;;;;;The first three parameters are automatically leveled
M8036 X-40 Y-17; The first point represents the XY offset of the sensor from the extrusion nozzle,
M8036 X30 Y30; the second point represents the minimum position of the point
M8036 X270 Y300; the third point represents the maximum position of the point
;;;;;;;;;;;;;;;;;;;;;;;;The last four are the positions of manual leveling
M8036 X20 Y300; rear left
M8036 X270 Y300; rear right
M8036 X20 Y30; left front
M8036 X270 Y30; right front
; ==================================
" I have a 330x330mm bed; you need to stay with the Nozzle inside this range"
X270mm (sensor point) -> X310mm Nozzle position (20mm space from border)
For backup just print the savesettings.gcode after reboot.
Unfortunately the currentconfig.gcode textfile is in Chinese. Just translate it in google.
Change your or mine configuration file and print it.
Don't forget a reboot to make it work ;-) !!!
Don't forget to make an autolevel and a Z-offset calibration (parameter is in confi file).
If you want honor the effort and you want to make a donation to mehttps://paypal.me/MakeDE
If you have some comments or you have a make don't hesitate to post it.
Have Fun