Thingiverse

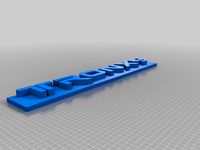
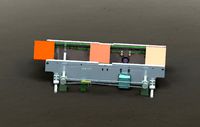
Tronxy/3DCStar P802 X-Axis Belt Tensioner by wypoon
by Thingiverse
Last crawled date: 3 years ago
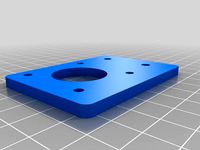
The Tronxy P802M X-Axis end-carriage is not a 'through' design, and traditional Anet A8 belt-tensioners, which rely on looping the belt past the end of the right end-carriage, will not work on it.
This compact design simply snaps on to the X-axis rail by the right carriage which:
adds more tension to your x-axis belt (e.g. when it stretches due to aging), and
has the added benefit of making the x-axis belt loop more run more 'parallel' to each other (the Tronxy uses a much larger bearing than the diameter of the stepper pinion gear).
Assembly:
Print all three parts and perform any clean-up or sanding required. Use a Q-Tip to clean the outside and inside cylindrical faces of the bearing with alcohol to remove any grease/oil.
Test fit the pulley wheel cap (WheelB) to the pulley wheel (WheelA). Make sure the cap's groove is clear of debris and that the cap fits snug and the two circular guard flanges are parallel to each other.
Lightly coat the inside barrel of the pulley wheel with CA glue (be sure to wipe off any excess) and press a 5x11x4mm bearing into the wheel. Once flush in the wheel, use a dowel (a X-acto knife holder also works) that is >4mm to push the bearing all the way until it's completely seated within the pulley.
Lightly coat the i. rim of the pulley wheel (where it contacts the wheel cap), as well the ii. groove of the wheel cap with CA, and press the cap tightly onto the pulley. Let it set overnight.
Use a small butane torch (or cigarette-lighter) to heat up just the nub of the tensioner. Be very gentle (very quickly brush the flame across the nub 2-3x). Press the assembled pulley-wheel onto the nub. Make sure it's seated fully and while the nub is softened, adjust the plane of the pulley so that that it's straight and square and will not wobble as the pulley is rotated on the post.
Once the nub has cooled down, remove the pulley. Coat the cylindrical face of the nub with CA glue (be absolutely sure to wipe off any excess) and re-insert the pulley. Let it set overnight.
Similar models
thingiverse
free

Tronxy X8 Belt tensioner x axis by GabrielePRG
...ith 60% infill is strong.
printed at 260c hot end, and 100c heated bed and no supports, with rafts and used simplify3d software.
thingiverse
free

Tronxy P802E X Axis Belt Tensioner by nipnbite
... than the large tronxy bearing.
you will need
(2) 4mm x40mm bolts
(4) 4mm nuts
(1) biqu-h303
(1) 5mm locknut
(1) 5mm x 25 bolt
thingiverse
free

Tronxy X5SA Belt Tensioner Y & X Axis by n02m4n
...tronxy x5sa belt tensioner y & x axis by n02m4n
thingiverse
a belt tensioner y & x axis for my tronxy x5sa.
thingiverse
free

Monoprice Select Mini X-Axis Belt Tensioner cap by justinschmitt
...m length (longer will work too)
an m3 nut to insert into the knob (nyloc preferred)
a washer to go between the nut and end cap
thingiverse
free

Afinibot A3 Y Axis Belt Pulley Wheel Assembly - With tensioner by Bartlby76
...mbly - with tensioner by bartlby76
thingiverse
a y axis belt pulley wheel assembly with a tensioner, for an afinibot a3 printer.
thingiverse
free

Tronxy p802m x axis belt tensioner by teesked
...m. might need to be heated with water and bended slightly depending on the quality of the x carriages. no need to buy a new belt.
thingiverse
free

Tevo tarantula PRO X axis belt tensioner
...y hands.
if you want to use 5mm bolts, you can print carriage from original design (they are swappable) and drill out the holles.
thingiverse
free

TronXY X8 X Carriage Belt Tension Mod by duodreamer
...rriage, plus two long m3 screws with nuts. can also use a smaller (625) bearing if you want and if your belt needs the clearance.
thingiverse
free

Tronxy p802 X axis belt tensioner by rtbuhler
...t;prusa i3 x axis belt tensioner" to fit tronxy p802e.
no need to replace the belt.
no need to print the parts with support.
thingiverse
free

X carrige belt idler for GEEETech prusa i3 x by sender86
...x by sender86
thingiverse
this is belt tensioning for x axies if pulley bearing fails. i designed it around two 624 zz bearings.
Wypoon
thingiverse
free

Tronxy/3DCStar P802 Thumbscrew/Thumbwheel Cap by wypoon
...nt with 100% infill.
be sure to add a drop or two of engine oil into the nut before re-installing -- makes a world of difference!
thingiverse
free

Tronxy/3DCStar P802 Z-Axis Endstop MicroSwitch Spacer by wypoon
...s properly aligned with the adjustment bolt. this is important for your z-axis homing to be accurate and reproducible every time!
thingiverse
free

Tronxy/3DCStar P802 Extruder Filament Guide by wypoon
...pooling the filament on the extruder's hobb wheel.
install by simply gluing it to the steel u-frame of the extruder carriage.
thingiverse
free

Tronxy PM802 Smooth rod holder and cap by kenbigt
...to compliment tronxy/3dcstar p802 z-axis threaded-rod bearing holder/stabilizer by wypoon published apr 14,...
thingiverse
free

Tronxy/3DCStar P802 Z-Axis Threaded-Rod Bearing Holder/Stabilizer by wypoon
...material.
update #2: the clearance for the bearing (as well as for the nub) has been reduced by 0.2mm to make it a more snug fit.
3Dcstar
thingiverse
free

Z_max endstop mount for Zonestar P802M / 3DCstar printer by Jagi
...x endstop, used in a cheap gearbest p802m printer (3dcstar acrylic). uses the same screw as the lid which covers the z-rail-hole.
thingiverse
free

M8 Mount for Tronxy 3DCSTAR P802-MHS by Miguel_Morales
... pieza en onshapehttps://cad.onshape.com/documents/cd7695b06ed63508cdba94c8/w/c6a10585002410ce8be7211d/e/84d79874b6ba7229ab8f8e7c
thingiverse
free

Clip for my Acrylic 3DCSTAR P802-MHS 3D Printer by mau21710
...ved the filament guide (go to the original file to take it)
. new measures for the clip (now fits well ot the printer, see photo)
thingiverse
free

3DCSTAR P802-MHS X-Tensioner by MarioVillani
...i've modified the original design to fit the hole in my printer. original top part was 8mm thick, i've reduced it to 6mm.
thingiverse
free
Tronxy/3DCStar P802 Thumbscrew/Thumbwheel Cap by wypoon
...nt with 100% infill.
be sure to add a drop or two of engine oil into the nut before re-installing -- makes a world of difference!
thingiverse
free
Tronxy/3DCStar P802 Z-Axis Endstop MicroSwitch Spacer by wypoon
...s properly aligned with the adjustment bolt. this is important for your z-axis homing to be accurate and reproducible every time!
thingiverse
free
Tronxy/3DCStar P802 Extruder Filament Guide by wypoon
...pooling the filament on the extruder's hobb wheel.
install by simply gluing it to the steel u-frame of the extruder carriage.
thingiverse
free

Tronxy/3DCStar P802 Motherboard 80mm Cooler Adapter by Sneakiest
...heating bed.
i could've designed it to use less filament, but i honestly couldn't be too bothered, it serves its purpose!
thingiverse
free

Tronxy P802 T-Bracket by astronauti
...a remix of the bracket to fit the tronxy p802/3dcstar just cut out a small hole for the screw...
thingiverse
free
Tronxy PM802 Smooth rod holder and cap by kenbigt
...kenbigt thingiverse these parts in red are to compliment tronxy/3dcstar p802 z-axis threaded-rod bearing holder/stabilizer by wypoon, published apr...
P802
thingiverse
free

Tronxy P802 Faceplate by Miziavelli
...tronxy p802 faceplate by miziavelli
thingiverse
tronxy p802 faceplate. wip!!
thingiverse
free

Brace for Tronxy P802
...for more stiffness of the frame
print the brace standing-up without support
printed on my tronxy p802
0.15mm hight and 20% infill
thingiverse
free

Copri elettronica prusa P802 by caspablog
...copri elettronica prusa p802 by caspablog
thingiverse
copri elettronica per prusa p802 ma
thingiverse
free

Tronxy P802 Filament Holder Clip by danzlrobert
...tronxy p802 filament holder clip by danzlrobert
thingiverse
clip for the tronxy p802 holder
thingiverse
free

Zonestar p802 mainboard + mofset holder by crimix73
...zonestar p802 mainboard + mofset holder by crimix73
thingiverse
zonestar p802 mainboard + mofset holder
thingiverse
free

prusa i3 p802 T corner by caillou333
...prusa i3 p802 t corner by caillou333
thingiverse
corner to reduce z-wobble for prusa i3 p802
thingiverse
free

P802-M button guide by BomanXIX
...802-m button guide by bomanxix
thingiverse
i've adapted these button guides to fit my printer from gearbest: tronxy p802-mhs
thingiverse
free

ZONESTAR P802 Filament feeder by HallyZhong
...ng
thingiverse
p802 filament feeder, it is can be applied to p802n p802q and p802c of zonestar 3d printer, support 1kg filament.
thingiverse
free

Zonestar P802 Prusa i3 Belt Clamp by tomausteltow
...zonestar p802 prusa i3 belt clamp by tomausteltow
thingiverse
zonestar p802 belt clamp
thingiverse
free

Filament_Dust_Filter__Guide_for_Prusa_I3 ZoneStar P802 edition 1 by harddrv1
... zonestar p802 edition 1 by harddrv1
thingiverse
remixed this to fit the frame of a zonestar p802 just made the clamp part wider
Tronxy
thingiverse
free
LMF8LUU for tronxy x5s
...lmf8luu for tronxy x5s
thingiverse
lmf8luu for tronxy x5s
thingiverse
free
TRONXY XY2PRO by MaiMaiFACTORY
...tronxy xy2pro by maimaifactory
thingiverse
tronxy xy2-pro
sadebox
thingiverse
free

Power_supply_cover for TRONXY by Karollo
...power_supply_cover for tronxy by karollo
thingiverse
power supply cover for tronxy.
thingiverse
free
Tronxy support by d3m1sf
...tronxy support by d3m1sf
thingiverse
soporte para impresora tronxy x3.
thingiverse
free
Tronxy 13mm wrench
...tronxy 13mm wrench
thingiverse
13mm wrench for hotend fitting on tronxy x1...
thingiverse
free

Tronxy x5s by alex190074
...tronxy x5s by alex190074
thingiverse
tronxy x5s cart x fully adjustable only !!
thingiverse
free
Tronxy Logo
...tronxy logo
thingiverse
made this logo
thingiverse
free

Patas TronXY X3 - Vitofeli - TronXY Legs by Todopic
...todopic
thingiverse
patas separadoras para la tronxy x3, permite colocar la caja de control debajo y aprovechas mejor el espacio
thingiverse
free
TRONXY X5S EXTRUDER by ADAM98
...tronxy x5s extruder by adam98
thingiverse
tronxy x5s extruder
thingiverse
free

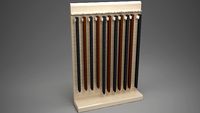
Belt tensioner Tronxy by jpalianak
...belt tensioner tronxy by jpalianak
thingiverse
belt tensioner tronxy
Tensioner
3d_export
$5

adjustable tension lock
...adjustable tension lock
3dexport
adjustable tension lock
turbosquid
$5

tension ring
...oyalty free 3d model tension ring for download as fbx and stl on turbosquid: 3d models for games, architecture, videos. (1553452)
turbosquid
$3

Tension Chair
...free 3d model tension chair for download as obj, c4d, and fbx on turbosquid: 3d models for games, architecture, videos. (1251503)
3d_export
$5
transformador de tension
...transformador de tension
3dexport
transformador de tension entrada 460vac salida 220vac marca audax
turbosquid
$20

Motorbike Chain Tensioner
...y free 3d model motorbike chain tensioner for download as stl on turbosquid: 3d models for games, architecture, videos. (1428322)
turbosquid
$25

TENSION-WOOD-CHAIR
... available on turbo squid, the world's leading provider of digital 3d models for visualization, films, television, and games.
turbosquid
$25

tension-bentwood-chair
... available on turbo squid, the world's leading provider of digital 3d models for visualization, films, television, and games.
turbosquid
$19

Tension engagement ring
...n engagement ring for download as obj, fbx, 3dm, dwg, and stl on turbosquid: 3d models for games, architecture, videos. (1491631)
3d_export
$10

Ruby Tension set Ring 3D Model
...ruby tension set ring 3d model
3dexport
tension set ruby ring in 18k
ruby tension set ring 3d model rehansheikh 25254 3dexport
turbosquid
$20
Superficial Tension Exp. Image.max
... available on turbo squid, the world's leading provider of digital 3d models for visualization, films, television, and games.
Belt
turbosquid
$9
Belt conveyor belt
...t conveyor belt for download as 3ds, ige, obj, stl, and sldas on turbosquid: 3d models for games, architecture, videos. (1226546)
3d_export
$6

belt
...d then comes off and fastens at the front of the seat. version: 2015 units: millimetres x-form: yes polys: 120 950 verts: 163 944
3d_export
$7
belt grinder
...belt grinder
3dexport
belt grinder
3d_export
$5
Belt conveyor
...belt conveyor
3dexport
belt conveyor
3ddd
$1
column belt
...column belt
3ddd
колонна
column belt
turbosquid
$5

Belt
... available on turbo squid, the world's leading provider of digital 3d models for visualization, films, television, and games.
3d_ocean
$5
Leather Belt
...ather belt is created in 3dsmax 2011 and rendered with vray 1.5 and it has all the texture included with the multiple obj format.
3d_ocean
$5

Belt Ring
...belt ring
3docean
belt jewelry ring
belt ring 3d model. total weight 3.5 gram & 1.1 stone size. 3dm and obj file format.
design_connected
$11
Belt Round
...belt round
designconnected
meridiani belt round computer generated 3d model. designed by parisio, andrea.
design_connected
$11
Belt Oval
...belt oval
designconnected
meridiani belt oval computer generated 3d model. designed by parisio, andrea.
Axis
3ddd
$1

Мария Axis
...
3ddd
кухня , классическая , axis
модель кухни.
3d_export
$22

Axis robot 6-axis robotic arm
...ing parts drawings, standard parts purchased parts list, can be produced directly according to the drawings, welcome to download!
3ddd
free

Versatile Axis
...ddd
nexus , плитка
http://bvtileandstone.com/ceramic-porcelain/versatile-axis/
3d_export
$19

robot 2 axis
...robot 2 axis
3dexport
robot 2 axis
turbosquid
$40

Axis R5F
... available on turbo squid, the world's leading provider of digital 3d models for visualization, films, television, and games.
turbosquid
$40

Axis S5F
... available on turbo squid, the world's leading provider of digital 3d models for visualization, films, television, and games.
turbosquid
$30

Axis Athlon
... available on turbo squid, the world's leading provider of digital 3d models for visualization, films, television, and games.
turbosquid
$10

Linear Axis
... available on turbo squid, the world's leading provider of digital 3d models for visualization, films, television, and games.
3d_export
$15

drawing axis
...drawing axis
3dexport
simple rendering of the scene file
3ddd
$1

versatile axis ARC
...versatile axis arc
3ddd
versatile , плитка
versatile axis arc red dot design award