Thingiverse
Tronxy X5S X-Axis Belt Straightener by graham01
by Thingiverse
Last crawled date: 3 years ago
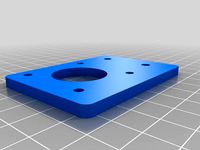
Due to the design of the belt system, 2 of the belts connected to the extruder are not aligned perpendicular to the direction of travel. This causes a change in angle, which causes a change in belt length. I did a little simulation of this and due to the significant angle offset, the belts technically stretch over 3mm when moving from the center of the gantry to the edges. This is not good, and would put huge strain on the belts, pulleys and steppers, especially if you tensioned your belts when the extruder was in the middle of the gantry.
This is a little solution I cooked up that straightens the belts to be (almost) perpendicular to the direction of travel, while still wrapping round the original holes on the extruder plate for strength. It's not pretty, but its big and strong.
I would recommend printing this in at least PETG or ABS for the strength.
You will need;
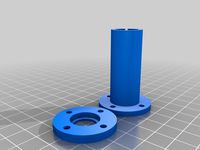
1x "x5s belt alignment main r1"
2x "x5s belt alignment wheel r1"
2x M4x30 bolts (or 35, 40)
2x M4 nuts (preferably nyloc)
No supports required, just print as oriented already in the stl files.
To install it;
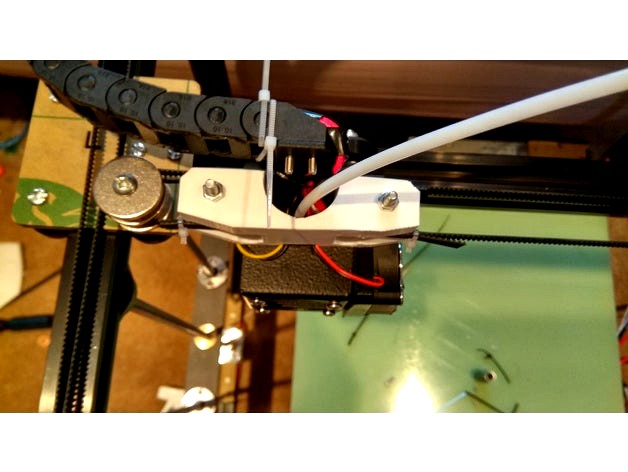
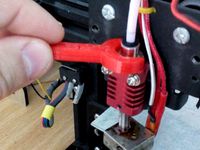
1) Assembly all the printed bits using the nuts and bolts, use pictures for reference.
2) Attach and clamp the 2 belts that DO line up properly to the extruder plate
3) Remove the 2 top wheels from the extruder plate
4) Put this assembly in place, push the top wheel bolts back through and assemble the plate onto the gantry again.
Note; You may need to bend the pins of the x-axis microswitch, and rotate the cooling fan 90 degrees so the wires do not get in the way - see pictures
Note: When tightening the 2 top wheels, you should push up from the underside of the extruder, so it grips tightly on the rail.
5) Feed the remaining 2 belts round the gaps in this assembly, loop them back through original holes in the extruder plate and all the way back round to the front, where you can zip tie them.
That was a terrible explanation, but just use pictures for reference :)
Hope others find this useful anyway.
This is a little solution I cooked up that straightens the belts to be (almost) perpendicular to the direction of travel, while still wrapping round the original holes on the extruder plate for strength. It's not pretty, but its big and strong.
I would recommend printing this in at least PETG or ABS for the strength.
You will need;
1x "x5s belt alignment main r1"
2x "x5s belt alignment wheel r1"
2x M4x30 bolts (or 35, 40)
2x M4 nuts (preferably nyloc)
No supports required, just print as oriented already in the stl files.
To install it;
1) Assembly all the printed bits using the nuts and bolts, use pictures for reference.
2) Attach and clamp the 2 belts that DO line up properly to the extruder plate
3) Remove the 2 top wheels from the extruder plate
4) Put this assembly in place, push the top wheel bolts back through and assemble the plate onto the gantry again.
Note; You may need to bend the pins of the x-axis microswitch, and rotate the cooling fan 90 degrees so the wires do not get in the way - see pictures
Note: When tightening the 2 top wheels, you should push up from the underside of the extruder, so it grips tightly on the rail.
5) Feed the remaining 2 belts round the gaps in this assembly, loop them back through original holes in the extruder plate and all the way back round to the front, where you can zip tie them.
That was a terrible explanation, but just use pictures for reference :)
Hope others find this useful anyway.
Similar models
thingiverse
free

Tronxy X5s e3d v6 Mount With Belt Aligner by graham01
...ckets see: https://www.thingiverse.com/thing:2594291
for my micro cooling fan duct see: https://www.thingiverse.com/thing:2469775
thingiverse
free

X5S Belt Straightener by FDM_Guru
...sert your belt on each side from the front, tension each belt and cinch a zip tie over each belt on the backside of the carriage.
thingiverse
free

Tronxy x5s Gantry Belt Bracket by jmaloy5365
...tronxy x5s gantry belt bracket by jmaloy5365
thingiverse
tronxy x5s belt alignment bracket
thingiverse
free

Tronxy X5s Mega Gantry Plates by graham01
...ading my e3d-v6 mount soon shown in the pictures, that combines a belt straighter for the 2 very unaligned belts on the extruder.
thingiverse
free

Belt Straightner by peteroakes
...uded the step file if you want to play with the design
you can see the video were i used this here:- https://youtu.be/kedhmbwvpqe
thingiverse
free

TronXY X5S Titan Aero Mount by kyrixa10
...the heads of the m5 bolts. the cutouts are 10mm diameter and are 5mm deep.
print 3 of the 6mm spacers and 2 of the 20mm spacers.
thingiverse
free

Tronxy X5S Dual E3D V6 Extruder Carriage by Eyegoresky
...y and belt idler from 3dfreezeme. https://www.thingiverse.com/thing:2580773
i can upload the current fusion 360 file on request.
thingiverse
free

TEVO Tornado and CR-10 belt driven dual Z mod with braces by PeroE30
...leys against top bearings) by gantry weight. the layers precision should be visibly improved.
if you have any questions just ask!
thingiverse
free

Belt Straightener by jjsarnowski
... the edges of the frame. i also added a boss on the bolt holes to remove the white spacer and maintain the belts properly spaced.
thingiverse
free

Belted extruder by Drasko
...ned m8 hobbed bolt
2x m8 locking nuts
the top part, which enables mounting is available here geeetech z-axes top and bottom mount
Graham01
thingiverse
free

no bearing roller by byroadejr
...no bearing roller for mega anti-tangle spool holder by graham01 ...
thingiverse
free
Tronxy X5s Mega Gantry Plates by graham01
...ading my e3d-v6 mount soon shown in the pictures, that combines a belt straighter for the 2 very unaligned belts on the extruder.
thingiverse
free

CR-10 3 in 1 Extruder Cover and Filament Guide by graham01
...rrect way). if your printer suffers from adhesion problems you may need a brim.
thanks for looking, hope people find this useful!
thingiverse
free

E3D v6 Micro Cooling Fan Duct (4020/5015 Radial Fan) by graham01
...ce is on the build plate (stl's should already be oriented the correct way)
thanks for looking, hope people find this useful!
thingiverse
free

Mega Anti-Tangle Spool Holder by graham01
...tps://youtu.be/kyg6kblxhzm
quick and dirty demonstration: https://youtu.be/sldd7rn0kj4
hope you all like this and find it useful!
thingiverse
free

Short adjustable YZ endstops for Tronxy X5S by NoelJean
...and my corner bracket, so the model designed by graham01 (https://www.thingiverse.com/thing:2594291) was not...
thingiverse
free

Tronxy X5s Semi Mega Gantry Plates by PixelPerfectCT
...by pixelperfectct thingiverse remixed the mega gantry plates by graham01 to fit the titan aero carriage https://www.thingiverse.com/thing:2784677 removed some...
thingiverse
free

E3D v6 VOLCANO Micro Cooling Fan Duct 40mm Hotend Fan remix by dmon88
...e3d mount by chito (https://www.thingiverse.com/thing:2494642) but originally also by graham01 this is horribly mashed together in tinkercad and doesn't...
thingiverse
free
Tronxy X5s e3d v6 Mount With Belt Aligner by graham01
...ckets see: https://www.thingiverse.com/thing:2594291
for my micro cooling fan duct see: https://www.thingiverse.com/thing:2469775
Straightener
turbosquid
$2

straightener
... 3d model straightener for download as max, 3ds, fbx, and obj on turbosquid: 3d models for games, architecture, videos. (1578840)
turbosquid
$200

Hair Straightener
... available on turbo squid, the world's leading provider of digital 3d models for visualization, films, television, and games.
turbosquid
$15

Hair Straightening Brush
...del hair straightening brush for download as ma, obj, and c4d on turbosquid: 3d models for games, architecture, videos. (1270243)
turbosquid
$29

Hair Straightener 3D
... available on turbo squid, the world's leading provider of digital 3d models for visualization, films, television, and games.
turbosquid
$19

Metal sheet straightener
...heet straightener for download as 3ds, max, obj, fbx, and stl on turbosquid: 3d models for games, architecture, videos. (1341359)
turbosquid
$55

Hair straightener (3 in 1)
...ghtener (3 in 1) for download as ma, max, obj, fbx, and blend on turbosquid: 3d models for games, architecture, videos. (1272676)
3d_export
$15

hair straightener
...gically named.<br>other formats<br>=================<br>- collada (.dae)<br>- autodesk fbx<br>- obj
turbosquid
$19

Metal sheet straightening and rolling machine
...d rolling machine for download as 3ds, max, obj, fbx, and stl on turbosquid: 3d models for games, architecture, videos. (1348042)
3d_export
$8

hair straightener 01
...& .obj. please rate, when you buy. thanks! :) also, please check out my other useful portfolio items that you may be missing!
3ddd
$1

Vitra Tip Ton
...tens the pelvis and spine and thus improves circulation to the abdominal and back muscles.
max 2012 + obj 8 orginal vitra colors
X5S
3ddd
$1

топор Fiskars X5
...топор fiskars x5
3ddd
топор
точная модель топора fiskars-x5
3d_export
$25

Bmw x5 3D Model
...bmw x5 3d model
3dexport
bmw x5
bmw x5 3d model alex.fox 914 3dexport
turbosquid
$9

Smartband X5
... available on turbo squid, the world's leading provider of digital 3d models for visualization, films, television, and games.
3d_ocean
$89

BMW X5 2011
...r detailed detailed german german luxury luxury model model sport sport suv suv vehicle vehicle x5 x5
bmw x5 2011 detailed model
3d_export
$39

BMW X5 3D Model
...bmw x5 3d model
3dexport
bmw x5 car transport
bmw x5 3d model bumart 406 3dexport
3d_export
$28

BMW X5 3D Model
...bmw x5 3d model
3dexport
car bmw x5 vray 3ds max high poly
bmw x5 3d model spwar 2 3dexport
3d_export
$60

BMW X5 3D Model
...bmw x5 3d model
3dexport
bmw bmw x5 suv german car transportation automovile tuning
bmw x5 3d model pati3nt 19059 3dexport
3d_export
$69

BMW-X5 2023
...bmw-x5 2023
3dexport
turbosquid
$10

fruit and vegetable x5
...yalty free 3d model fruit and vegetable x5 for download as ma on turbosquid: 3d models for games, architecture, videos. (1653791)
turbosquid
$10

fruit and vegetable x5
...yalty free 3d model fruit and vegetable x5 for download as ma on turbosquid: 3d models for games, architecture, videos. (1653839)
Tronxy
thingiverse
free
LMF8LUU for tronxy x5s
...lmf8luu for tronxy x5s
thingiverse
lmf8luu for tronxy x5s
thingiverse
free

TRONXY XY2PRO by MaiMaiFACTORY
...tronxy xy2pro by maimaifactory
thingiverse
tronxy xy2-pro
sadebox
thingiverse
free

Power_supply_cover for TRONXY by Karollo
...power_supply_cover for tronxy by karollo
thingiverse
power supply cover for tronxy.
thingiverse
free
Tronxy support by d3m1sf
...tronxy support by d3m1sf
thingiverse
soporte para impresora tronxy x3.
thingiverse
free
Tronxy 13mm wrench
...tronxy 13mm wrench
thingiverse
13mm wrench for hotend fitting on tronxy x1...
thingiverse
free

Tronxy x5s by alex190074
...tronxy x5s by alex190074
thingiverse
tronxy x5s cart x fully adjustable only !!
thingiverse
free
Tronxy Logo
...tronxy logo
thingiverse
made this logo
thingiverse
free

Patas TronXY X3 - Vitofeli - TronXY Legs by Todopic
...todopic
thingiverse
patas separadoras para la tronxy x3, permite colocar la caja de control debajo y aprovechas mejor el espacio
thingiverse
free
TRONXY X5S EXTRUDER by ADAM98
...tronxy x5s extruder by adam98
thingiverse
tronxy x5s extruder
thingiverse
free

Belt tensioner Tronxy by jpalianak
...belt tensioner tronxy by jpalianak
thingiverse
belt tensioner tronxy
Belt
turbosquid
$9

Belt conveyor belt
...t conveyor belt for download as 3ds, ige, obj, stl, and sldas on turbosquid: 3d models for games, architecture, videos. (1226546)
3d_export
$6

belt
...d then comes off and fastens at the front of the seat. version: 2015 units: millimetres x-form: yes polys: 120 950 verts: 163 944
3d_export
$7
belt grinder
...belt grinder
3dexport
belt grinder
3d_export
$5
Belt conveyor
...belt conveyor
3dexport
belt conveyor
3ddd
$1
column belt
...column belt
3ddd
колонна
column belt
turbosquid
$5

Belt
... available on turbo squid, the world's leading provider of digital 3d models for visualization, films, television, and games.
3d_ocean
$5
Leather Belt
...ather belt is created in 3dsmax 2011 and rendered with vray 1.5 and it has all the texture included with the multiple obj format.
3d_ocean
$5

Belt Ring
...belt ring
3docean
belt jewelry ring
belt ring 3d model. total weight 3.5 gram & 1.1 stone size. 3dm and obj file format.
design_connected
$11
Belt Round
...belt round
designconnected
meridiani belt round computer generated 3d model. designed by parisio, andrea.
design_connected
$11

Belt Oval
...belt oval
designconnected
meridiani belt oval computer generated 3d model. designed by parisio, andrea.
Axis
3ddd
$1

Мария Axis
...
3ddd
кухня , классическая , axis
модель кухни.
3d_export
$22

Axis robot 6-axis robotic arm
...ing parts drawings, standard parts purchased parts list, can be produced directly according to the drawings, welcome to download!
3ddd
free

Versatile Axis
...ddd
nexus , плитка
http://bvtileandstone.com/ceramic-porcelain/versatile-axis/
3d_export
$19

robot 2 axis
...robot 2 axis
3dexport
robot 2 axis
turbosquid
$40

Axis R5F
... available on turbo squid, the world's leading provider of digital 3d models for visualization, films, television, and games.
turbosquid
$40

Axis S5F
... available on turbo squid, the world's leading provider of digital 3d models for visualization, films, television, and games.
turbosquid
$30

Axis Athlon
... available on turbo squid, the world's leading provider of digital 3d models for visualization, films, television, and games.
turbosquid
$10

Linear Axis
... available on turbo squid, the world's leading provider of digital 3d models for visualization, films, television, and games.
3d_export
$15

drawing axis
...drawing axis
3dexport
simple rendering of the scene file
3ddd
$1

versatile axis ARC
...versatile axis arc
3ddd
versatile , плитка
versatile axis arc red dot design award