Thingiverse
Tronxy X5S Redesign
by Thingiverse
Last crawled date: 4 years, 2 months ago
Thingiverse doesn't like doing what is supposed to do... so here's a link to all the fileshttps://drive.google.com/open?id=1G-BReDbdTD_9Myla20l2dGKuE8fYCVYH
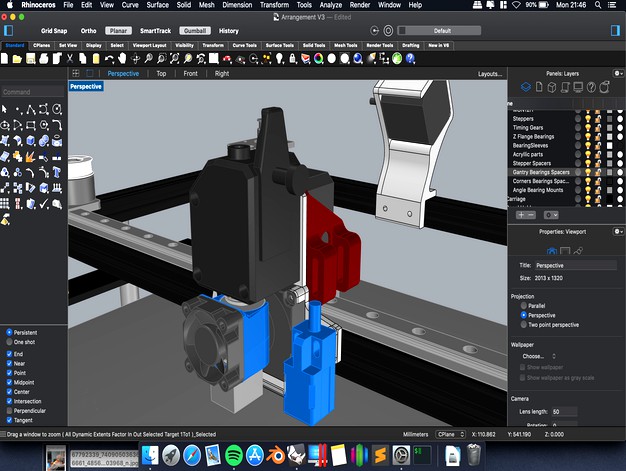
My mods for the coreXY system on the X5S
I tried keeping it simple as much as possible but my hand slipped and I accidentally redesigned most of it.
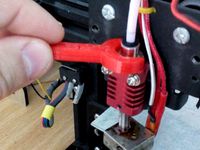
EXTRUDER & X Axis:
The extruder part is a bit tricky.
I don't yet have a Bondtech BMG extruder (Bondtech hit me up pls) because my thirst for Pepsi keeps me from having any long term financial stability, so I downloaded a model from GrabCAD but it isn't very precise and I didn't manage to find anything better online.
So if it doesn't fit don't send bad vibez in my direction.
There are two versions for the motor mount: one for a normal NEMA17 and one for a pancake one so pick the one you like.
The whole carriage is supposed to be mounted on a MGN12H rail because I found out the wheels on the original are generic poopoo and the X axis on my printer moved like a drunk cat.
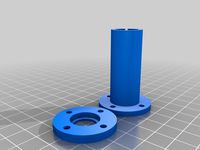
GANTRY & Y Axis:
The MGN rail elevates the carriage to a new plane of existence which is approximately 10mm higher than before and now the bearings have to get a little higher as well, so I made those cylinder like spacers that are mounted on top of the acrylic gantry plates. My suggestion is to use longer M5 screws and with a larger head, to keep the 608 bearing from flying away.
In the future I plan to use MGN rails for the Y axis.
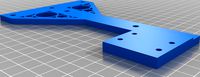
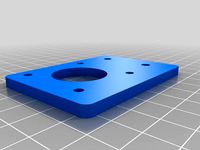
STEPPER MOUNTS:
Initially I used just some printed spacers to get the steppers a bit higher but I found that making a single PETG piece, instead of using PETG spacers and acrylic plates for the stepper mounts, makes a lot more sense.
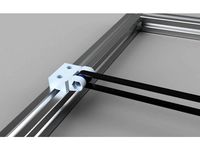
ANGLE MOUNT:
The two bearings that can be mounted with the spacers I made for the angles do their job properly if the internal one is tightened with a nut (which has a slot to slide into) and if the outmost one has a long enough M5 to screw into the frame, like is supposed to do on the original design.
Original design for the 608 bearing sleeve:https://www.thingiverse.com/thing:2783536
I remixed them from this one.
Get yourself some M3 screws and M3 T-Nuts or drill out the holes out.
Also get some long M5s and nuts.
(I'M INCLUDING A STEP FILE BECAUSE I'M A NICE GUY AND HATE PEOPLE WHO JUST GIVE YOU MESHES)
(Sorry for any typos, I'm not a native english speaker)
My mods for the coreXY system on the X5S
I tried keeping it simple as much as possible but my hand slipped and I accidentally redesigned most of it.
EXTRUDER & X Axis:
The extruder part is a bit tricky.
I don't yet have a Bondtech BMG extruder (Bondtech hit me up pls) because my thirst for Pepsi keeps me from having any long term financial stability, so I downloaded a model from GrabCAD but it isn't very precise and I didn't manage to find anything better online.
So if it doesn't fit don't send bad vibez in my direction.
There are two versions for the motor mount: one for a normal NEMA17 and one for a pancake one so pick the one you like.
The whole carriage is supposed to be mounted on a MGN12H rail because I found out the wheels on the original are generic poopoo and the X axis on my printer moved like a drunk cat.
GANTRY & Y Axis:
The MGN rail elevates the carriage to a new plane of existence which is approximately 10mm higher than before and now the bearings have to get a little higher as well, so I made those cylinder like spacers that are mounted on top of the acrylic gantry plates. My suggestion is to use longer M5 screws and with a larger head, to keep the 608 bearing from flying away.
In the future I plan to use MGN rails for the Y axis.
STEPPER MOUNTS:
Initially I used just some printed spacers to get the steppers a bit higher but I found that making a single PETG piece, instead of using PETG spacers and acrylic plates for the stepper mounts, makes a lot more sense.
ANGLE MOUNT:
The two bearings that can be mounted with the spacers I made for the angles do their job properly if the internal one is tightened with a nut (which has a slot to slide into) and if the outmost one has a long enough M5 to screw into the frame, like is supposed to do on the original design.
Original design for the 608 bearing sleeve:https://www.thingiverse.com/thing:2783536
I remixed them from this one.
Get yourself some M3 screws and M3 T-Nuts or drill out the holes out.
Also get some long M5s and nuts.
(I'M INCLUDING A STEP FILE BECAUSE I'M A NICE GUY AND HATE PEOPLE WHO JUST GIVE YOU MESHES)
(Sorry for any typos, I'm not a native english speaker)
Similar models
thingiverse
free

TronXy X5S Y axis bearing spacers by JD_Printing
...at the right side (x axis) the spacer is to the front of the printer. on the lefts side (y axis) the spacer is on the back side.
thingiverse
free

X5S Direct drive mount for Linear Rail by lookupatnight
...d e3d v6 hot end higher than my other designs.
the e3d v6 just clears the bottom of the carriage. this mount is pretty solid!
thingiverse
free

Stepper mount for 2020 rail by rollinns
...eat original design.
update: version 2b has the correct spacing between the clamp and the block that fits in the 2020 extrusion.
thingiverse
free

OpenBuilds V-Slot® Gantry Plate Mount for BondTech Extruder by changedsoul
...truder by changedsoul
thingiverse
i created this to mount my new bondtech extruder to my openbuilds gantry plate.
it works well.
thingiverse
free

TronXY X5S Titan Aero Mount by kyrixa10
...the heads of the m5 bolts. the cutouts are 10mm diameter and are 5mm deep.
print 3 of the 6mm spacers and 2 of the 20mm spacers.
thingiverse
free

X5S Extruder mount
... made one, fits any 2020 extrusion, but was specifically made for a tronxy x5s. i will post pictures once i print and mount it!!!
thingiverse
free

CR-10 Better Bondtech BMG Mount by int2str
...(not a remix, designed from scratch in openscad)that has the same 90deg layout of the bondtech mount and has no clearance issues.
thingiverse
free

Adimlab Gantry X Linear Rail Mount With Spacer
...iece to gain a bit more rigidity.
uses the original bolt from the rear wheel bearing, but requires 2 m3 x 55mm bolts to install.
thingiverse
free
Ender 5 Plus Voron M4 Extruder Mount by Apulo
...nuts to mount the runout sensor, 3 m5 screws and t-nuts to mount it to the frame, and 2 m5 screws and nuts to mount the extruder.
thingiverse
free
FolgerTech 2020 Y Axis Idler Bearing Holder by JWag
...er over the bolt and thread on the nylock
attach the holder to the 2020 frame with m5 bolts and t-nuts.
tension your y-axis belt.
X5S
3ddd
$1

топор Fiskars X5
...топор fiskars x5
3ddd
топор
точная модель топора fiskars-x5
3d_export
$25

Bmw x5 3D Model
...bmw x5 3d model
3dexport
bmw x5
bmw x5 3d model alex.fox 914 3dexport
turbosquid
$9

Smartband X5
... available on turbo squid, the world's leading provider of digital 3d models for visualization, films, television, and games.
3d_ocean
$89

BMW X5 2011
...r detailed detailed german german luxury luxury model model sport sport suv suv vehicle vehicle x5 x5
bmw x5 2011 detailed model
3d_export
$39

BMW X5 3D Model
...bmw x5 3d model
3dexport
bmw x5 car transport
bmw x5 3d model bumart 406 3dexport
3d_export
$28

BMW X5 3D Model
...bmw x5 3d model
3dexport
car bmw x5 vray 3ds max high poly
bmw x5 3d model spwar 2 3dexport
3d_export
$60

BMW X5 3D Model
...bmw x5 3d model
3dexport
bmw bmw x5 suv german car transportation automovile tuning
bmw x5 3d model pati3nt 19059 3dexport
3d_export
$69

BMW-X5 2023
...bmw-x5 2023
3dexport
turbosquid
$10

fruit and vegetable x5
...yalty free 3d model fruit and vegetable x5 for download as ma on turbosquid: 3d models for games, architecture, videos. (1653791)
turbosquid
$10

fruit and vegetable x5
...yalty free 3d model fruit and vegetable x5 for download as ma on turbosquid: 3d models for games, architecture, videos. (1653839)
Tronxy
thingiverse
free
LMF8LUU for tronxy x5s
...lmf8luu for tronxy x5s
thingiverse
lmf8luu for tronxy x5s
thingiverse
free
TRONXY XY2PRO by MaiMaiFACTORY
...tronxy xy2pro by maimaifactory
thingiverse
tronxy xy2-pro
sadebox
thingiverse
free

Power_supply_cover for TRONXY by Karollo
...power_supply_cover for tronxy by karollo
thingiverse
power supply cover for tronxy.
thingiverse
free
Tronxy support by d3m1sf
...tronxy support by d3m1sf
thingiverse
soporte para impresora tronxy x3.
thingiverse
free
Tronxy 13mm wrench
...tronxy 13mm wrench
thingiverse
13mm wrench for hotend fitting on tronxy x1...
thingiverse
free

Tronxy x5s by alex190074
...tronxy x5s by alex190074
thingiverse
tronxy x5s cart x fully adjustable only !!
thingiverse
free
Tronxy Logo
...tronxy logo
thingiverse
made this logo
thingiverse
free

Patas TronXY X3 - Vitofeli - TronXY Legs by Todopic
...todopic
thingiverse
patas separadoras para la tronxy x3, permite colocar la caja de control debajo y aprovechas mejor el espacio
thingiverse
free
TRONXY X5S EXTRUDER by ADAM98
...tronxy x5s extruder by adam98
thingiverse
tronxy x5s extruder
thingiverse
free

Belt tensioner Tronxy by jpalianak
...belt tensioner tronxy by jpalianak
thingiverse
belt tensioner tronxy
Redesign
3d_ocean
$45

Hyundai SUV vehicle redesigned
...was redesigned by me. 3d model was created in blender3d.preview images were rendered with realistic plugin yafaray.side view o...
turbosquid
$25

Pagani Huayra Redesign
... available on turbo squid, the world's leading provider of digital 3d models for visualization, films, television, and games.
turbosquid
free

Colt M16 (Redesign)
... available on turbo squid, the world's leading provider of digital 3d models for visualization, films, television, and games.
turbosquid
$30

3D for Pose Scarlet Witch redesign\para Posar redesign Feiticeira Escarlate
... imprimir redesign feiticeira escarlate for download as blend on turbosquid: 3d models for games, architecture, videos. (1700850)
3d_export
$5

Gaz 21 redesign 3D Model
...gaz 21 redesign 3d model
3dexport
gaz 21 volga
gaz 21 redesign 3d model rossergorp 71511 3dexport
turbosquid
$55

Porsche Cayman 2015 redesign
... available on turbo squid, the world's leading provider of digital 3d models for visualization, films, television, and games.
3d_ocean
$55

Gallardo superleggera redesign
...model was made with blender3d 2.62.preview images were rendered with blender3d and yafaray 0.1.2 realistic rendering engine.ob...
3d_ocean
$55

Chevy Stingray 2013 redesign
...car.i gave my best to create accurate model,but without top view image it wasn’t possible for me.so when i lost a lots of nerv...
turbosquid
$30

Redesign Crash Bandicoot (c4d,obj,max,zpr)
... available on turbo squid, the world's leading provider of digital 3d models for visualization, films, television, and games.
3ddd
$1

Tango Floor Lamp
...3ddd andrey kole , tango , castlewerks andrey kole redesign tango floor lamp by castlewerks. 3dsmax2012 - corona...