Thingiverse
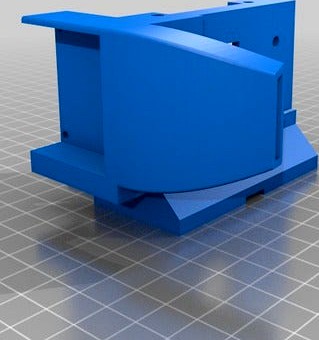
Tronxy X5S Flexion E3D V6 Retrofit Extruder Mount/Fan Shroud by Plasticasso
by Thingiverse
Last crawled date: 3 years ago
THERE IS AN UPDATED VERSION OF THIS MOUNT! Follow this link...
https://www.thingiverse.com/thing:3000014
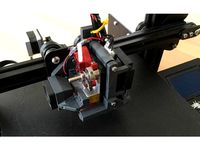
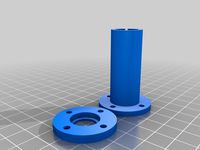
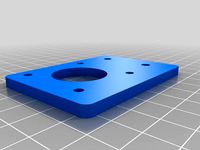
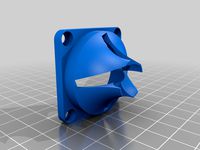
This is a mount and fan shroud made to fit the Flexion Extruder with an E3D V6 Retrofit Hot-end using a slim 17HS4023 extruder stepper motor mounted with a direct drive setup to a Tronxy X5S printer using the original hardware, original 40mm blower part cooling fan for the Tronxy X5S, and the snap-on 30mm heatsink fan that comes with the E3D V6 Hot-end. This mount will allow you to utilize the existing gantry system belt attachments designed on the newer version of the Tronxy X5S where the belts are running parallel (unlike older versions of the Tronxy X5S where the belts were not parallel causing binding issues with the gantry system). So far i've printed over 30 hours non-stop successfully with TPU filament. See below for my comments on printing with ABS...
Assembly tips:
Disassemble your E3D V6 hot-end completely (even removing the heater and thermistor wires from the heat block)
Assemble the Flexion Extruder onto the stepper motor and align the hob bolt on the extruder.
Screw the limit switch onto the back side of the printed mount fan shroud with the wires pointing up using original smalls screws.
Bolt the printed mount onto the gantry system of the Tronxy X5S using original hardware.
Install the E3D heatsink onto the stepper motor using the bracket that comes with the Flexion E3D V6 Retrofit kit with the heat break and hot-end unattached.
Thread the nozzle, heat block, and heat break together. Do not assemble them onto the heat sink yet.
Stick the heat sink down through the hole in the printed mounting bracket at an angle in order to clear the tip of the fan shroud, and thread the heat break, heat block, nozzle combo onto the heatsink.
Using original hardware that came with the Tronxy X5S, bolt the Extruder to the printed mounting bracket using M3 screws in the front.
Snap the 30mm fan that comes with the E3D V6 hot-end onto the heat sink.
Using M3 screws and nuts (should be left over from Tronxy X5S assembly if you kept the extra original hardware) bolt the extruder assembly down to the printed mount through the "top holes" on either side of the heat sink.
Insert the original Tronxy X5S blower fan into the fan shroud to the left of the heat sink and screw it in using the tops holes and the extra small screws from the original Tronxy hardware. (same as the type used for the limit switches)
Insert the heater and thermistor wires back into the heat block and tighten them down.
Warm the hot-end up to 235 - 250 C and perform a heated tightening on all parts of the hot-end assembly.
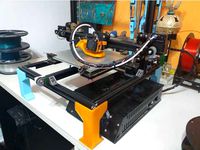
DON'T FORGET TO RE-LEVEL YOUR PRINT BED! This one is easy to forget. It is likely that this assembly will place your nozzle at a different height than your previous setup and you may end up digging the nozzle into the build plate and causing damage. As you can see in the photos, I am guilty of this... several times... my build plate surface has seen better days.
Enjoy! I know this is a fairly basic mount and this is my first revision. Let me know if there are improvements that could be made!
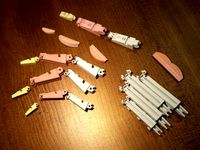
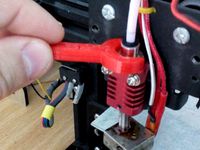
Note: This mount is designed to work with the 17HS4023 Slim Stepper Motor and will NOT work with full depth stepper motors. I chose a slim stepper motor for this direct drive system to reduce the amount of force placed on the printer during jerking motions made by the print head. So far I have had no problems with this motor skipping steps or under extruding. Keep in mind that this stepper motor wiring differs from the wiring of the stepper motors that come stock on the Tronxy X5S printer. The "controller board end" of the stepper motor wires are the same, but the "motor end" of the stepper motor wires need to be wired different in the following order reading from left to right while snapped into the stepper motor with the drive gear of the motor facing toward you and the connector pointing up connecting into the "bottom" of the stepper motor(pictures above illustrate this orientation)
Original Tronxy X5S Stepper Motors:
1.) Red
2.) Empty
3.) Blue
4.) Green
5.) Empty
6.) Black
17HS4023 Slim Stepper Motor:
1.) Red
2.) Empty
3.) Black
4.) Blue
5.) Empty
6.) Green
I was able to use the tiny flat head screwdriver that came with my Tronxy X5S to pry up on the white plastic pieces on the bottom side of the connector to remove the wires from the connector, allowing me to snap them back in accordingly.
Also, you will have to reverse the E0 stepper motor direction, and I used 102 steps/mm in the Marlin firmware settings for this Stepper Motor/Extruder combo and so far it works beautifully! I came up with this number using the following formula...
(Steps Per Revolution) x (Micro Steps) x (Gear Ratio) / (Hob Bolt Diameter) x (Pi)
(usually found in manufacturer specs) (there is no gear) (measured this with micrometer)
(200) x (16) x (1) / (10) x (3.142)
(3200) / (31.42) = 101.8 which is roughly 102 steps per mm
A great tutorial for this can be found at this link...
https://e3d-online.dozuki.com/Guide/Titan+Marlin+Configuration/35
UPDATE: As stated above, 102 steps/mm worked great printing with TPU flexible filament. After switching to using ABS filament, I noticed some major over extrusion. After manually recalibrating my extruder, I came up with 90 steps/mm. For anyone who does not already know how to do this, there is a great instructional video by Matter Hackers in the link below...
https://www.youtube.com/watch?v=X3A9Ir2SreI
Once you upgrade your Marlin firmware to 1.1.8 you can change this in the options directly on the Tronxy Display under "control" then under "motion" in your settings.
Here is a link to THE BEST TUTORIAL I HAVE FOUND TO DATE on how to flash firmware onto the Tronxy X5S WITHOUT NEEDING AN ARDUINO UNO. Contrary to popular belief (at least with the new version of the Tronxy X5S) you only need a computer and the USB cable that came with the TRONXY X5S printer.
http://www.customize-3d.com/flashing-tronxy-x5s-factory-control-board-usb-cable-only.html
https://www.thingiverse.com/thing:3000014
This is a mount and fan shroud made to fit the Flexion Extruder with an E3D V6 Retrofit Hot-end using a slim 17HS4023 extruder stepper motor mounted with a direct drive setup to a Tronxy X5S printer using the original hardware, original 40mm blower part cooling fan for the Tronxy X5S, and the snap-on 30mm heatsink fan that comes with the E3D V6 Hot-end. This mount will allow you to utilize the existing gantry system belt attachments designed on the newer version of the Tronxy X5S where the belts are running parallel (unlike older versions of the Tronxy X5S where the belts were not parallel causing binding issues with the gantry system). So far i've printed over 30 hours non-stop successfully with TPU filament. See below for my comments on printing with ABS...
Assembly tips:
Disassemble your E3D V6 hot-end completely (even removing the heater and thermistor wires from the heat block)
Assemble the Flexion Extruder onto the stepper motor and align the hob bolt on the extruder.
Screw the limit switch onto the back side of the printed mount fan shroud with the wires pointing up using original smalls screws.
Bolt the printed mount onto the gantry system of the Tronxy X5S using original hardware.
Install the E3D heatsink onto the stepper motor using the bracket that comes with the Flexion E3D V6 Retrofit kit with the heat break and hot-end unattached.
Thread the nozzle, heat block, and heat break together. Do not assemble them onto the heat sink yet.
Stick the heat sink down through the hole in the printed mounting bracket at an angle in order to clear the tip of the fan shroud, and thread the heat break, heat block, nozzle combo onto the heatsink.
Using original hardware that came with the Tronxy X5S, bolt the Extruder to the printed mounting bracket using M3 screws in the front.
Snap the 30mm fan that comes with the E3D V6 hot-end onto the heat sink.
Using M3 screws and nuts (should be left over from Tronxy X5S assembly if you kept the extra original hardware) bolt the extruder assembly down to the printed mount through the "top holes" on either side of the heat sink.
Insert the original Tronxy X5S blower fan into the fan shroud to the left of the heat sink and screw it in using the tops holes and the extra small screws from the original Tronxy hardware. (same as the type used for the limit switches)
Insert the heater and thermistor wires back into the heat block and tighten them down.
Warm the hot-end up to 235 - 250 C and perform a heated tightening on all parts of the hot-end assembly.
DON'T FORGET TO RE-LEVEL YOUR PRINT BED! This one is easy to forget. It is likely that this assembly will place your nozzle at a different height than your previous setup and you may end up digging the nozzle into the build plate and causing damage. As you can see in the photos, I am guilty of this... several times... my build plate surface has seen better days.
Enjoy! I know this is a fairly basic mount and this is my first revision. Let me know if there are improvements that could be made!
Note: This mount is designed to work with the 17HS4023 Slim Stepper Motor and will NOT work with full depth stepper motors. I chose a slim stepper motor for this direct drive system to reduce the amount of force placed on the printer during jerking motions made by the print head. So far I have had no problems with this motor skipping steps or under extruding. Keep in mind that this stepper motor wiring differs from the wiring of the stepper motors that come stock on the Tronxy X5S printer. The "controller board end" of the stepper motor wires are the same, but the "motor end" of the stepper motor wires need to be wired different in the following order reading from left to right while snapped into the stepper motor with the drive gear of the motor facing toward you and the connector pointing up connecting into the "bottom" of the stepper motor(pictures above illustrate this orientation)
Original Tronxy X5S Stepper Motors:
1.) Red
2.) Empty
3.) Blue
4.) Green
5.) Empty
6.) Black
17HS4023 Slim Stepper Motor:
1.) Red
2.) Empty
3.) Black
4.) Blue
5.) Empty
6.) Green
I was able to use the tiny flat head screwdriver that came with my Tronxy X5S to pry up on the white plastic pieces on the bottom side of the connector to remove the wires from the connector, allowing me to snap them back in accordingly.
Also, you will have to reverse the E0 stepper motor direction, and I used 102 steps/mm in the Marlin firmware settings for this Stepper Motor/Extruder combo and so far it works beautifully! I came up with this number using the following formula...
(Steps Per Revolution) x (Micro Steps) x (Gear Ratio) / (Hob Bolt Diameter) x (Pi)
(usually found in manufacturer specs) (there is no gear) (measured this with micrometer)
(200) x (16) x (1) / (10) x (3.142)
(3200) / (31.42) = 101.8 which is roughly 102 steps per mm
A great tutorial for this can be found at this link...
https://e3d-online.dozuki.com/Guide/Titan+Marlin+Configuration/35
UPDATE: As stated above, 102 steps/mm worked great printing with TPU flexible filament. After switching to using ABS filament, I noticed some major over extrusion. After manually recalibrating my extruder, I came up with 90 steps/mm. For anyone who does not already know how to do this, there is a great instructional video by Matter Hackers in the link below...
https://www.youtube.com/watch?v=X3A9Ir2SreI
Once you upgrade your Marlin firmware to 1.1.8 you can change this in the options directly on the Tronxy Display under "control" then under "motion" in your settings.
Here is a link to THE BEST TUTORIAL I HAVE FOUND TO DATE on how to flash firmware onto the Tronxy X5S WITHOUT NEEDING AN ARDUINO UNO. Contrary to popular belief (at least with the new version of the Tronxy X5S) you only need a computer and the USB cable that came with the TRONXY X5S printer.
http://www.customize-3d.com/flashing-tronxy-x5s-factory-control-board-usb-cable-only.html
Similar models
thingiverse
free

Tronxy X5S Flexion E3D V6 Retrofit Extruder Mount/Fan Shroud v2 by Plasticasso
... can be made.
update: corrected the recessed hole in the back of the mount that is intended to fit over the bottom carriage bolt.
thingiverse
free

Tronxy X5S Flexion Single HT Extruder Mount and Fan Shroud by Plasticasso
...s link to find helpful tutorials relating to making changes to the tronxy x5s firmware.
https://www.thingiverse.com/thing:2994333
thingiverse
free

TronXY X5s E3d mount for Linear Rail by lookupatnight
... linear rail. i'm using it in a floating extruder setup where the extruder is suspended over the hot end by latex tubes. .
thingiverse
free

TronXY X5s E3D V6 extruder holder by JD_Printing
...nxy x5s. uses the existing mounting plate and e3d cooling fan.
back plate mounts with m3 screws. the front plate with m3 screws.
grabcad
free

Aluminum Fan Shroud for Tronxy X5S Standard Hot End
...aluminum fan shroud for tronxy x5s standard hot end
grabcad
aluminum fan shroud for tronxy x5s standard hot end
thingiverse
free

TronXY X5S direct extruder
...idworks part to make it easier if you want to edit.
feel free to leave a tip by clicking on "tip designer". thank you!
thingiverse
free

TEVO BLACK WIDOW FLEXION E3D EXTRUDER MOUNT by EDSDESIGNS
...
-flexible filament to enjoy how amazing the flexion extruder works
blt touch mount and adapters for ducts will be available soon
thingiverse
free

Tronxy X5S E3D V6 cooler with fang by Eyegoresky
...lts when in the home position. i still need to print it out and make sure there are no issues with clearance on the bowden tube.
thingiverse
free

Taz 5 Extended Fan Mount for E3D Hot End by Wolfie
...n't fit.
the extended mount is designed to accommodate the e3d v6 hot end when mounted on the stock lulz extruder and head.
thingiverse
free

K8200/3Drag E3D v6 HotEnd extruder mount with fan by Area51
...ng the original parts.
here is the version for 40mm fan.
updated: 2015.01.23:
easier to print
stronger grip on e3d cooler
Plasticasso
thingiverse
free

Pointy Guitar Pick by Plasticasso
...evised these picks from originally being 0.75mm thick to 1.00mm thick due to the prints coming out too flimsy using abs filament.
thingiverse
free

24V TriGorilla MOSFET Mount by Plasticasso
... keep the electronics from being exposed to excessive heat. it allows you to flush mount directly to a flat surface using screws.
thingiverse
free

Second Sight 3D Logo (OG) by Plasticasso
... am currently creating a similar design for. no practical value, but i think it would make a neat sort of rubix cube type design.
thingiverse
free

Space-Time Antenna Template (Half) by Plasticasso
...gned so that two identical copies of this template half can be printed and then fused/glued together to create the full template.
thingiverse
free

Tronxy X5S Angled Display Mount by Plasticasso
...9;s lcd case)
here is a link to the lcd case this mount was intended to be used with...
https://www.thingiverse.com/thing:2627194
thingiverse
free
Tronxy X5S Flexion Single HT Extruder Mount and Fan Shroud by Plasticasso
...s link to find helpful tutorials relating to making changes to the tronxy x5s firmware.
https://www.thingiverse.com/thing:2994333
thingiverse
free
Tronxy X5S Flexion E3D V6 Retrofit Extruder Mount/Fan Shroud v2 by Plasticasso
... can be made.
update: corrected the recessed hole in the back of the mount that is intended to fit over the bottom carriage bolt.
Flexion
thingiverse
free
Ender 3 - Flexion by danielroibert
...ender 3 - flexion by danielroibert
thingiverse
adapter for flexion on a ender 3
thingiverse
free
Palm Flexion by JayJo
...onger linkages together
makes a specifically oriented palm plate
for finger flexion attachment
twin grip pads fit in each linkage
thingiverse
free

Flexion Extruder Fanduct by huge11
...flexion extruder fanduct by huge11
thingiverse
later more
thingiverse
free

Flexion HT Spare head holder by KaTZWorld
...xion ht spare nozzles and tools for the monoprice maker select
designed in fusion 360 printed in petg with the flexion ht nozzle
thingiverse
free

Box for Flexion Extruder by rdsail
...box for flexion extruder by rdsail
thingiverse
printed .2 in petg
thingiverse
free

BLTouch Mount for Flexion E3D by zanthor
...d work with pretty much anything.
offsets are roughly as below:
x_probe_offset_from_extruder -25
y_probe_offset_from_extruder -29
thingiverse
free

Flexion single Extruder box insert by shadowflee
...r + 2 nozzle holes
v1.1 now allows you to close the box :) and takes less filament
bitcoin: 1eo4b4bqp8ctutk8rfqxzgyrljjstuzywz
thingiverse
free

Flexion PTFE Tube Mount by EyeWolfDesign
...to hold the ptfe tubing there is two sizes are available m10 and m6. to screw the flexion mount to the assembly use a m3 x 8mm.
thingiverse
free

FT-5 Flexion Extruder Part Cooling Fan by Cbarkie
...ft-5 flexion extruder part cooling fan by cbarkie
thingiverse
part cooling fan for flexion extruder on the ft-5
thingiverse
free

CR-10 Flexion bracket by Cero_
... on the ptfe tube that goes against the flexion drive unit. it should be pushed against the nip point with the cam on position 4.
Retrofit
3d_export
$60

canadair cl-415
...early 1990s, shortly after the success of the cl-215t retrofit programme had proven a viable demand for a turboprop-powered...
3ddd
free

RH RESTORATION HARDWARE
...race between the united states and russia – and retrofited with edison-style filament bulbs developed even earlier. its slim...
3ddd
$1

Dawson Media Consoles
..., ваза like an antique chest that has been retrofited to function as a media console, these pieces blend...
3d_export
$15

Lockheed Martin F-35
...development and testing led to expensive design changes and retrofit. the f-35b entered service with the u.s. marine corps...
3dfindit
free

Retrofit Air Terminal Units
...retrofit air terminal units
3dfind.it
catalog: metal industries
thingiverse
free

TRS Projector Retrofit Nut Socket by shiannyamin
... (the retrofit source). this makes tightening down the nut significantly easier as you can have leverage instead of using pliers.
thingiverse
free

6 in recessed retrofit light fixture
...affle-trim-recessed-dimmable-etl/323724895080?sspagename=strk%3amebidx%3ait&var=512716375820&_trksid=p2057872.m2749.l2649
thingiverse
free

Human Face Great for Retrofitting A Blank Foam Manikin Head by mikelkunz
... for retrofitting a blank foam manikin head by mikelkunz
thingiverse
human face great for retrofitting a blank foam manikin head
thingiverse
free

Replicator 2 Extruder Fan Blade Retrofit by Doodle_Monkey
...s of the extruder fan... (pause for laughter)... i made this retrofit fan blade design. i'm using it now and it works great.
thingiverse
free
Valeo (PSA, probably others) H7 bulb holder for LED retrofit by tsokorai
...sokorai
thingiverse
h7 bulb holder for psa (peugeot, citroën, probably others that use valeo headlights), to allow led retrofit.
X5S
3ddd
$1

топор Fiskars X5
...топор fiskars x5
3ddd
топор
точная модель топора fiskars-x5
3d_export
$25

Bmw x5 3D Model
...bmw x5 3d model
3dexport
bmw x5
bmw x5 3d model alex.fox 914 3dexport
turbosquid
$9

Smartband X5
... available on turbo squid, the world's leading provider of digital 3d models for visualization, films, television, and games.
3d_ocean
$89

BMW X5 2011
...r detailed detailed german german luxury luxury model model sport sport suv suv vehicle vehicle x5 x5
bmw x5 2011 detailed model
3d_export
$39

BMW X5 3D Model
...bmw x5 3d model
3dexport
bmw x5 car transport
bmw x5 3d model bumart 406 3dexport
3d_export
$28

BMW X5 3D Model
...bmw x5 3d model
3dexport
car bmw x5 vray 3ds max high poly
bmw x5 3d model spwar 2 3dexport
3d_export
$60

BMW X5 3D Model
...bmw x5 3d model
3dexport
bmw bmw x5 suv german car transportation automovile tuning
bmw x5 3d model pati3nt 19059 3dexport
3d_export
$69

BMW-X5 2023
...bmw-x5 2023
3dexport
turbosquid
$10

fruit and vegetable x5
...yalty free 3d model fruit and vegetable x5 for download as ma on turbosquid: 3d models for games, architecture, videos. (1653791)
turbosquid
$10

fruit and vegetable x5
...yalty free 3d model fruit and vegetable x5 for download as ma on turbosquid: 3d models for games, architecture, videos. (1653839)
Tronxy
thingiverse
free
LMF8LUU for tronxy x5s
...lmf8luu for tronxy x5s
thingiverse
lmf8luu for tronxy x5s
thingiverse
free

TRONXY XY2PRO by MaiMaiFACTORY
...tronxy xy2pro by maimaifactory
thingiverse
tronxy xy2-pro
sadebox
thingiverse
free

Power_supply_cover for TRONXY by Karollo
...power_supply_cover for tronxy by karollo
thingiverse
power supply cover for tronxy.
thingiverse
free
Tronxy support by d3m1sf
...tronxy support by d3m1sf
thingiverse
soporte para impresora tronxy x3.
thingiverse
free
Tronxy 13mm wrench
...tronxy 13mm wrench
thingiverse
13mm wrench for hotend fitting on tronxy x1...
thingiverse
free

Tronxy x5s by alex190074
...tronxy x5s by alex190074
thingiverse
tronxy x5s cart x fully adjustable only !!
thingiverse
free
Tronxy Logo
...tronxy logo
thingiverse
made this logo
thingiverse
free

Patas TronXY X3 - Vitofeli - TronXY Legs by Todopic
...todopic
thingiverse
patas separadoras para la tronxy x3, permite colocar la caja de control debajo y aprovechas mejor el espacio
thingiverse
free
TRONXY X5S EXTRUDER by ADAM98
...tronxy x5s extruder by adam98
thingiverse
tronxy x5s extruder
thingiverse
free

Belt tensioner Tronxy by jpalianak
...belt tensioner tronxy by jpalianak
thingiverse
belt tensioner tronxy
Shroud
3d_export
$500

Centrifugal pump volute casing with impeller
...casing with impeller 3dexport volute casing with impeller and shroud ...
3d_export
$35

The Holy Face base relief 3D Model
...the holy face base relief 3d model 3dexport shroud turin veronica veronica's veil gospel ikon jesus holy face...
3d_export
$20
present car cloth presentation transport transportation shape concepts show celebration cover showro
...transportation shape concepts show celebration cover showroom covered revealin shroudd cover covering tarp draped fabric cloth showroom reveal revealing...
3d_export
$5

Lockheed F-117 Nighthawk lowpoly stealth bomber
...initial operating capability status in 1983. the aircraft was shroudd in secrecy until it was revealed to the public...
3d_export
$49

kriss vector gen 2 sub-d
...rear flip sight.<br>- vector ejection port.<br>- vector crb square shroud / 16"" sliencer.<br>- ds150 stock.<br>- .ma (maya 2020 ascii)<br>-...
3d_export
$10

vichy dining table
...in oak, sycamore and walnut marquetry.<br>even if the restaurant shroud the vichy in a long table cloth, two slender...
3d_export
$500

us navy pcu sterett ddg-104 arleigh burke class destroyer flight iia max
...the position has been shifted.<br>q. where are the exhaust shroud for the stacks?<br>a. since ddg-89, the exhaust system was...
thingiverse
free

shroud by samshay317
...shroud by samshay317
thingiverse
shroud
thingiverse
free

Fan Shroud
...fan shroud
thingiverse
this is a fan shroud for a 140mm fan
thingiverse
free
40mm fan shroud
...40mm fan shroud
thingiverse
40mm fan shroud
E3D
turbosquid
$23

E3D - Google Home
... 3d model e3d - google home for download as max, obj, and c4d on turbosquid: 3d models for games, architecture, videos. (1192509)
cg_studio
free

e3d model
...e3d model
cgstudio
- e 3d model, royalty free license available, instant download after purchase.
turbosquid
$2

Syringe C4D (E3D Ready)
...lty free 3d model syringe c4d (e3d ready) for download as c4d on turbosquid: 3d models for games, architecture, videos. (1336720)
turbosquid
$12

Microphone USB E3D and C4D
...ree 3d model microphone usb e3d & c4d for download as c4d on turbosquid: 3d models for games, architecture, videos. (1568216)
turbosquid
$29

E3D - OnePlus 6 Black
...model e3d - oneplus 6 black for download as max, obj, and c4d on turbosquid: 3d models for games, architecture, videos. (1358534)
turbosquid
$29

E3D - Motorola One 2018
...del e3d - motorola one 2018 for download as max, obj, and c4d on turbosquid: 3d models for games, architecture, videos. (1358533)
turbosquid
$29

E3D - Disney MagicBands 2
...l e3d - disney magicbands 2 for download as max, obj, and c4d on turbosquid: 3d models for games, architecture, videos. (1355515)
turbosquid
$29

E3D - Samsung Z4 Smartphone
...e3d - samsung z4 smartphone for download as max, obj, and c4d on turbosquid: 3d models for games, architecture, videos. (1182179)
turbosquid
$23

E3D - Razer Phone model
...del e3d - razer phone model for download as max, obj, and c4d on turbosquid: 3d models for games, architecture, videos. (1231207)
turbosquid
$23

E3D - Alcatel Idol 5
... model e3d - alcatel idol 5 for download as max, obj, and c4d on turbosquid: 3d models for games, architecture, videos. (1212799)
V6
3d_export
$100

v6 engine
...engine
3dexport
complete v6 engine modeled on solidworks 2017 along with .stl, .sldprt and .sldasm of all th parts and assembly.
3d_export
$10

V6 engine
... the first v6 engines were designed and produced independently by marmon motor car company, deutz gasmotoren fabrik and delahaye.
3d_export
$35

v6 engine
...s a complete model of a v6 engine containing over 400 components. you can contact me for a video of all the components assembling
3d_export
$10

v6 engine
...v6 engine
3dexport
turbosquid
$25

Bed1001-v6
... available on turbo squid, the world's leading provider of digital 3d models for visualization, films, television, and games.
turbosquid
$22

Chair2-v6
... available on turbo squid, the world's leading provider of digital 3d models for visualization, films, television, and games.
turbosquid
$20

V6.mb
... available on turbo squid, the world's leading provider of digital 3d models for visualization, films, television, and games.
3d_export
$20

V6 engine
...rovided in this package is all the parts in sldprt format and assembly in sldasm format. i can also convert the format on demand.
3ddd
$1

Стол V6
...6" в стиле дизельпанк изготовлен из блока двигателя, 4х поршней и 4х шатунов.
столешница изготовлена из стекла толщиной 8мм.
cg_studio
$199

V6 VVTi3d model
...v6 vvti3d model
cgstudio
.3ds - v6 vvti 3d model, royalty free license available, instant download after purchase.
Extruder
3ddd
$1

Extruded Chair
...extruded chair
3ddd
extruded , tom dixon
inspired by tom dixon extruded chair
turbosquid
$15

Extruded Table
... extruded table for download as blend, dae, fbx, obj, and stl on turbosquid: 3d models for games, architecture, videos. (1634137)
turbosquid
$2

3D Printer Extruder
...d
royalty free 3d model 3d printer extruder for download as on turbosquid: 3d models for games, architecture, videos. (1537359)
turbosquid
$1

Zombie extruded text
...oyalty free 3d model zombie extruded text for download as obj on turbosquid: 3d models for games, architecture, videos. (1322198)
turbosquid
$4

Extruder conical screw
...el extruder conical screw for download as sldpr, ige, and stl on turbosquid: 3d models for games, architecture, videos. (1524433)
turbosquid
$50

3d PRINTER - Extruder
... available on turbo squid, the world's leading provider of digital 3d models for visualization, films, television, and games.
turbosquid
$15

Extruded Table 2
...xtruded table 2 for download as blend, dae, fbx, obj, and stl on turbosquid: 3d models for games, architecture, videos. (1621846)
turbosquid
$10

Maya Extrude Tool
... available on turbo squid, the world's leading provider of digital 3d models for visualization, films, television, and games.
3d_export
$5

world earth extrude map
...world earth extrude map
3dexport
3ddd
$1

Simply Elegant Extruded Tree Coffee Table Design
...ble by link studios. the silhouette of a tree is visible at one angle, extruded from the surface to create the support structure.
Fan
3d_export
$5

fan
...fan
3dexport
fan 3d model, table fan, fan, electric fan, ventilator
archibase_planet
free

Fan
...fan
archibase planet
fan large fan
fan out n260707 - 3d model for interior 3d visualization.
archibase_planet
free

Fan
...fan
archibase planet
fan ceiling fan ventilator
fan stealth n300615 - 3d model (*.gsm+*.3ds) for interior 3d visualization.
3d_export
$15

fan
...fan
3dexport
is an ancient fan
3ddd
$1

Fan-C-Fan by marco gallegos
...n-c-fan by marco gallegos
3ddd
вентилятор , marco gallegos
fan-c-fan by marco gallegos
3d_export
$10

fan
...fan
3dexport
a detailed fan designed for home or space blowing is now available for only 19.99!
turbosquid
$1

Fan
...fan
turbosquid
free 3d model fan for download as on turbosquid: 3d models for games, architecture, videos. (1427865)
turbosquid
$14

Fan
...fan
turbosquid
royalty free 3d model fan for download as on turbosquid: 3d models for games, architecture, videos. (1415642)
3ddd
$1

Светильник Fan
...светильник fan
3ddd
fan , italamp
светильник fan, производитель italamp
turbosquid
$25

Fan
...fan
turbosquid
royalty free 3d model fan for download as c4d on turbosquid: 3d models for games, architecture, videos. (1483246)
Mount
3d_export
free

mounting bracket
...mounting plate is the portion of a hinge that attaches to the wood. mounting plates can be used indoors, cabinetry and furniture.
turbosquid
$2

MOUNTING
... available on turbo squid, the world's leading provider of digital 3d models for visualization, films, television, and games.
turbosquid
free

Mounts
... available on turbo squid, the world's leading provider of digital 3d models for visualization, films, television, and games.
turbosquid
free

Mount Fuji
...fuji
turbosquid
free 3d model mount fuji for download as obj on turbosquid: 3d models for games, architecture, videos. (1579977)
3d_export
$5

Headphone mount LR
...headphone mount lr
3dexport
headphone mount l+r
turbosquid
$39

Mount rainier
...quid
royalty free 3d model mount rainier for download as fbx on turbosquid: 3d models for games, architecture, videos. (1492586)
turbosquid
$5

pipe mounting
...quid
royalty free 3d model pipe mounting for download as obj on turbosquid: 3d models for games, architecture, videos. (1293744)
turbosquid
$3

Mounting Tires
...uid
royalty free 3d model mounting tires for download as fbx on turbosquid: 3d models for games, architecture, videos. (1708511)
3d_export
$5

Magnetic GoPro Mount
...pro mount
3dexport
cool magnetic mount for gopro. allows you to mount the camera on flat metal surfaces and get exclusive shots.
turbosquid
$5

Stone Mount
...ty free 3d model stone mount for download as ma, obj, and fbx on turbosquid: 3d models for games, architecture, videos. (1370306)