Thingiverse
Tronxy X5 YEndStopMount (Customizable)
by Thingiverse
Last crawled date: 5 years, 7 months ago
Everyone who owns a TronXY X5 or maybe a successor knows the wonky Y Endstop. This little clamp which sits on the 8mm rod holding the end-stop switch and fixated only by a 3mm screw which bends the plastic to its limit to keep the end-stop in place.
And for sure you know what happens when the plastic breaks. The end-stop moves by vibration until the print head is crashing. Or the end-stop mount gets pushed further back until the head is crashing.
After having the printer for about one year I found out is was broken once again. In total I broke it twice and it was broken when I got the printer second hand. My long term improvement was to place zip ties onto the rod, so the end-stop cannot bump back even when broken, but this did not stop it from rotating, so the switch becomes unreachable for the print head.
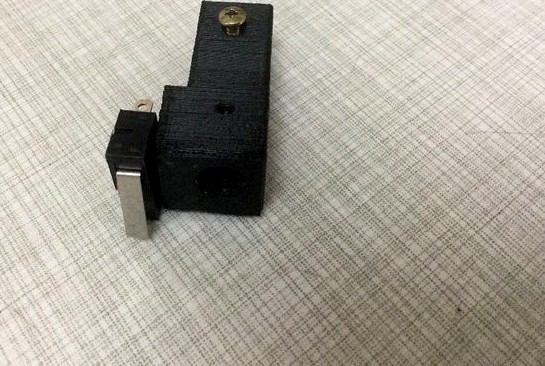
Long story short: I sat down and designed a new mount, that does not require any maintenance now and in the future. I achieved this by replacing the clamp mechanism by using a simple closed guide for the 8mm rod and a self tapping screw to prevent rotation and other movement.
Requirements:
2 2x10mm self tapping screws (to mount the end-stop itself)
1 3x5mm self tapping screw (optional to avoid rotation)
Printing:
Print vertically with the bigger side at the bottom. In this orientation no support is needed.
Use a good mount of infill. I suggest 42%. This model is not big, so you wont waste a lot of material. The self tapping screws need this to dig in.
Better use higher ratio infill once, than reprint later.
Installation:
If your printer is properly calibrated the mount block should slide over an 8mm rod without any force. If it takes some force consider recalibrating your printer. However, use an 8mm drill to fix your part as proper accuracy is not required here.
Now take the old end-stop and screw it onto the bigger section of the mount block. There are two minor dents marking the place to mount. Pre drilling may be a good idea as I just marked the position in case some other switch needs more space or a slightly different position.
If you have a spare 8mm rod it is a good idea to search for a proper screw for the fixator holes. There are four of them, but of course you only need one. It needs to be at least 5mm long. Pick the hole which is accessible the best on your printer.
Now you need to loosen the screws holding the end-stop rod in place. DO NOT REMOVE THE ROD. It is just needed to pull it to the front a few centimeters, so it gets free at the other end. Now slide over the end-stop mount with the end-stop facing to the front of the printer and slide the rod back into its mounting place. Now you can screw the rod back in. Orientate the end-stop, so it can hit the Y carriage and use the fixation screw to hold it in place.
Do not forget to reattach the two switch wires and you are done. Before doing a real test, move the y carriage by hand and listen of you can hear the switch click. If that worked you succeeded and properly installed an end-stop that will never fail again.
As always I included the FreeCAD file, so you can adapt the model the easy way.
And for sure you know what happens when the plastic breaks. The end-stop moves by vibration until the print head is crashing. Or the end-stop mount gets pushed further back until the head is crashing.
After having the printer for about one year I found out is was broken once again. In total I broke it twice and it was broken when I got the printer second hand. My long term improvement was to place zip ties onto the rod, so the end-stop cannot bump back even when broken, but this did not stop it from rotating, so the switch becomes unreachable for the print head.
Long story short: I sat down and designed a new mount, that does not require any maintenance now and in the future. I achieved this by replacing the clamp mechanism by using a simple closed guide for the 8mm rod and a self tapping screw to prevent rotation and other movement.
Requirements:
2 2x10mm self tapping screws (to mount the end-stop itself)
1 3x5mm self tapping screw (optional to avoid rotation)
Printing:
Print vertically with the bigger side at the bottom. In this orientation no support is needed.
Use a good mount of infill. I suggest 42%. This model is not big, so you wont waste a lot of material. The self tapping screws need this to dig in.
Better use higher ratio infill once, than reprint later.
Installation:
If your printer is properly calibrated the mount block should slide over an 8mm rod without any force. If it takes some force consider recalibrating your printer. However, use an 8mm drill to fix your part as proper accuracy is not required here.
Now take the old end-stop and screw it onto the bigger section of the mount block. There are two minor dents marking the place to mount. Pre drilling may be a good idea as I just marked the position in case some other switch needs more space or a slightly different position.
If you have a spare 8mm rod it is a good idea to search for a proper screw for the fixator holes. There are four of them, but of course you only need one. It needs to be at least 5mm long. Pick the hole which is accessible the best on your printer.
Now you need to loosen the screws holding the end-stop rod in place. DO NOT REMOVE THE ROD. It is just needed to pull it to the front a few centimeters, so it gets free at the other end. Now slide over the end-stop mount with the end-stop facing to the front of the printer and slide the rod back into its mounting place. Now you can screw the rod back in. Orientate the end-stop, so it can hit the Y carriage and use the fixation screw to hold it in place.
Do not forget to reattach the two switch wires and you are done. Before doing a real test, move the y carriage by hand and listen of you can hear the switch click. If that worked you succeeded and properly installed an end-stop that will never fail again.
As always I included the FreeCAD file, so you can adapt the model the easy way.