Thingiverse
Triple Threat - E3D Carriage Bowden Mount for AM8/A8 by Draknore
by Thingiverse
Last crawled date: 3 years ago
This thing has now been redesigned and tested and is ready for printing. Thanks for your patience everyone. Hope you all enjoy (Be sure to download all the new files)
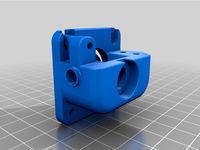
Triple Threat - E3D Carriage Mount
This thing is an all in one E3D v6 carriage bowden mount for the Anet AM8/A8 and similar type printers. While there are quite a few really good designs on thingiverse they are all missing one thing or another, like a tensioner or a cable chain attachment etc. This design aims to include all these in one.
It has three 40mm fans, one for the E3D and two part cooling fans. X belt holder/tensioner and a cable chain head attachment as well as an attachment for a 3DTouch/BLTouch sensor.
Join the two part cooling fans together and then connect them to your motherboard (So they run in parallel).
Update - 28-01-2019
I have uploaded the complete assembly step file for those who need to tinker.
BOM:
3x 40mm Fan - If your fans have a 3mm countersink use the "CS-Back-Vent"
2x M3x10mm Button Head - Probe Mount
2x M3x10mm Button Head - 3DTouch/BLTouch Probe
2x M3x10mm Button Head - Chain Head
8x M3x14mm Cap Screw - Side Fans (If your fans have a 3mm countersink use M3x10mm)
4x M3x50mm - Assembly Mounting (If your fans have a 3mm countersink use the "CS-Back-Vent")
3x m3x20mm Button Head - Belt Holder
1x m3x30mm Button or Cap Screw - Belt Tensioner (The Anet A8 has one of these spare)
14x M3 Nut
Additional required files:
1) Grab the belt holder/tensioner from the link below, because the tensioner has a no derivitives licence (rolling my eyes) you will need to use a 3mm or 3.5mm drill bit and drill a new mounting hole right through the tensioner from the hole in the backplate. My original design included the tensioner with one small change to the mounting holes but I cannot share that due to the licence. So either drill the hole or modify the tensioner if you know how (or only use 2 of the 3 mounting holes).https://www.thingiverse.com/thing:2425783
2) Grab the chain and motor mount here:https://www.thingiverse.com/thing:2104821
Make sure you insert all nuts in their place holders before assembly as some thought will have to go into in what order you should assemble it.
Print Infill and Support
Back-Plate = 60% Infill - No Support
Back-Vent/CS-Back-Vent = 60% Infill - No Support
Clamp-Assembly = 60% Infill - Support touching build plate only
Fan-Clamp = 60% Infill - Support touching build plate only
Chain-Head = 80 - 100% - No Support
Probe-Mount = 100% - No Support
Probe Offset:
define X_PROBE_OFFSET_FROM_EXTRUDER -34 // X offset: -left +right [of the nozzle]
define Y_PROBE_OFFSET_FROM_EXTRUDER -33 // Y offset: -front +behind [the nozzle]
Backplate design taken from:https://www.thingiverse.com/thing:2668564
Similar models
thingiverse
free

Anet A8 E3D V6 Titan mount Direct Drive with BLTouch
...thing:1571526
or one of these remixes:https://www.thingiverse.com/thing:1571526/remixes
this is a work in progress not yet tested
thingiverse
free

Anet A8 X-Axis Belt Tensioner (3mm) by scrhall
...ll
thingiverse
same anet a8 x-axis belt tensioner by wedgesd desing (https://www.thingiverse.com/thing:1895051) with 3mm holes.
thingiverse
free

Anet A8 Direct Feed E3D - BLTOUCH and 40mm Fan Holder
...ch
offsets:
x probe offset -25.6
y probe offset +17.5
10.03.2020
add 40mm fan holder (need 2x m4x50)
13.03.2020
update fan holder
thingiverse
free

E3D V6/Lite, Direct Drive for Anet A8 by Revoc
...//www.thingiverse.com/thing:2485331
adapter to proximity sensor // x-belt tensioner in: https://www.thingiverse.com/thing:2485332
thingiverse
free

Anet A8 - Probe Bracket 30mm fan mount for 18mm probe by Keepars
...unt for 30mm fans. designs to screw into the e3d v6 30mm fan.
offsets for v1 are:
x: +35
y: -30
offsets for v2 are:
x: +35
y: -19
thingiverse
free

Anycubic Chiron E3d Hemera Linaer Mount by alexten9
...nal. the other files are remix of original but for linear mount. flip probe mount and belt tension so they print with no support.
thingiverse
free

Geeetech Prusa I3 Pro A - E3D v6, 3DTouch, Extra fan and Y-belt mount by MrAP
...extra cooling fan mounted on the front, found a similar but it was not for 24mm cc beetwen the...
thingiverse
free

Bracket for 3DTouch Probe on Creality CR-10 by PukinDog
... could offset the distance 3dtouch recommends. now it's adjustable.
and it has a rim on the side to prevent it from rotating.
thingiverse
free

Anet A8 3dTouch rear mount by matsondawson
... update your firmware, see here:
http://www.thingiverse.com/thing:2091529
tinkercad link:https://tinkercad.com/things/16dh38tc7vw
grabcad
free

3Dtouch mount for TwoTrees Bluer
...r 3d printer using 3dtouch probe.
leveling settings:
probe x axis offset: 41.5
probe y axis offset: 0
probe z axis offset: -3.2
Draknore
thingiverse
free

Bearing Block for Igus Drylin Bearings (RJ4JP-01-08) by Draknore
...s are quite a tight fit and will need to be pressed in, check out my bearing press here:https://www.thingiverse.com/thing:2973644
thingiverse
free

Anet AM8 Corner Trim (2040) by Draknore
...increased the clearance on the 5mm holes to make inserting the bolts easier.
added some chamfers on the edges for a cleaner look.
thingiverse
free

Bearing Press for Igus Drylin Bearings by Draknore
...:https://www.thingiverse.com/thing:2973632
and 0scars's housing for rjmp-01-08 here:https://www.thingiverse.com/thing:2464917
thingiverse
free

12v 30A PSU Kit for AM8 (2040) by Draknore
...all lip at the top that will have to be removed either by filing it down or carefully cutting it off with a blade (stanley knife)
Threat
3d_export
$5

Mcafee activate 25 digit code
...pc will receive continuous and continuing protection from internet threat thanks to the mcafee...
3d_export
$48

Iranian Shahab3B 3D Model
...iran iranian medium range ballistic missile rocket shahab defense threat nuke nuclear cob dxf 3ds obj weapons military iranian...
3d_export
$53

Iranian Sejil2 3D Model
...sejil sejjil sajil ballistic missile medium range bmd defense threat warhead rocket motor nuke stage military weapon iranian sejil2...
3d_export
$31

Isreali Arrow 2 3D Model
...model 3dexport isreal arrow ballistic missile defense interceptor iran threat short range rocket truespace cob 3ds obj dxf military...
3d_export
$29

Iranian Sagheb Bomb 3D Model
...iranian air launched surface bomb missile rocket military range threat asc 3ds cob dxf obj directx truespace iranian sagheb...
3d_export
$36

Israeli Stunner Missile 3D Model
...guided missile rocket military warhead medium long short range threat israeli stunner missile 3d model visualmotion 52789...
3d_export
$18

Rocket 3D model 3D Model
...army war nuclear atom atomic bomb danger world destruction threat massive full elementary destroy damage terminate kill rocket 3d...
3d_export
$48

DRDO Akash SAM Missile 3D Model
...3dexport missile sam akash india drdo defense rocket ballistic threat military weapon warhead nuclear nuke truespace cob 3ds dxf...
3d_export
$30

Iranian Yasser ASM Missile 3D Model
...ground ballistic asm missile rocket military warhead short range threat 3ds iranian yasser asm missile 3d model visualmotion 51160...
3d_export
$86

Israeli Arrow 3 Missile 3D Model
...army air force hit to kill technology vehicle warhead threat upper tier israeli arrow 3 missile 3d model visualmotion...
Am8
evermotion
$12
armchair 055 am8
...f armchair with all textures, shaders and materials. it is ready to use, just put it into your scene.. evermotion 3d models shop.
evermotion
$12

armchair 051 am8
...f armchair with all textures, shaders and materials. it is ready to use, just put it into your scene.. evermotion 3d models shop.
evermotion
$10
chair 012 am8
...l of chair with all textures, shaders and materials. it is ready to use, just put it into your scene.. evermotion 3d models shop.
evermotion
$10
chair 011 am8
...l of chair with all textures, shaders and materials. it is ready to use, just put it into your scene.. evermotion 3d models shop.
evermotion
$10
chair 017 am8
...l of chair with all textures, shaders and materials. it is ready to use, just put it into your scene.. evermotion 3d models shop.
evermotion
$10
desk 079 am8
...el of desk with all textures, shaders and materials. it is ready to use, just put it into your scene.. evermotion 3d models shop.
evermotion
$10

chair 027 am8
...l of chair with all textures, shaders and materials. it is ready to use, just put it into your scene.. evermotion 3d models shop.
evermotion
$10

chair 015 am8
...l of chair with all textures, shaders and materials. it is ready to use, just put it into your scene.. evermotion 3d models shop.
evermotion
$10

chair 037 am8
...l of chair with all textures, shaders and materials. it is ready to use, just put it into your scene.. evermotion 3d models shop.
evermotion
$10

chair 013 am8
...l of chair with all textures, shaders and materials. it is ready to use, just put it into your scene.. evermotion 3d models shop.
Bowden
turbosquid
$199
Vintage Ben Bowden Spacelander bike
... available on turbo squid, the world's leading provider of digital 3d models for visualization, films, television, and games.
3ddd
$1

Manooi Artica
...and pendants in various sizes and forms. suspension: galvanized bowden - dia. 1,5 mm. bulb: max 60 w -...
thingiverse
free
Remix Compact Bowden extruder - m6 bowden couplers and bowden tube pass-through
...ouplers and bowden tube pass-through
thingiverse
remix compact bowden extruder - m6 bowden couplers and bowden tube pass-through
thingiverse
free

Bowden Extruder
...bowden extruder
thingiverse
i have created bowden extruder for flsun delta 3d printer.
thingiverse
free

bowden 3mm by spee_D
...bowden 3mm by spee_d
thingiverse
for bowden 3mm
thingiverse
free
Bowden Tube Cutter
...bowden tube cutter
thingiverse
bowden tube cutter
thingiverse
free
Customizable Bowden Clip
...customizable bowden clip
thingiverse
customizable bowden clip
thingiverse
free
Bowden Oiler by fcheshire
...bowden oiler by fcheshire
thingiverse
inline bowden oiler
thingiverse
free

Bowden adapter by helkaroui
...bowden adapter by helkaroui
thingiverse
this is a fixed bowden adapter
thingiverse
free

Adventure3 Bowden Clip
...adventure3 bowden clip
thingiverse
adventure3 bowden clip
Triple
turbosquid
$10

Triple angle michael triple
...free 3d model triple angle michael triple for download as max on turbosquid: 3d models for games, architecture, videos. (1243156)
3d_export
$5

triple knob
...triple knob
3dexport
triple knob
3ddd
$1

flora triple
...flora triple
3ddd
slamp
подвес flora triple
3ddd
$1

Triple P!
...iple p!
3ddd
горшок , цветок , листья
triple p!
design_connected
$16

To triple sofa
...to triple sofa
designconnected
nurus to triple sofa computer generated 3d model. designed by ozelgin, tanju.
3d_export
$5

Triple bars
...triple bars
3dexport
these are triple bars for outdoor training/gymnastics. suitable for push-ups on uneven bars
turbosquid
$10

Triple Window
...quid
royalty free 3d model triple window for download as 3ds on turbosquid: 3d models for games, architecture, videos. (1484877)
turbosquid
$5

Triple copper
...free 3d model triple copper for download as max, obj, and fbx on turbosquid: 3d models for games, architecture, videos. (1317753)
turbosquid
$3

TRIPLE SWITCH
...free 3d model triple switch for download as max, obj, and fbx on turbosquid: 3d models for games, architecture, videos. (1369504)
turbosquid
$3

Triple bench
...d model triple bench for download as sldpr, ige, stl, and obj on turbosquid: 3d models for games, architecture, videos. (1560286)
A8
turbosquid
$47

Car A8
...
turbosquid
royalty free 3d model car a8 for download as max on turbosquid: 3d models for games, architecture, videos. (1196060)
turbosquid
$50

Audi A8
...yalty free 3d model audi a8 for download as 3dm, obj, and fbx on turbosquid: 3d models for games, architecture, videos. (1580187)
turbosquid
$15

Audi A8
...lty free 3d model audi a8 for download as obj, fbx, and blend on turbosquid: 3d models for games, architecture, videos. (1387519)
turbosquid
$500

Audi A8
... available on turbo squid, the world's leading provider of digital 3d models for visualization, films, television, and games.
3d_export
$5

Audi A8 3D Model
...audi a8 3d model
3dexport
audi a8 cars car
audi a8 3d model ma 20351 3dexport
3d_export
$5

Audi A8 3D Model
...audi a8 3d model
3dexport
3d model of audi a8
audi a8 3d model badyaka 12136 3dexport
3d_ocean
$89

Audi A8 2010
...usiness car car class class f f german german luxury luxury s s s8 s8 sedan sedan vehicle vehicle
new audi a8 2010 detaled model.
turbosquid
$39

A8 2018
...a8 2018 for download as 3ds, obj, wrl, c4d, fbx, dae, and stl on turbosquid: 3d models for games, architecture, videos. (1345349)
turbosquid
free

audi a8 l
...rbosquid
royalty free 3d model audi a8 l for download as obj on turbosquid: 3d models for games, architecture, videos. (1663016)
3d_ocean
$45

Audi A8 restyled
...our door vehicle was created in blender3d 2.62.realistic renderings were created with yafaray 0.1.2 realistic plugin.rendering...
E3D
turbosquid
$23

E3D - Google Home
... 3d model e3d - google home for download as max, obj, and c4d on turbosquid: 3d models for games, architecture, videos. (1192509)
cg_studio
free

e3d model
...e3d model
cgstudio
- e 3d model, royalty free license available, instant download after purchase.
turbosquid
$2

Syringe C4D (E3D Ready)
...lty free 3d model syringe c4d (e3d ready) for download as c4d on turbosquid: 3d models for games, architecture, videos. (1336720)
turbosquid
$12

Microphone USB E3D and C4D
...ree 3d model microphone usb e3d & c4d for download as c4d on turbosquid: 3d models for games, architecture, videos. (1568216)
turbosquid
$29

E3D - OnePlus 6 Black
...model e3d - oneplus 6 black for download as max, obj, and c4d on turbosquid: 3d models for games, architecture, videos. (1358534)
turbosquid
$29

E3D - Motorola One 2018
...del e3d - motorola one 2018 for download as max, obj, and c4d on turbosquid: 3d models for games, architecture, videos. (1358533)
turbosquid
$29

E3D - Disney MagicBands 2
...l e3d - disney magicbands 2 for download as max, obj, and c4d on turbosquid: 3d models for games, architecture, videos. (1355515)
turbosquid
$29

E3D - Samsung Z4 Smartphone
...e3d - samsung z4 smartphone for download as max, obj, and c4d on turbosquid: 3d models for games, architecture, videos. (1182179)
turbosquid
$23

E3D - Razer Phone model
...del e3d - razer phone model for download as max, obj, and c4d on turbosquid: 3d models for games, architecture, videos. (1231207)
turbosquid
$23

E3D - Alcatel Idol 5
... model e3d - alcatel idol 5 for download as max, obj, and c4d on turbosquid: 3d models for games, architecture, videos. (1212799)
Carriage
archibase_planet
free

Carriage
...arriage
archibase planet
perambulator baby carriage pram
carriage n250908 - 3d model (*.gsm+*.3ds) for interior 3d visualization.
3d_export
free

carriage
...carriage
3dexport
old fashion carriage model, more files here:
turbosquid
$140

Carriage
...urbosquid
royalty free 3d model carriage for download as max on turbosquid: 3d models for games, architecture, videos. (1482052)
turbosquid
$25

Carriage
...urbosquid
royalty free 3d model carriage for download as max on turbosquid: 3d models for games, architecture, videos. (1285944)
3d_export
free

carriage
...carriage
3dexport
game cart
3d_ocean
$15

Barrel Carriage
...ieval oak old transport wheels wine wood
this model contains a barrel and a carriage. it is a medieval type of wood oak carriage.
turbosquid
$40

Carriage
...ty free 3d model carriage for download as obj, fbx, and blend on turbosquid: 3d models for games, architecture, videos. (1290094)
turbosquid
free

Carriage
...yalty free 3d model carriage for download as ma, obj, and fbx on turbosquid: 3d models for games, architecture, videos. (1239157)
3d_export
$5

Medieval carriage
...medieval carriage
3dexport
medieval carriage in fairy style
turbosquid
$58

Carriage
...d model carriage with scene for download as max, obj, and fbx on turbosquid: 3d models for games, architecture, videos. (1276262)
Mount
3d_export
free

mounting bracket
...mounting plate is the portion of a hinge that attaches to the wood. mounting plates can be used indoors, cabinetry and furniture.
turbosquid
$2

MOUNTING
... available on turbo squid, the world's leading provider of digital 3d models for visualization, films, television, and games.
turbosquid
free

Mounts
... available on turbo squid, the world's leading provider of digital 3d models for visualization, films, television, and games.
turbosquid
free

Mount Fuji
...fuji
turbosquid
free 3d model mount fuji for download as obj on turbosquid: 3d models for games, architecture, videos. (1579977)
3d_export
$5

Headphone mount LR
...headphone mount lr
3dexport
headphone mount l+r
turbosquid
$39

Mount rainier
...quid
royalty free 3d model mount rainier for download as fbx on turbosquid: 3d models for games, architecture, videos. (1492586)
turbosquid
$5

pipe mounting
...quid
royalty free 3d model pipe mounting for download as obj on turbosquid: 3d models for games, architecture, videos. (1293744)
turbosquid
$3

Mounting Tires
...uid
royalty free 3d model mounting tires for download as fbx on turbosquid: 3d models for games, architecture, videos. (1708511)
3d_export
$5

Magnetic GoPro Mount
...pro mount
3dexport
cool magnetic mount for gopro. allows you to mount the camera on flat metal surfaces and get exclusive shots.
turbosquid
$5

Stone Mount
...ty free 3d model stone mount for download as ma, obj, and fbx on turbosquid: 3d models for games, architecture, videos. (1370306)