Thingiverse
Tricklaser Hospital
by Thingiverse
Last crawled date: 4 years, 2 months ago
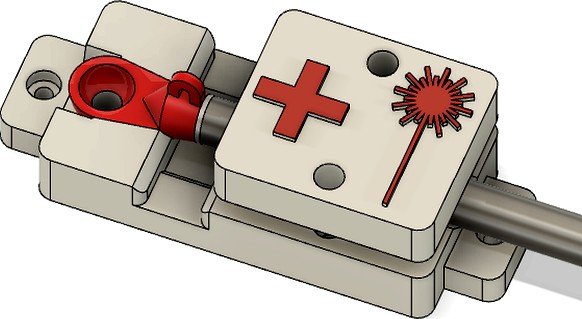
This is a jig to create and repair Tricklaser rods. Tricklaser no longer sells new rods and rod ends, so if yours breaks you need a way to repair them. The jig could also be used for making new rods if you happen to have some rod ends.
The jig retains the rod ends and rod such that you can glue them back together with epoxy.
There's also a drilling jig if you wish to drill out the center of the rod (with remnants of the rod end remaining) and the rod and insert a pin. I used a m2 screw with the head cut off. The hole in the drill jig is 1mm so you may choose to use a finish nail or other pin. I have one report of someone gluing their rod ends back together using just epoxy and no pin and so far it's working fine, so you may not even need the drill jig.
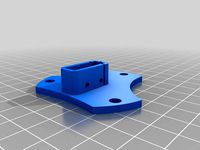
Print 2 copies of the base and 2 copies of the clamp. 1 copy of the drill jig. Attach them to a piece of 2020 extrusion using tee nuts and m3 screws, spaced the appropriate distance for your rods. By having 2 jigs you can ensure the rod ends cups are aligned properly.
I used PrusaSlicer's filament swap to print the top layers with the medic/laser symbol in red. You shouldn't need supports for the nut inserts.
I used M5 heatserts for the clamp screws as well as for the M5 screw that locates and clamps the tricklaser rod end. You can also use M5 nuts for the clamps, and use a tee nut in the extrusion for the tricklaser screw if you don't have heatserts.
I have had excellent luck with JB-Weld PlasticWeld epoxy (the syringe style, not the hand mix stuff which isn't nearly as strong). Loctite makes a similar plastic epoxy.
You may wish to place a small bit of foil in the valley below the glue joint to catch glue that drips.
F360 archive provided if you wish to remix or mod.
The jig retains the rod ends and rod such that you can glue them back together with epoxy.
There's also a drilling jig if you wish to drill out the center of the rod (with remnants of the rod end remaining) and the rod and insert a pin. I used a m2 screw with the head cut off. The hole in the drill jig is 1mm so you may choose to use a finish nail or other pin. I have one report of someone gluing their rod ends back together using just epoxy and no pin and so far it's working fine, so you may not even need the drill jig.
Print 2 copies of the base and 2 copies of the clamp. 1 copy of the drill jig. Attach them to a piece of 2020 extrusion using tee nuts and m3 screws, spaced the appropriate distance for your rods. By having 2 jigs you can ensure the rod ends cups are aligned properly.
I used PrusaSlicer's filament swap to print the top layers with the medic/laser symbol in red. You shouldn't need supports for the nut inserts.
I used M5 heatserts for the clamp screws as well as for the M5 screw that locates and clamps the tricklaser rod end. You can also use M5 nuts for the clamps, and use a tee nut in the extrusion for the tricklaser screw if you don't have heatserts.
I have had excellent luck with JB-Weld PlasticWeld epoxy (the syringe style, not the hand mix stuff which isn't nearly as strong). Loctite makes a similar plastic epoxy.
You may wish to place a small bit of foil in the valley below the glue joint to catch glue that drips.
F360 archive provided if you wish to remix or mod.
Similar models
thingiverse
free

PVC pipe tee clamp
...cesses.
i didn't need supports, brim or raft, and i used pla. petg is a little more flexible so would also be a good choice.
thingiverse
free

Drill Press Vice by AutoX3D by largeformat3dprinter
...n the harbor freight drill press drilling bed. the clamping block has cutouts to allow for the heads of the nuts to protrude up.
thingiverse
free

Fishing Rod by VitaliyT
...h support. i used a screw (m5*16) with nut to connect reel and rod. nut fix with glue. the alerter bite is on the end of the rod.
thingiverse
free

Mortise Jig for router by tibuck
... 1/2 inch threaded rods with 1/2-13 bolts.
use epoxy to glue both nuts on head stock clamp base, and the nut on router board adj.
thingiverse
free

prusa i3 X endstop for leadscrew by Benn25
...ly...
leadscrew nut diameter : 10.2mm
lm8uu linear bearings diameter : 15mm
use a m5 screw for the tensioner and a 625zz bearing.
thingiverse
free

Kossel Rod Jig M3 Bolt by joochung
...t it seemed the center pin would be a bit fragile. so i remixed it to take a m3 screw and nut. a 16mm m3 screw should work great.
thingiverse
free

Delta Arm Alignment Plate by vangalvin
...uggest using something like a 2 pot epoxy so if you have to remove the eyes you can apply a little bit of heat and pull them off.
thingiverse
free

Minimalistic V-Slot jig for delta rods by theinternal
...les are for m3 and m4 screws. if you've come this far, you'll figure out the rest by yourself by looking at the pictures.
thingiverse
free

Z Rib for CR10 by TarantulaTevo
...ts
4x m10 washers
8 t-nuts
8 screws, that fit your t-nuts.
i used m5 t nuts and 10mm m5 schrews with countersunk head
have fun :)
thingiverse
free

Solder Station Rod by patricktate
... at one piece or you can print them separated and glue them together, works as a charm.
filament, try to go with petg, stronger.
Tricklaser
thingiverse
free

Diamond Hotend for RostockMAX + TrickLaser effector platform by Renha
...f-el-tape-ring-shape-in-tron-costume/
added version for using without/with another linght solution (where inner holes used only).
thingiverse
free
Zesty Nimble adapter for TrickLaser Rostock groove mount by Schlauncha
... in the prints). single biggest improvement in performance i've seen out of any of the upgrades i've done to my rostock.
thingiverse
free

Screw Terminal to 2020 mount by TheRealRocket
...and easily swappable electronics. designed for use with the tricklaser max metal...
thingiverse
free

Drop-in T Nut for 80/20 brand 10-Series Extrusion by bradjshannon
...series 10 aluminum extrusions, such as those used in tricklaser#39;s rostock max metal...
thingiverse
free

E3D Titan Aero mount for Rostock MAX by SublimeLayers
...(v2 or v3 tested, v1 probably works) or the tricklaser or 713maker (shown in photo) cnc effectors with three...
thingiverse
free

D300VS Thickened Barbell Carriages
...the extra 3mm spacers that were required for the tricklaser arms on the d300vs+, it puts more leverage on...
thingiverse
free

FSR Mounts - Rostock Max V2 by DodgeDerek
...modified mounts that will hopefully work for the new tricklaser fsr plate. these have not been tested as i...
thingiverse
free
Endstop Z-Probe Mount for Rostock MAX/Orion/MAX Metal by 626Pilot
...to mount a microswitch to a seemecnc plastic or tricklaser metal effector. i've been using this for awhile, and...
thingiverse
free

Rostock Max Flyingstruder Mount for E3D's Titan Extruder by jup2000
...titan extruder by jup2000 thingiverse my original fly'n'strude from tricklaser didn't fit or work well with the new e3d...
Hospital
3d_export
$50

hospital
...hospital
3dexport
this design is real and it is present in saudi arabia it is for a large hospital
3d_ocean
$19

Hospital
...hospital lebedev low poly lowpoly medical medicine model polygonal render
low poly hospital,modeled and textured in cinema4d r16.
turbosquid
$50

hospital
...urbosquid
royalty free 3d model hospital for download as max on turbosquid: 3d models for games, architecture, videos. (1695259)
3d_export
$5

house hospital
...house hospital
3dexport
house hospital, helicopter plant.
turbosquid
$40

Hospital
... available on turbo squid, the world's leading provider of digital 3d models for visualization, films, television, and games.
turbosquid
$15

Hospital
... available on turbo squid, the world's leading provider of digital 3d models for visualization, films, television, and games.
turbosquid
$5

Hospital
... available on turbo squid, the world's leading provider of digital 3d models for visualization, films, television, and games.
3d_export
$5

Hospital Bed
...hospital bed
3dexport
hospital bed, with various control panels, gameready
3d_export
$65

hospital
...hospital
3dexport
simple rendering of the scene file
3d_export
$65

Hospital
...hospital
3dexport
simple rendering of the scene file