Thingiverse
ToyREP 3D Printer by thorgal
by Thingiverse
Last crawled date: 3 years ago
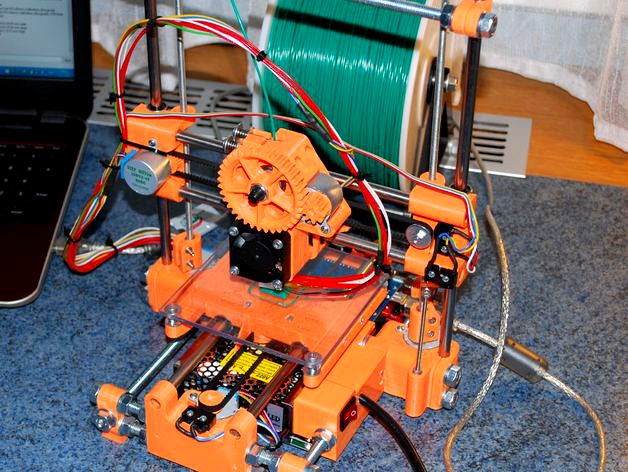
ToyREP is a tiny and inexpensive FFD 3D printer designed mostly as a technology demonstrator or child's toy. The print volume is 100x100x100mm (125x125x100mm with some upgrades) with a cold bed made of polyacrylate. Hot end is a E3D clone for 1.75 PLA or ABS filament with 0.4mm noozle. Using very cheap 28BYJ-48 stepper motors (with Bi-polar hack) in all axis and geared extruder, Arduino Mega 2560 with Ramps 1.4, DRV8825 and modular RepRap construction based on Mendel, Printerbot, Cherry, Prusa i3 and CARP Box ideas. It is designed to use 12V PSU for LED lights that should fit under bed. Power consumption is currently ca 40W when heating just hotend and 15W-20W when printing on polycarbonate bed. Or with 100x100mm PCB heatbed it will consume 75-85W when preheating and 30-45W in total when printing.
On video http://youtu.be/rhNdqjVxz4o, bridge test calibration model is printed. During this particular print it is reaching top speeds 30mm/s in X and Y axis, 0.35mm/s in Z axis and extruder can push filament up to 4mm/s. But such speeds requires higher current, so the motors are overheating and eventually the internal gear box or coils of 28BYJ-48 may got damaged.
For a reliable long term print, printer should not exceed 12.5/s in X and Y axis and 1mm/s on extruder with as low current as possible so the real speed will be close to the first layer on the video. Also usage of coolers above stepper motors is highly recommended. You can find such solution among improvements. Despite this precaution I've already burned two motors in extruder so consider this until the reason will be found.
More up to date video from October 2015 https://youtu.be/UwSxXt_PTyk of ToyREP was captured when Marvin Key Chain was made. Printer is reaching speeds 16mm/s, on X, Y and E motors are fans, DRV8825 stepper drivers are tweaked for precise current control and it is equiped with heatbed. This 11 minute long time laps is showing complete 1h41m long print and is probably most accurate example of printer's performance.
Other Print Examples
Calibration BoxBridge TestTreefrogMarvin
Disclaimer
All of the information provided about ToyREP 3D Printer is provided as-is and with no warranties. Author assumes or undertakes no liability for any loss or damage suffered as a result of the use, misuse or reliance on the information and content on this project.
Warning
ToyREP, although proved working, is still experimental. The whole idea is based on 28BYJ-48 stepper motors, that are capable of driving 3D printer, but their longevity is not tested thoroughly. In two months of usage I've burned two motors. Keep that in mind when building it.
To make them last as long as possible:
Be very careful when disassembling the motors. Even slight shift of the PCB under the plastic cap can damage tiny wires from coils. You are doing the bipolar hack at your own risk.
Set the current as per the specification of the manufacturer.
Keep the timing belts as loose as possible. Tight belts would put side stress to the motor shaft. This is very harmful for this tiny motor.
Keep the working temperature of motors within manufacturers limits.
License
Please follow the CC-BY-SA terms.
Share freely but give credit or link to the source.
You can alter this design with attribution to the original. All subsequent designs have to be released under the same license.
Commercial use only with the consent of author.
Improvements:
LED PSU mount and cover with switch for size 111x78x36mm and 129x99x38mm
Frog for print area 125x125mm - uploaded to ToyREP.
Bowden extruder mount - uploaded to ToyREP.
ZMAX without 608ZZ bearings (to prevent wobbling) - uploaded to ToyREP.
Coolers for stepper motors and different motor mount - Use them instead of X1, Y1, Z1&2 and Extruder parts uploaded here
X1_M8 and X2_M8 for quicker z movement - Use them instead of X1 and X2 parts uploaded here
100x100mm PCB Heatbed by kolardan - Use it instead of polycarbonate plate
28BYJ-48 Plastic Cap - Use this cover if you want to customize the colour or you break it when disassembling steppers.
Additional extruder gears for hobbed bolts with different spacing between groove and hexagonal head - uploaded to ToyREP
Pulleys for T2.5 and GT2 timing belts of width up to 7mm uploaded to ToyREP files. These Rev2 parts are experimental. Use them only if (for some strange reason) you don't like original T2.5 pulley.
120x120mm PCB Heatbed by kolardan - Use it instead of polycarbonate plate
50mm Long Legs by sobo84 - print it instead of legs placed here.
3 point levelling for 100x100mm bed by timbologist.
Frog for 120x120mm Aluminum Heatbed with mounting holes 112x112mm apart - uploaded to ToyREP
Remixed extruder with servo for auto bed levelling BranJaq S1 by Branez
Hotend Fan Duct - Use this additional cooler if you want to print PLA
Geared Extruder for 3mm Fillament by TouchWARE - rest of the extruder uses the same vitamins (except for the 3mm hotend)
PSU cover for 99x42mm LED PSU by Felyo - Slightly different design for enclosures higher than 38mm for what is prepared PSU2 file.
NEMA 17 X and Y mounts - First viable solution prepared by moses65174 for both main axis, although it will need a bit more changes in rod and belts lengths.
Servo Z probe - Plate under extruder fan to install servo designed by mwelchuk
ToyREP Fillament Holder - Snap on filament holder by tetroboylp
Planned improvements (no promises :D):
40 teeth T2.5 pulleys (require also major changes in frog, carriage, X1 and X2) to achieve higher print speeds (around 25mm/s)
Adjustable legs
Direct drive extruder
Fan mount to cool stepper drivers
Mount compatible with Prusa Mendel vertical carriage
Change log
2018-10-21
Published ToyREP Fillament Holder - See Improvement No.21
2018-08-26
Published Extruder part without supports
2017-07-18
Published bigger PSU cover - See Improvement No.18
Published NEMA 17 upgrade - See Improvement No.19
Published Z Probe - See Improvement No.20
2016-02-24
Published 3mm Geared Extruder - See Improvement No.17
2016-01-18
Hotend nozzle cooler published - See Improvement No.16
2015-12-07
Remixed extruder with servo driven auto bed levelling - See Improvement No.15
2015-11-16
Frog for commercially available 120x120mm Aluminum Heatbed - See Improvement No.14
2015-11-02
Added 3 point bed levelling upgrade - See Improvement No.13
2015-10-13:
Printed another example - Marvin Key Chain.
Replaced drivers with tweaked DRV8825 with 2R2 reference resistors for better current control. Current lowered down to 100-105mA per coil to reduce overheating.
2015-10-04:
Added 120x120mm heatbed and 50m long legs - See Improvements No.11 and 12.
2015-10-01:
Changed BoM due to fact, that RAMPS 1.4 have to be adjusted from power plugs to screw terminals. Also made minor changes in Instructions and http://reprap.org/wiki/ToyREP
I've burned second motor in extruder. Looking for the reason.
2015-09-29:
Prepared pulleys for wider timing belts. See Improvement No.10.
2015-09-22:
The distance of mounting holes on micro switches was corrected. Holes should be 9.5mm apart (not 11mm). BoM re-uploaded.
2015-09-21:
Added two more extruder gears for different hobbed bolts - See Improvement No.9.
2015-09-12:
Added model of plastic cap for 28BYJ-48 - See Improvement No.8.
2015-09-10:
With Courtesy of my friend Dan Kolar PCB Heatbed was published as another upgrade - See Improvement No.7.
Minor changes in Description and Instructions related to heatbed
2015-09-02:
Prepared X1 and X2 models using M8 threaded rods for Z movement - see Improvement No.6.
2015-08-29:
Prepared models for motors with four mounting holes - see Improvement No.5.
2015-08-26:
As I already found copies of ToyREP source files on chinese servers, Warning, Disclaimer and Licence Agreement had to be added.
2015-08-24:
Published fan mounts above X, Y and E stepper motor - see Improvement No.5.
2015-08-22:
Added some examples of print quality - see chapter Thing Info - Print Examples.
2015-08-02:
Frog for 125x125mm print area, Z max without 608ZZ bearing, PCB2-1 + PCB2-2 for 129x99x38mm PSU (PSU2) and Bowden extruder fan mount uploaded.
Minor changes in Instructions
2015-07-29:
New revision of extruder uploaded as the older one was colliding with some of the blue caps on 28BYJ-48 motors.
Prepared instruction how to set up firmware
Added LED PSU cover for sizes 111x78x36mm.
Similar models
3dwarehouse
free

Stepper Motor 28BYJ-48
...stepper motor 28byj-48
3dwarehouse
stepper motor 28byj-48 stepper motor 28byj-48 stepper motor 28byj-48
grabcad
free

28BYJ-48 stepper motor
...28byj-48 stepper motor
grabcad
small stepper motor used by m3d printer,
thingiverse
free

28BYJ-48 by Jordan_Doerksen
...things that will use this motor i also print this out to use in place of the stepper motor while i design the rest of the device.
thingiverse
free

Lego to Stepper 28BYJ-48 Adapter
...simple lego axle to 28byj-48 stepper motor adapter. snug but not too tight fit.
if it doesn't fit your printer over-extrudes.
thingiverse
free

ToyREP Stepper Motor Cooling by thorgal
...my self yet. my fans are already glued to similar positions, so i don't need this upgrade :d. and...
grabcad
free

3D printed gripper for the 28BYJ-48 stepper motor
...3d printed gripper for the 28byj-48 stepper motor
grabcad
a simple 3d printed gripper for the small 28byj-48 stepper motor.
grabcad
free

stepper-motor-28byj-48
...stepper-motor-28byj-48
grabcad
stepper-motor-28byj-48
grabcad
free

Stepper Motor 28BYJ-48
...stepper motor 28byj-48
grabcad
stepper motor 28byj-48
thingiverse
free

Dual 28byj-48 Stepper Motor Mounts by Magdel16
...dual 28byj-48 stepper motor mounts by magdel16
thingiverse
2 mount with one print
thingiverse
free

28BYJ-48 Stepper Motor Cover by superwoodle
...r by superwoodle
thingiverse
a simple slide on cover for your 28byj-48 stepper motors. no other hardware necessary for mounting.
Thorgal
thingiverse
free

Hotend Cooler by thorgal
... with additional holes that allow installation on 30mm fans as on e3d v6 hotend. rest is the same as for the toyrep hotend cooler
thingiverse
free
LED light torch by thorgal
...battery - no soldering required.
you can use it as it is in small lantern or intergrate the battery holder into your own design.
thingiverse
free

Filament bobbin holder by thorgal
...obbins with 30-31mm center openings diameter. bobbin of overall size 132mm wide up to diameter 230mm can be fitted in the holder.
thingiverse
free

Coffee Measuring Spoon 7g by thorgal
...nt to grind one dose at a time. the amount may vary depending on bean size and shape, so you will have to experiment a bit.
enjoy
thingiverse
free

Hookah diffuser by thorgal
...er 11-12mm. inside the flange is also a groove for o-ring, but in my case (11.5mm) the aerator stays on the pipe even without it.
thingiverse
free

ToyREP Heatbed by thorgal
...temperature 116°c (at room temperature 24.5°c) in 15-20 minutes
for heatbed in operation see video https://youtu.be/2mr6av5bdxu
thingiverse
free

28BYJ-48 Plastic Cap by thorgal
...teeth on output shaft.
(32x22x27x24)/(9x11x9x8)=64
the other motor i got previously had:
(32x22x26x31)/(9x11x9x10)=63.68395
thingiverse
free

Mata Leon Amboss 8ball Hookah Diffuser by thorgal
... bit quieter. but both will splash the water in the jar and that is quite audiable. still way different from the stem without it.
thingiverse
free

ToyREP Power Supply Cover by thorgal
... be installed at the very beginning of toyrep assembly. for latter upgrade you will have to disassemble almost the whole printer.
thingiverse
free

ToyREP Hotend Cooler by thorgal
...ermanently turned on will locally cool the print surface (that may cause warping) and prolong heating of heatbed and/or extruder.
Toyrep
thingiverse
free

ToyREP 3mm Fillament Extruder by TouchWARE
...llament. this is the only part that has to be printed to upgrade it.
we use this extruder on our toyrep printer with lcd display.
thingiverse
free

ToyREP leg 50mm by sobo84
...toyrep leg 50mm by sobo84
thingiverse
xyz
thingiverse
free

ToyREP Legs for LCD Display upgrade by TouchWARE
...ing toyrep to lcd 128x64 display (full graphic smart controller 12864).
we use these legs on our toyrep printer with lcd display.
thingiverse
free

ToyREP Z-probe by mwelchuk
...rews in the upper two mount points, but required longer ones for the lower two as i also have the toyrep hotend cooler installed.
thingiverse
free
ToyREP Power Supply Cover by thorgal
... be installed at the very beginning of toyrep assembly. for latter upgrade you will have to disassemble almost the whole printer.
thingiverse
free

ToyRep Nema 17 Upgrades by zipeartnes
...unt is hard to print. you will need to experiment with ways to print it with supports.
have fun and feel free to leave comments.
thingiverse
free

toyRep nema 17 adapters for X and Y axis by marcomx
...ed parts for toyrep for the x and y axis, the z axis still use the 28byj-48
any tips will be much appreciated, but not necesary,
thingiverse
free

ToyRep LCD2004 Mount by qupen
...i to send the rest of my parts so i can test it out fully. but i think it can work.
update 18/07/2017
some edits to the right arm
thingiverse
free

ToyRep remake by Branez
...watch?v=rsjp6iy3twu
i added a bigger stepper motors for x and y axis and branyaq extruder
http://www.thingiverse.com/thing:881394
thingiverse
free

2.5 ToyRep pulley for Y axis by sobo84
...2.5 toyrep pulley for y axis by sobo84
thingiverse
just a remix to hold down belt on my y axis.
Printer
archibase_planet
free

Printer
...inter
archibase planet
printer laser printer pc equipment
printer n120614 - 3d model (*.gsm+*.3ds) for interior 3d visualization.
archibase_planet
free

Printer
...rchibase planet
laser printer office equipment computer equipment
printer - 3d model (*.gsm+*.3ds) for interior 3d visualization.
turbosquid
$100

Printer
...er
turbosquid
royalty free 3d model printer for download as on turbosquid: 3d models for games, architecture, videos. (1487819)
turbosquid
$3

Printer
...turbosquid
royalty free 3d model printer for download as max on turbosquid: 3d models for games, architecture, videos. (1670230)
turbosquid
$1

printer
...turbosquid
royalty free 3d model printer for download as max on turbosquid: 3d models for games, architecture, videos. (1595546)
turbosquid
$1

printer
...turbosquid
royalty free 3d model printer for download as max on turbosquid: 3d models for games, architecture, videos. (1595105)
turbosquid
$10

Printer
...id
royalty free 3d model printer for download as max and 3dm on turbosquid: 3d models for games, architecture, videos. (1607146)
turbosquid
$7

Printer
...royalty free 3d model printer for download as ma, ma, and obj on turbosquid: 3d models for games, architecture, videos. (1644580)
turbosquid
$30

Printer
... available on turbo squid, the world's leading provider of digital 3d models for visualization, films, television, and games.
turbosquid
$20

Printer
... available on turbo squid, the world's leading provider of digital 3d models for visualization, films, television, and games.