GrabCAD
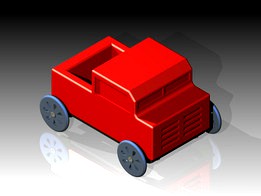
Toy Truck
by GrabCAD
Last crawled date: 1 year, 11 months ago
A simple toy truck that can be printed using an Ultimaker 3D printer. Designed to survive abuse by a common child (can withstand being thrown or stepped on by children).
Axles are printed in half and then two halves are glued together, to ensure the axle could be printed.
The axles are locked in their location by the groves on it. In the chassis and frame are matching extrusions that fit into the grooves to allow the axles to turn.
The wheels are connected to the axles with self tapping screws. The screws pass through the holes in the centers of the wheels, then are tapped into the hole in the center of the axles' faces. The wheels are designed for the screws to be countersunk, to prevent their heads from sticking out and potentially harming someone unprepared.
In addition, on each wheel (on the back side) and on each axle face, is a "connection pattern": a bulge on one side of the screw's hole and a fitting hole on the other. This pattern fits into itself, so that the pattern on each wheel fits into the pattern on the axle. That way even if the screw is a bit loose the wheel and axle will spin together.
The frame is connected to the chassis via the same kind of self tapping screws, from the bottom.
All screws are M2.5x12 self tapping screws.
Specifications:
Size: 106 mm X 81 mm X 65mm
Weight: 0.718lbs (326gr)
Construction:
1. print all parts: 4 wheels, 4 axle halfs, 1 chassis (black), 1 frame (red).
2. glue two axle halves together along the flat edge. The alignment of the "connection patterns" on the sides is not important. Make sure the axle halves are concentric. Do the same with the other pair of axle halves.
3. take a wheel and an axle, fit the "connection pattern" on the wheel into the one on the axle. Pass a screw through the middle of the wheel then tap it into the axle. do the same with the other wheels until you have two axles with two wheels on each.
4. put the red frame on a table upside down and place the axles on the fitting grooves in the frame, make sure the grooves on the axles fit the extrusions inside the frame's axle grooves.
5. place the black chassis on top of the frame, so that it's axle grooves cover the axles and the holes on the corners fit the holes on the frame. Place screws through the holes in the chassis and tap them into the frame.
The truck is ready! Should not take longer than 10 minutes to assemble.
Similar models
grabcad
free

Truss frame for Feather and SOIC breakout boards
...crews.
on the side there is room and mounting holes for 0.1" perf board (~0.8" x 2.6") (m2.5 self tapping screws)
thingiverse
free

2020 Aluminum Extrusion Frame Corner by adamjvr
...new ones at this new thing: https://www.thingiverse.com/thing:4117326 come check them out and print them, tell me what you think!
thingiverse
free

Sack truck wheel
...ess steel.
the tyre is held between the wheel-halves.
each wheel needs two ball bearings, 18mm o/d 6mm i/d which are a press fit.
thingiverse
free

Pickup Truck Model Toy by shakela140
...ar will roll once the wheels and axles are assembled and sanded down to fit together. print 4 wheels and two axles and one frame!
thingiverse
free

Magnifying glass holder by peaceotter
...e to inspect small objects.
for the magnifying glass, i used an old hitachi projector lens which has a convex on one side only.
thingiverse
free

Losi Mini T 2.0 Bead Lock Wheel by h2oandy
...f tapping screws
included a disc version so you could use tinker cad or some other program to cut to make your own spoke pattern.
thingiverse
free

Toy Truck by gnellany
...ake drawings with the wheel patterns.
it was designed around a lego truck and the axle is designed to be able to fit lego wheels.
thingiverse
free

Golden Gun easier print
...holes will fit a 9mm long piece of 1.75mm filament each, which will hold the two halves in position while you glue them together.
thingiverse
free

JP Monster Truck by chsdesign
...o the chassis. the slots in the chassis allow for the axle to articulate. i created this body to allow for a minifigure to fit.
thingiverse
free

Gripping gears
... and will segerman. thanks to icerm (https://icerm.brown.edu) for their hospitality during some of my development of this design.
Truck
3d_export
$8
truck
...truck
3dexport
truck
archibase_planet
free

Truck
...truck
archibase planet
truck truck crane car
truck toyota n071013 - 3d model (*.gsm+*.3ds) for exterior 3d visualization.
archibase_planet
free

Truck
...truck
archibase planet
truck lorry car
truck - 3d model (*.gsm+*.3ds) for exterior 3d visualization.
archibase_planet
free

Truck
...truck
archibase planet
truck lorry car
truck n260213 - 3d model (*.gsm+*.3ds) for exterior 3d visualization.
3d_export
$5

truck
...truck
3dexport
3d model of a truck, made for optimus prime!
3d_ocean
$19
Truck
...truck
3docean
four-wheel max truck
precision four-wheel drive truck with mud mask effect, the door can be opened
archibase_planet
free
Truck
...truck
archibase planet
truck car broken car lorry
truck broken - 3d model (*.gsm+*.3ds) for exterior 3d visualization.
archibase_planet
free
Truck
...truck
archibase planet
truck lorry autotruck
truck kenworth t600 n280113 - 3d model (*.gsm+*.3ds) for exterior 3d visualization.
archibase_planet
free
Truck
...
archibase planet
truck freightliner lorry car
truck freightliner n200314 - 3d model (*.gsm+*.3ds) for exterior 3d visualization.
archibase_planet
free
Truck
...truck
archibase planet
truck lorry autotruck
truck 4 eu n160614 - 3d model (*.gsm+*.3ds) for exterior 3d visualization.
Toy
3d_export
$5

toys
...toys
3dexport
toys
archibase_planet
free

Toy
...toy
archibase planet
giraffe toy toy giraffe
toy giraffe n041010 - 3d model (*.gsm+*.3ds) for interior 3d visualization.
archibase_planet
free

Toy
...toy
archibase planet
elephant toy toy plaything
toy elephant n131010 - 3d model (*.gsm+*.3ds) for interior 3d visualization.
archibase_planet
free

Toy
...toy
archibase planet
toy deer
toy n061011 - 3d model (*.3ds) for interior 3d visualization.
archibase_planet
free

Toy
...toy
archibase planet
nutcracker toy
toy n070111 - 3d model (*.3ds) for interior 3d visualization.
archibase_planet
free

Toy
...toy
archibase planet
toy nutcracker
toy n190811 - 3d model (*.3ds) for interior 3d visualization.
archibase_planet
free

Toy
...toy
archibase planet
toy snake serpent
toy n181112 - 3d model (*.3ds) for interior 3d visualization.
archibase_planet
free

Toy
...toy
archibase planet
toy elephant
toy elephant n040112 - 3d model (*.3ds) for interior 3d visualization.
archibase_planet
free

Toy
...toy
archibase planet
toy hare
toy a hare n311210 - 3d model (*.3ds) for interior 3d visualization.
archibase_planet
free

Toy
...toy
archibase planet
toy rabbit
toy s n150412 - 3d model (*.3ds) for interior 3d visualization.