Thingiverse
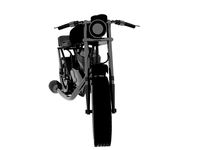
Tornado CR-10 Frame Brace Dual Z
by Thingiverse
Last crawled date: 4 years, 2 months ago
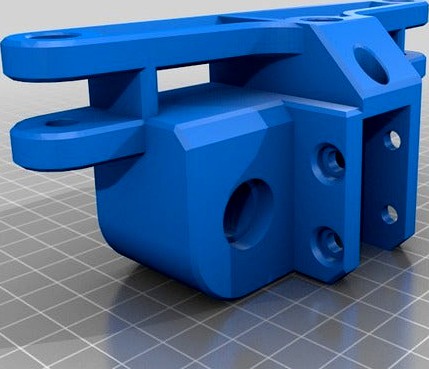
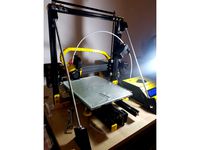
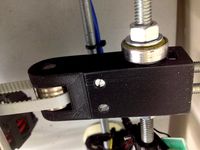
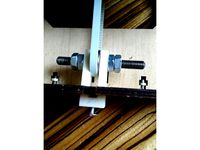
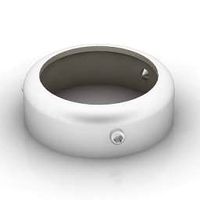
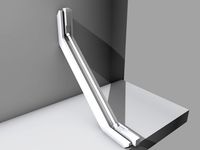
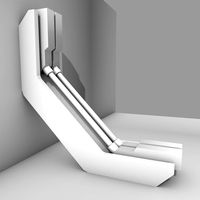
This is a full frame brace, & dual Z mod for Tevo Tornado, CR-10, and other variants. A few extra parts are needed : 2- leadscrew/shaft collar clamps, 2- 8mmx10mmx1mm washers for between the bearings and pulleys, 1- Smooth idler bearing for the belt tensioner(I used openbuilds), 8- M8 nuts & 4- 600mm M8 threaded rods(trim to fit, 5/16" also works fine), various M3, M4, & M5 screws/nuts & t-nuts, 5- 625-2RS bearings, 2- 600mm T8 2mm pitch 8mm lead leadscrews(trim to fit) I'm probably forgetting something else :)
This setup is a mashup of a few different mods edited to suit my needs. This is a VERY solid setup. a little tip : Take your time to line up the leadscrews and motor mount,and the Z axis wheels. These must be in PERFECT alignment & tension to stop Z banding/ringing. Also be sure to use the proper aluminum wheel spacers for the Gantry plates to keep proper alignment. This was based off a Creality printer first, so uses 8mm spacers(Original Tornado uses 7mm).
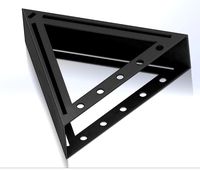
The "Frame_support" & "Frame_support_short" files are to stop the bottom frame from flexing between to rubber feet. The "short" file allows a 3mm thick piece of silicone sheet or 3mm printed TPU gasket to be installed between your table and the frame_support. This will help to stop external vibrations being transferred to the printer.
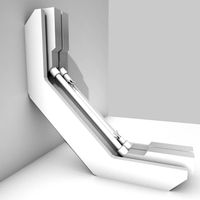
The "tie_rod" files have a bigger hole and smaller hole. The small hole version allows the threaded rods to thread into the tie rod. The big hole version allows the threaded rod to "slide" inside the tie rod, allowing tension adjustement of the frame brace. Use 1 of each type for each threaded rod. SuperGlue or Epoxy the M8 nuts into the BallNutM8 pieces.
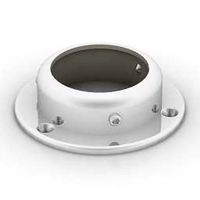
I use adjustable Z endstop for easy nozzle changes and nozzle height adjustments, so I included those files also. Epoxy the X_End_Stop_Nut into the X_End_Stop_Support. I'm not sure why the original designer left these pieces seperate, but Epoxy does the trick :)
Only 2 of these parts need to be printed with supports, Z_endstop_support_V2, and bearing_mount_625x2. Just be sure to put the proper face against the bed(sorry I'm too lazy to reorient the models :P)
This setup is a mashup of a few different mods edited to suit my needs. This is a VERY solid setup. a little tip : Take your time to line up the leadscrews and motor mount,and the Z axis wheels. These must be in PERFECT alignment & tension to stop Z banding/ringing. Also be sure to use the proper aluminum wheel spacers for the Gantry plates to keep proper alignment. This was based off a Creality printer first, so uses 8mm spacers(Original Tornado uses 7mm).
The "Frame_support" & "Frame_support_short" files are to stop the bottom frame from flexing between to rubber feet. The "short" file allows a 3mm thick piece of silicone sheet or 3mm printed TPU gasket to be installed between your table and the frame_support. This will help to stop external vibrations being transferred to the printer.
The "tie_rod" files have a bigger hole and smaller hole. The small hole version allows the threaded rods to thread into the tie rod. The big hole version allows the threaded rod to "slide" inside the tie rod, allowing tension adjustement of the frame brace. Use 1 of each type for each threaded rod. SuperGlue or Epoxy the M8 nuts into the BallNutM8 pieces.
I use adjustable Z endstop for easy nozzle changes and nozzle height adjustments, so I included those files also. Epoxy the X_End_Stop_Nut into the X_End_Stop_Support. I'm not sure why the original designer left these pieces seperate, but Epoxy does the trick :)
Only 2 of these parts need to be printed with supports, Z_endstop_support_V2, and bearing_mount_625x2. Just be sure to put the proper face against the bed(sorry I'm too lazy to reorient the models :P)
Similar models
thingiverse
free

Anet A8 Top Frame Brace by FredGenius
...nd nuts if you can't get hold of m8 in your area.
this goes well with my z sync mod:https://www.thingiverse.com/thing:2350350
thingiverse
free

Acrylic folgertech i3 clone diagonal front rod brace for rigidity by JamesCarpino
... needed are:
17.25" or 438-440mm.
you only need 3 nuts per side if using 5/16" rod because parts have internal threads.
thingiverse
free
Tarantula Z-Brace for 8mm threaded rod by Toxothrix
...ner braces. lower piece is unchanged.
works with 8mm or 5/16" threaded rod. 43cm per side. i've used 8 standard m8 nuts.
thingiverse
free

Anet A8 Z Axis CHUNK Reinforcement Top Mount & Z Motor Mount by TheWalkletts
...e job once the parts are printed.
top mounts take 1 x 608zz bearing each
join the two top mounts using m8 threaded rod & nuts
thingiverse
free
Belt Tensioner - Idle Pulley for Prusa Mendel I2 by Chris918
... old 608 bearing idler on the frame's threaded rod. it is acting as a washer on one side between the nut and the tensioner ;)
thingiverse
free

Tevo Tornado Lateral Frame Support by Markram94
...8 rod will be on the sides of the tornado so the z rod will not touched.
you need:
2 m8 rod
8 m8 nuts
8 m4x20 screws
8 t nuts m4
thingiverse
free

Z Stabilizer for Tornado/CR-10/... (608ZZ bearing) by cbaoth
...east on the tornado, these can't be used as bottom parts, since there are already screws in place holding the frame together.
thingiverse
free

TEVO Tornado and CR-10 belt driven dual Z mod with braces by PeroE30
...leys against top bearings) by gantry weight. the layers precision should be visibly improved.
if you have any questions just ask!
thingiverse
free
Graber I3 Y-Belt Tensioner by keinervonuns
...imple y-belt tensioner for graber i3.
parts list
608 skate bearing
m8 threaded rod or screw + nuts
m5 screw to adjust the tension
thingiverse
free

608 bearing to m4 threaded rod adapter by Antsurkov
...i use it with this z rod constraint for prevent z wobbing. http://www.thingiverse.com/thing:9864/
inner hole 4mm, outer size 8 mm
Tornado
3ddd
$1

диван Tornado
...диван tornado
3ddd
tornado
диван tornado
turbosquid
$20
Tornado
... available on turbo squid, the world's leading provider of digital 3d models for visualization, films, television, and games.
turbosquid
free

tornado
... available on turbo squid, the world's leading provider of digital 3d models for visualization, films, television, and games.
3d_export
$75
Tornado 3D Model
...tornado 3d model
3dexport
tornado low polygon
tornado 3d model mikemu 64260 3dexport
turbosquid
$20
Tornado Small
...yalty free 3d model tornado small for download as max and fbx on turbosquid: 3d models for games, architecture, videos. (1383489)
turbosquid
$100
Tornado GR4
... available on turbo squid, the world's leading provider of digital 3d models for visualization, films, television, and games.
turbosquid
$1

Tornado FumeFX
... available on turbo squid, the world's leading provider of digital 3d models for visualization, films, television, and games.
turbosquid
$5
Tornado
...
turbosquid
royalty free 3d model aletta for download as max on turbosquid: 3d models for games, architecture, videos. (1152155)
3d_export
$199
Tornado F3 3D Model
...tornado f3 3d model
3dexport
tornado f3 fighter aircraft airplane plane military
tornado f3 3d model drguz 67 3dexport
3d_ocean
$15

Panavia Tornado GR4
...t panavia plane soar tornado transport
low polygon and nicely detailed panavia tornado gr4 . check out my profile for more items!
Brace
archive3d
free
Bracing 3D Model
...
holder bracing strengthening
bracing 4 - 3d model (*.gsm+*.3ds) for interior 3d visualization.
archive3d
free
Bracing 3D Model
...
bracing strengthening holder
bracing 2 - 3d model (*.gsm+*.3ds) for interior 3d visualization.
turbosquid
$5

brace PARIS
...osquid
royalty free 3d model brace paris for download as max on turbosquid: 3d models for games, architecture, videos. (1284415)
archive3d
free
Bracing 3D Model
...older fastening strengthening
bracing 1 - 3d model (*.gsm+*.3ds) for interior 3d visualization.
archive3d
free
Bracing 3D Model
...older fastening strengthening
bracing 3 - 3d model (*.gsm+*.3ds) for interior 3d visualization.
turbosquid
$20
Corner Brace Bracket
...oyalty free 3d model corner brace bracket for download as stl on turbosquid: 3d models for games, architecture, videos. (1322777)
turbosquid
$10

Craftsman Handtools - Brace
... available on turbo squid, the world's leading provider of digital 3d models for visualization, films, television, and games.
turbosquid
$2
Degree Brace 4
...el degree brace 4 for download as 3ds, max, obj, c4d, and fbx on turbosquid: 3d models for games, architecture, videos. (1205705)
turbosquid
$1
Degree Brace 3
...el degree brace 3 for download as 3ds, max, obj, c4d, and fbx on turbosquid: 3d models for games, architecture, videos. (1205719)
turbosquid
$1
Degree Brace 2
...el degree brace 2 for download as 3ds, max, obj, c4d, and fbx on turbosquid: 3d models for games, architecture, videos. (1205714)
Cr
turbosquid
$15
Creazioni CR-673 CR-4461
... available on turbo squid, the world's leading provider of digital 3d models for visualization, films, television, and games.
3ddd
$1

Ravak CR 055.00
...ravak cr 055.00
3ddd
ravak , смеситель
ravak cr 055.00
turbosquid
$100

CR-002
...
turbosquid
royalty free 3d model cr-002 for download as stl on turbosquid: 3d models for games, architecture, videos. (1686037)
3ddd
$1

Ravak CR 012.00
...ravak cr 012.00
3ddd
ravak , смеситель
смеситель ravak cr 012.00
3ddd
free
Консоль CR Currin
...ь , cr currin
консоль cr currin
ширина - 1675 мм
глубина - 510 мм
общая высота - 810 мм
3ddd
$1
CR 39444
...0
диаметр: 100
тип патрона: gu5,3 gu10
количество ламп: 1
мощность: 35w
цвет: золото хрусталь
материал: металл хрусталь exclusive
3d_ocean
$89

Honda CR-Z
...www.youtube.com/watch?v=rrbb4d4lypk ` he honda cr-z‘s exterior styling is formed around a “one-motion wedge” concept with a lo...
3ddd
$1

Creazoni / STEFY CR-8901
...creazoni / stefy cr-8901
3ddd
creazoni
creazioni stefy cr-8901
turbosquid
$60

Chain-CR-001
...squid
royalty free 3d model chain-cr-001 for download as stl on turbosquid: 3d models for games, architecture, videos. (1680536)
turbosquid
$99

Honda CR-Z
... available on turbo squid, the world's leading provider of digital 3d models for visualization, films, television, and games.
Dual
turbosquid
free

Dual Pistols
...ls
turbosquid
free 3d model dual pistols for download as fbx on turbosquid: 3d models for games, architecture, videos. (1320360)
turbosquid
$2

Dual Axe
...urbosquid
royalty free 3d model dual axe for download as fbx on turbosquid: 3d models for games, architecture, videos. (1332372)
turbosquid
$10

Dual Lesaths
... available on turbo squid, the world's leading provider of digital 3d models for visualization, films, television, and games.
3ddd
$1

плитка Dual Bianco (Испания)
...й плитки venis dual (испания). технические качества: устойчивость к стирания, отличная геометрия, отсутствие проблем при укладке.
turbosquid
$35

Dual Mesh Fonts
...ree 3d model dual mesh fonts for download as ma, obj, and fbx on turbosquid: 3d models for games, architecture, videos. (1352989)
turbosquid
$29

Dual Flask with Bungs
...del dual flask with bungs for download as obj, fbx, and blend on turbosquid: 3d models for games, architecture, videos. (1210512)
turbosquid
$19

Dual Socket Plug
...3d model dual socket plug for download as obj, fbx, and blend on turbosquid: 3d models for games, architecture, videos. (1303912)
turbosquid
$13

Dual Adjustable Pulley
... available on turbo squid, the world's leading provider of digital 3d models for visualization, films, television, and games.
turbosquid
$10

Amoi N809 Dual
... available on turbo squid, the world's leading provider of digital 3d models for visualization, films, television, and games.
turbosquid
$5

Dual Turret Tank
... available on turbo squid, the world's leading provider of digital 3d models for visualization, films, television, and games.
Z
3d_export
$5

nissan z
...nissan z
3dexport
nissan z
3ddd
$1

Vase Z
...vase z
3ddd
vase z
3ddd
$1

полотенцесушить Z
...полотенцесушить z
3ddd
полотенцесушитель
полотенцесушить z
design_connected
free

Z-Chair
...z-chair
designconnected
free 3d model of z-chair designed by karman, aleksei.
design_connected
$11

Z Lamp
...z lamp
designconnected
phillips z lamp computer generated 3d model. designed by kalff, louis.
3d_export
$5

Dragon balls z
...dragon balls z
3dexport
dragon ball z
turbosquid
$20

Fighter Z
...
turbosquid
royalty free 3d model fighter z for download as on turbosquid: 3d models for games, architecture, videos. (1292563)
turbosquid
$9

Pen Z
...pen z
turbosquid
free 3d model pen z for download as obj on turbosquid: 3d models for games, architecture, videos. (1686775)
turbosquid
free

z chair
...z chair
turbosquid
free 3d model z chair for download as max on turbosquid: 3d models for games, architecture, videos. (1410230)
turbosquid
$5

Letter Z
...urbosquid
royalty free 3d model letter z for download as max on turbosquid: 3d models for games, architecture, videos. (1408540)
Frame
archibase_planet
free

Frame
...frame
archibase planet
frame photo frame
frame n190813 - 3d model (*.gsm+*.3ds) for interior 3d visualization.
archibase_planet
free

Frame
...frame
archibase planet
frame photo frame
frame n071113 - 3d model (*.gsm+*.3ds) for interior 3d visualization.
3ddd
$1

Frame
...frame
3ddd
frame
3ddd
free

Frame
...frame
3ddd
frame
archibase_planet
free

Frame
...frame
archibase planet
frame mirror frame ornament
frame n260113 - 3d model (*.gsm+*.3ds) for interior 3d visualization.
archibase_planet
free

Frame
...frame
archibase planet
frame photo frame
frame photo n190813 - 3d model (*.gsm+*.3ds) for interior 3d visualization.
archibase_planet
free

Frame
...frame
archibase planet
frame window window frame
frame 1 - 3d model (*.gsm+*.3ds) for interior 3d visualization.
archibase_planet
free

Frame
...frame
archibase planet
frame window frame window
frame 3 - 3d model (*.gsm+*.3ds) for interior 3d visualization.
archibase_planet
free

Frame
...frame
archibase planet
frame wall frame decoration
frame 1 - 3d model (*.gsm+*.3ds) for interior 3d visualization.
archibase_planet
free

Frame
...frame
archibase planet
frame window window frame
frame 2 - 3d model (*.gsm+*.3ds) for interior 3d visualization.
10
turbosquid
$25

10
... available on turbo squid, the world's leading provider of digital 3d models for visualization, films, television, and games.
turbosquid
$10

a-10
... available on turbo squid, the world's leading provider of digital 3d models for visualization, films, television, and games.
3ddd
$1

EX 10
...ex 10
3ddd
samsung , фотоаппарат
ex 10
3ddd
$1

Bed 10
...bed 10
3ddd
постельное белье
bed 10
evermotion
$25

Scene 10 Archinteriors vol. 10
...dering design interior
take a look at textured and shadered visualization scene ready to be rendered.. evermotion 3d models shop.
3ddd
$1

Curtains 10
...curtains 10
3ddd
curtains 10
3ds max 2011,fbx + textures
polys: 100355
3ddd
free

PLANTS 10
...plants 10
3ddd
цветок , горшок
plants 10,, with 3 different color planter boxes
turbosquid
$24

Chandelier MD 89310-10+10 Osgona
... chandelier md 89310-10+10 osgona for download as max and fbx on turbosquid: 3d models for games, architecture, videos. (1218762)
design_connected
$29

Nuvola 10
...nuvola 10
designconnected
gervasoni nuvola 10 computer generated 3d model. designed by navone, paola.
design_connected
$22

Kilt 10
...kilt 10
designconnected
zanotta kilt 10 computer generated 3d model. designed by progetti, emaf.