Thingiverse
TMNT Change Is Constant & Cityfall Box Insert
by Thingiverse
Last crawled date: 5 years, 7 months ago
I recently received my pre-orders for IDW's TMNT boardgames, Change Is Constant and Cityfall. I'm loving the games so far, but I quickly realized that I wanted a better way to store the various cardboard components, cards, and dice. So, I built one, and now I'm sharing it with you =) I tried to build this to keep the game as "ready to play" as possible while still fitting in the box, really focusing on keeping the various cards sorted and the heroes' stuff organized. This has been designed to accommodate sleeved cards; I specifically use Fantasy Flight's Standard Card Game sleeves. That said, I only play the game coop, so I didn't bother sleeving the PvP cards, but they should still fit with sleeves.
This took me something like 50 hours of printing time and 150 meters of filament (with 9 full printer beds of stuff!), so it's not exactly a small project... but I'm pretty happy with how it came together! This insert is designed to replace the bottom black tray from the boxes (the one with the slots for the decks of cards) and leaves just enough room for the original miniature storage tray on top of it.
If you want to use this, you're going to need to print one each of the following parts:
Dice-Tokens.stl
Hit-Dice.stl
Overlay-Storage.stl
Round-Tokens.stl
Short-Misc.stl
Tray-Lid1.stl
Tray-Lid2.stl
Tray-Lid3.stl
Tray-Lid4.stl
You'll want to print 2 copies of this:
Card-Tray.stl
You'll need 6 copies of this:
Character-Tray.stl
The Dice-Tray files are to replace the cardboard character trays that the Kickstarter edition came with. Those ones are nice and all, but they're fairly large and I wanted to put everything that you need for the characters in each Character-Tray, so I made these to use instead (also, not everyone is going to get the KS edition)! The Dice-Tray.stl is built to hook onto the side of the character box, giving you 5 slots to put your dice + dice tokens in, to track which have been used or not. I printed 5 of them for myself and just put one in each character box, but you could only print 4 of them and just shuffle them around based on which characters are being played. This is designed to be printed standing up (in the orientation that I uploaded it). It takes advantage of your printer's ability to bridge by a cm or two in order to print without supports.
Dice-Tray-Standalone.stl is just the little slider bit from the dice tray, in case someone wants to print those out to use without the whole character tray solution.
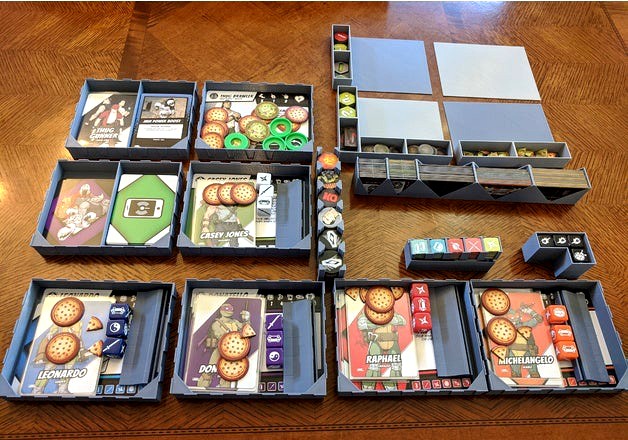
So, once you've got them all printed, how do you fit them in the box? You can see how I filled each piece in the All-Components.jpg photo, but here's a description of my process:
1) Prepare the character trays. Put a hero character sheet in the bottom of one of the Character-Tray.stl objects. Stack that hero's action cards and initiative card on top of their character card. Put that character's dice in, and the Dice-Tray.stl object. If you're using the pizza slice HP tokens, put the correct amount in, otherwise put in a pizza dial. You can put the Focus tokens in as well... but I kindof like the full round-token storage bit, so I've just left them in there for now. Repeat this process for the other 4 heroes.
2) Prepare the Villains tray. This is just another Character-Tray.stl; put all of the villain character sheets in the bottom of it, then put any remaining round pizza health tokens in there. Also put the round base clips in here... or put one in each of your favorite 4 heroes' boxes... I don't even use them myself, so it's up to you!
3) Prepare the card trays. You've got 4 slots in the two copies of the Card-Tray.stl that you printed; divide your cards in a reasonable fashion between them to help you keep track of what goes where. I personally put all of the villain initiative cards in one stack and then just spread the villain action cards amongst the others. I put the Ally cards on the top of one of those other stacks to make them easy to find when they're needed.
4) Prepare the Overlay-Storage. This piece is built to hold all of those 1x1 and 2x1 cardboard overlay tokens. There are 3 sections for the 2x1 tokens; I sorted them into yellow border, black border, and other. There are two spaces for the 1x1 tokens; I sorted those as black border and other (although there were a few too many black borders, so they had to overflow a bit).
5) Prepare the Round-Tokens storage. There are a bunch of round tokens in this game. I made two stacks of 12 Focus tokens, two stacks of 12 KO tokens, one stack of 12 Cover tokens, and 1 stack of 12 Fire/Smoke tokens. I then stacked the ally tokens on top of one of the two KO stacks, since I'm not going to need both of those stacks too often (hopefully!).
6) Prepare the Dice-Tokens storage. These are those little 16mm squares that have the same icons as the dice, which are used to track which actions you've received from your neighbors. There are 5 distinct tokens, so sort them out and put them into the 5 columns in this piece. I went Move/Double Move, Skateboard+Defense/Defense, Sword+Defense/Shuriken+Defense, Sword/Double Sword, Shuriken/Double Shuriken... but do what makes sense for you! This piece is a little tight fitting, but the PLA should be moderately flexible since the bottom is only 1 mm thick. I recommend flexing it upwards slightly when sliding down a stack of tokens into it to get them in more easily. After that, they should be held pretty snugly but it shouldn't be difficult to get one or two tokens out at a time.
7) Put the black hit dice into the Hit-Dice tray. It's shaped weirdly so that it'll help hold the other pieces in place in the box.
8) Put whatever you want in the Short-Misc box; I didn't actually put anything in it, but it's there to hold the place in the box or to help with some other tokens.
9) Prepare the lids. There are 4 distinct lids, each with a different bit of storage on them (or no storage). That storage is there mainly to keep the game boards in place in the box, but I figured that the extra potential storage would be nice. I like to put the manhole covers in two of the cells, the ? tokens in one, the small pizza slices in two more, the spawn tokens in one, and the objective tokens in the last one. Use them however you see fit!
Ok, at this point, you've got everything all loaded up like in my photo, so it's time to start putting it in the box. You probably noticed that the Character-Trays and Card-Trays are the same size; stack them up in four stacks (so there'll be two boxes in each stack), then put a lid on top of each stack. Put these stacks in the box so that the storage on the lids makes a nice square. So, just put them in order from left to right, top to bottom (blank lid, lid with storage on the long side to the right, lid with the storage on the short side on the bottom, lid with the storage on two sides on the bottom right). I hope that made sense, but look at Box-Layer2.jpg to see how I did it if you're confused.
There should be a fairly large gap in the middle of those trays; that's where everything else goes. It fits in like a puzzle, but you can look at the photos for reference. The most confusing part is probably that the Dice-Token storage bit sits on top of the Misc-Short storage bit, in the slot on it.
With all of that stuff in place, set the large 2x2 and 2x4 tiles into the center (for Change is Constant), then set the game board tiles down in the square created by the character tray lid storage boxes (check out Box-Layer3.jpg). I like to put my rulebooks and other flat stuff on top of there, then the final step is to put the miniatures tray on top of it all.
Phew, that was a lot of work... but you're done! Now, when you want to play the game, you can just pull out the desired characters' trays and have everything that you need in order to play them right there! Also, the scenario setup will hopefully be a bit easier with the various tokens moderately sorted and contained in one place. Enjoy!
As always, the .blend file and pre-supported .obj (the one that I used to print it on my Prusa mk3 with a .25 mm nozzle) for this model are available to my patrons athttps://patreon.com/VirtuallyJason. If you appreciate my work and have a few dollars to spare each month, please consider joining!
This took me something like 50 hours of printing time and 150 meters of filament (with 9 full printer beds of stuff!), so it's not exactly a small project... but I'm pretty happy with how it came together! This insert is designed to replace the bottom black tray from the boxes (the one with the slots for the decks of cards) and leaves just enough room for the original miniature storage tray on top of it.
If you want to use this, you're going to need to print one each of the following parts:
Dice-Tokens.stl
Hit-Dice.stl
Overlay-Storage.stl
Round-Tokens.stl
Short-Misc.stl
Tray-Lid1.stl
Tray-Lid2.stl
Tray-Lid3.stl
Tray-Lid4.stl
You'll want to print 2 copies of this:
Card-Tray.stl
You'll need 6 copies of this:
Character-Tray.stl
The Dice-Tray files are to replace the cardboard character trays that the Kickstarter edition came with. Those ones are nice and all, but they're fairly large and I wanted to put everything that you need for the characters in each Character-Tray, so I made these to use instead (also, not everyone is going to get the KS edition)! The Dice-Tray.stl is built to hook onto the side of the character box, giving you 5 slots to put your dice + dice tokens in, to track which have been used or not. I printed 5 of them for myself and just put one in each character box, but you could only print 4 of them and just shuffle them around based on which characters are being played. This is designed to be printed standing up (in the orientation that I uploaded it). It takes advantage of your printer's ability to bridge by a cm or two in order to print without supports.
Dice-Tray-Standalone.stl is just the little slider bit from the dice tray, in case someone wants to print those out to use without the whole character tray solution.
So, once you've got them all printed, how do you fit them in the box? You can see how I filled each piece in the All-Components.jpg photo, but here's a description of my process:
1) Prepare the character trays. Put a hero character sheet in the bottom of one of the Character-Tray.stl objects. Stack that hero's action cards and initiative card on top of their character card. Put that character's dice in, and the Dice-Tray.stl object. If you're using the pizza slice HP tokens, put the correct amount in, otherwise put in a pizza dial. You can put the Focus tokens in as well... but I kindof like the full round-token storage bit, so I've just left them in there for now. Repeat this process for the other 4 heroes.
2) Prepare the Villains tray. This is just another Character-Tray.stl; put all of the villain character sheets in the bottom of it, then put any remaining round pizza health tokens in there. Also put the round base clips in here... or put one in each of your favorite 4 heroes' boxes... I don't even use them myself, so it's up to you!
3) Prepare the card trays. You've got 4 slots in the two copies of the Card-Tray.stl that you printed; divide your cards in a reasonable fashion between them to help you keep track of what goes where. I personally put all of the villain initiative cards in one stack and then just spread the villain action cards amongst the others. I put the Ally cards on the top of one of those other stacks to make them easy to find when they're needed.
4) Prepare the Overlay-Storage. This piece is built to hold all of those 1x1 and 2x1 cardboard overlay tokens. There are 3 sections for the 2x1 tokens; I sorted them into yellow border, black border, and other. There are two spaces for the 1x1 tokens; I sorted those as black border and other (although there were a few too many black borders, so they had to overflow a bit).
5) Prepare the Round-Tokens storage. There are a bunch of round tokens in this game. I made two stacks of 12 Focus tokens, two stacks of 12 KO tokens, one stack of 12 Cover tokens, and 1 stack of 12 Fire/Smoke tokens. I then stacked the ally tokens on top of one of the two KO stacks, since I'm not going to need both of those stacks too often (hopefully!).
6) Prepare the Dice-Tokens storage. These are those little 16mm squares that have the same icons as the dice, which are used to track which actions you've received from your neighbors. There are 5 distinct tokens, so sort them out and put them into the 5 columns in this piece. I went Move/Double Move, Skateboard+Defense/Defense, Sword+Defense/Shuriken+Defense, Sword/Double Sword, Shuriken/Double Shuriken... but do what makes sense for you! This piece is a little tight fitting, but the PLA should be moderately flexible since the bottom is only 1 mm thick. I recommend flexing it upwards slightly when sliding down a stack of tokens into it to get them in more easily. After that, they should be held pretty snugly but it shouldn't be difficult to get one or two tokens out at a time.
7) Put the black hit dice into the Hit-Dice tray. It's shaped weirdly so that it'll help hold the other pieces in place in the box.
8) Put whatever you want in the Short-Misc box; I didn't actually put anything in it, but it's there to hold the place in the box or to help with some other tokens.
9) Prepare the lids. There are 4 distinct lids, each with a different bit of storage on them (or no storage). That storage is there mainly to keep the game boards in place in the box, but I figured that the extra potential storage would be nice. I like to put the manhole covers in two of the cells, the ? tokens in one, the small pizza slices in two more, the spawn tokens in one, and the objective tokens in the last one. Use them however you see fit!
Ok, at this point, you've got everything all loaded up like in my photo, so it's time to start putting it in the box. You probably noticed that the Character-Trays and Card-Trays are the same size; stack them up in four stacks (so there'll be two boxes in each stack), then put a lid on top of each stack. Put these stacks in the box so that the storage on the lids makes a nice square. So, just put them in order from left to right, top to bottom (blank lid, lid with storage on the long side to the right, lid with the storage on the short side on the bottom, lid with the storage on two sides on the bottom right). I hope that made sense, but look at Box-Layer2.jpg to see how I did it if you're confused.
There should be a fairly large gap in the middle of those trays; that's where everything else goes. It fits in like a puzzle, but you can look at the photos for reference. The most confusing part is probably that the Dice-Token storage bit sits on top of the Misc-Short storage bit, in the slot on it.
With all of that stuff in place, set the large 2x2 and 2x4 tiles into the center (for Change is Constant), then set the game board tiles down in the square created by the character tray lid storage boxes (check out Box-Layer3.jpg). I like to put my rulebooks and other flat stuff on top of there, then the final step is to put the miniatures tray on top of it all.
Phew, that was a lot of work... but you're done! Now, when you want to play the game, you can just pull out the desired characters' trays and have everything that you need in order to play them right there! Also, the scenario setup will hopefully be a bit easier with the various tokens moderately sorted and contained in one place. Enjoy!
As always, the .blend file and pre-supported .obj (the one that I used to print it on my Prusa mk3 with a .25 mm nozzle) for this model are available to my patrons athttps://patreon.com/VirtuallyJason. If you appreciate my work and have a few dollars to spare each month, please consider joining!