Thingiverse

Thunderbird 1 by gadgetmind
by Thingiverse
Last crawled date: 3 years ago
First two requests:
1) Please print this.
2) Then take a picture and create a "Make" to show us all how well it worked.
Thanks. :-)
This design is very much inspired by Len Hickman's excellent Thunderbird 2 and 3 models, both of which I enjoyed printing and building.
https://www.thingiverse.com/thing:440767https://www.thingiverse.com/thing:406777
There was no similar multi-part model of TB1 that had the detail that I wanted, and my painting skills are such that I like everything to print in the right colour, so I created my own.
It prints in over 80 parts, but a lot of these are letters, so don't get worried!
Part
Colour
Support
Brim
Print
Notes
Body
Silver
No
No
1
Body_Clips
Black
No
No
1
Body_HText
White
No
No
1
Body_VText
White
No
No
1
Body_Thruster
Silver
No
No
1
Engine_Bottom
Silver
No
No
1
Engine_Blue
Sky Blue
No
No
1
Engine_Discs
Silver
No
No
1
Engine_IntakePlug
Black
No
No
8
Engine_Intake
Silver
No
No
1
Engine_Text
White
No
No
2
FuelDrum
Sky Blue
No
No
1
FuelDrum_Text
White
No
No
1
Nose
Red
No
No
1
Lots of cooling near tip.
Winglet_Trim
Sky Blue
No
Yes?
4
Cooling and print a few at once.
Winglet
Silver
No
Yes?
4(*)
May get away without brim.
Winglet_Whole
Silver
No
Yes?
4!
Use if winglet+trim too fiddly.
Winglet_Inc_Gear
Silver
No
Yes?
1(*)
For rear landing leg.
Wings
Silver
Yes!
Yes
1(*)
Sky Blue for 1st 5.2mm.
Wings_Inc_Gear
Silver
Yes!
Yes
1(*)
Sky Blue for 1st 5.2mm.
Covers
Silver
No
No
1(*)
Covers_Inc_Gear
Silver
No
No
1(*)
Gear_Mounts
Silver
No
No?
2(*)
Small but I did without brim
Skid
Silver
No
No
3(*)
Stand_Cloud
White?
No
No
1
Stand_Base
Black
No
No
1
Stand_Text
White
No
No
1
See next section regards (*) items.
Gear and Stand
You have a few options regards whether to print landing gear and use stand.
1) No gear, no stand
Print 4x "Winglet" all without "Inc Gear" and ditto 1x"Wings".
Print "Body_Thruster" to fit into stand hole.
The wings can be moved between launch and horizontal flight modes, and you need to use your throat, lips and tongue to make the right noises as you switch.
2) Might want gear later
Print 3x"Winglet" and 1x"Winglet_Inc_Gear". The one with the gear hole goes at the bottom!
Print 1x"Wings_Inc_Gear"
Print 1x"Covers" as these can be fixed into the cutouts under the wings with double-sided tape.
Decide for yourself regards using stand or printing "Body_Thruster".
3) Want gear and stand!
Print winglets and wings as per option (2) above.
Print 1x"Covers_Inc_Gear", 2x "Gear_Mounts", and 3x"Skids"
Assemble gear using 2mm bicycle spoke as shown in picture. Long section of spoke is 58mm and short 48mm, but you may need to tweak if it doesn't look right. Threaded end of spoke goes into short mount. This mount and the covers are then fixed to the cut out in the wing as shown (note that I've added more contact area in the parts I uploaded). You'll also need a very short length of spoke to attach the rear foot to the winglet. Adding more infill to engine and fueldrum also helps balance as it does tend to be nose heavy, and this is made worse if the rear foot extends too far from the body.
Pretty much all printed parts will need chasing out with a 2mm drill to let the spokes push/screw in, and the gear is fiddly and delicate so use the stand!
Feedback
All feedback welcome, as are better designs for the exhaust cloud. Or maybe someone with great painting skills can make it look more like hot rocket exhaust and less like shaving foam!
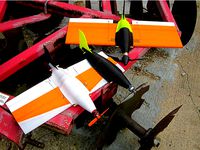
BTW, the "group shot" shows an unfinished small scale prototype, the 1st full size build that prompted a fair few changes to seams and text, a test nose to check these changes (printed in Thunderbird 2 green, yikes!), and my final one with landing gear. I slightly rushed my final one, and the "no gear" one actually looks better finish wise. Ah well.
1) Please print this.
2) Then take a picture and create a "Make" to show us all how well it worked.
Thanks. :-)
This design is very much inspired by Len Hickman's excellent Thunderbird 2 and 3 models, both of which I enjoyed printing and building.
https://www.thingiverse.com/thing:440767https://www.thingiverse.com/thing:406777
There was no similar multi-part model of TB1 that had the detail that I wanted, and my painting skills are such that I like everything to print in the right colour, so I created my own.
It prints in over 80 parts, but a lot of these are letters, so don't get worried!
Part
Colour
Support
Brim
Notes
Body
Silver
No
No
1
Body_Clips
Black
No
No
1
Body_HText
White
No
No
1
Body_VText
White
No
No
1
Body_Thruster
Silver
No
No
1
Engine_Bottom
Silver
No
No
1
Engine_Blue
Sky Blue
No
No
1
Engine_Discs
Silver
No
No
1
Engine_IntakePlug
Black
No
No
8
Engine_Intake
Silver
No
No
1
Engine_Text
White
No
No
2
FuelDrum
Sky Blue
No
No
1
FuelDrum_Text
White
No
No
1
Nose
Red
No
No
1
Lots of cooling near tip.
Winglet_Trim
Sky Blue
No
Yes?
4
Cooling and print a few at once.
Winglet
Silver
No
Yes?
4(*)
May get away without brim.
Winglet_Whole
Silver
No
Yes?
4!
Use if winglet+trim too fiddly.
Winglet_Inc_Gear
Silver
No
Yes?
1(*)
For rear landing leg.
Wings
Silver
Yes!
Yes
1(*)
Sky Blue for 1st 5.2mm.
Wings_Inc_Gear
Silver
Yes!
Yes
1(*)
Sky Blue for 1st 5.2mm.
Covers
Silver
No
No
1(*)
Covers_Inc_Gear
Silver
No
No
1(*)
Gear_Mounts
Silver
No
No?
2(*)
Small but I did without brim
Skid
Silver
No
No
3(*)
Stand_Cloud
White?
No
No
1
Stand_Base
Black
No
No
1
Stand_Text
White
No
No
1
See next section regards (*) items.
Gear and Stand
You have a few options regards whether to print landing gear and use stand.
1) No gear, no stand
Print 4x "Winglet" all without "Inc Gear" and ditto 1x"Wings".
Print "Body_Thruster" to fit into stand hole.
The wings can be moved between launch and horizontal flight modes, and you need to use your throat, lips and tongue to make the right noises as you switch.
2) Might want gear later
Print 3x"Winglet" and 1x"Winglet_Inc_Gear". The one with the gear hole goes at the bottom!
Print 1x"Wings_Inc_Gear"
Print 1x"Covers" as these can be fixed into the cutouts under the wings with double-sided tape.
Decide for yourself regards using stand or printing "Body_Thruster".
3) Want gear and stand!
Print winglets and wings as per option (2) above.
Print 1x"Covers_Inc_Gear", 2x "Gear_Mounts", and 3x"Skids"
Assemble gear using 2mm bicycle spoke as shown in picture. Long section of spoke is 58mm and short 48mm, but you may need to tweak if it doesn't look right. Threaded end of spoke goes into short mount. This mount and the covers are then fixed to the cut out in the wing as shown (note that I've added more contact area in the parts I uploaded). You'll also need a very short length of spoke to attach the rear foot to the winglet. Adding more infill to engine and fueldrum also helps balance as it does tend to be nose heavy, and this is made worse if the rear foot extends too far from the body.
Pretty much all printed parts will need chasing out with a 2mm drill to let the spokes push/screw in, and the gear is fiddly and delicate so use the stand!
Feedback
All feedback welcome, as are better designs for the exhaust cloud. Or maybe someone with great painting skills can make it look more like hot rocket exhaust and less like shaving foam!
BTW, the "group shot" shows an unfinished small scale prototype, the 1st full size build that prompted a fair few changes to seams and text, a test nose to check these changes (printed in Thunderbird 2 green, yikes!), and my final one with landing gear. I slightly rushed my final one, and the "no gear" one actually looks better finish wise. Ah well.
Similar models
thingiverse
free

Destiny Ghost Stand for Iron Song Wings by kehlebracht
...9;ll mention it) glue the front and back wings together and it will hold the center together better than the using just the pegs.
thingiverse
free

2020 Formula 1 Model Kit by McGoo_Models
... rear wing flap
4x wheel
assembly instructions:https://drive.google.com/file/d/1hwdqfxhhksn8s85orh41wuqijh57iqav/view?usp=sharing
thingiverse
free

Boeing 787-8, 1:400 and 1:500 scale by Zippitybamba
...lane touches the build place only at the nose! i also had to sink the model 0.2mm into the bed to make a brim appear at the nose.
thingiverse
free

Voronoi Night Light by SpitinPrints
...ill, print upside down
no supports
yes brim
.1 to .16 layer height
bottom: 20% infill
no supports
yes brim
.1 to .16 layer height
thingiverse
free

Wing Wing Z-84 Landing Gear by Opteryx
...lue in place with ca and accelerator
notes: nose of the airplane should sit high. positive angle of attack is needed for takeoff.
cults
$5

Lego - Plane - Airplane - With fastener - Duplo
...eel: 2x
little reminder:
for lego of standard size the scale is to be set at 50% (so the parameters are divisible by 2)
grabcad
free

Thunderbird 1
...enders made in solidworks 2014
future plans:
- wing improvement
- swept wings
- retractable landing gear
next: project behemoth
thingiverse
free

Boeing 747-8i by Simulatedbog545
...very much appreciate you sharing it, or if you feel very inclined, you can throw some money at me with the tip button. thank you!
thingiverse
free
3 hybrid planks, RC airplanes. by _Dave
....
with the small motor and smallish battery the plane is under 250 grams with a 50g motor and 2500mah battery it is 380 grams.
thingiverse
free
1/4 Wing Nut Drill Bit by JaronLindow
...1/4 wing nut drill bit by jaronlindow
thingiverse
drill bit for wing nut on long 1/4" bolt.
printed with brim.
Gadgetmind
thingiverse
free

Brompton Mount With Logo by gadgetmind
...mpton mount with logo by gadgetmind
thingiverse
two great designs, one gratuitous melding hack by me, apologies to both authors!
thingiverse
free

Base for Glove dryer with 80mm fan by gadgetmind
...ng, whatever) by gadgetmind with a modification so that it can be printed in smaller beds like that of my flashforge creator pro.
thingiverse
free

Makita RT0700 collet drawer by gadgetmind
...y gadgetmind
thingiverse
very simple remix just rejigging the code so i could read it and adapting the slots for makita collets.
thingiverse
free

Red intakes for Thunderbird 2 by gadgetmind
...rassed to call this a remix! i wanted the distinctive red flash on the intake so designed an additional part that glues in place.
thingiverse
free

Threaded star knob by gadgetmind
...e of the nut catch.
this is designed to be used with my dog hole hold down thing here -
https://www.thingiverse.com/thing:2857409
thingiverse
free

Snail teapot by gadgetmind
...rse.com/thing:2804095
elephant - https://www.thingiverse.com/thing:2804090
bear stein - https://www.thingiverse.com/thing:2804092
thingiverse
free

DMStrong (Diymore) Arduino base by gadgetmind
...h340g and usb. other models have 32u4, just serial, etc.
source included so you can design it into other projects/cases/whatever.
thingiverse
free

Art Deco teapot by gadgetmind
...rse.com/thing:2804095
elephant - https://www.thingiverse.com/thing:2804090
bear stein - https://www.thingiverse.com/thing:2804092
thingiverse
free

Ornate (French?) teapot by gadgetmind
...rse.com/thing:2804095
elephant - https://www.thingiverse.com/thing:2804090
bear stein - https://www.thingiverse.com/thing:2804092
thingiverse
free

Circle Tangents in OpenSCAD by gadgetmind
...er to use! http://forum.openscad.org/script-to-replicate-hull-and-minkoswki-for-csg-export-import-into-freecad-tp16537p16556.html
Thunderbird
3d_export
$5

thunderbird
...thunderbird
3dexport
thunderbird formats max obj stl e obj
turbosquid
$119

thunderbird 1955
...e 3d model thunderbird 1955 for download as max, fbx, and obj on turbosquid: 3d models for games, architecture, videos. (1663838)
turbosquid
$1

Thunderbird 2
... available on turbo squid, the world's leading provider of digital 3d models for visualization, films, television, and games.
3d_export
$5

ThunderBird 3D Model
...thunderbird 3d model
3dexport
plain bomber fighter
thunderbird 3d model thunderbirdnewen55613 30942 3dexport
3d_export
$20

for thunderbird
...s.<br>car textures:png - 2k resolution other available formats: obj, 3ds, fbx, stl, max. polycount: 33436 poly / 34625 tris
3d_ocean
$89

Ford Thunderbird 1957
...e.com/watch?v=i-nbh8bvyio the 3d model was created on real car base. model is created accurately, in real units of measurement...
3ddd
$1

64-Ford-Thunderbird
...64-ford-thunderbird
3ddd
автомобиль форд
3d_ocean
$89

Ford Thunderbird 1961
...y, in real units of measurement, qualitatively and maximally close to the original. model formats: - *.max (3ds max 2008 scanl...
3d_export
$10

Ford Thunderbird 1957 3D Model
...ort
classic car ford thunderbird old class vehicle tire engine high hd
ford thunderbird 1957 3d model viperandbull 90849 3dexport
turbosquid
$2

Thunderbird 1 / Original show
...ee 3d model thunderbird 1 / original show for download as c4d on turbosquid: 3d models for games, architecture, videos. (1288671)
1
turbosquid
$69

armchairs(1)(1)
... available on turbo squid, the world's leading provider of digital 3d models for visualization, films, television, and games.
turbosquid
$15

ring 1+1
... available on turbo squid, the world's leading provider of digital 3d models for visualization, films, television, and games.
turbosquid
$10

chair(1)(1)
... available on turbo squid, the world's leading provider of digital 3d models for visualization, films, television, and games.
turbosquid
$8

Chair(1)(1)
... available on turbo squid, the world's leading provider of digital 3d models for visualization, films, television, and games.
turbosquid
$2

RING 1(1)
... available on turbo squid, the world's leading provider of digital 3d models for visualization, films, television, and games.
turbosquid
$1

house 1(1)
... available on turbo squid, the world's leading provider of digital 3d models for visualization, films, television, and games.
turbosquid
$1

Table 1(1)
... available on turbo squid, the world's leading provider of digital 3d models for visualization, films, television, and games.
turbosquid
$59

Formula 1(1)
...lty free 3d model formula 1 for download as max, fbx, and obj on turbosquid: 3d models for games, architecture, videos. (1567088)
design_connected
$11

No 1
...no 1
designconnected
sibast no 1 computer generated 3d model. designed by sibast, helge.
turbosquid
$2

desert house(1)(1)
...3d model desert house(1)(1) for download as 3ds, max, and obj on turbosquid: 3d models for games, architecture, videos. (1055095)