Thingiverse
ThinkFun BoatBuddy Expansion Set Upgrade by bawkbawk
by Thingiverse
Last crawled date: 3 years ago
UPDATE 11/4/2015
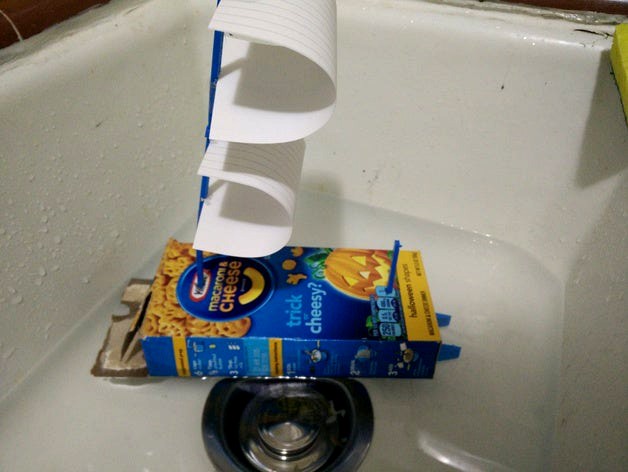
With my cheap purse i3 printer, I managed to print it without that much difficulty. I uploaded pictures of my BoatBuddy and I scaled the files except the mast 105% and the mast has been extruded up by 2mm for the paper to be held in to the mast. BoatBuddy has a hole on top of the float where it is compatible for the rod from Thinkfun to be connected. In conclusion, this is will be a work in progress since it is completed, unless you have some issues, comment it. And also, I will show you my print settings.
**MATERIALS
BoatBuddy x 1
Mast x ? (minimum 2)
Connector x ? (the number of masts printed - 1)
Tape or glue that doesn't dissolve in water.
A Macaroni and Cheese box (7" x 1 1/4" x 3 2/5")
Index cards or 3" x 5" papers x ? (the number of masts)
**
This is BoatBuddy to upgrade your ThinkFun set to conquer your land and sea. BoatBuddy comes with a float that supports a 7" x 1 1/4" x 3 2/5" box (a macaroni and cheese box) and you can use make it float on water or you can modify your car to run on wind power and better yet, why not do both?
INSTRUCTIONS
1) Locate a clear spot inside the box where the mast will come in and out from both sides. Make a hole but NOT TOO BIG just enough for the mast to go through.
2) The mast can extend to your desire but you don't want it too high or else torque (lever: the longer it is, then it will use a lot of force) will kill it and you will lose a BoatBuddy. A mast is 75mm per print and the connector (the piece that looks almost like a cube) is used to connect the mast together. There are two slits on the mast where the index card will go. Use the short edge to insert it (Hamburger style) and use tape or glue to hold it in place.
3) SWAG OUT your ThinkFun BoatBuddy/car/mobile and have fun!!!
Similar models
thingiverse
free

Float Upgrade by bawkbawk
...icking out on top of the box.
3)tape the paper to the other stick(t-shaped) and then attach it to the other stick and try it out.
thingiverse
free

Index Card Box for 3" x 5" cards by peejaybee
...or 3" x 5" cards by peejaybee
thingiverse
remix for 3"x5" index cards of din index card box by @theblackjack
thingiverse
free

3 X 5 Index Card and Pen Holder by steve220
...20
thingiverse
a quick and simple 3x5 index card and pen holder. designed to either glue to a surface or use double sided tape.
thingiverse
free

3 x 5 index card label or tag holder by twinsenw
...in school. print with .2 layer height or something similary small (not .5). screw in place. i guess you...
thingiverse
free

Index Card Box by Brennenenenenen
... file to make it fit better on most printers. also the corners tend to warp a little, but i fixed that problem with a glue stick.
thingiverse
free

Basic 3 x 5 Index Card Display / Holder by KidSwidden
...s, to-do request, warning sign, reminders, clip-art, and / or anything else you might care to put on a standard 3 x 5 index card.
thingiverse
free

Configurable index card holder by makkuro
... as "i made one"! i am curious what my customizable designs are used for and wether printing works out well.
have fun!
thingiverse
free

Business Card Holder by emilyin3d
...giverse
holds 5 standard business cards (2" x 3.5"). dimensions of card
holder: 2 1/8" x 3 5/8" x 1/4".
grabcad
free

Macaroni
...macaroni
grabcad
i made a golden macaroni
if you use this, quote me
ly x
3dwarehouse
free

Macaroni and Cheese
...se my spoon or bowl or even cheese colouring if you want. #and #cheese #cheesy #flaming #flamingos #macaroni #macaroni_and_cheese
Bawkbawk
thingiverse
free

Fraction Helper by bawkbawk
...action helper by bawkbawk
thingiverse
this will help students understand fractions and comparing how big they are to each other.
thingiverse
free

LoudMouth by bawkbawk
...ou want to annoy people with two loudmouths at once.
the loudmouth_160mm.stl is by itself.
comments is appreciated.
thanks!!!
thingiverse
free

Revolvable Cane Tip by bawkbawk
...blic and stairs.
this currently support canes with 1" tips so scale it using the fraction formula: your cane diameter size/1
thingiverse
free
Float Upgrade by bawkbawk
...icking out on top of the box.
3)tape the paper to the other stick(t-shaped) and then attach it to the other stick and try it out.
thingiverse
free

Revolvable Cane v2 by bawkbawk
...es and crutches and in order to fit it, you need to know your diameter size and divide it by one. example your cane size ÷ 1 inch
thingiverse
free

TapTap by bawkbawk
...but i know that you wanted the finger itself, so i have a separate file so you can bling your fingers with fingertap.
tap away!!!
thingiverse
free

Small Mechanic Gun by shivinteger
...[6] thing url : http://www.thingiverse.com/thing:1038877 [6] thing author : bawkbawk [6] thing licence : creative commons - attribution [7]...
thingiverse
free

Multipurpose strapped to i3 dedale by shivinteger
...[5] thing url : http://www.thingiverse.com/thing:1038877 [5] thing author : bawkbawk [5] thing licence : creative commons - attribution [6]...
Thinkfun
thingiverse
free

Boy ThinkFun Maker Studio by ThinkFun
...boy thinkfun maker studio by thinkfun
thingiverse
this connector is a custom maker studio part available only on thingiverse.
thingiverse
free

Girl ThinkFun Maker Studio by ThinkFun
...girl thinkfun maker studio by thinkfun
thingiverse
this connector is a custom maker studio part available only on thingiverse.
thingiverse
free

Box Link ThinkFun Maker Studio by ThinkFun
...x link thinkfun maker studio by thinkfun
thingiverse
this connector is a custom maker studio part available only on thingiverse.
thingiverse
free

Corner Connector ThinkFun Maker Studio by ThinkFun
...ector thinkfun maker studio by thinkfun
thingiverse
this connector is a custom maker studio part available only on thingiverse.
thingiverse
free

Spinning top thinkfun compatible by stepvor
...atible. #thinkfunchallenge
shaft and wheel are thinkfun parts.
the spinning tip is a new part that fits on the thinkfun parts.
thingiverse
free

Hook ThinkFun Maker Studio by ThinkFun
...in the maker studio winches set. stl and pdf files are available on thingiverse or you can buy the sets in your local toy store.
thingiverse
free

ThinkFun Battle Protectors by Southwest145
... / wing protector goes on the side of you thinkfun kit and the two front cone like protectors go on the front of you thinkfun kit
thingiverse
free

ThinkFun Battle Protectors by Southwest145
.../ wing protector goes on the side of you thinkfun kit and the two front cone like protectors go on the front of you thinkfun kit.
thingiverse
free

Spool ThinkFun Maker Studio by ThinkFun
... the maker studio propeller set. stl and pdf files are available on thingiverse or you can buy the sets in your local toy store.
thingiverse
free

1 mm thinkfun makerstudio washer by jbs
...1 mm thinkfun makerstudio washer by jbs
thingiverse
extra for thinkfun
Expansion
turbosquid
$42

Expansion tank
...d model expansion tank for download as 3ds, max, obj, and fbx on turbosquid: 3d models for games, architecture, videos. (1207393)
3d_export
$50

Expansion Joint 3D Model
...expansion joint 3d model
3dexport
expansion joint 3d model stargazer 4537 3dexport
turbosquid
$25
Titanic Expansion Joint
... available on turbo squid, the world's leading provider of digital 3d models for visualization, films, television, and games.
3d_export
$5
thermostatic expansion valve
...thermostatic expansion valve
3dexport
3d model stl of fusion 360.
3d_ocean
$15
Dungeon Tileset01 Expansion 1
...m/dungeon-tileset01-base/4625640 including stairs, tiles to make large rooms and a new texture that works with the tiles in th...
turbosquid
$20
Cartoon Corgi Banana Costume Expansion Pack
...artoon corgi banana costume expansion pack for download as ma on turbosquid: 3d models for games, architecture, videos. (1445388)
3ddd
$1
Hichory chair Ingold Oval Expansion
...kitchen-furniture/1911-collection/i510089-ingold-oval-expansion-top-mahogany-and-185-11-ingold-3-leg-pedestal-base.aspx
turbosquid
$299
Sci-Fi Dark Space Game Kit plus Expansion Pack
... available on turbo squid, the world's leading provider of digital 3d models for visualization, films, television, and games.
3d_export
$5

Swedish wall
...swedish wall 3dexport swedish wall, expansion wall bars, stairs for children, horizontal bar for...
3d_export
$10

External HDD 3D Model
...hard disk drive external seagate usb storage hdd portable expansion data mobile external hdd 3d model nkfrds 47740...
Upgrade
turbosquid
$15

Upgraded Glock
...e 3d model upgraded glock for download as obj, fbx, and blend on turbosquid: 3d models for games, architecture, videos. (1185950)
3ddd
$1

Calligaris / UPGRADE
...calligaris / upgrade
3ddd
calligaris
c материалом
3d_export
free

cz upgrade
...cz upgrade
3dexport
https://www.buymeacoffee.com/mestrezen3d https://linktr.ee/mestrezen3
turbosquid
$80

Custer Tank upgrade
... available on turbo squid, the world's leading provider of digital 3d models for visualization, films, television, and games.
turbosquid
$39

Domestos 1 upgrade
... available on turbo squid, the world's leading provider of digital 3d models for visualization, films, television, and games.
3d_export
$10

Upgraded tea cup
...upgraded tea cup
3dexport
a cup with an unusual design and a unique shape for a more enjoyable tea experience
3d_export
$8

dixy outlander classic style upgraded poplar wood lounge chair
...utlander classic style upgraded poplar wood lounge chair
3dexport
dixy outlander classic style upgraded poplar wood lounge chair
turbosquid
free

AK-12 + Upgrades low-poly 3D model
...ow-poly 3d model for download as fbx, blend, and unitypackage on turbosquid: 3d models for games, architecture, videos. (1501145)
evermotion
$700

Upgrade from V-ray 1.5 to 3.5 for 3ds max
...here is no need to purchase a new dongle - your current dongles will be reprogrammed to carry v-ray 3. evermotion 3d models shop.
evermotion
$300

Upgrade from V-Ray 2.0 to V-ray 3.5 for 3ds Max
... interface (gui) for editing settings on one machine and one render node for rendering on one machine. evermotion 3d models shop.
Set
archibase_planet
free

Setting
...setting
archibase planet
setting cover place setting
setting - 3d model (*.gsm+*.3ds) for interior 3d visualization.
archibase_planet
free
Setting
...setting
archibase planet
setting place setting cover
setting - 3d model (*.gsm+*.3ds) for interior 3d visualization.
archibase_planet
free

Setting
...setting
archibase planet
setting place setting cover
setting - 3d model (*.gsm+*.3ds) for interior 3d visualization.
3d_export
$8

decorative set mens set
...decorative set mens set
3dexport
decorative set men's set
archibase_planet
free
Set
...anet
set kitchen ware kitchen set kitchen tools
set kitchen tools n281114 - 3d model (*.gsm+*.3ds) for interior 3d visualization.
archibase_planet
free
Set
...set
archibase planet
beer set bar equipment
beer set - 3d model for interior 3d visualization.
archibase_planet
free
Set
...set
archibase planet
cover place setting
set - 3d model (*.gsm+*.3ds) for interior 3d visualization.
archibase_planet
free
Set
...set
archibase planet
kitchen set kitchen ware
set - 3d model (*.gsm+*.3ds) for interior 3d visualization.
archibase_planet
free
Set
...set
archibase planet
set cup glass kitchen ware
set - 3d model (*.gsm+*.3ds) for interior 3d visualization.
archibase_planet
free
Set
...set
archibase planet
flatware cover place setting
set n311210 - 3d model (*.gsm+*.3ds) for interior 3d visualization.