Thingiverse
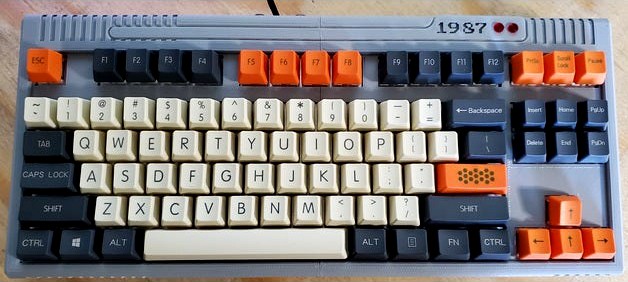
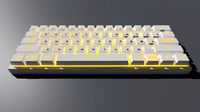
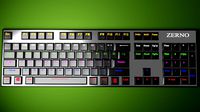
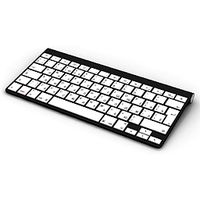
The1987 - A Modular Retro-Inspired 87 Key Mechanical Keyboard
by Thingiverse
Last crawled date: 4 years, 1 month ago
Summary:
More to come as I build this out, but this is a printable case with a cut (laser or otherwise) switch plate. Its primarily designed to be used with the Phantom PCB and Cherry Switches, but the plate allows for both Cherry MX style and Alps style switches, and both Costar and Cherry stabilizers.
This was designed so that the case itself and the Swtich Plate / PCB / Key sandwich are modular, so you can create the core of the keyboard, and swap it into another case (I have some more styles in the pipline)
Design Choices:
I wanted to create a keyboard that pulled from 80's design styles - especially consumer electronics, PCs and videogame systems. I was feeling nostalgic for the 80's grey everything that my 12 year old self drooled over in the always just slightly out of reach consumer electronics market. I really had a feeling for standing over glass counters at catalog-showroom stores looking at the latest gadgets, and i just couldn't shake it.
I knew I wanted to make a TKL (or 10) and the creative impulse had a strong hold on me so.....over the last month or so i designed and built The1987!
Why 1987? It is an 87 key keyboard that pulls design feeling and elements from things like my commodore 64, original Gameboy and some other early to mid 1980s consumer products.
More to come as I straighten out my thoughts, but let me know what you think in the comments
Parts List:
87 Cherry MX or Alps Keyswitches of your choice, along with a set of keycaps
Laser-cut plate
Phantom PCB (if you go that way)
Teensy 2.0 or similar micro-controller
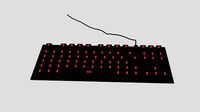
2 LEDs (i used these:3mm low intensity red ones - https://www.radioshack.com/products/radioshack-3mm-red-led-2-pack - radio shack PN: 2760026 ) but any 5mm LEDs should do
2 Resistors for your LEDs
87 IN448 diodes
8x M4x12 or 16 machine screws (I used hex insert cap screws)
2x small (M2 or M3) couarse screws fo rthe feet
2x M3x10 or similar screws for the cablecover
Assembly Instructions:(WIP)
Assemble the Plate:
1A. Phantom PCB Version Following the Deskauthority Guide: https://deskthority.net/wiki/Phantom_instruction_guide
1B. Hand-wiring is possible as well - here is another guide for that on geekhack: https://geekhack.org/index.php?topic=87689.0
Print the Case
Cleanup and debur the case parts
Test Fit the halves
Pin and Glue the halves
install the LEDs and Feet
Insert the Keyboard sammich
Connect USB to the Teensy/Controller
Attach the Top to the Bottom
Install the Cablecover
Resources:https://www.ponoko.com - for the laser cutting (one plate cut and shipped should be about 40 US dollars)
http://www.keyboard-layout-editor.com/ - helpful site for building layouts
http://builder.swillkb.com/ - the case builder site i used for the switch plates. I included all the plate files here, and also a screencap of the settings i used in case you want to replicate and/or tweak for yourself.
https://mechanicalkeyboards.com/ - the Phantom PCB and various parts
Miscellaneous Notes and Observations:
Order the plate first, it can take a long time to receive, and you will want it for fitment tests and assembly of the case. This is somewhat bespoke, in that filing, trimming and etc are all needed
More to come as I build this out, but this is a printable case with a cut (laser or otherwise) switch plate. Its primarily designed to be used with the Phantom PCB and Cherry Switches, but the plate allows for both Cherry MX style and Alps style switches, and both Costar and Cherry stabilizers.
This was designed so that the case itself and the Swtich Plate / PCB / Key sandwich are modular, so you can create the core of the keyboard, and swap it into another case (I have some more styles in the pipline)
Design Choices:
I wanted to create a keyboard that pulled from 80's design styles - especially consumer electronics, PCs and videogame systems. I was feeling nostalgic for the 80's grey everything that my 12 year old self drooled over in the always just slightly out of reach consumer electronics market. I really had a feeling for standing over glass counters at catalog-showroom stores looking at the latest gadgets, and i just couldn't shake it.
I knew I wanted to make a TKL (or 10) and the creative impulse had a strong hold on me so.....over the last month or so i designed and built The1987!
Why 1987? It is an 87 key keyboard that pulls design feeling and elements from things like my commodore 64, original Gameboy and some other early to mid 1980s consumer products.
More to come as I straighten out my thoughts, but let me know what you think in the comments
Parts List:
87 Cherry MX or Alps Keyswitches of your choice, along with a set of keycaps
Laser-cut plate
Phantom PCB (if you go that way)
Teensy 2.0 or similar micro-controller
2 LEDs (i used these:3mm low intensity red ones - https://www.radioshack.com/products/radioshack-3mm-red-led-2-pack - radio shack PN: 2760026 ) but any 5mm LEDs should do
2 Resistors for your LEDs
87 IN448 diodes
8x M4x12 or 16 machine screws (I used hex insert cap screws)
2x small (M2 or M3) couarse screws fo rthe feet
2x M3x10 or similar screws for the cablecover
Assembly Instructions:(WIP)
Assemble the Plate:
1A. Phantom PCB Version Following the Deskauthority Guide: https://deskthority.net/wiki/Phantom_instruction_guide
1B. Hand-wiring is possible as well - here is another guide for that on geekhack: https://geekhack.org/index.php?topic=87689.0
Print the Case
Cleanup and debur the case parts
Test Fit the halves
Pin and Glue the halves
install the LEDs and Feet
Insert the Keyboard sammich
Connect USB to the Teensy/Controller
Attach the Top to the Bottom
Install the Cablecover
Resources:https://www.ponoko.com - for the laser cutting (one plate cut and shipped should be about 40 US dollars)
http://www.keyboard-layout-editor.com/ - helpful site for building layouts
http://builder.swillkb.com/ - the case builder site i used for the switch plates. I included all the plate files here, and also a screencap of the settings i used in case you want to replicate and/or tweak for yourself.
https://mechanicalkeyboards.com/ - the Phantom PCB and various parts
Miscellaneous Notes and Observations:
Order the plate first, it can take a long time to receive, and you will want it for fitment tests and assembly of the case. This is somewhat bespoke, in that filing, trimming and etc are all needed
Similar models
thingiverse
free

HHKB Style 60% Keyboard Plate for Cherry MX and Alps, Costar and Cherry Stab compatible by childofthehorn
...d cherry pcb mount stabilizers. i used costar in my build, but its nice to be able to switch to cherry plate mount down the road.
thingiverse
free

ALPS to Cherry MX keyboard stem adapter by option8
...by option8
thingiverse
replace missing keys from your alps-style apple ii keyboard with commonly available cherry mx-style keys.
thingiverse
free

USB 10-key keyboard case by hplogsdon
...ing plate-mount switches with an appropriate case.
hopefully this is a good start for a plate-mount case for the external 10-key.
thingiverse
free

Macro keyboard case by jakebot
...such as the spark fun pro micro or other similar clones. the case can be friction fit or glued...
thingiverse
free

Igloo key plate by _spindle
...ndle
thingiverse
spherical key plate for cherry mx compatible keyboard switches. i made this to test non-planar keyboard plates.
thingiverse
free

Cherry Mx key by Oreshield
...erry mx key by oreshield
thingiverse
a key that you can use on a keyboard with cherry mx switches and other mechanical switches.
thingiverse
free

20 percent key plate by _spindle
...ey plate by _spindle
thingiverse
a 4x6 key plate for cherry mx switches. i'm still working on refining the pcb and firmware.
thingiverse
free

100 Switch Test Plate by HoldReady
...100 switch test plate by holdready
thingiverse
this is a plate to hold up to 100 cherry mx style keyboard switches.
3dwarehouse
free

Key switch (Cherry)
...small signal diode, and pcb pins hidden by default; unhide in the outliner if desired.) #cherry #key #keyboard #keyswitch #switch
thingiverse
free

One Key Keyboard by ElliottMoo
...hingiverse
a one key keyboard enclosure designed for a cherry mx switch. originally designed for a power switch for my computer.
The1987
thingiverse
free

The2187 - A Modular Modern 87 Key Mechanical Keyboard
...on the popularity of the original. the instructions for the1987 all apply save for one: this case will only...
thingiverse
free

TheBasic - A Minimalist 87 Key Mechanical Keyboard by revere521
...monotony a little. the instructions and parts lists for the1987 all apply to this case. i also included some...
87
turbosquid
$140

Tatra 87
...urbosquid
royalty free 3d model tatra 87 for download as max on turbosquid: 3d models for games, architecture, videos. (1328810)
turbosquid
$15

Chair 87
...alty free 3d model chair 87 for download as max, obj, and fbx on turbosquid: 3d models for games, architecture, videos. (1497544)
turbosquid
$15

Curtain 87
...ty free 3d model curtain 87 for download as max, obj, and fbx on turbosquid: 3d models for games, architecture, videos. (1462501)
turbosquid
$8

Table 87
...alty free 3d model table 87 for download as max, obj, and fbx on turbosquid: 3d models for games, architecture, videos. (1503920)
turbosquid
$8

Lamp 87
...yalty free 3d model lamp 87 for download as max, obj, and fbx on turbosquid: 3d models for games, architecture, videos. (1500815)
turbosquid
$6

Bedcloth 87
...y free 3d model bedcloth 87 for download as max, fbx, and obj on turbosquid: 3d models for games, architecture, videos. (1531165)
turbosquid
$20

BAth 87
... free 3d model bath 87 for download as max, dxf, fbx, and dwg on turbosquid: 3d models for games, architecture, videos. (1277154)
turbosquid
$29

Landscape 87
... available on turbo squid, the world's leading provider of digital 3d models for visualization, films, television, and games.
turbosquid
$25

Ring 87
... available on turbo squid, the world's leading provider of digital 3d models for visualization, films, television, and games.
turbosquid
$23

Building 87
... available on turbo squid, the world's leading provider of digital 3d models for visualization, films, television, and games.
Keyboard
3d_ocean
$9
Keyboard
...odels computer electronics keyboard peripheral / part
computer keyboard 3d models. it’s computer keyboard. render ready keyboard.
archibase_planet
free
Keyboard
...keyboard
archibase planet
input keyboard keyboard office equipment
pro keyboard - 3d model for interior 3d visualization
3d_export
$5
keyboard
...keyboard
3dexport
computer keyboard
3d_export
$11
Keyboard
...keyboard
3dexport
gaming keyboard with backlight 1:1
3d_export
free
keyboard
...keyboard
3dexport
keyboard blender stl obj fbx
archibase_planet
free
Keyboard
...keyboard
archibase planet
keyboard pc equipment
keyboard apple n130315 - 3d model (*.gsm+*.3ds) for interior 3d visualization.
3d_export
free
keyboard gaming
...keyboard gaming
3dexport
keyboard gaming include: 1 x keyboard gaming.blend 3 x keyboard gaming.png
archibase_planet
free
Keyboard
...keyboard
archibase planet
keyboar pc equipment
keyboard - 3d model (*.gsm+*.3ds) for interior 3d visualization.
3d_ocean
$9

keyboard USB
...models computer electronics keyboard peripheral / part
keyboard for computer 3d models. high detailed model of computer keyboard.
turbosquid
$24

Keyboard
...urbosquid
royalty free 3d model keyboard for download as max on turbosquid: 3d models for games, architecture, videos. (1710291)
Retro
3d_export
$6

billboard-retro
...billboard-retro
3dexport
billboard-retro
3d_export
$5

Retro Bathroom
...retro bathroom
3dexport
retro bathroom
3d_export
$10

billboard retro
...billboard retro
3dexport
billboard retro of the 30s
3d_export
$6

retro tv3ds
...retro tv3ds
3dexport
retro tv.3ds
3d_export
$5

retro lamp
...retro lamp
3dexport
small retro lamp
3ddd
$1

Retro Radio
...retro radio
3ddd
радио
retro radio
3ddd
$1

Retro TV
...retro tv
3ddd
телевизор
retro tv
turbosquid
$5

retro
...ty free 3d model retro for download as max, max, fbx, and obj on turbosquid: 3d models for games, architecture, videos. (1539192)
3d_export
$5

retro sunset
...retro sunset
3dexport
very nice retro sunset selfmade.
3ddd
$1

retro office
...retro office
3ddd
стол
retro office vol.02
Modular
3ddd
$1
MODULAR
...modular
3ddd
modular , врезной свет
modular потолочные светильники
3ddd
$1
Modular Spock
...modular spock
3ddd
modular
modular spock
3ddd
$1
MODULAR / Spock
...modular / spock
3ddd
modular
modular/spock
design_connected
$7
Modular
...modular
designconnected
emmemobili modular shelves and storage computer generated 3d model. designed by ferruccio laviani.
3ddd
$1
Modular spock
...modular spock
3ddd
modular
spock wall led
turbosquid
$25
Modular sofa Angelo Cappellini Modular
...a angelo cappellini modular for download as max, fbx, and obj on turbosquid: 3d models for games, architecture, videos. (1570923)
turbosquid
$15
Modular sofa Angelo Cappellini Modular
...a angelo cappellini modular for download as max, fbx, and obj on turbosquid: 3d models for games, architecture, videos. (1570304)
3ddd
$1
Modular 2FLAT2C
...modular 2flat2c
3ddd
modular
modularhttp://www.supermodular.com/
3d_export
free
Modular walls
...modular walls
3dexport
modular walls for playing without materials and textures
3ddd
$1
Modular / Lighting Juliette
...modular / lighting juliette
3ddd
modular
modular lighting juliette
Key
archibase_planet
free
Key
...key
archibase planet
bunch of keys key
key n190510 - 3d model (*.gsm+*.3ds) for interior 3d visualization.
3d_export
$5
key
...key
3dexport
key
archibase_planet
free
Key
...key
archibase planet
key
key n080710 - 3d model (*.3ds) for interior 3d visualization.
3d_ocean
$2
Key
...key
3docean
door key lock open unlock
a key facecount: 617 (2x subsurfed: 9872)
archibase_planet
free

Key
...key
archibase planet
key
key n240713 - 3d model (*.gsm+*.3ds) for interior 3d visualization.
archibase_planet
free
Key
...key
archibase planet
key
key 2 n080710 - 3d model (*.gsm+*.3ds) for interior 3d visualization.
turbosquid
$3
Keys With Key Chain
... chain 3d model for download as blend, dae, stl, obj, and fbx on turbosquid: 3d models for games, architecture, videos. (1673644)
archibase_planet
free

Key
...key
archibase planet
key
key ancient strike plate n130912 - 3d model (*.3ds) for interior 3d visualization.
archibase_planet
free
Key
...key
archibase planet
key
key stephan mette n300412 - 3d model (*.gsm+*.3ds) for interior 3d visualization.
3d_export
free
key
...key
3dexport
a simple key obj, fbx, blend
Inspired
turbosquid
$10

Inspiration?
... available on turbo squid, the world's leading provider of digital 3d models for visualization, films, television, and games.
3ddd
free

INSPIRATION tecni nova
... tecni , письменный
моделился по каталогу inspiration tecni nova.
3ddd
$1

Inspire Christina Aguilera
...inspire christina aguilera
3ddd
парфюм
inspire christina aguilera
3d_export
$15

Starkiller Inspired Lightsaber
...starkiller inspired lightsaber
3dexport
this lightsaber is inspired by starkiller's lightsaber
3ddd
$1

Creative Inspire T6160
...creative inspire t6160
3ddd
колонка
колонки 5.1 creative inspire t6160
polys: 912452
verts: 475911
3d_export
$15

razer inspired keyboard
...xport
i made this highly detailed keyboard inspired by the . it's high poly, highly detailed. available for commercial use.
turbosquid
$39

Maul inspired lightsaber
... model maul inspired lightsaber for download as blend and obj on turbosquid: 3d models for games, architecture, videos. (1630272)
turbosquid
$499

Pretty Lady Inspiration
... available on turbo squid, the world's leading provider of digital 3d models for visualization, films, television, and games.
turbosquid
$249

Anime Inspired Male
... available on turbo squid, the world's leading provider of digital 3d models for visualization, films, television, and games.
turbosquid
$98
DJI Inspire 1
... available on turbo squid, the world's leading provider of digital 3d models for visualization, films, television, and games.
Mechanical
3d_export
$50
Mechanism
...mechanism
3dexport
mechanism -------- animation is present only in the blender file.
3d_export
$5

mechanics
...mechanics
3dexport
turbosquid
$50
mechanic
... available on turbo squid, the world's leading provider of digital 3d models for visualization, films, television, and games.
3ddd
$1
Mechanical Wasp
...mechanical wasp
3ddd
робот
mechanical wasp
3d_export
$20
Mechanical tail
...mechanical tail
3dexport
mechanical tail<br>four-part movement
3d_export
$5
mechanical ballista
...mechanical ballista
3dexport
a mechanical ballista useful for medieval or fantasy games does not contain animations
turbosquid
$59

Mechanical Part
...id
royalty free 3d model mechanical part for download as c4d on turbosquid: 3d models for games, architecture, videos. (1410833)
turbosquid
$50
Mechanical Spider
...royalty free 3d model mechanical spider for download as blend on turbosquid: 3d models for games, architecture, videos. (1599864)
turbosquid
$45

Mechanical Pencil
...royalty free 3d model mechanical pencil for download as blend on turbosquid: 3d models for games, architecture, videos. (1503379)
turbosquid
$35

Mechanical fish
...id
royalty free 3d model mechanical fish for download as max on turbosquid: 3d models for games, architecture, videos. (1152530)