Thingiverse
The Vase Face - Tesla / Einstein - Hollow Face Illusion by Amygdoloid
by Thingiverse
Last crawled date: 3 years, 3 months ago
Hi there,
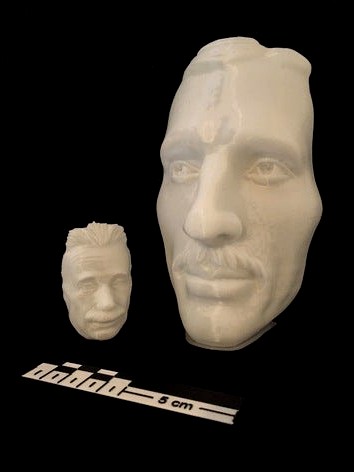
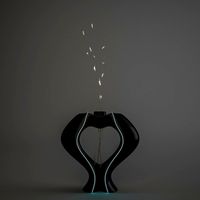
first of all this is not a vase. At least not realy, or you could say it's a vase with zero volume. Actually it's my version of the hollow face illusion (see link) printed in vase mode, therefore I call it "The Vase Face". Check out the videos at:
Tesla:https://youtu.be/MY9tw4UuWss
Einstein:https://youtu.be/BlQJ5gTVvRo
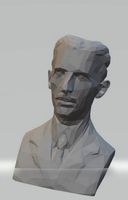
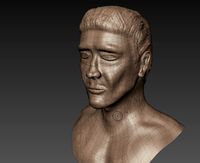
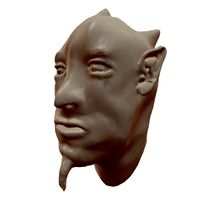
I've found the hollow face illsuion always fascinating, but I could only find a few versions of it online. They are always cut out of a whole block (see links below). At first I tried cutting a face out of a block, too, with a mediocre result (see the image with the grey Einstein). Than I thought why not print the walls as thin as possible and in vase mode to be fast. So I made the outer (or convex) face one layerline thick and the inner (concave) another line thick. In vase mode the printer can lay the outer and inner lines in a spiral by continuosly extruding two lines per layer and going back and forth on each layer.
Further I think this could be a Method to print masks for cosplayers, without a need for supports, eyes and mouth should be easy to ut out with a hot scalpel. Maybe someone wants likes to print a Iron man mask or something similiar?
Remixes
Nikola Tesla is remixed from the great "Bust of Nikola Tesla" by mushogenshin:https://www.thingiverse.com/thing:571784
Albert Einstein is a remixed fromhttps://www.thingiverse.com/thing:4655016
which is a remix from the amazing bust by LSMiniatures:https://www.thingiverse.com/thing:966908
Print Settings
I've used Prusa Sclicer 2.2.0 (see pictures)
Print Settings:
Advanced -> Perimters AND external Perimeters: 0.4 mm. This is really import, this way you will have a line on the inside and on the outside on each layer.
Layers:
toggel the spiral vase checkbox on to print in vase mode
Layerheigt: 0.1 mm
First Layer: 0.2 mm (I had much better layer adhesion at 0.2 mm istead of 0.1 mm)
I've tried different layer heights. Printing with 0.1 mm yields the best results. The higher your layer the steeper your overhangs and you get print errors mostly on the hair, and nose (and above the mustache). Also the surface quality is much better and therefore the illusion works better. Because this is printed in vase mode, the biggest model (Tesla) has around 18 cm height and takes only 8.5 hours to print at 0.1 mm layerheight. Einstein is the smallest and prints in 1.5 hours.
Brim:
Use a 5 ..10 mm Brim. I tried printing with and without, every now and then the print failed without a brim, but never with a brim. Also when you don't remove the brim it acts as a foot, so the model stands better (and I like how it looks).
Filament
I've tried a regular white filament I usually use for Lithophanes. The illusion works with this filament, but I've found the effect to be much stronger if the filament is more translucent. Therefore I used a phosphorescent and green glowing white filament, which is more translucent then the regular white one. Both typer are made by "Das-Filament.de". Nice sideffect, your model glows green in the dark (like Tesla in the pictures).
Design
You can make a Vase Face on your own, it is actually not that hard. The design was made completly in Meshmixer. Here's how:
Load a bust sculpture
In many cases you can reduce the meshcount by 50 % ... 80 %, you don't need a million vertices for this design aorund 100 000 ... 300 000 is fair enough.
Rotate the model so the head is tilted slighty backwards (2-5°). This way the overhang angle below the nose will be managable.
Plane cut. Cut the model horizontally right below the chin.
Make solid. Solidify the model, use at least a value of 200 for mesh density and solid accuracy.
Hollow. Hollow out the model with an offset (wall thickness) of 0.8 mm a solid accuracy and meshdensity of at least 200 ... 300.
Plane cut. Cut the model vertically (90°). I've found the effect works best when cutting at the temporals. If you cut around the ears, the effect is less impressive (at least in my tests it was).
Depending on the model and the haircut you may want to cut a bit of the Hair (horizontaly) on top and reduce the mesh count again.
Export as STL
sclice
My Findings:
By printing several Versions of Vase Faces here's what I've found:
The illusion is higly dependent on your lightning situation. The shadows have to be "right" to make the illusion work.
The illsuion is stronger with translucent filament
The illsuon is stronger with 0.1 mm Layerheigt
The illsuion is stronger if you take pictures/ videos OR look at it with one eye. Yes, with one eye. I don't know why, this still puzles me.
For the bigger Vase Face you have to step away from the model, which makes the illusion stronger, too
The illusion is stronger when cutting the face at the temporals instead of behind the ears (compare Dracula and Tesla)
0.25 mm Layerheigt caused big gaps in the face (overhang angles become really steep)
I was surprised how well the nose printed without supports and 0.1 mm layers
Links
The hollow face illusion:https://en.wikipedia.org/wiki/Hollow-Face_illusion
Hollow Face illsusions on Thinigiverse:https://www.thingiverse.com/thing:2569573https://www.thingiverse.com/thing:1656654
first of all this is not a vase. At least not realy, or you could say it's a vase with zero volume. Actually it's my version of the hollow face illusion (see link) printed in vase mode, therefore I call it "The Vase Face". Check out the videos at:
Tesla:https://youtu.be/MY9tw4UuWss
Einstein:https://youtu.be/BlQJ5gTVvRo
I've found the hollow face illsuion always fascinating, but I could only find a few versions of it online. They are always cut out of a whole block (see links below). At first I tried cutting a face out of a block, too, with a mediocre result (see the image with the grey Einstein). Than I thought why not print the walls as thin as possible and in vase mode to be fast. So I made the outer (or convex) face one layerline thick and the inner (concave) another line thick. In vase mode the printer can lay the outer and inner lines in a spiral by continuosly extruding two lines per layer and going back and forth on each layer.
Further I think this could be a Method to print masks for cosplayers, without a need for supports, eyes and mouth should be easy to ut out with a hot scalpel. Maybe someone wants likes to print a Iron man mask or something similiar?
Remixes
Nikola Tesla is remixed from the great "Bust of Nikola Tesla" by mushogenshin:https://www.thingiverse.com/thing:571784
Albert Einstein is a remixed fromhttps://www.thingiverse.com/thing:4655016
which is a remix from the amazing bust by LSMiniatures:https://www.thingiverse.com/thing:966908
Print Settings
I've used Prusa Sclicer 2.2.0 (see pictures)
Print Settings:
Advanced -> Perimters AND external Perimeters: 0.4 mm. This is really import, this way you will have a line on the inside and on the outside on each layer.
Layers:
toggel the spiral vase checkbox on to print in vase mode
Layerheigt: 0.1 mm
First Layer: 0.2 mm (I had much better layer adhesion at 0.2 mm istead of 0.1 mm)
I've tried different layer heights. Printing with 0.1 mm yields the best results. The higher your layer the steeper your overhangs and you get print errors mostly on the hair, and nose (and above the mustache). Also the surface quality is much better and therefore the illusion works better. Because this is printed in vase mode, the biggest model (Tesla) has around 18 cm height and takes only 8.5 hours to print at 0.1 mm layerheight. Einstein is the smallest and prints in 1.5 hours.
Brim:
Use a 5 ..10 mm Brim. I tried printing with and without, every now and then the print failed without a brim, but never with a brim. Also when you don't remove the brim it acts as a foot, so the model stands better (and I like how it looks).
Filament
I've tried a regular white filament I usually use for Lithophanes. The illusion works with this filament, but I've found the effect to be much stronger if the filament is more translucent. Therefore I used a phosphorescent and green glowing white filament, which is more translucent then the regular white one. Both typer are made by "Das-Filament.de". Nice sideffect, your model glows green in the dark (like Tesla in the pictures).
Design
You can make a Vase Face on your own, it is actually not that hard. The design was made completly in Meshmixer. Here's how:
Load a bust sculpture
In many cases you can reduce the meshcount by 50 % ... 80 %, you don't need a million vertices for this design aorund 100 000 ... 300 000 is fair enough.
Rotate the model so the head is tilted slighty backwards (2-5°). This way the overhang angle below the nose will be managable.
Plane cut. Cut the model horizontally right below the chin.
Make solid. Solidify the model, use at least a value of 200 for mesh density and solid accuracy.
Hollow. Hollow out the model with an offset (wall thickness) of 0.8 mm a solid accuracy and meshdensity of at least 200 ... 300.
Plane cut. Cut the model vertically (90°). I've found the effect works best when cutting at the temporals. If you cut around the ears, the effect is less impressive (at least in my tests it was).
Depending on the model and the haircut you may want to cut a bit of the Hair (horizontaly) on top and reduce the mesh count again.
Export as STL
sclice
My Findings:
By printing several Versions of Vase Faces here's what I've found:
The illusion is higly dependent on your lightning situation. The shadows have to be "right" to make the illusion work.
The illsuion is stronger with translucent filament
The illsuon is stronger with 0.1 mm Layerheigt
The illsuion is stronger if you take pictures/ videos OR look at it with one eye. Yes, with one eye. I don't know why, this still puzles me.
For the bigger Vase Face you have to step away from the model, which makes the illusion stronger, too
The illusion is stronger when cutting the face at the temporals instead of behind the ears (compare Dracula and Tesla)
0.25 mm Layerheigt caused big gaps in the face (overhang angles become really steep)
I was surprised how well the nose printed without supports and 0.1 mm layers
Links
The hollow face illusion:https://en.wikipedia.org/wiki/Hollow-Face_illusion
Hollow Face illsusions on Thinigiverse:https://www.thingiverse.com/thing:2569573https://www.thingiverse.com/thing:1656654
Similar models
thingiverse
free

Christmas Tree Bauble - Vase Mode by 3DBISH
...inter does not support multi profiles:
print 7 mm as solid bottom layers (@0.1 mm = 70 bottom layers)
print the rest in vase mode
thingiverse
free

Christmas Angel 01 (Vase Mode) by lichtzeichenanlage
...690349https://www.thingiverse.com/thing:4689705https://www.thingiverse.com/thing:4688281https://www.thingiverse.com/thing:4686593
thingiverse
free

Christmas Bauble 01 (Vase Mode) by lichtzeichenanlage
...690349https://www.thingiverse.com/thing:4689705https://www.thingiverse.com/thing:4688281https://www.thingiverse.com/thing:4686593
thingiverse
free

Dice Tower for Vase Mode
...is a solid! you will need to print it without infill and top layers to work. i designed it to be printed in "vase mode"
thingiverse
free

Curvaceous Vase by markwheadon
...spiral vase mode then slice it with five bottom layers, no top layers, one perimeter (0.55-ish mm) and no fill.
then add flowers!
thingiverse
free

Small Base (vase mode) Santa Claus Village ver. 2 by dobloxy
...ic 4max pro)
nozzle: 0,8
layer height: 0,2
bottom layers: 3
if you want to use my project commercially, contact me.
donation link
thingiverse
free

Low Poly Pikachu Lamp by rifflinks
...s
no infill
use a brim with 10 outlines
print it at least 190 mm tall. this will make the hole in the bottom 40 mm wide.
have fun
thingiverse
free

Woman body for vase mode with lingerie
...with lingerie
thingiverse
lace pattern test
i think that can be printed in a vase mode
the recommended pitch is 0.05 to 0.1 mm.
thingiverse
free

Spiral lampshade (vase mode) by etsugo
...n the steeper surfaces.
print with brim to prevent falling over as it gets quite tall.
designed in fusion 360 with the form mode.
thingiverse
free

Triangular Sinusoidal Vase by CarlSans
...triangular sinusoidal vase by carlsans
thingiverse
i've got a little overhang on one face but it is still a nice print !
Amygdoloid
thingiverse
free

Fibonacci Sunwheel Ornament by Amygdoloid
...re,
here is an ornament made out of rotated golden (fiboacci) spirals.
printed on prusa mini
have fun and please post your makes.
thingiverse
free

Mandelbulb Polygon Fractal by Amygdoloid
... in mandelbulb 3d (www.mandelbulb.com)
postprocess meshmixer / blender
printed on prusa mini
have fun and please post your makes.
thingiverse
free

Koch Snowflake Ornament and/or coaster by Amygdoloid
...actal.
i made this one with fusion 360. first i drew the outline and the used the offset function to create all other innerlines.
thingiverse
free

Yo! - by Steak One by Amygdoloid
...hange.
links
https://www.instagram.com/the.steak.one/
filament used:https://www.dasfilament.de/
inkscape:https://inkscape.org/de/
thingiverse
free

Street Dreams by Amygdoloid
....instagram.com/alexis_persani/
alexis persani on behance:https://www.behance.net/alexis-persani
inkscape:https://inkscape.org/de/
thingiverse
free

Apollonian Fractal Penholder by Amygdoloid
...bution to create the desired flowability of a given powder.
have fun, leave some feedback if you like and please post your makes.
thingiverse
free

Balkans by Causeturk by Amygdoloid
...//www.help.prusa3d.com/en/article/color-change_1687
lithophane generator:https://itslitho.com/
paint.nethttps://www.getpaint.net/
thingiverse
free

Photography Scale - 10 cm by Amygdoloid
... 0.1mm (instead of 0.2 mm) and printed with a non shiny black filament. to the new version looks cleaner and overall much better.
thingiverse
free

Revolved Koch Snowflake Box by Amygdoloid
...nch of fillets, so the print doesn't need any supports.
wikipedia koch snowflake:https://en.wikipedia.org/wiki/koch_snowflake
thingiverse
free

Letter Holder (A4 folded) by Amygdoloid
... first and than put on the horizontal bar.
feel free to leave me some feedback in the comments and please let me see your prints.
Einstein
turbosquid
$55

Albert Einstein
...alty free 3d model albert einstein for download as ma and ztl on turbosquid: 3d models for games, architecture, videos. (1686581)
vizpark
$5
Einstein Vertical
...tical is a set of 3d brick textures for modern buildings, including mulit-textures and 4k tileable textures with material layers.
turbosquid
$140

Albert Einstein
... available on turbo squid, the world's leading provider of digital 3d models for visualization, films, television, and games.
turbosquid
$2

Albert Einstein
... available on turbo squid, the world's leading provider of digital 3d models for visualization, films, television, and games.
turbosquid
free

Einstein Bust
... available on turbo squid, the world's leading provider of digital 3d models for visualization, films, television, and games.
3d_export
$50

A bust of Einstein 3D Model
...a bust of einstein 3d model
3dexport
bust figure art sculpture einstein
a bust of einstein 3d model 3dbyte 85509 3dexport
turbosquid
$29

Einstein figure statue
...alty free 3d model einstein figure statue for download as max on turbosquid: 3d models for games, architecture, videos. (1233803)
3d_export
$20

einstein-cyborg
...einstein-cyborg
3dexport
a demo game model from our gaming studio, this can be 3d printable. designed by ig@the_a_things
turbosquid
$5

albert Einstein 3d model
...3d model
turbosquid
free 3d model albert for download as obj on turbosquid: 3d models for games, architecture, videos. (1509768)
thingiverse
free

Einstein lithophane by JayJo
...einstein lithophane by jayjo
thingiverse
einstein lithophane
Illusion
design_connected
$16

Illusion
...illusion
designconnected
essey illusion computer generated 3d model. designed by brauer, john.
3ddd
$1

Unique Illusion Poltrona
...unique illusion poltrona
3ddd
unique , illusion
кресло unique illusion
3ddd
$1

Illusion Half
...ставила обновленную версию их продукта illusion. лампа была разработана студией hareide design и получила название illusion half.
3ddd
$1

Illusion side table
...able
3ddd
illusion , круглый
illusion side table: не стол, а сплошная иллюзия.
turbosquid
$5

Illusion bed
...squid
royalty free 3d model illusion bed for download as max on turbosquid: 3d models for games, architecture, videos. (1634448)
turbosquid
$19

Dot and Illusion
... available on turbo squid, the world's leading provider of digital 3d models for visualization, films, television, and games.
3ddd
$1

Illusion Table by John Brauer
...
illusion table and grand illusion table by john brauer. model optimized for use with caustics. coffee cup included with model.
3ddd
$1

Unique Illusion Divano
...divano
3ddd
unique , illusion
в файле в слоях находятся деревянные и металлические ножки
3d_ocean
$1

Penrose Triangle Illusion
...d of only 60 polygons, this 3d model is provided as : obj, 3ds, fbx, and c4d. feel free to rate, comment or follow my envato a...
3ddd
$1

Sonex - Illusion 2141
... материалами, текстурами и размерами.
max + obj + fbx
габариты:
314 х 314 х 70h
polys/verts:
32710/16585
maxfile ~ 1,800 mb
Tesla
3d_export
$15

tesla cybertruck
...tesla cybertruck
3dexport
this is an tesla cybertruck.
3d_export
$5

Tesla emblem
...tesla emblem
3dexport
this is tesla emblem
3d_export
$5
nikola tesla
...nikola tesla
3dexport
nikola tesla
turbosquid
$15

Tesla - Rims - Tesla Model 3
...e 3d model tesla - rims - tesla model 3 for download as blend on turbosquid: 3d models for games, architecture, videos. (1612048)
3d_export
$5
Tesla coil
...tesla coil
3dexport
detailed tesla coil model
3d_export
$5
tesla cybertruck
...tesla cybertruck
3dexport
3d model of low poly tesla cybertruck
3d_export
$20

tesla cybertruck and tuning tesla cybertruck
...tesla cybertruck and tuning tesla cybertruck
3dexport
the model consists of 230 details
3d_export
$5

tesla cup
...;br>this file contains a model of a cup with the tesla logo.<br>made in the visualization and modeling program cinema 4d
3d_export
$15
tesla tower object
...tesla tower object
3dexport
tesla tower object
3d_export
$60

tesla cybertruck
...tesla cybertruck
3dexport
3d model tesla cybertruck hi-poly , corona render ,3ds max , obj , fbx
Hollow
3d_export
$20

hollow knight
...hollow knight
3dexport
this is a 3d version of the game character hollow knight
turbosquid
$5

Hollow Tree
...quid
royalty free 3d model hollow tree for download as blend on turbosquid: 3d models for games, architecture, videos. (1403446)
turbosquid
$3

Hollow Glass
...alty free 3d model hollow glass for download as blend and obj on turbosquid: 3d models for games, architecture, videos. (1555369)
3ddd
$1

Quail Hollow
...quail hollow
3ddd
журнальный
журнальный столик "quail hollow"(ар.01-0460-945). 30к полигонов. все текстуры в архиве.
turbosquid
$9

Hollowed Asteroids
... available on turbo squid, the world's leading provider of digital 3d models for visualization, films, television, and games.
turbosquid
free

the log with hollow
... available on turbo squid, the world's leading provider of digital 3d models for visualization, films, television, and games.
3d_export
$12

hollow cross
...hollow cross
3dexport
the cross has three parts and an eyelet for the chain.
turbosquid
$10

BMO figurine (hollow)
... available on turbo squid, the world's leading provider of digital 3d models for visualization, films, television, and games.
turbosquid
$10

Hollow point bullet
... available on turbo squid, the world's leading provider of digital 3d models for visualization, films, television, and games.
turbosquid
$9

Hollow Zig Zag
...el hollow zig zag for download as max, max, 3ds, fbx, and obj on turbosquid: 3d models for games, architecture, videos. (1560240)
Vase
turbosquid
$9
vases vase
...bosquid
royalty free 3d model vases vase for download as max on turbosquid: 3d models for games, architecture, videos. (1171666)
3d_ocean
$3

Vase
...s ceramic vase editable vase vase
3d model vase that you can modify easily by moving the shapes. created in 3ds max 2014 version.
archibase_planet
free

Vase
... planet
vase vase with flowers flowers roses vase with roses
vase roses n110413 - 3d model (*.3ds) for interior 3d visualization.
3d_export
$5
vase
...vase
3dexport
vase
3d_export
$5
vase
...vase
3dexport
vase
3d_export
$5

vase
...vase
3dexport
vase
3d_export
$5

Vase
...vase
3dexport
vase
3ddd
$1
vase
...vase
3ddd
vase
3ddd
$1
Vase
...vase
3ddd
vase
3ddd
free
Vase
...vase
3ddd
vase
Face
turbosquid
$100
face a face
... available on turbo squid, the world's leading provider of digital 3d models for visualization, films, television, and games.
turbosquid
$6
Face To Face Swing
... available on turbo squid, the world's leading provider of digital 3d models for visualization, films, television, and games.
3ddd
$1
Almerich Face to Face
... гибкостью материала, прозрачностью и тактом, чтобы создавать игры со светом и тенью.
размеры: 48 x 48 x 155 см
полигоны: 39 376
design_connected
$11
Face
...face
designconnected
montis face chairs computer generated 3d model. designed by gerard van den berg.
turbosquid
$15
Face
...ce
turbosquid
royalty free 3d model face for download as mud on turbosquid: 3d models for games, architecture, videos. (1178369)
turbosquid
$6
Face
...ce
turbosquid
royalty free 3d model face for download as max on turbosquid: 3d models for games, architecture, videos. (1409756)
turbosquid
$1
Face
...uid
royalty free 3d model face for download as obj and blend on turbosquid: 3d models for games, architecture, videos. (1288500)
turbosquid
$150
Face
... available on turbo squid, the world's leading provider of digital 3d models for visualization, films, television, and games.
turbosquid
$50
face
... available on turbo squid, the world's leading provider of digital 3d models for visualization, films, television, and games.
turbosquid
$15
Face
... available on turbo squid, the world's leading provider of digital 3d models for visualization, films, television, and games.