Thingiverse
The Universal Kitchen Rack by wanhaofan1
by Thingiverse
Last crawled date: 2 years, 10 months ago
Introduction
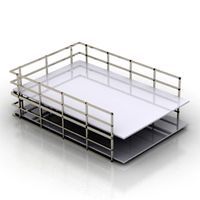
The Universal Kitchen Rack (TUKR, “Tucker”) is a storage solution for organizing your pans, lids, plates, dishes, or other kitchen items. Unlike common retail pan racks, TUKR allows you to customize the spaces to fit your kitchen items and store them more securely. Plus it’s plastic, so it won’t scratch your stuff like metal racks can.
TUKR does not require any additional hardware and can be assembled in a horizontal or vertical orientation. It consists of three main components: spacers, dividers, pegs. The spacer length is varied (by scaling the spacer stl length) to obtain the desired spacing between two dividers, and that space (calling this a “slot”), is what holds your kitchen item(s). The dividers come in multiple styles and sizes for different size kitchen items. The pegs join spacers and dividers together. There is a picture showing different peg-spacer-divider options and resulting slot widths.
Horizontal TUKR Instructions
This rack has the dividers stacked horizontally, so the items stand up. This rack is good for storing pans, plates, etc. up to about 10 inches in diameter.
Determine the number of slots you want in your rack. If you want one slot for each item, like for pans, then number of slots=number of items. If you want to store multiple items per slot, maybe for plates, then figure out how many slots you need based on the number of plates and number of plates per slot.
Determine the width of each slot, which will be the width of the item(s) you wish to store in that slot. Write these widths down.
The total length of TUKR will be (the sum of the slot widths) + (number of slots+1)*(divider thickness = 12mm by default). Make sure the rack will fit where you want it to go before proceeding.
Print: (number of slots + 1) “style#_H_divider.stl” parts. I suggest printing them in the uploaded orientation with a high enough temperature to ensure good layer adhesion.
Print: two spacers for each rack slot. The spacer is a simple cylinder 100mm long, making it easy to scale (keep diameter unscaled). The length of the spacers depends on divider orientation, refer to the peg-spacer-divider options picture. I suggest printing the spacers vertically with a high enough temperature to ensure good layer adhesion.
Print: (number of slots)* 4 “peg.stl” parts. These may need to be scaled in X-Y (diameter) if your printer’s tolerances are significantly different than mine. They should fit snuggly into the holes in the spacers and dividers, but not be so tight as to break the parts. I suggest printing the pegs vertically with a high enough temperature to ensure good layer adhesion.
Optional Print: four “plug_peg.stl”. These fill the unused outward facing peg holes in the two end dividers to give the rack a more finished look.
Assemble TUKR by inserting two pegs into one of the dividers, pushing one spacer over each peg until it seats against the divider. Place two pegs into another one of the dividers, press the other ends of these pegs into the holes in the spacers you just installed. Repeat this process until you reach the end of your rack. The spacers do not have insertion limits for the pegs (because length scaling would mess this up), but the dividers do, so it is strongly recommended that you insert the pegs into the dividers first and into the spacers second as described above.
Optional: Apply CA to each peg joint. Thin CA will wick into the parts better. This will prevent the rack from coming apart over time, and is recommended if the pegs were not a snug fit. One advantage to not doing this is the ability to modify the rack in the future.
Vertical TUKR Instructions
This rack has the dividers stacked vertically, so the items lay on the dividers. First, determine the style of vertical rack you want. There are two three-post (a “post” is a vertical column of spacer cylinders) styles, one with posts 90 degrees apart (“V3P90”) that can hold items up to 9 inches in diameter and one with posts spaced evenly 120 degrees apart (“V3P120”) that can hold items up to 7 inches in diameter. There’s also a four-post style (“V4P”) that can hold items a little over 6 inches in diameter.
A two-post vertical rack is not recommended because the weight of the items in that slot would be applying a cantilevered load on the divider, which could cause it to break. If you need a two-post vertical rack, and the items being stored in the rack are very lightweight, a horizontal TUKR could be turned on its side get a two-post vertical TUKR.
Determine the height of each slot, which will be the height of the stacked item(s) you wish to store in that slot. Write these heights down.
The total height of TUKR will be (the sum of the slot heights) + (number of slots+1)* (divider thickness = 12mm by default). Make sure the rack will fit where you want it to go before proceeding.
Print: (number of slots + 1) “style#_VXXX_divider.stl” parts. I suggest printing them in the uploaded orientation with a high enough temperature to ensure good layer adhesion.
If you have three posts, print three spacers for each rack slot. If you have four posts, print four spacers for each rack slot. The spacer is a simple cylinder 100mm long, making it easy to scale (keep diameter unscaled). The length of the spacers depends on divider orientation, refer to the peg-spacer-divider options picture. I suggest printing the spacers vertically with a high enough temperature to ensure good layer adhesion.
If you have three posts, print (number of slots) x6 “peg.stl” parts. If you have four posts, print (number of slots) x8 “peg.stl” parts. These may need to be scaled in X-Y (diameter) if your printer’s tolerances are significantly different than mine. They should fit snuggly into the holes in the spacers and dividers, but not be so tight as to break the parts. I suggest printing the pegs vertically with a high enough temperature to ensure good layer adhesion.
Optional Print: three or four “plug_peg.stl”. These fill the unused upward facing peg holes in the top-most divider to give the rack a more finished look.
Assemble TUKR by inserting pegs into one of the dividers’ holes, pushing one spacer over each peg until it seats against the divider. Place pegs into another one of the dividers’ holes, press the other ends of these pegs into the holes in the spacers you just installed. Repeat this process until you reach the end of your rack. The spacers do not have insertion limits for the pegs (because length scaling would mess this up), but the dividers do, so it is strongly recommended that you insert the pegs into the dividers first and into the spacers second as described above.
Optional: Apply CA to each peg joint. Thin CA will wick into the parts better. This will prevent the rack from coming apart over time, and is recommended if the pegs were not a snug fit. One advantage to not doing this is the ability to modify the rack in the future.
The following divider styles are available for the horizontal TUKR:
style0: Blank. This is so you can make your own divider. If there’s a flat-ish STL model that you like, you can load both this and that stl into Cura, scale and move them around as needed, and slice: Cura automatically joins models where they overlap. There’s also an insert plate that fits inside style0, which allows you to make inserts like style6.
style1: Curvy V
style2: “PUBG Arsenal”. PlayerUnknown’s BattleGround arsenal for your most important weapon: the frying pan. You can mirror this in your slicer if you need the text to face the other direction, just play with mirroring until it looks like you want it. If you don’t like the little letter connector tabs, you can load this and the style0_H_divider_insert_plate.stl into Cura, scale the style0_H_divider_insert_plate.stl by 200% in Z (to make it 2mm thick), and overlap them to make the letters embossed.
style3: Peace Sign
style4: Deathly Hallows
style5: Leaf
style6: Tree. This insert fits inside style0 and should be glued in place. It’s printed separately to allow you to insert it facing either direction without having to use supports. I downloaded the tree stl from thingiverse (can’t find the model, will update with credit to user if I can find it) and merged it with the style0_H_divider_insert_plate.stl in Cura.
The following divider styles are available for the 3-post 90deg vertical TUKR:
style0: Blank. See comments in horizontal styles above.
style1: Curvy V
style3: Peace Sign
style4: Deathly Hallows
style5: Leaf
The following divider styles are available for the 3-post 120deg vertical TUKR:
style0: Blank. See comments in horizontal styles above.
style1: Cross
style2: Radiation. In fact, most triangular hazard signs would work well with this divider.
style3: Peace Sign
style4: Deathly Hallows
The following divider styles are available for the 4-post vertical TUKR:
style0: Blank. See comments in horizontal styles above.
style1: Cross
style2: “PUBG Arsenal”. See comments in horizontal styles above. I also include a PUBG insert plate, which has the letters debossed instead of embossed.
style3: Peace Sign
style4: Deathly Hallows
style5: Leaf
Other divider ideas (not made yet):
Letters, see style2 PUBG examples for letter connections, debossing, and embossing.
Animals
Sports Teams
Other leaves
Car brand logos
Hazard symbols
Your own? Make a remix and post your divider designs.
Larger TUKR Option
What if I want to store larger pans/items than can fit in the default size racks? If you have a printer with a print bed larger than mine, you can scale TUKR up. Current envelope for the dividers is 180mm x 180mm. If you scale the dividers, pegs, and spacers the same % in X and Y (not Z), they should still fit together, though (as mentioned above) you may have to make some slight adjustments to the peg’s diameter depending on your printer’s tolerances. The slot width (horizontal TUKR) or height (vertical TUKR) math in the above instructions remains unchanged. I give the approximate maximum diameter items that the unscaled racks can store in the instructions above, which should help you with scaling. For example, to store 12” pans in a horizontal TUKR (max ~10”), follow the instructions above for a horizontal TUKR, except scale the dividers, spacers, and pegs by (at least) 12/10=120% in X and Y before printing them.
Large Divider Option
If you don’t have a larger printer and would like TUKR to have larger dividers so you can store larger items, you can use sheet metal (aluminum or stainless steel) or sheet plastic (acrylic, polycarbonate, etc.) to obtain any size you desire. For a horizontal TUKR, all you have to do is substitute each “_H_divider.stl” in the above instructions with two “sheet_Xmm_divider.stl” and two “sheet_divider_H_foot.stl” parts. The foot can be printed separately and glued on, or arranged with a slight overlap with the “sheet_Xmm_divider.stl” part in Cura so they’ll be printed as one part. The foot can be also be scaled (in Y in uploaded configuration) to make the height of the horizontal rack taller. For the vertical TUKR, substitute each “_VXXX_divider.stl” with three or four (depending on desired number of posts) “sheet_Xmm_divider.stl” parts. These dividers are printed in a different orientation to prevent the need for supports inside the sheet slot feature. Select the stl appropriate for the material sheet thickness (Xmm) you will use; available options are: 1.5mm (close to 1/16”), 2mm, 3mm (close to 1/8”), 5mm (close to 3/16”), 6mm (close to 1/4”). You will need to scale these a little in thickness to obtain a snug fit on your particular sheet material. Since the size of the sheet determines the size of the rack, there’s no need to scale any of the other printed parts, unless you’re going REALLY big and 10mm diameter posts aren’t strong enough. The shape of the sheets doesn’t particularly matter: round discs, squares, rectangles, custom milled or laser cut patterns should all work, but it needs to be thick enough to not deflect much. Squares and discs in various sizes and materials are readily available on Amazon, eBay, and many other online retailers. The “_hole.stl” versions of these have a single countersunk hole and hexahedron cut for a flat head M3 screw + hex nut located 6mm x 6mm from the closest corner. There are a couple uploaded pictures of example assemblies.
A Comment On Strength
I tested the (unscaled) divider-peg-spacer joints made from PLA at over 100lbf static shear load, as well as with high dynamic cyclic loading, a.k.a repeatedly slamming a pan edge onto a spacer near a joint. The maximum load the joints can handle should be even higher in compression, as in a vertical TUKR, than shear. Thus, with the correct tolerances and print temperature, the default joints should be plenty strong for most applications. That being said, there are two simple options for strengthening your racks.
Reinforced Spacers Option: You can scale the peg’s length so that it fills the whole inside of a spacer instead of just the ends. This will make the spacers a little stronger and stiffer, but won’t make the joints any stronger.
Metal Reinforced Option: If you need TUKR to be stronger, then you can drill out the peg insertion limiters in the dividers with a 6mm drill bit, not print the pegs, and use pieces of 6mm stainless steel rod the length (horizontal) or height (vertical) of your rack to hold all of the rack pieces together instead of pegs. I wanted the rack to be fully 3D printable, so this isn’t the default option, but it’s possible and designed to be easy to do if you need to.
Basic dimensions
Peg diameter x length: 5.8mm x 10mm
Spacer OD x ID x length: 10mm x 6mm x 100mm
Divider (unscaled) minimum bed size: 180mm x 180mm
Divider plate thickness: 5mm
Divider peg boss diameter x thickness: 10mm x 7mm, so the dividers are 5+7=12mm thick at the peg bosses.
Divider peg hole diameter: 6mm
Center-center spacing between peg holes for the H_dividers, V3P90_dividers, and V4P_dividers: 170mm
Final notes
Feel free to remix this, especially if you have new divider designs. I’d love to see a large user base of divider designs.
If you find any mistakes or omissions, please leave a comment, and I’ll try to get it fixed ASAP.
This took quite a few hours to design and test, so if you feel like it, please leave me a tip so I’ll be motivated to design and post more things.
Disclaimer: I am not responsible for any injury or broken items. Build and use this rack at your own risk.
Sorry everything is bulleted, I couldn't figure out how to make the body text larger so it was the same size as the list text. Anyone know how to do that?
Similar models
thingiverse
free

PB Swiss 970 BitBlock Rack - Customizable by 6d6178
....
for example, you you want 5 slots your rack length must be at least 121.875mm (5 x 24.375mm) but you can round it up to 125mm.
thingiverse
free

Pearl Throne Thumper Amp Mount by hobbyfin
...about 300g worth of plastic is needed.
hardware needed:
10 m4 4mm long threaded brass inserts
-6 m4 screws 20mm
-4 m4 screws 30mm
3dwarehouse
free

HRHBh1200
...hrhbh1200
3dwarehouse
hand rail horizontal bars h1200mm. dc you can assign the total length and the divided number.
thingiverse
free

Customizable Cable Rack by jimmit
...e height of the backplate and added a couple of variables to make it easier to tweak. i also updated it to work with customizer.
thingiverse
free

Ender 3 v2 wire clip with vertical inserts for spacing by littledevil
...s added along with slots for spacers into each wire clamp/clip. please post makes and let me know how they worked for you! thanks
thingiverse
free

Parametric tool rack by spyki
...this variable over 'slot_diameter', but it will default to 'slot_diameter' for rows where this isn't defined.
thingiverse
free

Modular Sewing Spool Holder by xyzaxis
... this thing is the improved sewing bobbin clip - clipped bobbins fit on top of the spools. you can see some of these in the pics.
thingiverse
free

Distress Ink/Oxide and Marker Modular Storage Tower
...just be glued together. small, nonskid feet on the base might be a good idea as well.
will fit large distress ink or oxide pads.
thingiverse
free

Switch Cartridge Case by Erop1928
...ts
m3 plastic spacers between all inserts
if you use spacer, each casespacer/casespacerhole need be scaled up to 105% in z axis.
thingiverse
free

Bow rack for 2 bows - simple by techpubsman
...ill to your required size. print 2 for the required pair... or 4 if you have more bows to hang. pegs are approx. 50mm in length.
Wanhaofan1
thingiverse
free

Totoro Coat Rack - Pokemon Remix
...yuyuy75. i have used the remixed files made by wanhaofan1 because wanhaofan1 made it more precise, added tolerances, screw...
thingiverse
free

Faster Totoro Coat Rack by freelance_fedora
...unhappy with the print time and filament requirements. using wanhaofan1#39;s step file, i thinned out the character images to...
thingiverse
free

Better filament guide for Wanhao i3, Maker Select, etc. by wanhaofan1
...ubing and how tuned your printer is. this part is held into the filament guide hole with 1 dot of ca in case i need to remove it.
thingiverse
free

Delta II Rocket Fairing for Kepler Space Telescope by wanhaofan1
...cale than the ones i printed (same total height though, so it shouldn't affect how the kepler telescope fits in the fairing).
thingiverse
free

Supermicro server hot swap 3.5" to 2.5" HDD/SSD adapter, MCP-220-00043-0N by wanhaofan1
...;s currently configured for 7mm thick drives, but it can take up to 11mm thick sff drives with the above mentioned modifications.
Rack
archibase_planet
free
Rack
...ack
archibase planet
rack paper rack rack for paper
rack 6 office n060914 - 3d model (*.gsm+*.3ds) for interior 3d visualization.
archibase_planet
free
Rack
...ack
archibase planet
rack paper rack rack for paper
rack 3 office n060914 - 3d model (*.gsm+*.3ds) for interior 3d visualization.
archibase_planet
free
Rack
...ack
archibase planet
rack paper rack rack for paper
rack 5 office n060914 - 3d model (*.gsm+*.3ds) for interior 3d visualization.
archibase_planet
free
Rack
...ack
archibase planet
rack paper rack rack for paper
rack 7 office n060914 - 3d model (*.gsm+*.3ds) for interior 3d visualization.
archibase_planet
free

Rack
...for magazines rack for notebooks notebooks notebook
rack notebook n120614 - 3d model (*.gsm+*.3ds) for interior 3d visualization.
archibase_planet
free

Rack
...rack
archibase planet
rack umbrella umbrella rack
rack n180811 - 3d model (*.3ds) for interior 3d visualization.
archibase_planet
free
Rack
...rack
archibase planet
rack book rack stand
rack - 3d model (*.gsm+*.3ds) for interior 3d visualization.
archibase_planet
free

Rack
...rack
archibase planet
rack rack for glasses
rack 1 - 3d model (*.gsm+*.3ds) for interior 3d visualization.
archibase_planet
free
Rack
...rack
archibase planet
rack rack for glasses
rack 2 - 3d model (*.gsm+*.3ds) for interior 3d visualization.
3d_export
free
rack
...rack
3dexport
rack
Universal
3d_export
$20
university
...university
3dexport
university model with textures.
3d_export
free

steven universe
...steven universe
3dexport
steven universe
3ddd
free

Quasar Universe
...quasar universe
3ddd
quasar
люстра quasar universe
turbosquid
$65
Universal
... available on turbo squid, the world's leading provider of digital 3d models for visualization, films, television, and games.
turbosquid
$65

University
... available on turbo squid, the world's leading provider of digital 3d models for visualization, films, television, and games.
turbosquid
$5

Universal
... available on turbo squid, the world's leading provider of digital 3d models for visualization, films, television, and games.
3d_export
$40
Graphics Universe Universe Flares 3D Model
...graphics universe universe flares 3d model
3dexport
textures
graphics universe universe flares 3d model crashangel 97554 3dexport
3d_export
$65

universe
...universe
3dexport
simple rendering of the scene file
3d_export
$65

university
...university
3dexport
simple rendering of the scene file
3ddd
$1
Gala Universal раковина
...universal раковина
3ddd
gala , universal
раковина
производитель gala
коллекция universal
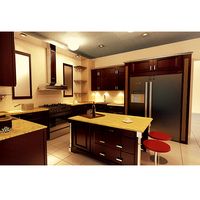
Kitchen
3d_ocean
$29
Kitchen
...tchen interior kitchen interior rendering kitchen rendering
kitchen interior,kitchen,kitchen rendering,kitchen interior rendering
archibase_planet
free
Kitchen
...net
kitchen kitchen furniture kitchen table kitchen cabinet
kitchen table - 3d model (*.gsm+*.3ds) for interior 3d visualization.
archibase_planet
free
Kitchen
...kitchen
archibase planet
kitchen kitchen cabinet kitchen furniture
kitchen - 3d model (*.3ds) for interior 3d visualization.
archibase_planet
free
Kitchen
...kitchen
archibase planet
kitchen furniture kitchen cabinet kitchen equipment
kitchen - 3d model for interior 3d visualization.
archibase_planet
free
Kitchen
...itchen
archibase planet
kitchen kitchen cabinet kitchen furniture
kitchen - 3d model (*.gsm+*.3ds) for interior 3d visualization.
archibase_planet
free
Kitchen
...chen
archibase planet
kitchen kitchen cabinet kitchen furniture
kitchen n020315 - 3d model (*.3ds) for interior 3d visualization.
archibase_planet
free
Kitchen
...itchen
archibase planet
kitchen kitchen cabinet kitchen furniture
kitchen - 3d model (*.gsm+*.3ds) for interior 3d visualization.
archibase_planet
free

Kitchen
...itchen
archibase planet
kitchen kitchen furniture kitchen cabinet
kitchen - 3d model (*.gsm+*.3ds) for interior 3d visualization.
archibase_planet
free

Kitchen
...kitchen
archibase planet
kitchen kitchen furniture kitchen table
kitchen - 3d model (*.gsm+*.3ds) for interior 3d visualization.
archibase_planet
free

Kitchen
...itchen
archibase planet
kitchen kitchen furniture kitchen cabinet
kitchen - 3d model (*.gsm+*.3ds) for interior 3d visualization.