Thingiverse
The Rocket - Side Spool Mount - Creality / Ender 3 Pro by regularlabs
by Thingiverse
Last crawled date: 3 years, 4 months ago
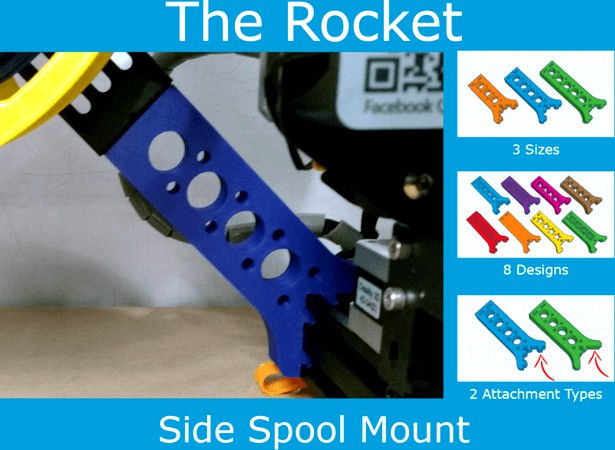
The Rocket
My new design for the Side Spool Mount, which I call: The Rocket
The mount slides on to the bottom bar of the rack of your printer.
It should fit on any printer using the standard X-frame. So that includes:
Creality Ender 3
Creality Ender 3 Pro
Creality CR-10
3 SIZES
There are 3 sizes to choose from:
M - Medium
L - Long
XL - Extra Long
I personally use the Long version, which gives more than enough clearance for standard 1KG filament rolls.
If you use 2.5KG roles, you might need the Extra Long version.
The Medium version should also give just enough clearance, but it is tight. So I only recommend that if you are short on space on the side.
8 DESIGNS
There are currently 8 different design to choose from
Circles
Dots
Flowers
Hearts
Squares
Solid *
Stars
Triangles
Note: The Solid design is overkill and uses a lot of filament, of course. I included it as a basis for if you want to create your own design (remix)
2 ATTACHMENT TYPES
There are 2 attachment types for each design:
Tabs
This has 4 tabs that slide snuggly onto the X-frame. No screws needed. Just slide it onto the rack and you are done.
This is also the version I use.
Holes
This one has 2 tabs and 2 screw holes. This is the easiest to slide on to the rail and will offer the most sturdy fit. The M58 screws included with your printer are long enough. But I recommend using M510 screws.
TIPS
Printing
I recommend 3 walls and a minimum of 50% infill.
You do not need any supports. The holes for the screws should print fine without them.
You can print with any material.
PLA and PETG are great for this.
ABS should work too, but it is a headache (both literally and figuratively) to print with.
I would love to see a print using TPE (flexible) too. Of course, totally useless. But that's beside the point.
Finishing
If you have set your printer up to have the first layer very tight to the bed, you can get 'elephants feet'. Meaning the first layer will be a bit squashed and therefor a bit wider than the rest. This can mean that it will be hard to slide the mount on to the rack. In that case, fie down those little edges of that first layer, and you should be golden!
Assembly
I recommend you attach the original spool mount so that the bottom of the print (the first printed layer) will point forwards.
That side usually looks nicer and smoother
The holes for the screws will be at the back
Similar models
thingiverse
free

Ender 3 inverted spool mount
...oles for screws, i have prepared it digitally but not printed it yet.
both simply slide on the top 2020 extrusion of the printer.
thingiverse
free

Side Spool Mount 4 Hole Extension - Ender 3 (Pro) / Creality CR by j3of0
...er 3 (pro) / creality cr by j3of0
thingiverse
a 4 hole extension for the side mount. additional set of screws and nuts required.
thingiverse
free
Spool Holder for Ender 3 uses factory holder by Djkirkendall
...ews that come with the ender 3. the holes are deep enough to accept the longer bottom frame screws.
print at 20% infill.
enjoy!
thingiverse
free

Ender 3 spool side mount
...are used.
it is a loose fit for the mounting groves, so it is easy to mount and slide to its desired position.
happy printing :-)
thingiverse
free

Ender 3 Side Spool Holder by Elproducts
...anged name of long foot version that fits aquila, ender 3 max, ender 3 v2 and printers with the rubber foot shown in the video.
thingiverse
free

Creality Upper Filament Guide
... with a very well designed dust filter made by kezat.https://www.thingiverse.com/thing:497764
thanks for the design! works great.
thingiverse
free

Ender 3/Pro Side Spool Mount - No extra hardare required by Gbartonw
... fillamet entering the extruder at an angle).
this may also work on other creality printers with the same structural extrusions.
thingiverse
free

Pen holder Creality ender 3 by Jackpistol96
... are long enough for both parts. then screw the file clamp with m4x16 screws (leave some space for then). insert pen and tighten.
thingiverse
free

2020 adapter for 2040 Extrusion Top Mounted Spool Holder by FruitDude
...er using m4 screws. then screw the adapter to the side of the 2020 extrusion. this should stabilize the spool holder sufficiently
thingiverse
free

Ender 3 Filament Spool Holder Bracket
...lder can either sit on top or hang below the spool adapter.
these parts were designed using the freeware version of emachineshop.
Regularlabs
thingiverse
free

Rocket Circle XL Spool Mount with Chain Start. by ybeyin
...thingiverse remixed from side spool holder (rocket serie) of @regularlabs https://www.thingiverse.com/thing:4691695 and for the chain start is from cable...
thingiverse
free

Lovely Filament Side Mount by KWhitt92
...thank you so much to the original designer - regularlabs the tabs are sized and spaced perfectly. printed easily...
thingiverse
free

Side Spool Mouth with Chain Start (Long Side Spool Mouth with Kette Grob Unten) by ybeyin
...and i really liked the spool mouth design of @regularlabs . using both at the same time seemed impossible....
thingiverse
free

Ender 3 Squash Ball Feet combined w/ Feet Noise Dampers by timjim81
...to slide into 4040 so i combined it with regularlabs#39;s creality ender 3 pro - feet noise dampers (https://www.thingiverse.com/thing:3520264)...
thingiverse
free

Ender 3 Side mount Filament Filter by PrintsLeo3D
...my printer instead of from the top rail (using regularlabs awesome filament holder "the rocket" https://www.thingiverse.com/thing:4691695). however i also...
Creality
turbosquid
$7

filament roller single print creality
...del filament roller single print creality for download as stl on turbosquid: 3d models for games, architecture, videos. (1619309)
3d_export
free

Creality ender enclosure webcam mount
...e creality enclosure. sure is better than a tripod. change it up if it helps. i printed pla with 50% infill on my dd ender 3 pro.
3d_export
free

ender 3 frame cavity covers
...3 inserts,<br>made these inserts for the framework of the creality ender 3 - makes it look a bit more...
3d_export
$42

excavator
...width is the original size. 0.12 mm printing surface creality ender-5...
3d_export
free

ender 3 3d print bed clips
...glass bed + normal aluminium bed frame of the creality ender 3 = 6mm (b) these clips are designed...
3d_export
free

ender 3 enclosure corners
...that i could build my enclosure frame for my creality ender 3 - so i printed them in a...
thingiverse
free

Toolbox Creality
...ingiverse
this is a toolbox for tools that comes with creality printers, with a guide to cut capricorn ptfe with a cutter blade.
thingiverse
free

Creality Hotend Plate
... from creality themselves as the ender 3 is open source. this means i did not create this design and all credit goes to creality.
thingiverse
free
Creality Cat by alexander125
...creality cat by alexander125
thingiverse
this is the cat that comes on the sd card for all creality 3d printers.
thingiverse
free

Creality Dog by alexander125
...creality dog by alexander125
thingiverse
this is the dog that comes on the sd card for all creality 3d printers.
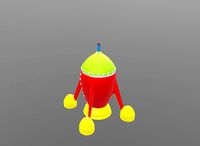
Rocket
3d_export
$5
rocket
...rocket
3dexport
rocket 3d model low poly
3d_export
$5

rocket
...rocket
3dexport
rocket low poly 3d model cartoon
archibase_planet
free

Rocket
...rocket
archibase planet
rocket toy
rocket tintin's n290813 - 3d model (*.gsm+*.3ds+*.max) for interior 3d visualization.
3d_export
$5

Rocket
...rocket
3dexport
the rocket is made from a cylinder made in blender 3.0
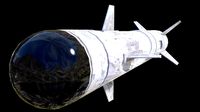
turbosquid
$6

Rocket Baby Rocket Stool
...el rocket baby rocket stool for download as max, obj, and fbx on turbosquid: 3d models for games, architecture, videos. (1502645)
turbosquid
$15

rocket
...ket
turbosquid
royalty free 3d model rocket for download as on turbosquid: 3d models for games, architecture, videos. (1340796)
turbosquid
$10
Rocket
...ket
turbosquid
royalty free 3d model rocket for download as on turbosquid: 3d models for games, architecture, videos. (1247547)
3d_export
$5

scifi rocket
...scifi rocket
3dexport
scifi rocket
turbosquid
$199

rockets
...turbosquid
royalty free 3d model rockets for download as max on turbosquid: 3d models for games, architecture, videos. (1233135)
turbosquid
$30
Rocket
...
turbosquid
royalty free 3d model rocket for download as fbx on turbosquid: 3d models for games, architecture, videos. (1290260)
Ender
3ddd
$1

Enders / Elegance
...enders / elegance
3ddd
обогреватель
уличный газовый обогреватель enders elegance
высота: 2200 мм
3d_export
free
ender 3 frame cavity covers
... of the creality ender 3 - makes it look a bit more attractive it just slides into the open channels of the aluminium framework
turbosquid
$1

pen support for ender 3
...y free 3d model pen support for ender 3 for download as blend on turbosquid: 3d models for games, architecture, videos. (1611282)
3d_ocean
$9

Ender Dragon Minecraft
...ojang obj poly videogames
ender dragon minecraft created with cinema 4d r15 formats included: max 2013 – fbx 2012 – c4d r15 – obj
3d_export
free
Creality ender enclosure webcam mount
...e creality enclosure. sure is better than a tripod. change it up if it helps. i printed pla with 50% infill on my dd ender 3 pro.
3d_export
free
ender 3 enclosure corners
...er corners and 4 upper corners, using 25mmx25mm angled aluminium pieces that gets covered on inside of the frame with plexiglass
3d_export
free
ender 3 3d print bed clips
...ed + normal aluminium bed frame of the creality ender 3 = 6mm (b) these clips are designed for glass plate + aluminium bed = 4mm
3d_export
$5

GRUMPY CAT
...grumpy cat 3dexport grumpy cat to print in ender ...
3d_export
$5

Logs fire
...with one multi material for corona and vray r ender. albedo, normal, uvmap, roughness format jpg 4096x4096 models:...
3d_export
$42
excavator
...is the original size. 0.12 mm printing surface creality ender5 ...
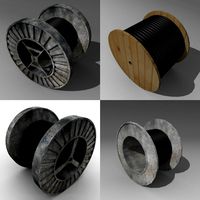
Spool
3ddd
$1

spool c53301
...spool c53301
3ddd
spool
spool c53301 650х350х145
turbosquid
$3

Cable Spool
...royalty free 3d model cable spool for download as max and fbx on turbosquid: 3d models for games, architecture, videos. (1457009)
turbosquid
free

Pallets and Spool
... available on turbo squid, the world's leading provider of digital 3d models for visualization, films, television, and games.
turbosquid
$10

Spool of String
...ol of string pink for download as c4d, 3ds, fbx, obj, and stl on turbosquid: 3d models for games, architecture, videos. (1647892)
3ddd
$1

Подвесные светильники Spool
...ye/podvesnoy_svetilnik_spool_d320/ http://www.cosmorelax.ru/catalog/podvesnyye/podvesnoy_svetilnik_spool_d420/
3ddd
free

Spool 001 sofa
...spool 001 sofa
3ddd
roda
roda
collection spool
design rodolfo dordoni
dimensions:
lenght 90 cm
depth 94 cm
height 79 cm
turbosquid
$15

Roda Spool Sofa
...ee 3d model roda spool sofa for download as max, obj, and fbx on turbosquid: 3d models for games, architecture, videos. (1502650)
turbosquid
$95
wire spools 3ds
... available on turbo squid, the world's leading provider of digital 3d models for visualization, films, television, and games.
turbosquid
$20

spool of TV wire
... available on turbo squid, the world's leading provider of digital 3d models for visualization, films, television, and games.
turbosquid
$3

Simple and Fast Spool Holder
...ree 3d model simple and fast spool holder for download as stl on turbosquid: 3d models for games, architecture, videos. (1548546)
Pro
turbosquid
$29

Pro
...ree 3d model mac pro for download as obj, c4d, fbx, and blend on turbosquid: 3d models for games, architecture, videos. (1505782)
turbosquid
$15

Apple Mac Pro and Pro Display
...ee 3d model apple mac pro and pro display for download as max on turbosquid: 3d models for games, architecture, videos. (1417078)
3d_export
$5

iphone 13 pro max and pro
...3 pro max and 13 pro the model is made in four colors (graphite, gold, silver, and blue), all of which are attached in the files.
3d_export
free

sapphire pro
...sapphire pro
3dexport
sapphire pro 3d printer head mask
3d_export
$4

macbook pro
...macbook pro
3dexport
macbook pro 13" inch 2020 years model
3ddd
free

GentleLase Pro
... syneron , candela
gentlelase pro аппарат для лазерной эпиляции
turbosquid
$25

PRO frame
...rbosquid
royalty free 3d model pro frame for download as max on turbosquid: 3d models for games, architecture, videos. (1148329)
turbosquid
$5

Alien pro
...osquid
royalty free 3d model alien pro for download as blend on turbosquid: 3d models for games, architecture, videos. (1678446)
turbosquid
$5

iphone11 pro
...uid
royalty free 3d model iphone11 pro for download as blend on turbosquid: 3d models for games, architecture, videos. (1562707)
3ddd
$1

Mac Pro (appel)
...mac pro (appel)
3ddd
компьютер , apple
mac pro
Side
3ddd
free
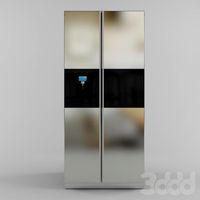
Side-by-side холодильник
...side-by-side холодильник
3ddd
холодильник
side-by-side холодильник samsung
turbosquid
free

siding
... available on turbo squid, the world's leading provider of digital 3d models for visualization, films, television, and games.
3ddd
$1

Кресло Side
...ресло side
3ddd
side , eero saarinen
eero saarinen кресло side.
материалы corona render.
turbosquid
$15
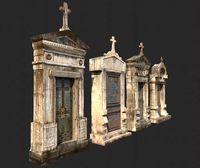
Mausoleum Entrances Lined Side By Side
...model mausoleum entrances lined side by side for download as on turbosquid: 3d models for games, architecture, videos. (1696515)
3ddd
$1

Side-by-Side SHARP SJ-F78PEBE
... холодильник
холодильник side-by-side sharp sj-f78pebe, габариты (шxгxв) 89x77x183 см, с материалами
3ddd
$1

Liebherr Refrigerator Side By Side Sbes 7165
... side sbes 7165
3ddd
liebherr , холодильник
liebherr refrigerator side by side sbes 7165
3ddd
$1
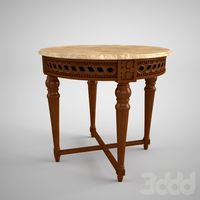
Side table
...side table
3ddd
журнальный
classic side table
3ddd
$1

Зеркало Side
...зеркало side
3ddd
винтаж , зеркало
зеркало side
3ddd
$1
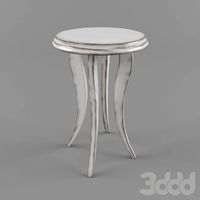
Side Table
...side table
3ddd
кофейный , круглый
side table
3ddd
$1
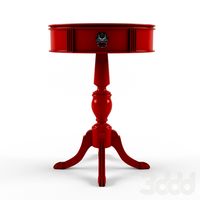
Side table
...side table
3ddd
приставной
bed side table, coffee table
Mount
3d_export
free

mounting bracket
...mounting plate is the portion of a hinge that attaches to the wood. mounting plates can be used indoors, cabinetry and furniture.
turbosquid
$2

MOUNTING
... available on turbo squid, the world's leading provider of digital 3d models for visualization, films, television, and games.
turbosquid
free

Mounts
... available on turbo squid, the world's leading provider of digital 3d models for visualization, films, television, and games.
turbosquid
free

Mount Fuji
...fuji
turbosquid
free 3d model mount fuji for download as obj on turbosquid: 3d models for games, architecture, videos. (1579977)
3d_export
$5

Headphone mount LR
...headphone mount lr
3dexport
headphone mount l+r
turbosquid
$39

Mount rainier
...quid
royalty free 3d model mount rainier for download as fbx on turbosquid: 3d models for games, architecture, videos. (1492586)
turbosquid
$5

pipe mounting
...quid
royalty free 3d model pipe mounting for download as obj on turbosquid: 3d models for games, architecture, videos. (1293744)
turbosquid
$3

Mounting Tires
...uid
royalty free 3d model mounting tires for download as fbx on turbosquid: 3d models for games, architecture, videos. (1708511)
3d_export
$5

Magnetic GoPro Mount
...pro mount
3dexport
cool magnetic mount for gopro. allows you to mount the camera on flat metal surfaces and get exclusive shots.
turbosquid
$5

Stone Mount
...ty free 3d model stone mount for download as ma, obj, and fbx on turbosquid: 3d models for games, architecture, videos. (1370306)
3
turbosquid
$10

Mountain Bike 3 -3 of 3
...model mountain bike 3 (#3 of 3) for download as fbx and blend on turbosquid: 3d models for games, architecture, videos. (1438752)
turbosquid
$6

Rock 3-3
...urbosquid
royalty free 3d model rock 3-3 for download as obj on turbosquid: 3d models for games, architecture, videos. (1628065)
turbosquid
$29

Books 150 pieces 3-3-3
...books 150 pieces 3-3-3 for download as max, obj, fbx, and stl on turbosquid: 3d models for games, architecture, videos. (1384033)
turbosquid
$3

Genesis 3 Clothing 3
... available on turbo squid, the world's leading provider of digital 3d models for visualization, films, television, and games.
3d_export
$5

hinge 3
...hinge 3
3dexport
hinge 3
3ddd
$1

Розетка 3
...розетка 3
3ddd
розетка
розетка 3
turbosquid
$50

is-3
... available on turbo squid, the world's leading provider of digital 3d models for visualization, films, television, and games.
turbosquid
$10

Mountain Bike 3 -2 of 3
...model mountain bike 3 (#2 of 3) for download as fbx and blend on turbosquid: 3d models for games, architecture, videos. (1438750)
turbosquid
$10

Mountain Bike 1 -3 of 3
...model mountain bike 1 (#3 of 3) for download as fbx and blend on turbosquid: 3d models for games, architecture, videos. (1438743)
3d_export
$5

3 CATS
...3 cats
3dexport
3 cats pen holder