Thingiverse

The Ratcheting CVT by Gear_Down_For_What
by Thingiverse
Last crawled date: 3 years, 1 month ago
Description: https://youtu.be/G9-N-nIqc4g
Assembly: https://youtu.be/2hdSGDdjpeQ
Torque Capabilities
Please know that i designed this CVT for a demonstration model, it's not intended to be used as an actual transmission
How This Works
Watch the video!
Hardware Required!
2 Sheetrock screws 1" or 2" long.
4.5mm BB's You Need These BB's
Print settings
You need to calibrate your printer to +/- .02 mm on a 20mm calibration cube before you print this or it will not fit and/or work properly, use horizontal expansion to accomplish this if necessary, but often oversized parts are caused by printing speed or worn out nozzle.
It is also necessary to level your bed - especially if you have an auto leveling sensor. This one cause me to have to reprint due to compensation that is done after auto leveling.
1.2mm wall thickness and 10% - 30% infill at .2mm layer height.
Print everything in the orientation that it's already in (yes print the cam adjustment shaft horizontally)
Use supports where necessary, I think I marked everything that needs it but use your own judgement.
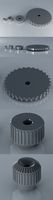
PRINT ALL THE GEARS (including the ratchet gear) together as a batch, but separate from all the other parts and slow your printing speed down substantially, otherwise they will come out too rough and will not fit together.
Part Preparation
Use a screwdriver (or the cam control shaft) to break the custom support material out of the inside hole of the crankshaft, this is there to help bridging and is only one(or two) layers thick.
Separate the eccentric components from each other, they should not be attached.
The two halves of the eccentric mount have a bearing race around them, its likely that the bearing race might have a small "bump" where the two halves meet due to printing jerk, use an exacto knife to make this bearing race nice and even.
Assembly
I plan to make an assembly video sometime, but until then, follow these instructions.
Assembly order
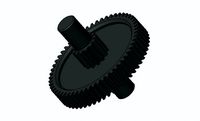
Assemble all three ratchets onto the output shaft, making sure that the ratchet pawl's are facing the clicker thingy, and the ratchet body's are facing the same way.
Install the crankshaft into the frame. The hex side of the crankshaft should be on the frame left side, then loosely place the three large pushrods (the giant circles) around the crankshaft.
Slide the output shaft with the ratchets into the frame.
Place the other side of the frame onto the machine, and use sheetrock screws to attach it.
Assemble the ratio adjuster gearbox, it's really hard to put together, and if it doesn't spin super freely you will need to reprint with a negative horizontal expansion setting. Ring gears need to be installed so that they are in the order of 1,2
Install the ratio adjuster with large carrier facing towards the frame, align the index marks on the crankshaft and the ring gear, and make sure the small carrier is facing out.
Install the cam control shaft through the entire apparatus, placing the cam gears into each pocket of the crankshaft in order of the marks on them with the marks facing the same direction, rotate the cam control shaft or the cam gears until the shaft slides through them( align the index position marks)
Install the ratio adjustment cover, aligning the notches on the cover to the notches on the ring gear.
At this point, the crank shaft should spin somewhat freely, and the cam gears should rotate at the same speed as the crankshaft assembly, if It does not, the gears are binding somewhere.
Install the two half's of the eccentric mount on the crankshaft in whichever spot you like, making sure to mate the rack of gears up with the cam gear.
Slide the pushrod over the top of the two halves of the eccentric mount and fill the grove up with 4.5mm BB's.
Once the raceway is filled with BB's, remove one or two BB's and then install the small wedge shaped piece into the bearing fill hole, the side with two faces should face out. I used a dab of hot glue to hold this piece in.
Repeat steps 8,9 and 10 for the other two eccentric's making sure not to flip them around (I.E. The build plate side should be on the same side for all three)
Place the wrist pins through the ratchets one at a time, use the eccentric offset adjustment to make the middle ratchet accessible
Other Important Info:
CAD Files??
I Included the Fusion 360 Project with this, But the most recent version of this project can be downloaded in lots of different formats from this link: http://a360.co/2IhRLLa
Feel free to create your own modifications and parts for this project, and if you do, make sure you create a remix and upload them, I'll link to them and possible create a collection for all of them!
Show Your Work!
Make a "make" and show everyone what you made! Everyone will thank you for it!
For More Cool Gearbox Projects, Don't forget Subscribe to Gear Down For What?! https://www.youtube.com/c/GearDownForWhat
Thanks!
We are a participant in the Amazon Services LLC Associates Program, an affiliate advertising program designed to provide a means for us to earn fees by linking to Amazon.com and affiliated sites.
Assembly: https://youtu.be/2hdSGDdjpeQ
Torque Capabilities
Please know that i designed this CVT for a demonstration model, it's not intended to be used as an actual transmission
How This Works
Watch the video!
Hardware Required!
2 Sheetrock screws 1" or 2" long.
4.5mm BB's You Need These BB's
Print settings
You need to calibrate your printer to +/- .02 mm on a 20mm calibration cube before you print this or it will not fit and/or work properly, use horizontal expansion to accomplish this if necessary, but often oversized parts are caused by printing speed or worn out nozzle.
It is also necessary to level your bed - especially if you have an auto leveling sensor. This one cause me to have to reprint due to compensation that is done after auto leveling.
1.2mm wall thickness and 10% - 30% infill at .2mm layer height.
Print everything in the orientation that it's already in (yes print the cam adjustment shaft horizontally)
Use supports where necessary, I think I marked everything that needs it but use your own judgement.
PRINT ALL THE GEARS (including the ratchet gear) together as a batch, but separate from all the other parts and slow your printing speed down substantially, otherwise they will come out too rough and will not fit together.
Part Preparation
Use a screwdriver (or the cam control shaft) to break the custom support material out of the inside hole of the crankshaft, this is there to help bridging and is only one(or two) layers thick.
Separate the eccentric components from each other, they should not be attached.
The two halves of the eccentric mount have a bearing race around them, its likely that the bearing race might have a small "bump" where the two halves meet due to printing jerk, use an exacto knife to make this bearing race nice and even.
Assembly
I plan to make an assembly video sometime, but until then, follow these instructions.
Assembly order
Assemble all three ratchets onto the output shaft, making sure that the ratchet pawl's are facing the clicker thingy, and the ratchet body's are facing the same way.
Install the crankshaft into the frame. The hex side of the crankshaft should be on the frame left side, then loosely place the three large pushrods (the giant circles) around the crankshaft.
Slide the output shaft with the ratchets into the frame.
Place the other side of the frame onto the machine, and use sheetrock screws to attach it.
Assemble the ratio adjuster gearbox, it's really hard to put together, and if it doesn't spin super freely you will need to reprint with a negative horizontal expansion setting. Ring gears need to be installed so that they are in the order of 1,2
Install the ratio adjuster with large carrier facing towards the frame, align the index marks on the crankshaft and the ring gear, and make sure the small carrier is facing out.
Install the cam control shaft through the entire apparatus, placing the cam gears into each pocket of the crankshaft in order of the marks on them with the marks facing the same direction, rotate the cam control shaft or the cam gears until the shaft slides through them( align the index position marks)
Install the ratio adjustment cover, aligning the notches on the cover to the notches on the ring gear.
At this point, the crank shaft should spin somewhat freely, and the cam gears should rotate at the same speed as the crankshaft assembly, if It does not, the gears are binding somewhere.
Install the two half's of the eccentric mount on the crankshaft in whichever spot you like, making sure to mate the rack of gears up with the cam gear.
Slide the pushrod over the top of the two halves of the eccentric mount and fill the grove up with 4.5mm BB's.
Once the raceway is filled with BB's, remove one or two BB's and then install the small wedge shaped piece into the bearing fill hole, the side with two faces should face out. I used a dab of hot glue to hold this piece in.
Repeat steps 8,9 and 10 for the other two eccentric's making sure not to flip them around (I.E. The build plate side should be on the same side for all three)
Place the wrist pins through the ratchets one at a time, use the eccentric offset adjustment to make the middle ratchet accessible
Other Important Info:
CAD Files??
I Included the Fusion 360 Project with this, But the most recent version of this project can be downloaded in lots of different formats from this link: http://a360.co/2IhRLLa
Feel free to create your own modifications and parts for this project, and if you do, make sure you create a remix and upload them, I'll link to them and possible create a collection for all of them!
Show Your Work!
Make a "make" and show everyone what you made! Everyone will thank you for it!
For More Cool Gearbox Projects, Don't forget Subscribe to Gear Down For What?! https://www.youtube.com/c/GearDownForWhat
Thanks!
We are a participant in the Amazon Services LLC Associates Program, an affiliate advertising program designed to provide a means for us to earn fees by linking to Amazon.com and affiliated sites.
Similar models
grabcad
free

Eccentric Cam shaft
...eccentric cam shaft
grabcad
3d model of eccentric cam shaft using solid works
thingiverse
free

Bullzeye Clock Remix by Legedus83
...les for small screws to connect each other from the back frame. the hex insert part never really fit into it's hole properly.
thingiverse
free

Rocking Body Walking Robot Drone #5 by RobotHut
...d as a pivot shaft for the motor frame unit. a shaky video will be posted to you tube for this build.https://youtu.be/jbndiefmkrs
thingiverse
free

Fully printable adjustable inline GT2 belt tensioner by apell
...tatic block and push against it's ring when tightening the nut. once the assembly is finished, install the zipties if needed.
thingiverse
free

Tronxy X3/X3A Electronics back panel by hazevapeco
...installed it, should be good now, but just in case it isn't and you find a problem, please let me know and i'll tweak it.
thingiverse
free

Mercedes ML320 W163 Blend Door Motor Gear by clearchris
...ear fits other gm vehicles including the 2004 blazer and 1998 saturn sl2. hat tip to thall320578 for reporting back his success.
thingiverse
free

Wine glass table with the secret by qnub
...art.
at the end you can close "frame" from the bottom with "frame cap". you can store some small things here…
thingiverse
free

Bevel Gears by kresty
...guys to adjust the fittings to fit your project.
these are intended for my lego bb-8 flywheel drive, we'll see how that goes.
thingiverse
free

Treasure chest
... the panels. only the edges need to be glued. on the base section no glue may be necessary depending on how the print turned out.
thingiverse
free

Adjustable Limit Switch Cam Arm for Hex Shaft by extrememoderate
...etc. i'll clean it up when there's time, but wanted to put it out there in case any other frc teams could make us of it.
Cvt
turbosquid
$25

Rotiform CVT
...d model rotiform cvt for download as obj, fbx, blend, and stl on turbosquid: 3d models for games, architecture, videos. (1397288)
cg_studio
$50

CVT - Small continuously variable transmission3d model
... .obj - cvt - small continuously variable transmission 3d model, royalty free license available, instant download after purchase.
3d_export
$130

steyr tractor - terrus cvt
... in this model, please do not hesitate to contact us, we are looking forward to continuously dealing with you.<br>markos 3d
3d_export
$15

niva urban
...niva urban 3dexport niva urban on wheels vossen cvt and a speaker system in the trunk amplifiers, subwoofer,...
3d_export
$99

Toyota Verso EZ 2012 3D Model
...2012 2013 2014 2015 hatchback compact b-mpv mpv urban cvt toyota verso ez 2012 3d model humster3d 50814...
3d_export
$90

2008 Toyota Mark X Zio 3D Model
...2008 toyota mark zio corolla camry auri axio super cvti japanese sedan 3dken kenny ng 2008 toyota mark x...
3d_ocean
$89

Subaru Impreza 2012
...impreza 2012 3docean 4 doors 4d all-wheel awd boxer cvt drive impreza japan new sedan sti subaru subaru impreza...
cg_studio
$99

Toyota Verso (E'Z) 20123d model
...2012 2013 2014 2015 hatchback compact b-mpv mpv urban cvt vehicle city style .c4d .fbx .lwo .max .mb .obj...
3d_ocean
$89

Toyota Verso (E'Z) 2012
...toyota verso (e'z) 2012 3docean b-mpv city compact cvt e'z hatchback mpv style toyota toyota verso urban vehicle...
thingiverse
free

Vossen Wheel CVT
...vossen wheel cvt
thingiverse
vossen wheel cvt made in blender.
instagram obscurus geek
Ratcheting
turbosquid
$2

Ratchet
...oyalty free 3d model ratchet for download as ma, obj, and fbx on turbosquid: 3d models for games, architecture, videos. (1390010)
turbosquid
$20

Ratchet
... available on turbo squid, the world's leading provider of digital 3d models for visualization, films, television, and games.
turbosquid
$25

Ratchet G1
... available on turbo squid, the world's leading provider of digital 3d models for visualization, films, television, and games.
turbosquid
$5

Ratchet's Omniwrench
... available on turbo squid, the world's leading provider of digital 3d models for visualization, films, television, and games.
3d_export
$15

Ratchet Socket Wrench 3D Model
...3dexport ratchet socket wrench fastener tools equipment hand tool ratcheting bolt nut torque tighten spanner screw extension hex assemble...
cg_studio
$30

Ratchet Socket Wrench3d model
...
cgstudio
.3ds .max .obj .wrl - ratchet socket wrench 3d model, royalty free license available, instant download after purchase.
3d_export
$30

Ratchet Socket Wrench 3D Model
...mble bolt screw chrome extension hex nut construction photorealistic vray
ratchet socket wrench 3d model plutonius 33314 3dexport
3d_export
$69

Ratchet Jack Stands
...dimensions. -ideal for your auto service project. -scene for 3ds max 2012 and v-ray 2.0 !!!in file only 3d model without light!!!
3d_export
$5

robot head
...robot head
3dexport
detailed head 3d model of transformers ratchet
3d_export
$5

Rachet Pawl Mechanism
...semblies that are used to transmit intermittent rotary motion, or to permit a shaft to rotate in one direction but not the other.
Gear
3d_ocean
$4
Gears
...gears
3docean
gear gears iron
4 different size of gears
3d_export
$5
gear
...gear
3dexport
gear
3d_export
free
Gears
...gears
3dexport
gears
3d_export
$5
gear
...gear
3dexport
a simple model of gear
3d_export
$5
gear
...gear
3dexport
gear for transmission , case machine
3d_ocean
$3
Gears
...nical parts process steampunk vehicle wheel work
10 different gear models volume 01-10 files: .3ds .c4d .obj note: you need vray
3d_ocean
$1

Spur Gear
...spur gear
3docean
decoration gear
a typical spur gear
3d_ocean
$4
Gear wheels
...gear wheels
3docean
engine engineering gear gears industry machinery mechanical toothwheel wheel
pair of gear wheels : animated.
turbosquid
$9
Gear
...gear
turbosquid
royalty free 3d model gear for download as on turbosquid: 3d models for games, architecture, videos. (1712328)
turbosquid
$2

Gears
...rs
turbosquid
royalty free 3d model gears for download as ma on turbosquid: 3d models for games, architecture, videos. (1166710)
What
3ddd
$1

Progetti What Time IN LEGNO NATURALE
...progetti what time in legno naturale
3ddd
часы
часы progetti what time in legno naturale
turbosquid
$28

Chandelier Andromeda So What
... available on turbo squid, the world's leading provider of digital 3d models for visualization, films, television, and games.
turbosquid
$19

Chair What's New Pussycat
... available on turbo squid, the world's leading provider of digital 3d models for visualization, films, television, and games.
3d_export
free

Download free You lookong for what 3D Model
...ort
words
you lookong for what 3d model download free .c4d .max .obj .fbx .ma .lwo .3ds .3dm .stl makleierik19098 103707 3dexport
3d_export
$49

air jordan 4 retro what the pbr
...x 2014 v-ray 3ds max 2018 arnold blender 2.8 cycles render cinema 4d r16 advanced render maya 2014 v-ray maya 2018 arnold fbc obj
3d_export
$135

honda e
...3dexport honda e, high detail model real world dimensions, what you see is what you...
3d_export
free

old barrel
...if you have time, download it and email me what is wrong and what needs to be fixed,...
3d_export
free

nail
...nail 3dexport a nail for what is...
3d_export
$155

Ferrari 812 Competizione
...ferrari 812 competizione, high detail model. real world dimensions, what you see is what you get, parts separated in...
3d_export
$155

Ferrari 812 Superfast
...ferrari 812 superfast, high detail model. real world dimensions, what you see is what you get, parts separated in...