Thingiverse

The Pastrini - A Kit for Converting Any Standard 60% Tray-Mount Into a Taco Bumper Gasket-Mount Keyboard, With Replaceable Magnetic Badge by BeagleChristo
by Thingiverse
Last crawled date: 3 years ago
INTRODUCTION:
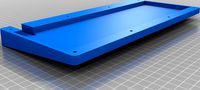
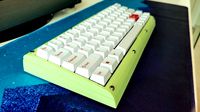
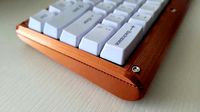
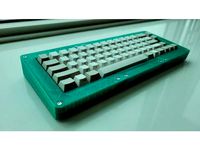
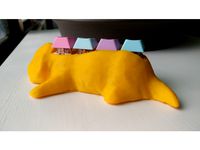
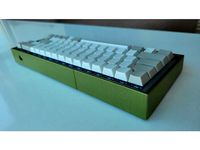
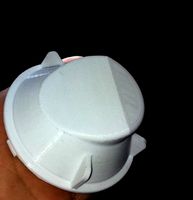
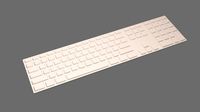
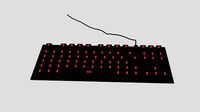
This is a kit for converting any standard 60% tray-mount keyboard (e.g., GH60 or DZ60) into a taco bumper gasket-mount keyboard. It consists of (1) the case and (2) gasket wings, which clip onto the plate. The gasket wings are rigid enough to keep the plate anchored to the case, but flexible enough to provide a softer and more delicate typing experience than other mounting methods.
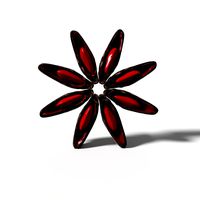
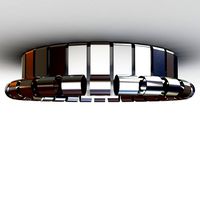
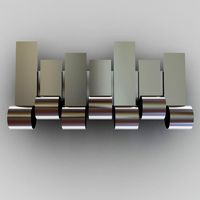
This version of the case allows for replaceable magnetic badges. I've included a few examples here (see attributions below), but you can design your own. The dimensions of the badge should be about 15mm x 15mm x 3mm. (The well for the badge is 6mm deep, but about 3mm of that depth will be taken up by the magnets.) The badge, of course, need not be limited to the well. It can protrude beyond the well. Also, magnets are not strictly necessary either. The badge can be affixed by other means as well, or even friction fit into the well.
INGREDIENTS
M3 20mm screws x 4 (for upper portion of keyboard)
M3 16mm screws x 4 (for bottom portion of keyboard)
M3 nuts x 8
adhesive poron, to be cut to size (I used the following 2mmT x 125mm x 1M poron: https://item.taobao.com/item.htm?spm=a1z09.2.0.0.67002e8dcgt1rA&id=596691601583&_u=820rh52kbe7d)
a standard 60% tray-mount PCB and plate (e.g., GH60 or DZ60)
adhesive magnets, about 1.5mm thick (optional)
internal weight (optional) https://item.taobao.com/item.htm?spm=a1z09.2.0.0.67002e8dcgt1rA&id=560138068179&_u=820rh52k68c4
case foam (optional)
ASSEMBLY INSTRUCTIONS
(1) Print out the case. If your build size is sufficient (length >= 296 mm, width >= 132 mm, height >= 27 mm), then you will be able to print out the entire "CASE TOP HALF" and "CASE BOTTOM HALF" at once. For build sizes of <= 150 mm^3, I have subdivided the case into four parts: "case top left," "case top right," "case bottom left," and "case bottom right."
(2) Print out the gasket wings:
(a) "wing - upper left/upper right 2u" x 2
(b) "wing - upper center 3u" x 1
(c) "wing - bottom 2.5u" x 2
Note that the "wing - upper center 3u" is optional. (I have not tried omitting any of the corner wings.)
(3) Affix the adhesive poron (or some other gasket material) to the gasket wings, forming a "taco" bumper around the wing. Lengthwise, the bumper should extend beyond the wing by about 0.5 mm on each side. This will prevent the sides of the wing from contacting the case.
(4) Insert switches and keycaps into plate and PCB.
(5) Clip the gasket wings onto the plate (not the PCB) so that they line up with the gasket wells in the case.
(6) Once clipped into the plate, align the gasket wings with the corresponding gasket wells on the case; sandwich the wings between the top and bottom halves of the case; and screw the top and bottom halves together. The 20 mm screws are for the upper portion of the case, and the 16 mm screws are for the bottom portion of the case.
If you print out the case in four parts (i.e., "case top left," "case top right," "case bottom left", and "case bottom right"), you might, depending on the tolerances of your printer, consider gluing together only "case bottom left" and "case bottom right." That way, it will be easier to line up the screw holes on the top and bottom halves of the case.
The gasket wells are 4.5 mm high and the gasket wing height (without poron) is 1.5 mm. Thus, if you use poron of 2 mm thickness, the combination of the 1.5 mm gasket wing and 2 mm poron (folded over the wing, so the thickness is doubled) will result in a bumper of about 5.5 mm thickness. This means that the poron will compress about 0.5 mm total in the gasket wells.
Badge Attributions:
The badges are remixes of the following designs. (The Thingiverse "Remix" function appears to be broken, which is why I am listing the attributions here.)
Square Flower Rosette Trim by BRUXXUS - https://www.thingiverse.com/thing:2168783
Ennis House Tile by Keenan - https://www.thingiverse.com/thing:45567
Heatwave 3d Printable Typeface by LorenIPSVM - https://www.thingiverse.com/thing:276836
Ornate Picture Frame by unwohlpol - http://www.thingiverse.com/thing:2050191
This is a kit for converting any standard 60% tray-mount keyboard (e.g., GH60 or DZ60) into a taco bumper gasket-mount keyboard. It consists of (1) the case and (2) gasket wings, which clip onto the plate. The gasket wings are rigid enough to keep the plate anchored to the case, but flexible enough to provide a softer and more delicate typing experience than other mounting methods.
This version of the case allows for replaceable magnetic badges. I've included a few examples here (see attributions below), but you can design your own. The dimensions of the badge should be about 15mm x 15mm x 3mm. (The well for the badge is 6mm deep, but about 3mm of that depth will be taken up by the magnets.) The badge, of course, need not be limited to the well. It can protrude beyond the well. Also, magnets are not strictly necessary either. The badge can be affixed by other means as well, or even friction fit into the well.
INGREDIENTS
M3 20mm screws x 4 (for upper portion of keyboard)
M3 16mm screws x 4 (for bottom portion of keyboard)
M3 nuts x 8
adhesive poron, to be cut to size (I used the following 2mmT x 125mm x 1M poron: https://item.taobao.com/item.htm?spm=a1z09.2.0.0.67002e8dcgt1rA&id=596691601583&_u=820rh52kbe7d)
a standard 60% tray-mount PCB and plate (e.g., GH60 or DZ60)
adhesive magnets, about 1.5mm thick (optional)
internal weight (optional) https://item.taobao.com/item.htm?spm=a1z09.2.0.0.67002e8dcgt1rA&id=560138068179&_u=820rh52k68c4
case foam (optional)
ASSEMBLY INSTRUCTIONS
(1) Print out the case. If your build size is sufficient (length >= 296 mm, width >= 132 mm, height >= 27 mm), then you will be able to print out the entire "CASE TOP HALF" and "CASE BOTTOM HALF" at once. For build sizes of <= 150 mm^3, I have subdivided the case into four parts: "case top left," "case top right," "case bottom left," and "case bottom right."
(2) Print out the gasket wings:
(a) "wing - upper left/upper right 2u" x 2
(b) "wing - upper center 3u" x 1
(c) "wing - bottom 2.5u" x 2
Note that the "wing - upper center 3u" is optional. (I have not tried omitting any of the corner wings.)
(3) Affix the adhesive poron (or some other gasket material) to the gasket wings, forming a "taco" bumper around the wing. Lengthwise, the bumper should extend beyond the wing by about 0.5 mm on each side. This will prevent the sides of the wing from contacting the case.
(4) Insert switches and keycaps into plate and PCB.
(5) Clip the gasket wings onto the plate (not the PCB) so that they line up with the gasket wells in the case.
(6) Once clipped into the plate, align the gasket wings with the corresponding gasket wells on the case; sandwich the wings between the top and bottom halves of the case; and screw the top and bottom halves together. The 20 mm screws are for the upper portion of the case, and the 16 mm screws are for the bottom portion of the case.
If you print out the case in four parts (i.e., "case top left," "case top right," "case bottom left", and "case bottom right"), you might, depending on the tolerances of your printer, consider gluing together only "case bottom left" and "case bottom right." That way, it will be easier to line up the screw holes on the top and bottom halves of the case.
The gasket wells are 4.5 mm high and the gasket wing height (without poron) is 1.5 mm. Thus, if you use poron of 2 mm thickness, the combination of the 1.5 mm gasket wing and 2 mm poron (folded over the wing, so the thickness is doubled) will result in a bumper of about 5.5 mm thickness. This means that the poron will compress about 0.5 mm total in the gasket wells.
Badge Attributions:
The badges are remixes of the following designs. (The Thingiverse "Remix" function appears to be broken, which is why I am listing the attributions here.)
Square Flower Rosette Trim by BRUXXUS - https://www.thingiverse.com/thing:2168783
Ennis House Tile by Keenan - https://www.thingiverse.com/thing:45567
Heatwave 3d Printable Typeface by LorenIPSVM - https://www.thingiverse.com/thing:276836
Ornate Picture Frame by unwohlpol - http://www.thingiverse.com/thing:2050191
Similar models
thingiverse
free
The Château d'If - A Kit for Converting a 60% Tray-Mount Into a Taco Bumper Gasket-Mount Keyboard by BeagleChristo
...ill result in a bumper of about 5.5 mm thickness. this means that the poron will compress about 0.5 mm total in the gasket wells.
thingiverse
free
The Baptistin - A Kit for Converting 60% Tray-Mounts Into a Taco Bumper Gasket-Mount Keyboard by BeagleChristo
...ill result in a bumper of about 5.5 mm thickness. this means that the poron will compress about 0.5 mm total in the gasket wells.
thingiverse
free

The Baptistin - A Kit for Converting 60% Tray-Mounts Into a Taco Bumper Gasket-Mount Keyboard by BeagleChristo
...ill result in a bumper of about 5.5 mm thickness. this means that the poron will compress about 0.5 mm total in the gasket wells.
thingiverse
free
The Zaccone - A Kit for Converting Any Standard 60% Tray-Mount Into a Taco Bumper Gasket-Mount Keyboard by BeagleChristo
...sure whether subsequent iterations of the gk61 will work. similary, the yc66 special is based on the yc66 plate...
thingiverse
free

The YC66 Special - Gasket Mount, Thin(ner) Bezel Version by BeagleChristo
...e.
add case foam to bottom of tray.
to do:
increase screw head diameter.
hide screws.
add space for hot-swappable magnetic badge.
thingiverse
free
The YC66 Special - Gasket Mount, Thick Bezel Version by BeagleChristo
... usb cutout downward by about 2 mm.
repair top center piece: currently, the ledge is not fully attached to the case.
hide screws.
thingiverse
free

The Teamwolf Special (Front Side Cutouts) - A Ring Gasket Mount Case for the Teamwolf Zhuque Keyboard by BeagleChristo
... into thirds ("left part," "middle part," and "right part").
to do:
implement replaceable cord mod.
thingiverse
free

The Teamwolf Special (Rear Side Cutouts) - A Ring Gasket Mount Case for the Teamwolf Zhuque Keyboard by BeagleChristo
... into thirds ("left part," "middle part," and "right part").
to do:
implement replaceable cord mod.
3dwarehouse
free

Silicon Energy Cascade Series photovoltaic module-example conditions. 3-D model creator = Susan Gohd
...nt_solar #pv #solar_array #solar_module #solar_panel #solar_panels #solar_photovoltaic #solar_pv #solar_racking #washington_solar
thingiverse
free

The GK61 Special - A Pseudo Gasket Mount Case for the GK61 by BeagleChristo
...ket and non-gasket versions. in particular, the gasket version works exactly as planned.
november 17, 2020: weight version added.
Beaglechristo
thingiverse
free
The Mercédès - A Cherry MX-Style Beagle Switch Tester by BeagleChristo
... mx-style beagle switch tester by beaglechristo
thingiverse
this is a switch tester that can hold four cherry mx-style switches.
thingiverse
free

Low-Profile YC66 Foot by BeagleChristo
... is designed to fit a low-profile yc66 that is approximately 12.3 mm thick, so if your model is equivalent, the foot should work.
thingiverse
free

Mechanical Keyboard Spacer for 2011 MacBook Air by BeagleChristo
...ed this solution with my 2011 macbook air. i'm not sure whether it will work with other macbooks or other notebook computers.
thingiverse
free

The YC66 Special - Gasket Mount, Thin Bezel Version by BeagleChristo
...added an alternate version of the top layer that incorporates a blocker to cover the exposed top-right portion of the yc66 plate.
thingiverse
free

The Spada - A Bauhaus 60% Keyboard Case (Modified Tray or Ring Gasket Mount) by BeagleChristo
...auhaus school logo" by ktronik. many thanks to ktronik.
update sept. 7, 2020: added remarks regarding ring gasket mounting.
thingiverse
free
The YC66 Special (Bottom Mount Version) by BeagleChristo
...t bottom of case.
add case foam to bottom of tray.
sound tests:https://soundcloud.com/ogerrbogast/sets/typing-on-the-yc66-special
thingiverse
free

Thick Plate Model for Standard 60% Tray-Mount Keyboard Builds With PCB-Mounted Stabilizers by BeagleChristo
...s; and tinkercad to convert the .svg file to .stl format. (i couldn't figure out how to cut polygons using swillkb directly.)
thingiverse
free

The Herbault - A Sculpted 60% Modified-Tray-Mount Keyboard Case by BeagleChristo
... please note that i have not yet printed this model out, so cannot give any assurances about whether it is feasible or practical.
thingiverse
free

"Subtraction" Block for Use in the Design of 60% Keyboard Cases by BeagleChristo
... "subtraction" model for the usb port. if there is a need for those features, i will post another model on thingiverse.
thingiverse
free
The Faria - A Sculpted 60% Modified-Tray-Mount Keyboard Case by BeagleChristo
... please note that i have not yet printed this model out, so cannot give any assurances about whether it is feasible or practical.
Taco
3ddd
$1

Плитки Taco Oxford
...ord , плитка
плитки taco oxford 4 вида (31,6х90 см):
- cognac
- natural
- acero
- blanco
3d_export
$5

Taco 3D Model
...taco 3d model
3dexport
taco fried meat beans lettuce tomatoes mexican food meal
taco 3d model uncle808us 41692 3dexport
turbosquid
$50

NIVELADOR TACOS PARA MUEBLES
... available on turbo squid, the world's leading provider of digital 3d models for visualization, films, television, and games.
3ddd
$1

Porcelanosa Taco Oxford
...porcelanosa taco oxford
3ddd
porcelanosa , плитка
коллекция 2014г , размер 31,6 х 90 см
3ddd
$1

Плитка taco oxford natural и 2 светильника Unika
... unika
коллекция настенной плитки taco oxford natura
и два светильника unika потолочный и напольный
3d_export
$8

Stainless Steel Taco Holder
...; x 3.98" x 2.02"<br>- model parts: 1<br>- material count: 1<br>- xform: yes<br>- boxtrick: yes
3ddd
$1

Porcelanite Dos 5000
...размер: 25x50 cenefa 5000 marengo бордюр размер: 25x50 вставка taco 5000 marengo вставка размер:25x25 taco 5000 beige вставка размер:...
thingiverse
free

Taco Taco Holder by Jcf_jackey
...taco taco holder by jcf_jackey
thingiverse
taco taco holder for 2 tacos
thingiverse
free

paddle taco
...paddle taco
thingiverse
paddle taco
thingiverse
free

Taco by Matsofan
...taco by matsofan
thingiverse
a simple taco
Gasket
turbosquid
$5

Leather Gasket cutter old
...s blend, ma, c4d, max, wire, ztl, usd, ma, 3ds, dae, and gltf on turbosquid: 3d models for games, architecture, videos. (1675900)
turbosquid
$5

Leather Gasket cutter new
...blend, c4d, ma, usd, wire, ztl, max, ma, 3ds, dxf, dae, and d on turbosquid: 3d models for games, architecture, videos. (1675892)
turbosquid
$1
Head Gasket - Single Cylinder Engine
...ngle cylinder engine for download as ige, obj, stl, and sldpr on turbosquid: 3d models for games, architecture, videos. (1233315)
3d_export
$6
the plug for the lights citroen c-crosser
...plug for the lights citroen c-crosser. form for silicone gasket ...
3d_export
free

gothic capsule
...gothic capsule 3dexport die-cast aluminium body<br>pretreated powder coating<br>watertight silicone gasketlt;br>clear toughen dustproof glass<br>high current carrying cable<br>earthing safe connection<br>ss grade...
3d_export
free
first stage reducer
...driving gear shaft, driven shaft, gear, 62056202 bearing, bolt gasket and perspective cover and other small parts. the design...
3d_export
$15
20 sets of vibrating plate direct vibration feeding mechanism
...mechanism diagram, spring plate material distribution vibration plate feeding, gasket vibration plate direct vibration feeder material distribution structure drawing,...
thingiverse
free

Gasket
...gasket
thingiverse
antenna gasket prototype model.
thingiverse
free

gasket by habibisoft
...gasket by habibisoft
thingiverse
gasket
thingiverse
free
Parametric gasket
...just a parametric gasket, with the option of a tab or not.
made to replace a broken gasket from a large spring closed glass jar.
Badge
3d_ocean
$5

Badge
...badge
3docean
3d 3d models badge badge 3d c4d cinema 4d earth hdri metal pin button profesional sky superbingo vray
3d badge
3d_export
$5

KGB badge
...kgb badge
3dexport
kgb badge
3d_ocean
$5

liquid badge
...liquid badge
3docean
liquid badge you can replace your logo
liquid badge,you can replace your logo
3d_ocean
$10

The Badge
...f strap black and red strap. you can also change the color of the strap on the materials view. also comes with two 3dmax 2012 ...
3d_ocean
$6

Badge Pack
... of badge, feel free to change the colour. format include : .c4d .obj .3ds i hope your enjoy and don’t forget to rate it. thanks
turbosquid
$9

CAMPING Badge
...quid
royalty free 3d model camping badge for download as stl on turbosquid: 3d models for games, architecture, videos. (1499495)
turbosquid
$25

Sheriff Badge
...free 3d model sheriff badge for download as lxo, lxo, and obj on turbosquid: 3d models for games, architecture, videos. (1549881)
turbosquid
$10

Electrician badge
...e 3d model electrician badge for download as ma, obj, and stl on turbosquid: 3d models for games, architecture, videos. (1603391)
turbosquid
$10

Mechanic Badge
...free 3d model mechanic badge for download as ma, stl, and obj on turbosquid: 3d models for games, architecture, videos. (1603396)
3d_export
$22

LA police badge
...la police badge
3dexport
los angeles police badge - subdivide ready 2x2
Bumper
turbosquid
free
Bumper
... available on turbo squid, the world's leading provider of digital 3d models for visualization, films, television, and games.
turbosquid
$10
Bumper Front
...squid
royalty free 3d model bumper front for download as obj on turbosquid: 3d models for games, architecture, videos. (1550133)
turbosquid
$15

bumper car.br3
... available on turbo squid, the world's leading provider of digital 3d models for visualization, films, television, and games.
3d_export
$5
bumper arb toyota fortuner
...bumper arb toyota fortuner
3dexport
bumper arb toyota fortuner
3d_export
$7

front bumper
... it to use in other car, here it is for you. also if you need some help, tell us, and we will be happy to give you want you need.
turbosquid
$28
bumper chair by HermanMiller
...ree 3d model bumper chair by hermanmiller for download as max on turbosquid: 3d models for games, architecture, videos. (1642341)
turbosquid
$15

Dodgem Bumper car
...
royalty free 3d model dodgem bumper car for download as obj on turbosquid: 3d models for games, architecture, videos. (1418034)
turbosquid
$95
Bumper Pool Table
... 3d model bumper pool table for download as 3ds, max, and obj on turbosquid: 3d models for games, architecture, videos. (1298512)
turbosquid
$20

Red Bumper Car
...model red bumper car for download as 3ds, obj, fbx, and blend on turbosquid: 3d models for games, architecture, videos. (1322171)
turbosquid
$70
Bumper WAC rocket
... available on turbo squid, the world's leading provider of digital 3d models for visualization, films, television, and games.
Keyboard
3d_ocean
$9
Keyboard
...odels computer electronics keyboard peripheral / part
computer keyboard 3d models. it’s computer keyboard. render ready keyboard.
archibase_planet
free
Keyboard
...keyboard
archibase planet
input keyboard keyboard office equipment
pro keyboard - 3d model for interior 3d visualization
3d_export
$5
keyboard
...keyboard
3dexport
computer keyboard
3d_export
$11
Keyboard
...keyboard
3dexport
gaming keyboard with backlight 1:1
3d_export
free
keyboard
...keyboard
3dexport
keyboard blender stl obj fbx
archibase_planet
free
Keyboard
...keyboard
archibase planet
keyboard pc equipment
keyboard apple n130315 - 3d model (*.gsm+*.3ds) for interior 3d visualization.
3d_export
free
keyboard gaming
...keyboard gaming
3dexport
keyboard gaming include: 1 x keyboard gaming.blend 3 x keyboard gaming.png
archibase_planet
free
Keyboard
...keyboard
archibase planet
keyboar pc equipment
keyboard - 3d model (*.gsm+*.3ds) for interior 3d visualization.
3d_ocean
$9

keyboard USB
...models computer electronics keyboard peripheral / part
keyboard for computer 3d models. high detailed model of computer keyboard.
turbosquid
$24

Keyboard
...urbosquid
royalty free 3d model keyboard for download as max on turbosquid: 3d models for games, architecture, videos. (1710291)
Tray
archibase_planet
free

Tray
...tray
archibase planet
tray salver tea-tray
tray 1 n210312 - 3d model (*.gsm+*.3ds) for interior 3d visualization.
archibase_planet
free

Tray
...tray
archibase planet
tray salver tea-tray
tray 2 n210312 - 3d model (*.gsm+*.3ds) for interior 3d visualization.
3d_export
$8

tray
...tray
3dexport
design of tray
archibase_planet
free

Tray
...tray
archibase planet
tray salver stand
tray - 3d model (*.gsm+*.3ds) for interior 3d visualization.
archibase_planet
free

Tray
...tray
archibase planet
tray salver
tray n050408 - 3d model (*.gsm+*.3ds) for interior 3d visualization.
archibase_planet
free

Tray
...tray
archibase planet
tray salver kitchen ware
tray - 3d model (*.gsm+*.3ds) for interior 3d visualization.
archibase_planet
free

Tray
...tray
archibase planet
tray salver
tray 2 n050408 - 3d model (*.gsm+*.3ds) for interior 3d visualization.
archibase_planet
free

Tray
...tray
archibase planet
tray salver kitchen ware
tray n241211 - 3d model (*.3ds) for interior 3d visualization.
archibase_planet
free

Tray
...tray
archibase planet
tray salver office ware
tray n160808 - 3d model (*.gsm+*.3ds) for interior 3d visualization.
archibase_planet
free

Tray
...tray
archibase planet
donuts donuts tray donut food
tray donuts n190614 - 3d model (*.gsm+*.3ds) for interior 3d visualization.
Magnetic
3d_ocean
$2

Magnet
...magnet 3docean 3d 3ds max electric magnet magnetic magnetism max model polygon realistic tesla magnet created in...
turbosquid
$6
Magnet
...
turbosquid
royalty free 3d model magnet for download as obj on turbosquid: 3d models for games, architecture, videos. (1548733)
turbosquid
$6

magnet
...uid
royalty free 3d model magnet for download as 3dm and max on turbosquid: 3d models for games, architecture, videos. (1670606)
turbosquid
$1

Magnet
...y free 3d model magnet for download as 3ds, max, obj, and fbx on turbosquid: 3d models for games, architecture, videos. (1215037)
turbosquid
$7

Magnet
...agnet for download as blend, unitypackage, fbx, gltf, and obj on turbosquid: 3d models for games, architecture, videos. (1576588)
3d_export
$5

magnetic knife holder
...magnetic knife holder
3dexport
ordinary magnetic knife holder
archive3d
free

Fridge magnet 3D Model
...3d model archive3d refrigerator magnet fridge magnet magnet toy magnetic s n280712 - 3d model (*.3ds) for interior 3d...
turbosquid
$35

Magnetic butterflies
...alty free 3d model magnetic butterflies for download as blend on turbosquid: 3d models for games, architecture, videos. (1315792)
turbosquid
$2
Magnetic Board
...quid
royalty free 3d model magnetic board for download as ma on turbosquid: 3d models for games, architecture, videos. (1264141)
turbosquid
$977
Magnetic Lego
...oyalty free 3d model magnetic lego for download as ma and obj on turbosquid: 3d models for games, architecture, videos. (1142761)
Kit
turbosquid
$3

Bathroom Kit Baño kit
... available on turbo squid, the world's leading provider of digital 3d models for visualization, films, television, and games.
turbosquid
$19

Kit
... available on turbo squid, the world's leading provider of digital 3d models for visualization, films, television, and games.
3d_export
$20

Drift Kit
...drift kit
3dexport
turbosquid
$40

BitCoin Kit
...urbosquid
royalty free 3d model bitcoin kit for download as on turbosquid: 3d models for games, architecture, videos. (1519068)
turbosquid
$9

Industrial kit
...osquid
royalty free 3d model industrial kit for download as on turbosquid: 3d models for games, architecture, videos. (1144117)
turbosquid
$6

Kit Vases
...
turbosquid
royalty free 3d model kit vases for download as on turbosquid: 3d models for games, architecture, videos. (1285114)
turbosquid
free

Survival Kit
...rbosquid
royalty free 3d model survival kit for download as on turbosquid: 3d models for games, architecture, videos. (1637721)
turbosquid
$50

Ninja Kit
...rbosquid
royalty free 3d model ninja kit for download as fbx on turbosquid: 3d models for games, architecture, videos. (1672364)
turbosquid
$35

Brushes Kit
...osquid
royalty free 3d model brushes kit for download as max on turbosquid: 3d models for games, architecture, videos. (1216721)
turbosquid
$19
Medical kit
...osquid
royalty free 3d model medical kit for download as fbx on turbosquid: 3d models for games, architecture, videos. (1486089)
60
3ddd
free
Life 60-60
...life 60-60
3ddd
life , часы
автор модели; aeroslon
design_connected
$29
60
...60
designconnected
restoration hardware 60" kensington leather sofa computer generated 3d model.
turbosquid
$1

60
...60
turbosquid
royalty free 3d model 60 for download as stl on turbosquid: 3d models for games, architecture, videos. (1158799)
3ddd
$1
ARKEL 60
...arkel 60
3ddd
arkel , круглый
arkel диаметр 60
design_connected
$13
60-0270
...60-0270
designconnected
christopher guy 60-0270 computer generated 3d model.
3ddd
$1

Pillows 60
...pillows 60
3ddd
подушка
pillows 60. i hope you like it. thank you !
design_connected
$13
Stool 60
...stool 60
designconnected
artek stool 60 computer generated 3d model. designed by aalto, alvar.
design_connected
$11
Mac 60
...mac 60
designconnected
linbrasil mac 60 computer generated 3d model. designed by rodrigues, sergio.
design_connected
$16
60-0246
...60-0246
designconnected
christopher guy 60-0246 armchairs computer generated 3d model. designed by n/a.
3ddd
$1
Pillows 60
...pillows 60
3ddd
подушка
pillows 60
new pillows .i hope you like it .thank you .
Converting
turbosquid
free
pallet converter
...d
royalty free 3d model pallet converter for download as rfa on turbosquid: 3d models for games, architecture, videos. (1285733)
3d_ocean
$85

Convertible Porsche
...agon
3d model of convertible porsche .object are grouped.rendering scene with,materials are include and detailed, with all files.
turbosquid
$5

GPU Converter
...yalty free 3d model gpu converter for download as 3ds and max on turbosquid: 3d models for games, architecture, videos. (1355494)
turbosquid
$14

Convert Sofa
... 3d model convert sofa for download as max, 3ds, fbx, and obj on turbosquid: 3d models for games, architecture, videos. (1546663)
3d_export
$15

pontiac gto convertible
...pontiac gto convertible
3dexport
pontiac gto convertible 3d model.
turbosquid
$10

Converter station
... available on turbo squid, the world's leading provider of digital 3d models for visualization, films, television, and games.
3d_ocean
$89
Audi A5 Convertible
...erman german interior interior luxury luxury sport sport vehicle vehicle
audi a5 convertible – high detailed model with interior.
3d_ocean
$55

Convertible Car
...d model of convertible car .objects are grouped.rendering scene with texture,materials are included and detailed, with all files.
3d_ocean
$89

Audi S5 Convertible
... german interior interior luxury luxury s5 s5 sport sport vehicle vehicle
audi s5 convertible – high detailed model with interior
design_connected
$27

Nomade Convertible Sofa
...ade convertible sofa
designconnected
ligne roset nomade convertible sofa computer generated 3d model. designed by gomez, didier.
Replaceable
3d_export
$12

replaceable bristle
...replaceable bristle
3dexport
this is 3d printable replaceable bristle toothbrush.
3d_export
$34
Knee Replacement
...h meets the lower leg. ... during a total knee replacement, the end of the femur bone is removed and replaced with a metal shell.
3d_export
$44
Hip Replacement
...omponents. the damaged femoral head is removed and replaced with a metal stem that is placed into the hollow center of the femur.
turbosquid
$59

Hip replacement
...el hip replacement for download as ma, c4d, lwo, lxo, and obj on turbosquid: 3d models for games, architecture, videos. (1520195)
turbosquid
$10

Module replacment station
...alty free 3d model module replacment station for download as on turbosquid: 3d models for games, architecture, videos. (1271271)
3d_export
$8
tool replacement gearbox
...tool replacement gearbox
3dexport
eccentric lifting mechanism, you can process according to available drawings.
turbosquid
$7

Globe Oil Atomizer Replacement Housing
... oil atomizer replacement housing for download as ige and stl on turbosquid: 3d models for games, architecture, videos. (1253839)
turbosquid
free

SLICE Ceramic Scapel (Replaceable Blade)
... (replaceable blade) for download as obj, fbx, blend, and dae on turbosquid: 3d models for games, architecture, videos. (1363525)
3d_export
$19
Knee Replacement Implant
...ntimeter<br>__________________________<br>poly count :<br>polygon count - 217440<br>vertex count - 108776
turbosquid
$19

(Project) Bad odor filtering sytem with support rail and pulley that assure a comfortable gel filter element replacement.
... available on turbo squid, the world's leading provider of digital 3d models for visualization, films, television, and games.
Standard
3ddd
$1

STANDARD LAMP
...standard lamp
3ddd
classic standard lamp
3d_export
free

standard router
...3dexport
hi! welcome to our store. this is a standard 3d model of standard router. you can use this 3d model for free. regards!!
design_connected
$18

Standard Chair
...standard chair
designconnected
vitra standard chair computer generated 3d model. designed by prouvé, jean.
design_connected
$18

Standard SR
...standard sr
designconnected
vitra standard sr computer generated 3d model. designed by prouvé, jean.
3ddd
$1

Ideal Standard / Skanitet
...ideal standard / skanitet
3ddd
ideal standard
производитель ideal standard, серия skanitet
design_connected
$29

Arca Standard
...connected
photo-realistic 3d models of the arca standard bed from alivar for 3d architectural and interior design presentations.
3ddd
$1

Ideal Standard Melange
...ideal standard melange
3ddd
ideal standard
смеситель ideal standard melange.
приятного пользования.
3ddd
free

Ideal Standard / Reflections
... раковина , унитаз
ideal standard reflections коллекция
vizpark
$50

Standard Walls
...f 20 highly detailed brick multitextures for architectural visualization, with bump, displacement, reflection and diffuse layers.
3d_export
free

standard monitor
...tor
3dexport
hi! welcome to our store. this is a standard 3d model monitor for pc. you can use this 3d model for free. regards!!
Mount
3d_export
free

mounting bracket
...mounting plate is the portion of a hinge that attaches to the wood. mounting plates can be used indoors, cabinetry and furniture.
turbosquid
$2

MOUNTING
... available on turbo squid, the world's leading provider of digital 3d models for visualization, films, television, and games.
turbosquid
free

Mounts
... available on turbo squid, the world's leading provider of digital 3d models for visualization, films, television, and games.
turbosquid
free

Mount Fuji
...fuji
turbosquid
free 3d model mount fuji for download as obj on turbosquid: 3d models for games, architecture, videos. (1579977)
3d_export
$5

Headphone mount LR
...headphone mount lr
3dexport
headphone mount l+r
turbosquid
$39

Mount rainier
...quid
royalty free 3d model mount rainier for download as fbx on turbosquid: 3d models for games, architecture, videos. (1492586)
turbosquid
$5

pipe mounting
...quid
royalty free 3d model pipe mounting for download as obj on turbosquid: 3d models for games, architecture, videos. (1293744)
turbosquid
$3

Mounting Tires
...uid
royalty free 3d model mounting tires for download as fbx on turbosquid: 3d models for games, architecture, videos. (1708511)
3d_export
$5

Magnetic GoPro Mount
...pro mount
3dexport
cool magnetic mount for gopro. allows you to mount the camera on flat metal surfaces and get exclusive shots.
turbosquid
$5

Stone Mount
...ty free 3d model stone mount for download as ma, obj, and fbx on turbosquid: 3d models for games, architecture, videos. (1370306)
Any
3ddd
$1

Calligaris / ANY
...calligaris / any
3ddd
calligaris
http://www.calligaris.biz/catalogue/dining/chairs/any/cs-1090
turbosquid
$4
Anis and powder
... model anis and powder for download as lwo, fbx, stl, and obj on turbosquid: 3d models for games, architecture, videos. (1626302)
turbosquid
$15
Any lamp
... available on turbo squid, the world's leading provider of digital 3d models for visualization, films, television, and games.
turbosquid
$10
Any sconce
... available on turbo squid, the world's leading provider of digital 3d models for visualization, films, television, and games.
3ddd
$1

Ani spot
... прожектор
http://bosma.ru/catalogue/product/12
экспозиционный прожектор на шинопроводе
turbosquid
$100

Chibi Anies Bas
...ee 3d model chibi anies bas for download as 3ds, obj, and c4d on turbosquid: 3d models for games, architecture, videos. (1447000)
turbosquid
$29

Cake - for any party
... available on turbo squid, the world's leading provider of digital 3d models for visualization, films, television, and games.
turbosquid
$25
parthanon ani 3_recover
... available on turbo squid, the world's leading provider of digital 3d models for visualization, films, television, and games.
turbosquid
$19
Calligaris Chair ANY
... available on turbo squid, the world's leading provider of digital 3d models for visualization, films, television, and games.
3ddd
free

Коллекция светильников ANI (BOSMA)
...(трековый прожектор)
ani mini spot (трековый прожектор)
файлы .ies к светильникам
трековая система босмаhttp://bosma.ru