Thingiverse

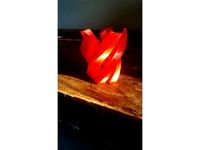
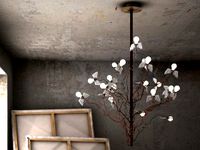
The Light Sky Bird Temple by JobSmolders
by Thingiverse
Last crawled date: 3 years, 1 month ago
For a newer and improved version on my own website, go tohttps://www.designuitinspiratie.nl/3d-printer/verlichte-lucht-tempel/
Jet another Bird Feeder that came into my mind :-) I tried to copy over that image into my computer. It became : The Light Sky Bird Temple :-)
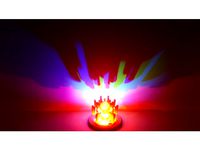
This one has a build in lamp. The lamp sits in the feeder part and shins up. The Lamp is actually a RGB LED strip, so it can change colors also. But I like the white light the best myself.
I tried to make the feeder part in such a way that water can easily escape trough an build in channel. Because there is a lamp inside it's possible to take this one apart for fixing purposes in the future. Some parts are glued, others are bolted together. See pictures.
In the center of the pillars sits a “translucent PET-G printed” cylinder (lamp glass roof.stl) wherein the IR receiver is placed. This way the remote can still be used :-). If you do not have a remote, you can also use this part to place a second lamp :-)
The position of the “ROOF PART with cable bore.stl” might be strange but works very good. This is an idea proposed to me by Thingiverse user : Petclaud in the comments of an other model : https://www.thingiverse.com/thing:2852328/comments/#comment-1946822https://www.thingiverse.com/thing:2884445
Printing details for people who like a guide line:
base.stl is printed with 30% infill and 4 wall, bottom & top lines/layers in PLA
foundation parts are printed with 10% infill and 4 wall, bottom & top lines/layers in PLA
lamp glass or feeder part.stl is printed 25% infill, 3 wall lines, 3 Top layers & 2 bottom layers in PET-G
lamp glass roof.stl is printed 25% infill, 2 wall lines, 3 Top layers & 2 bottom layers in PET-G
mount STL's are printed 35% infill and 4 wall, bottom & top lines/layers in PET-G Carbon
the pillars are printed 10% infill and 4 wall, bottom & top lines/layers in PLA
the roof parts are printed 10% infill and 4 wall, bottom & top lines/layers in PLA
the spikes are printed 20% infill and 4 wall, bottom & top lines/layers in PLA (the heat bed temp must kept as low as possible to prevent warping on the spiky tips/ends)
What you need to assemble this object the way I did:
1X base.stl
1X foundation part with bore for cable to the baseA.stl
1X foundation part with bore for cable to the baseB.stl
2X foundation partA.stl
2X foundation partB.stl
1X lamp glass or feeder part.stl
1X lamp glass roof.stl
1X mount second peace.stl
1X mount with bore.stl
1X pillar with bore for cable to the base.stl
3X pillar with mounting for base.stl
2X pillar.stl
6X ROOF PART with cable bore.stl
6X spike foundation part.stl
6X spike roof.stl
6X M3x20mm bolt & nut (3 extra ones are optional for roof)
1X M3x60mm bolt & nut (or 2 nuts and 60mm treated rod as I did)
1X Lamp or LED to mount inside.
Super Glue & Universal Glue for the base feeder part
If you have any questions, feel free to ask
If you think I made a mistake or made some other kind of error, please inform me :-)
Jet another Bird Feeder that came into my mind :-) I tried to copy over that image into my computer. It became : The Light Sky Bird Temple :-)
This one has a build in lamp. The lamp sits in the feeder part and shins up. The Lamp is actually a RGB LED strip, so it can change colors also. But I like the white light the best myself.
I tried to make the feeder part in such a way that water can easily escape trough an build in channel. Because there is a lamp inside it's possible to take this one apart for fixing purposes in the future. Some parts are glued, others are bolted together. See pictures.
In the center of the pillars sits a “translucent PET-G printed” cylinder (lamp glass roof.stl) wherein the IR receiver is placed. This way the remote can still be used :-). If you do not have a remote, you can also use this part to place a second lamp :-)
The position of the “ROOF PART with cable bore.stl” might be strange but works very good. This is an idea proposed to me by Thingiverse user : Petclaud in the comments of an other model : https://www.thingiverse.com/thing:2852328/comments/#comment-1946822https://www.thingiverse.com/thing:2884445
Printing details for people who like a guide line:
base.stl is printed with 30% infill and 4 wall, bottom & top lines/layers in PLA
foundation parts are printed with 10% infill and 4 wall, bottom & top lines/layers in PLA
lamp glass or feeder part.stl is printed 25% infill, 3 wall lines, 3 Top layers & 2 bottom layers in PET-G
lamp glass roof.stl is printed 25% infill, 2 wall lines, 3 Top layers & 2 bottom layers in PET-G
mount STL's are printed 35% infill and 4 wall, bottom & top lines/layers in PET-G Carbon
the pillars are printed 10% infill and 4 wall, bottom & top lines/layers in PLA
the roof parts are printed 10% infill and 4 wall, bottom & top lines/layers in PLA
the spikes are printed 20% infill and 4 wall, bottom & top lines/layers in PLA (the heat bed temp must kept as low as possible to prevent warping on the spiky tips/ends)
What you need to assemble this object the way I did:
1X base.stl
1X foundation part with bore for cable to the baseA.stl
1X foundation part with bore for cable to the baseB.stl
2X foundation partA.stl
2X foundation partB.stl
1X lamp glass or feeder part.stl
1X lamp glass roof.stl
1X mount second peace.stl
1X mount with bore.stl
1X pillar with bore for cable to the base.stl
3X pillar with mounting for base.stl
2X pillar.stl
6X ROOF PART with cable bore.stl
6X spike foundation part.stl
6X spike roof.stl
6X M3x20mm bolt & nut (3 extra ones are optional for roof)
1X M3x60mm bolt & nut (or 2 nuts and 60mm treated rod as I did)
1X Lamp or LED to mount inside.
Super Glue & Universal Glue for the base feeder part
If you have any questions, feel free to ask
If you think I made a mistake or made some other kind of error, please inform me :-)
Similar models
thingiverse
free

Flowing Bird Temple by JobSmolders
...ake? feel free to comment :-)
ps: the opening in the middle of the “base” is intensional. it's for letting the rain water out
thingiverse
free

Little Bird Feeder Air Temple by JobSmolders
...p ring.stl
if you have any questions, feel free to ask :-)
if you think i made a mistake of forgot anything, please inform me :-)
thingiverse
free

Wireless car (Skoda Octavia 3) iPhone (Xr) charger and holder by bob9dedu10bab
...6f4-6&btsid=2100bdcf16073479884952756e177b&ws_ab_test=searchweb0_0,searchweb201602_,searchweb201603_
1x usb cable
enjoy !
thingiverse
free

Maker Mining Rig by bytestrome
...: 10
infill: 30%
t-slot nut w/ fan mount:
layer: 0.1 mm
filament: pla
perimeters: 10
top layers: 10
bottom layers: 10
infill: 30%
thingiverse
free

Bubble Mower Wheel by Climbingnut878
...eel by climbingnut878
thingiverse
printed in pet-g on a creator pro
needs supports
3 shells
3 layers top and bottom
45% infill
thingiverse
free

Belt Tensioner by JimXYZ
...fill: 25% grid
top layers: 10
bottom layers: 10
tensioner housing:
wall line count: 7
infill: 0%
top layers: 16
bottom layers: 16
thingiverse
free

Makeup box by mboden77
...r
1x mirror-screws-and-nuts.stl mirror screws and nuts
1x mirror-holder-back.stl mirror mount for the back while carrying the box
thingiverse
free

PTFE cable clip by DaVinci2000
... layers: 0
fill gaps between walls: nowhere
infill: 0%
check out my other designs:https://www.thingiverse.com/davinci2000/designs
thingiverse
free

Glass In A Barrel by 3DIYOriginal
...for pla with super glue.
printed in black abs
youtube video:
https://youtu.be/ekct45aix2m
thanks & enjoy !!!
happy printing !
thingiverse
free

Ender 3 Pro direct drive adaptor by linsperf
...
layer height 0.2 or 0.16, wall line count 4, top & bottom layers 4, infill 35-40% pattern: octet,
support: no, material: pla
Jobsmolders
thingiverse
free
Swirl lamp by JobSmolders
...swirl lamp by jobsmolders
thingiverse
another lampshade :-)
thingiverse
free
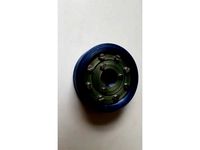
Bearing by JobSmolders
...bearing by jobsmolders
thingiverse
bearing printed in pet-g
needed also : 8x m4x20mm & 3x m3x20mm
thingiverse
free
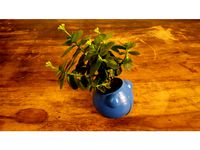
Pot Head by JobSmolders
...pot head by jobsmolders
thingiverse
the photos speak for them selves :-)
printed in purple abs, res 0.2mm
thingiverse
free

MOCKUP SG90 Servo by JobSmolders
...mockup sg90 servo by jobsmolders
thingiverse
for designers. 123d file included
thingiverse
free
Logo Lamp by JobSmolders
...logo lamp by jobsmolders
thingiverse
printed using “spiralize outer contour mode” in orange translucent pet-g :-)
thingiverse
free

Nr. 9 by JobSmolders
...lders
thingiverse
this is just a little experiment with the “spiralize contour mode” in cura
printed in pet-g transparent smokey
thingiverse
free
Lighter Holder Round by JobSmolders
...lighter holder round by jobsmolders
thingiverse
a way to connect a lighter to a key chain or hook
thingiverse
free
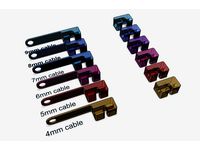
Cable Holder by JobSmolders
...newer and improved version on my own website, go to https://www.designuitinspiratie.nl/3d-printer/kabel-houder/
cable holders :-)
thingiverse
free

Mockup stepper 28BYJ-48 by JobSmolders
...mockup stepper 28byj-48 by jobsmolders
thingiverse
for designers. 123d file included :-)
thingiverse
free
MOCKUP Snail house fan by JobSmolders
...mockup snail house fan by jobsmolders
thingiverse
for designers + 123 3d autodesk file
Temple
3d_export
$10

temple
...temple
3dexport
japanise temple this temple looks good in eve and cycles
3d_export
$5

temple
...temple
3dexport
temple
3d_export
$18

hongri taoist temple-temple
...hongri taoist temple-temple
3dexport
hongri taoist temple-temple<br>3ds max 2015
3d_ocean
$5

Temple
... temple
temple…....................7749 polygon. .......3944 vertices. 4096*4096 texture. obj,fbx,blend format model. game ready.
turbosquid
$300

Temple
...ple
turbosquid
royalty free 3d model temple for download as on turbosquid: 3d models for games, architecture, videos. (1450670)
turbosquid
$27

Temple
...
turbosquid
royalty free 3d model temple for download as 3ds on turbosquid: 3d models for games, architecture, videos. (1298967)
turbosquid
$2

Temple
...
turbosquid
royalty free 3d model temple for download as obj on turbosquid: 3d models for games, architecture, videos. (1271524)
turbosquid
free

Temple
...e
turbosquid
royalty free 3d model temple for download as ma on turbosquid: 3d models for games, architecture, videos. (1237809)
3d_ocean
$25

Greek Temple
... detail and realism to any of your rendering projects. the model has a fully textured, detailed design that allows for close-u...
3d_export
free

temple
...temple
3dexport
Sky
3ddd
free

Sky
...dd
sky , pointex , кресло
кресло sky от pointex
3d_ocean
$18

Sky Landscape
...loudy evening sky hdr sky hdri landscape panorama sky sky landscape
panoramic view of sky landscape in hdri 32bit size: 8786×3079
3d_ocean
$20

Cloudy sky
...cloudy sky
3docean
blue blue sky cloudy cloudy sky hdr sky
panoramic view of cloudy sky in hdri 32bit size: 10356×3933
3ddd
$1

Redline Sky
...redline sky
3ddd
redline , sky
производитель redline
модель sky
3ddd
$1

Sky sofa
...sky sofa
3ddd
sky , jardan
модель дивана sky от jardan
3d_ocean
$15

Hdri sky
...hdri sky
3docean
clouds day hdri morning sky sun
hdri view, for 3d scenes, as the environment
3ddd
free

SKY LINE / Ruby
...sky line / ruby
3ddd
sky line , ротанг
sky line ruby диван ротанговый
231х120х77см
3d_export
$15

sky sofa
...sky sofa
3dexport
turbosquid
free

Night sky
...sky
turbosquid
free 3d model night sky for download as blend on turbosquid: 3d models for games, architecture, videos. (1425659)
3d_ocean
$25

HDRI spherical sky panorama -0948- sun sky
... morning sky (time: 09:48) with a clear blue summer sky. many backplates of this sky also included! the panoramic texture has ...
Bird
design_connected
$18
Birds Birds Birds
...oto-realistic 3d models of the birds birds birds pendant from ingo maurer for 3d architectural and interior design presentations.
archibase_planet
free
Bird
...bird
archibase planet
humming-bird hummingbird bird
humbird - 3d model (*.gsm+*.3ds) for interior 3d visualization.
design_connected
$13

Birds
...birds
designconnected
architectmade birds computer generated 3d model. designed by vedel, kristian.
3ddd
$1

Birds
...birds
3ddd
статуэтка
modern abstract resin animal bird sculpture,casting sculpture
3d_ocean
$7
bird feeders
...bird feeders
3docean
bird feeders wood
bird feeders
3ddd
$1
Bird mirror
...bird mirror
3ddd
visionnaire , bird
visionnaire - bird mirror
3ddd
free

Angry birds
...angry birds
3ddd
angry birds , птица
angry birds
archibase_planet
free
Bird
...bird
archibase planet
parrot birds macaw
macaw n200908 - 3d model (*.gsm+*.3ds) for interior 3d visualization.
3d_export
$25

heron bird
...heron bird
3dexport
heron bird
3d_export
$25

crane bird
...crane bird
3dexport
crane bird
Light
archibase_planet
free

Light
...light
archibase planet
lamp lighting light
light - s2 - 3d model for interior 3d visualization.
archibase_planet
free

Light
...light
archibase planet
light luminaire lighting
light l0465 - 3d model (*.gsm+*.3ds) for interior 3d visualization.
3d_export
$5

lighting
...lighting
3dexport
lighting
3d_export
$5

lighting
...lighting
3dexport
lighting in livingroom
turbosquid
$3

Lighting Tree with Lights
...d model lighting tree with lights for download as max and 3ds on turbosquid: 3d models for games, architecture, videos. (1585507)
archibase_planet
free

Light
...light
archibase planet
luster lighting solution
light - s - 3d model for interior 3d visualization.
archibase_planet
free

Light
...light
archibase planet
luster lamp lighting
light 1 - 3d model for interior 3d visualization.
archibase_planet
free

Lights
...lights
archibase planet
surgical lights surgical lamp
surgical lights (floor) - 3d model for interior 3d visualization.
archibase_planet
free

Light
...light
archibase planet
lighting luminaire candlelight
light l0463 - 3d model (*.gsm+*.3ds) for interior 3d visualization.
3d_export
$18

street light-lighting-light-xia bing
...
3dexport
street light-lighting-light-xia bing<br>max 2015 v-ray 3 max 2015<br>textures<br>all files in zip...