Thingiverse

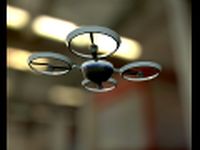
The Hawk - A Mostly 3d Printed Quadcopter by PaperScarecrow
by Thingiverse
Last crawled date: 3 years ago
Notes and Changelog:
1/06/19:
Added an updated motor mount designed for a RacerStar 3508 brushless motor. The originals will only work with ldpower-mt2213-920kv motors (or other motors with the same mounting hardware dimensions/body size). Also added variants of the cable route-body and racerstar 3508 motor mounts designed for 16mm carbon tubes.
Given how many mounting systems and motor sizes are out there and how little time I have due to my job I wont be able to create a model for every one of them.
I've attached an editable .f3d and .step models without the mounting holes cut, so you can re-size and place mounting holes as needed.
6/17/16:
There's now a camera mount in the files section. It clamps onto the arms next to the main body and has a central hole for a standard 1/4" universal mounting screw. It should work with any camera that can attach to the 1/4" threaded mount on a tripod.
6/9/16:
I've uploaded a hollow tube model for those who want to make this an entirely 3d printed craft. They're the ideal 230mm length version, but you can change the Z scaling to make them shorter if needed. There is a 6mm hole running through the center in case you wish to reinforce the arms with 6mm carbon fiber or fiberglass rods. I can provide a thin-walled version (internal channel would be 10mm instead of 6mm, leaving 2mm of wall thickness) as well if there's interest (for routing of wires and/or EL wire or LED strip lights).
6/6/16:
Directly gluing the blade legs to the motor mounts caused issues with attaching motor mounting screws, and allowed the legs to be easily broken off. A leg bracket that clamps onto the carbon fiber tubes using 4x m3 screws and 4x m3 nuts has been added to the files, this mount includes a mounting hole for attaching the blade leg using an additional m3 screw and nut, as well as a recessed channel for gluing the legs into the brackets. This should result in a stronger overall landing gear structure, and should allow for relatively quick leg swaps if a crash destroys one set.
A battery carriage has been added, it sits under the arms and can be attached to the frame using zip ties. The battery itself can attached to the sled using velcro, zip ties, double sided mounting tape or elastic bands. It should support a battery up to 40mm high x 60mm wide, meaning you can use a huge 4,000Mah 11.1v or a large 14.8v lipo battery.
The file labeled as "Complete Assembly" is intended only for illustration or scale info, the complete quad is far too large to be printed in one piece, unless the intention was to make a scale model for display or something.
The bottom cover has been updated, which gives 10mm more height to account for bulky wires, and includes routes for the ESCs and XT60 plug on the hobbyking power distribution board, you can find it in the files under "bottom cover with ESC routes".
The top cover has been updated to V3, which has plenty of room for both the receiver and flight controller, along with all the wires and cables and a top hole to route the sleeved antenna attached to the receiver through. You can still use the V2 if you plan to use a NAZE32 instead of the hobbyking KK, as it sits lower and doesn't require displacing the receiver to access the screen and controls.
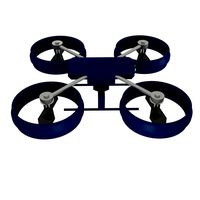
The new cover image shows the model as it would appear fully assembled with the V3 cover and extended canopy. The old model versions can be seen in the second image.
After trying a couple 3d printed Quadcopter designs made by other users, I decided to take a crack at designing my own.
The total assembled weight (with the receiver case removed and without a battery) is 625g. The motor kit I used has a maximum airframe weight of 1.5kg (at 14.8v with the included 9.5" x 4.5" blades, max craft weight should be a little under 2kg with 10" x 5" carbon fiber blades), which should nearly a kilogram of free weight for attaching cameras or large batteries. Maximum blade size with 250mm carbon arms is around 14", just use longer arms if you need longer blades.
This version uses a majority of 3d printed parts with some fairly cheap electronics and four 14mm OD x 220-250mm length carbon fiber tubes for arms.
For PLA, print the main body and motor mounts at 25% - 35% fill density, all other components can be printed at 10% - 15% fill density.
For ABS, add an additional 5% - 10% fill density to compensate for the materials more flexible nature.
To assemble each motor mount, apply some two part plastic epoxy or strong superglue (I used white, fast-dry Gorilla Glue, which worked great on PLA) to both the top of each leg and the bottom center of each mount, take an m3 nut and an m3 bolt and insert them in their respective holes on the model (you may need needle nose pliers to insert the bolt from the inside), tighten them down and leave the assembly upside down until the epoxy/glue has cured. After this you can remove the m3 bolts and nuts from the model. The carbon fiber tubes are friction fit, but if you feel like this isn't enough you can drill a 3mm hole through the carbon fiber using the top hole in each motor mount, then inserting an m3 bolt though and anchoring it using the m3 nut in the leg, or you can use epoxy for a more secure and permanent fit.
Once the body is assembled, secure the power distribution board to the bottom of the main body with either double sided tape or sip ties, do the same on the top of the body with the flight controller and receiver. The UBEC can sit inbetween the top and bottom sections, or can be stuffed next to the flight controller. ESCs can be attached to the carbon fiber arms using zip ties or heat shrink tubing, or can be stuffed between the top and bottom layers of the main body if the leads are long enough to reach the motors.
Attach the top cover first, then Insert the carbon fiber tubes, you can then snap on the bottom cover to complete the center of the body, add the motor mounts and assembly is complete.
Because this is my first quadcopter, I opted for cheaper electronic components, but you can substitute most of the parts for equivalent units. As is, the total non-printed components came out to around $160. Links to the electronic parts I used and the carbon fiber tubes I used are listed below. (note that )
1x Transmitter and Receiver.
4x Motors, ESC's and props (I used some ldpower-mt2213-920kv motors, you'll need to tinker with the mounts if you use something different)
1x Flight Controller
Various Servo Wires
1x UBEC to power the Flight controller and Receiver
1x Power Distribution Board or some fancy solder work
14mm OD x 13mm ID carbon fiber tubing (I bought two 500mm tubes and cut them in half for the arms, if you can find 220-250mm lengths then you can save a step)
Printed parts list:
4x Motor mounts
4x Blade legs
1x Main body
1x Top cover (current version)
1x Bottom cover (current version)
1/06/19:
Added an updated motor mount designed for a RacerStar 3508 brushless motor. The originals will only work with ldpower-mt2213-920kv motors (or other motors with the same mounting hardware dimensions/body size). Also added variants of the cable route-body and racerstar 3508 motor mounts designed for 16mm carbon tubes.
Given how many mounting systems and motor sizes are out there and how little time I have due to my job I wont be able to create a model for every one of them.
I've attached an editable .f3d and .step models without the mounting holes cut, so you can re-size and place mounting holes as needed.
6/17/16:
There's now a camera mount in the files section. It clamps onto the arms next to the main body and has a central hole for a standard 1/4" universal mounting screw. It should work with any camera that can attach to the 1/4" threaded mount on a tripod.
6/9/16:
I've uploaded a hollow tube model for those who want to make this an entirely 3d printed craft. They're the ideal 230mm length version, but you can change the Z scaling to make them shorter if needed. There is a 6mm hole running through the center in case you wish to reinforce the arms with 6mm carbon fiber or fiberglass rods. I can provide a thin-walled version (internal channel would be 10mm instead of 6mm, leaving 2mm of wall thickness) as well if there's interest (for routing of wires and/or EL wire or LED strip lights).
6/6/16:
Directly gluing the blade legs to the motor mounts caused issues with attaching motor mounting screws, and allowed the legs to be easily broken off. A leg bracket that clamps onto the carbon fiber tubes using 4x m3 screws and 4x m3 nuts has been added to the files, this mount includes a mounting hole for attaching the blade leg using an additional m3 screw and nut, as well as a recessed channel for gluing the legs into the brackets. This should result in a stronger overall landing gear structure, and should allow for relatively quick leg swaps if a crash destroys one set.
A battery carriage has been added, it sits under the arms and can be attached to the frame using zip ties. The battery itself can attached to the sled using velcro, zip ties, double sided mounting tape or elastic bands. It should support a battery up to 40mm high x 60mm wide, meaning you can use a huge 4,000Mah 11.1v or a large 14.8v lipo battery.
The file labeled as "Complete Assembly" is intended only for illustration or scale info, the complete quad is far too large to be printed in one piece, unless the intention was to make a scale model for display or something.
The bottom cover has been updated, which gives 10mm more height to account for bulky wires, and includes routes for the ESCs and XT60 plug on the hobbyking power distribution board, you can find it in the files under "bottom cover with ESC routes".
The top cover has been updated to V3, which has plenty of room for both the receiver and flight controller, along with all the wires and cables and a top hole to route the sleeved antenna attached to the receiver through. You can still use the V2 if you plan to use a NAZE32 instead of the hobbyking KK, as it sits lower and doesn't require displacing the receiver to access the screen and controls.
The new cover image shows the model as it would appear fully assembled with the V3 cover and extended canopy. The old model versions can be seen in the second image.
After trying a couple 3d printed Quadcopter designs made by other users, I decided to take a crack at designing my own.
The total assembled weight (with the receiver case removed and without a battery) is 625g. The motor kit I used has a maximum airframe weight of 1.5kg (at 14.8v with the included 9.5" x 4.5" blades, max craft weight should be a little under 2kg with 10" x 5" carbon fiber blades), which should nearly a kilogram of free weight for attaching cameras or large batteries. Maximum blade size with 250mm carbon arms is around 14", just use longer arms if you need longer blades.
This version uses a majority of 3d printed parts with some fairly cheap electronics and four 14mm OD x 220-250mm length carbon fiber tubes for arms.
For PLA, print the main body and motor mounts at 25% - 35% fill density, all other components can be printed at 10% - 15% fill density.
For ABS, add an additional 5% - 10% fill density to compensate for the materials more flexible nature.
To assemble each motor mount, apply some two part plastic epoxy or strong superglue (I used white, fast-dry Gorilla Glue, which worked great on PLA) to both the top of each leg and the bottom center of each mount, take an m3 nut and an m3 bolt and insert them in their respective holes on the model (you may need needle nose pliers to insert the bolt from the inside), tighten them down and leave the assembly upside down until the epoxy/glue has cured. After this you can remove the m3 bolts and nuts from the model. The carbon fiber tubes are friction fit, but if you feel like this isn't enough you can drill a 3mm hole through the carbon fiber using the top hole in each motor mount, then inserting an m3 bolt though and anchoring it using the m3 nut in the leg, or you can use epoxy for a more secure and permanent fit.
Once the body is assembled, secure the power distribution board to the bottom of the main body with either double sided tape or sip ties, do the same on the top of the body with the flight controller and receiver. The UBEC can sit inbetween the top and bottom sections, or can be stuffed next to the flight controller. ESCs can be attached to the carbon fiber arms using zip ties or heat shrink tubing, or can be stuffed between the top and bottom layers of the main body if the leads are long enough to reach the motors.
Attach the top cover first, then Insert the carbon fiber tubes, you can then snap on the bottom cover to complete the center of the body, add the motor mounts and assembly is complete.
Because this is my first quadcopter, I opted for cheaper electronic components, but you can substitute most of the parts for equivalent units. As is, the total non-printed components came out to around $160. Links to the electronic parts I used and the carbon fiber tubes I used are listed below. (note that )
1x Transmitter and Receiver.
4x Motors, ESC's and props (I used some ldpower-mt2213-920kv motors, you'll need to tinker with the mounts if you use something different)
1x Flight Controller
Various Servo Wires
1x UBEC to power the Flight controller and Receiver
1x Power Distribution Board or some fancy solder work
14mm OD x 13mm ID carbon fiber tubing (I bought two 500mm tubes and cut them in half for the arms, if you can find 220-250mm lengths then you can save a step)
Printed parts list:
4x Motor mounts
4x Blade legs
1x Main body
1x Top cover (current version)
1x Bottom cover (current version)
Similar models
thingiverse
free

Budget and Better than DJI! 3D Printed/ Laser Cut 10" Drone
...he nuts in place.
electronics i used:
4x t-motor 2216 11 900kv motors
mamba f405 stack
bn880 gps
bmp280 barometer
4000mah 3s lipo
thingiverse
free

Mini X Quad Frame for ZMR250 Arms by Phil_590
...scs
1x naze32 or cc3d board
1x reciever (i used the frsky d4r-ii)
2x 5x3 props (cw)
2x 5x3 props (ccw)
1x 1000mah 3s lipo battery
thingiverse
free

F450 2212 Motor Mount for 12 MM Carbon Fiber Tube by billkaroly
...ube 12mm od with 8mm id
4x m3 bolts 25mm length
8x m3 washers
4x m3 nyloc nuts
print out of pla at .2 layer and 50 percent infill
thingiverse
free

Motor mount for 30mm carbon fiber tube for airplane by Flying_Ginger
...or mounting the t-motor mn3508-20 580kv to a carbon fiber tube. i am going to use this as a nose for a very streamline fpv plane.
thingiverse
free

375mm folding quadcopter frame by takeshikun
...t4-3d, but hopefully can be adapted for others of similar size). printing guide: front side clip - 4x front...
grabcad
free

X4 750mm Quadcopter
...ermost hole.
any critiques on the design as well as ideas on how i may improve it are highly welcomed. thanks for your interest!
thingiverse
free

DIY Fpv Drone Motor Mount and Frame Center Arm by onratak
...ore strength motor mount)
2x pertinax with holes ( this piece generaly used in electronic )
4x m2 20mm screw and nut ( for frame)
thingiverse
free

180 DEVIL by Ziemels
...to try and machine top and bottom plates from carbon plates, but still i think there need to be more material around screw holes.
thingiverse
free

tbs discovery mod 25mm carbon fiber arms by dsastrealb
...t 2mm carbon fiber rods on this pieces on the 2.5 mm holes provided for maximum strength.
find the solidworks assembly attached.
grabcad
free

Zephyr V2
..... i have uploaded the .step files if you want to have these machined or manufactured some other way.
have fun and happy flying!
Paperscarecrow
thingiverse
free

Airsoft Stock locking tab/button for A&K Masada by PaperScarecrow
... pla or nylon.
no shaving or fililng should be required if you print at 95% scale, it should drop right in and work like a charm.
thingiverse
free

ThrowYo yo-yo by PaperScarecrow
...s the best place to find these, just search for buddha whipple or ripple bearings, they're about $5 a piece and last forever.
thingiverse
free

Airsoft Sound Amplifier by PaperScarecrow
...n failures or breaks in the wall on machines that aren't well calibrated.
see it in action here: https://youtu.be/vlo7v527aqg
thingiverse
free

MicroYo - The mostly-printed mini yoyo by PaperScarecrow
...-part polyurethane resin to fill the void, which is also option if you want an extremely light yoyo that plays surprisingly well.
thingiverse
free

Sci-Fi Sniper Rifle prop by PaperScarecrow
...e so you can pick up a pair of lynch pins from a hardware store, they'll be easier to insert and remove.
costumechallenge2017
thingiverse
free

Yobox - Modular Hive shelf for yoyos or other small items by PaperScarecrow
...mmer or have a well tuned printer, i recommend using the large dovetail version. it prints cleaner and is easier to fit together.
thingiverse
free

Cartrige/Shell for Marushin Shell Ejecting Gas Blowback Airsoft 1911 Pistols by PaperScarecrow
...ocate shells dropped in the field, and printing them from pla will ensure that any unrecovered shells bio-degrade in short order.
thingiverse
free

Airsoft Trigger for Version 2 (V2) Gearbox AEGs and HPA systems *Re-Upload* by PaperScarecrow
... well regardless of whether you're planning on 3d printing or utilizing reductive manufacturing techniques (ie. cnc milling).
thingiverse
free

Viper Trigger for Airsoft BAR-10, VSR-10 or other VSR style Airsoft rifles by PaperScarecrow
...et, sand the edges and you should be ready to roll.
this is a small part so watch your temps or you may encounter warping issues.
Hawk
3ddd
$1

Hawk Chair
...hawk chair
3ddd
hawk chair
resident, hawk chair. h: 770, w: 500, l:490
3d_export
$7

Hawk
...hawk
3dexport
the model is divided into 5 parts
turbosquid
$80

Black Hawk
...bosquid
royalty free 3d model black hawk for download as max on turbosquid: 3d models for games, architecture, videos. (1662435)
turbosquid
$22

Hunting the hawk
...d
royalty free 3d model hunting the hawk for download as stl on turbosquid: 3d models for games, architecture, videos. (1306651)
turbosquid
$19

Helicopter Hawk
...id
royalty free 3d model helicopter hawk for download as max on turbosquid: 3d models for games, architecture, videos. (1240870)
turbosquid
$99

Galaxy Hawk
... available on turbo squid, the world's leading provider of digital 3d models for visualization, films, television, and games.
turbosquid
$49

Aluminium Hawk
... available on turbo squid, the world's leading provider of digital 3d models for visualization, films, television, and games.
turbosquid
$40

Hawk Monster
... available on turbo squid, the world's leading provider of digital 3d models for visualization, films, television, and games.
turbosquid
$40

C-Hawk
... available on turbo squid, the world's leading provider of digital 3d models for visualization, films, television, and games.
turbosquid
$20

Hawk Blade
... available on turbo squid, the world's leading provider of digital 3d models for visualization, films, television, and games.
Quadcopter
3d_export
$5
quadcopter
...quadcopter
3dexport
futuristic quadcopter design.<br>original design davidflo 77
turbosquid
$19
quadcopter
...lty free 3d model quadcopter for download as max, ma, and obj on turbosquid: 3d models for games, architecture, videos. (1591426)
turbosquid
$25
QuadCopter
... available on turbo squid, the world's leading provider of digital 3d models for visualization, films, television, and games.
3d_export
$5
Quadcopter 3D Model
...quadcopter 3d model
3dexport
quadcopter studio shaders
quadcopter 3d model vortex333 93968 3dexport
3d_export
$5
Quadcopter 3D Model
...quadcopter 3d model
3dexport
quadcopter aircraft helicopter
quadcopter 3d model greatghost 94019 3dexport
3d_export
$18
passenger quadcopter
... a multicopter is an aircraft built according to a helicopter scheme, with three or more rotors. previews rendered with redshift.
turbosquid
$159
Quadcopter Animated.
... available on turbo squid, the world's leading provider of digital 3d models for visualization, films, television, and games.
turbosquid
$19
Drone Quadcopter
... available on turbo squid, the world's leading provider of digital 3d models for visualization, films, television, and games.
turbosquid
$12
Drone Quadcopter
... available on turbo squid, the world's leading provider of digital 3d models for visualization, films, television, and games.
3d_export
$29

Quadcopter
...
questions about the continuation of the collection or the model can be asked here:<br>https://www.artstation.com/evgen_beg
Mostly
turbosquid
free

Indoraptor mostly complete
...ree 3d model indoraptor - mostly complete for download as obj on turbosquid: 3d models for games, architecture, videos. (1545875)
3ddd
free

Coffee shop chair
...coffee shop chair 3ddd this chair is used in mostly all coffee shop company branches in...
3d_export
$6

pat- mini wooden table indian
...mini wooden table indian 3dexport mini wooden table is mostly used in india, the design of table in the...
3d_export
$5

Butterflyfish
...as the sickle butterflyfish, chaetodon falcula, blackwedged butterflyfish, is mostly white becoming yellow...
3d_export
$25

Russian heavy Military Helmet Fantasy version 3D Model
...detailed model of russian military heavy helmet, it is mostly used by specnaz and other special/heavy forces, mostly urban.it...
3d_export
$70

Santa Claus sleigh with reindeer
...3d model santa in sleigh with reindeer. real scale, mostly quads geometry and high quality textures. disabled subdivision surfaces...
3d_export
$10

fantasy sword
...king, what is his future fate?<br>the sword is made mostly of metal to provide maximum protection for its...
3d_export
free

Black Cool Sun Glasses
...be easily removed if need be. the frame is mostly standardised to fit nicely and it is ready to...
3d_export
$180

modern luxuary home
...in 3d as freelance for architectural visualization i work mostly with 3d studio max and vray, with a touch...
3d_ocean
$7

Food Container
...in blender 2.70 clean topology and totally polygon geometry (mostly quad and a few triangular...
Printed
design_connected
$27

...print
designconnected
moroso print computer generated 3d model. designed by wanders, marcel.
3ddd
free

Eichholtz Prints
...- eichholtz print central station i
13 - eichholtz print central station ii
14 - eichholtz print marisa
15 - eichholtz print tish
3ddd
$1

Eichholtz Prints
...print abstract - set of 2
10 - eichholtz print orange abstract
11 - eichholtz print buddha right
12 - eichholtz print buddha left
turbosquid
$1

... available on turbo squid, the world's leading provider of digital 3d models for visualization, films, television, and games.
3ddd
free

Eichholtz Prints
...of 4
2 - print dunbar 2 set of 4
3 - print guadeloupe 1 set of 4
4 - print guadeloupe 2 set of 4
5 - print giles
6 - print trett
3ddd
$1

Eichholtz Prints
...nt tutti frutti
3 - eichholtz prints watson - set of 2
4 - eichholtz prints antique nautilus - set of 2
5 - eichholtz print tiara
3d_export
$5

Monster for printing
...monster for printing
3dexport
monster 3d model printing
3ddd
free

printed rug
...printed rug
3ddd
ковер
very creative printed rug
3ddd
free

Eichholtz Prints
...иал: бумага
габариты (вхш): 72 x 62 см
описание: print sweetmeat - постер в деревянной раме.
3 - prints varsity set of 2
арти
3ddd
free

Art Print Posters
...art print posters
3ddd
прованс
art print posters by patrician prints