Thingiverse
The Communist Laser-Cut Dual Bookbinding Jig by electronrancher
by Thingiverse
Last crawled date: 3 years ago
True glastnost, my comrades! Basement publishing for all your derisive works!
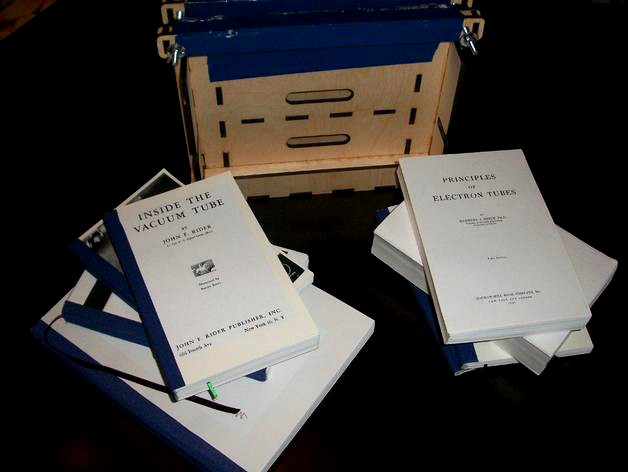
All joking aside, the internet is amazing for archiving old, out of copyright pdfs. But nothing beats sitting down with a real physical book, so I decided to start binding my own.
I call this jig the communist bookbinding jig because all your books are going to look pretty much the same - sharp, square, spartan little beaters that can be read and read, folded and abused with wild abandon - hey, you can always crank out another copy!
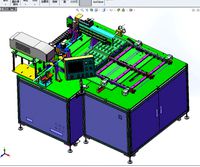
The jig is 2-sided and sized for US paper: The first side aligns a full 8.5 x 11 sheet, the other side aligns a half-sheet (8.5 x 5.5). Adobe reader is great at paginating your pdf (booklet mode) so half-sheets can be easily chopped and stacked and your pages end up in the right order.
This jig is cut from 6mm Baltic Birch plywood, and requires two each of 4" x 1/4" carriage bolts, washers, and wingnuts for the clamps, and wood glue to assemble. The length of the carriage bolts is negotiable if you plan to make thinner or thicker books. Each side will hold a max of about 400 or so pages, giving up to an 800 page book when printed double sided.
I use this jig for binding printed pdf's, as well as compiling volumes of kid art into nice manageable archives for later reminiscence. We're probably up to volume 5 or 6 of kid art, we just can't bear to throw it away!!
As far as assembly goes: Check out the pdf first - the green shapes go on the bottom side (half-size jig) and the black shapes are the top side (full size jig). Some extra green pieces are added to the periphery to act as a stable platform when using the top side, and the top-side box acts as a vertical stand to keep everything upright as the glue dries.
There is one clamp bar each for top and bottom so you can really crank the binding down tight. You will note the bottom clamp bar has square cutouts to fit the carriage bolt head.
The instructions for binding are simple: Square up your pages in the jig, and gently tighten the clamp bars to bring the pages together. Thoroughly paint the spine with the glue of your choosing, wait 10 minutes to let it soak a bit and then crank the clamps down tight to form the spine. Leave it sit until dry, and add a cover.
With regards to binding: I've gotten good results with Aileen's Tacky glue, as well as strong but ugly/foamy/lumpy results from gorilla glue. And you'll notice I use both blue tape and plastic wrap to keep from gluing my book to the jig - consider it!
There is a wealth of information and opinions on bookbinding easily available online - I'm certainly no expert. You'll find lots of discussions on glues, cover options, to all sorts of techniques. Search and enjoy your foray into home publishing!
All joking aside, the internet is amazing for archiving old, out of copyright pdfs. But nothing beats sitting down with a real physical book, so I decided to start binding my own.
I call this jig the communist bookbinding jig because all your books are going to look pretty much the same - sharp, square, spartan little beaters that can be read and read, folded and abused with wild abandon - hey, you can always crank out another copy!
The jig is 2-sided and sized for US paper: The first side aligns a full 8.5 x 11 sheet, the other side aligns a half-sheet (8.5 x 5.5). Adobe reader is great at paginating your pdf (booklet mode) so half-sheets can be easily chopped and stacked and your pages end up in the right order.
This jig is cut from 6mm Baltic Birch plywood, and requires two each of 4" x 1/4" carriage bolts, washers, and wingnuts for the clamps, and wood glue to assemble. The length of the carriage bolts is negotiable if you plan to make thinner or thicker books. Each side will hold a max of about 400 or so pages, giving up to an 800 page book when printed double sided.
I use this jig for binding printed pdf's, as well as compiling volumes of kid art into nice manageable archives for later reminiscence. We're probably up to volume 5 or 6 of kid art, we just can't bear to throw it away!!
As far as assembly goes: Check out the pdf first - the green shapes go on the bottom side (half-size jig) and the black shapes are the top side (full size jig). Some extra green pieces are added to the periphery to act as a stable platform when using the top side, and the top-side box acts as a vertical stand to keep everything upright as the glue dries.
There is one clamp bar each for top and bottom so you can really crank the binding down tight. You will note the bottom clamp bar has square cutouts to fit the carriage bolt head.
The instructions for binding are simple: Square up your pages in the jig, and gently tighten the clamp bars to bring the pages together. Thoroughly paint the spine with the glue of your choosing, wait 10 minutes to let it soak a bit and then crank the clamps down tight to form the spine. Leave it sit until dry, and add a cover.
With regards to binding: I've gotten good results with Aileen's Tacky glue, as well as strong but ugly/foamy/lumpy results from gorilla glue. And you'll notice I use both blue tape and plastic wrap to keep from gluing my book to the jig - consider it!
There is a wealth of information and opinions on bookbinding easily available online - I'm certainly no expert. You'll find lots of discussions on glues, cover options, to all sorts of techniques. Search and enjoy your foray into home publishing!
Similar models
3dwarehouse
free

Bookbinding Jig
...bookbinding jig
3dwarehouse
adjustable frame for setting pages to clamp and bind.
thingiverse
free

Book Spine by JMecky
...licone and a vice to glue the pages into the book.
i have added the solid-works file so it can be edited with any text you want.
thingiverse
free

Corner Cutter Tolls for Bookbinding by Simmons
...rse
this is a simple tool you can use to cut the paper or the cloth for the cover of your bindings.
it's a bookbinding tool.
3dwarehouse
free

Framing Square Clamping Jig
...e so it can be clamped, freeing up you hands so that a combination square and pencil can be used to mark a tenon. #timber_framing
thingiverse
free

M6 Turn Button Top by Marchie
...he bolt inside the two halves and glue them together. i use abs and acetone, if you use pla use methylene chloride or super glue.
grabcad
free

Self squaring frame clamp/jig
...he parts, this way the clamp squares itself so the frame will be square to
please hit the like button if you download the model
thingiverse
free

Bolt Hobbing Jig by d3delta3d
...e hobbing depth unimpeded by the tap.
if you want a diffenent sized clamping part let me know and i'll upload another size.
thingiverse
free

Prusa Bed Trapped Nut Leveler by TrevorLaw
...of bed corners. these bind trapped nuts to the bottom sheet so that you can simply turn the bolts on top of the bed to level it.
thingiverse
free

Kreg mini jig by mmori5
...ex heads. it's not needed if you glue the bolts to the single bottom piece or don't plan on changing the depth too often.
thingiverse
free

50 pages of 20# paper book binding block by Phelps3D
...ill come to the .2" thickness. you could always scale the block to meet your needs depending on the thickness of your pages.
Electronrancher
thingiverse
free

Fingerwheel Coupler by electronrancher
...in the face of the wheel and uses the collar as a coupler to a 1/4" stepper shaft.
printed on a seemecnc h1 with 45% infill.
thingiverse
free

Laser Cut Garden Stakes by electronrancher
...pefully with a more substantial stake and permanent writing, we won't be surprised when our green beans start sprouting peas.
thingiverse
free

5/16 All Thread MiniBlock by electronrancher
...r 1/2" black iron pipe using standard 608 skate bearings. bring your weird machines to life with dirt cheap all thread rod!
thingiverse
free

Flattened and CUTTABLE "Castle Under Attack" - Original laser cut model by Andrea Garuti by electronrancher
...st one)
rev1 01-11-2015: tebuchet had wrong size on some bucket pieces and upright holes, catapult2 had catapult1's top beam.
thingiverse
free

Laser Cut Handheld Marble Maze by electronrancher
... wall, seen as a small gap near the end of the start wall. it should be fixed now, but let me know if you find any other issues.
thingiverse
free

Laser Cut Mame Arcade Console - Raspberry Pi by electronrancher
...de-mame-box-for-raspberry-pi/
for those without a laser cutter, you can buy the parts herehttp://www.etsy.com/listing/222068642
thingiverse
free

Lasercut castle by buyskoen
...is a derivative ot the original lasercut castle by electronrancher in a layout to cut with 60x30cm plates of...
thingiverse
free

Laser-Cut Arcade Console
...raspberry pi. it is based on a design by electronrancher i made the following changes to it: combined the...
thingiverse
free

SAMD21 Switch Payload Launcher Micro Controller Case by Hatch
...c this is an open source collaboration project with electronrancher who created a mini samd21 board with cr2032 backpack...
Bookbinding
3d_export
$30

Animated book 3D Model
...kbinder binder book animatedbook animated books animatedbooks animation accessories
animated book 3d model rophaaa 11770 3dexport
thingiverse
free

Bookbinder by olo2000pm
...bookbinder by olo2000pm
thingiverse
bookbinder
thingiverse
free

Removable Bookbinding Disc by TheEarl6Q
...removable bookbinding disc by theearl6q
thingiverse
thingiverse
free
Corner Cutter Tolls for Bookbinding by Simmons
...rse
this is a simple tool you can use to cut the paper or the cloth for the cover of your bindings.
it's a bookbinding tool.
thingiverse
free

Customizable Half Letter/A5 bookbinding by avalonn
... bookbinding, for 100 perforated sheets or more, with a standard hole distance of 80 mm . a heading could be wrote on the back.
thingiverse
free

Bookbinding Corner Cutter by hanselcj
...ke other offsets if someone really wants them.
check out more on my blog: http://kiltedcraftworks.com/2017/08/14/cutting-corners
thingiverse
free

Bookbinding tool for A5 or smaller books (metric) by Neptune_Colt
...k with other sizes of paper. nothing fancy and an easy print, i had some issues but that was due to a clog, not the print itself.
thingiverse
free

Paper punch - bookbinding base by bybinhabr
...abr
thingiverse
you can see this video: https://www.youtube.com/watch?v=9o4kftoeh6k&t
"make your own moleskine"...
thingiverse
free

Bookbinding Awl Guide/Punching Cradle by strixin
... anyone wants to modify it to suit their purposes. excuse any fusion 360 errors, i'm at day 15 of a 30 day tutorial series :d
thingiverse
free

Olde Bookbinding Fittings for Notebook by ljblk
...o the rest.
ca glue to attach them to your book of choice.
lock can also be stored back in the front plate when the book is open.
Communist
3d_export
$50

Lada Nova 3D Model
...lada nova 3d model 3dexport lada vaz nova communist niva 2107 automobile soviet car sedan russian ussr old...
3d_export
$50

Lada Niva 3D Model
...lada niva 3d model 3dexport lada vaz nova communist niva 2107 automobile soviet car sedan russian ussr old...
cg_studio
$60

Map of China3d model
...map beijing hong kong gansu henan shanghai political politics communist .max .obj .3ds - map of china 3d model,...
3d_export
$50

Lada Riva 3D Model
...lada riva 3d model 3dexport lada riva vaz nova communist niva 2107 automobile soviet car sedan russian ussr old...
3d_export
$60

Russian patriot 3D Model
...patriot 3d model 3dexport toilet toilet destroyed patriot russia communist ussr putin shit russian patriot 3d model download .c4d...
3d_export
$5

Soviet star 3D Model
...soviet ussr zvezda symbol russian cockade emblem order wwii communist partisan pin cccp soviet star 3d model darko 94801...
3d_export
$110

Lada Pack 3D Model
...lada riva pack sale offer deal compilation vaz nova communist niva 2107 automobile soviet car sedan russian ussr old...
3d_export
$50

Renault 12Dacia 1300 3D Model
...old antique classic car vehicle romanian logan solenza french communist city renault 12dacia 1300 3d model dragosburian 80193...
3d_export
$5

Russian Fur Hat 3D Model
...3d model 3dexport adult armed badge balaclava commander communism communist cool cup fancy fun funny fur hat man militarism...
3d_export
$70

Class 42 Electric Locomotive 3D Model
...ferate romane class clasa 42 freight passenger eastern european communist romania craiov class 42 electric locomotive 3d model dragosburian...
Jig
turbosquid
$25

jig-saw_mid_SM
...uid
royalty free 3d model jig-saw_mid_sm for download as obj on turbosquid: 3d models for games, architecture, videos. (1244761)
turbosquid
$20
jig-saw_low
...osquid
royalty free 3d model jig-saw_low for download as obj on turbosquid: 3d models for games, architecture, videos. (1244760)
turbosquid
$10

jig-saw_hi
...bosquid
royalty free 3d model jig-saw_hi for download as obj on turbosquid: 3d models for games, architecture, videos. (1244757)
turbosquid
$7

Jig Armchair
...squid
royalty free 3d model jig armchair for download as max on turbosquid: 3d models for games, architecture, videos. (1648936)
turbosquid
$5

Jig Tail
... available on turbo squid, the world's leading provider of digital 3d models for visualization, films, television, and games.
turbosquid
$5
Jig Head
... available on turbo squid, the world's leading provider of digital 3d models for visualization, films, television, and games.
turbosquid
$5

Jig Head
... available on turbo squid, the world's leading provider of digital 3d models for visualization, films, television, and games.
turbosquid
$5
Jig Head
... available on turbo squid, the world's leading provider of digital 3d models for visualization, films, television, and games.
turbosquid
$5
Jig Head
... available on turbo squid, the world's leading provider of digital 3d models for visualization, films, television, and games.
turbosquid
$5

Jig Head
... available on turbo squid, the world's leading provider of digital 3d models for visualization, films, television, and games.
Dual
turbosquid
free

Dual Pistols
...ls
turbosquid
free 3d model dual pistols for download as fbx on turbosquid: 3d models for games, architecture, videos. (1320360)
turbosquid
$2

Dual Axe
...urbosquid
royalty free 3d model dual axe for download as fbx on turbosquid: 3d models for games, architecture, videos. (1332372)
turbosquid
$10

Dual Lesaths
... available on turbo squid, the world's leading provider of digital 3d models for visualization, films, television, and games.
3ddd
$1

плитка Dual Bianco (Испания)
...й плитки venis dual (испания). технические качества: устойчивость к стирания, отличная геометрия, отсутствие проблем при укладке.
turbosquid
$35

Dual Mesh Fonts
...ree 3d model dual mesh fonts for download as ma, obj, and fbx on turbosquid: 3d models for games, architecture, videos. (1352989)
turbosquid
$29

Dual Flask with Bungs
...del dual flask with bungs for download as obj, fbx, and blend on turbosquid: 3d models for games, architecture, videos. (1210512)
turbosquid
$19

Dual Socket Plug
...3d model dual socket plug for download as obj, fbx, and blend on turbosquid: 3d models for games, architecture, videos. (1303912)
turbosquid
$13

Dual Adjustable Pulley
... available on turbo squid, the world's leading provider of digital 3d models for visualization, films, television, and games.
turbosquid
$10

Amoi N809 Dual
... available on turbo squid, the world's leading provider of digital 3d models for visualization, films, television, and games.
turbosquid
$5

Dual Turret Tank
... available on turbo squid, the world's leading provider of digital 3d models for visualization, films, television, and games.
Laser
3d_export
$5
laser
...laser
3dexport
a 3d laser
3d_export
free
cnc 3dp laser nozzle for 2w laser opt lasers
...logy that gave birth to cutting and engraving laser heads this laser nozzle was designed for, read the article in the link below:
3d_export
free
cnc laser mount opt lasers
...eive the engraving and cutting laser heads this cnc machine laser mount was designed for, read the article on the following page:
turbosquid
$20
Laser
... available on turbo squid, the world's leading provider of digital 3d models for visualization, films, television, and games.
turbosquid
$15
Laser
... available on turbo squid, the world's leading provider of digital 3d models for visualization, films, television, and games.
turbosquid
$3
Laser
... available on turbo squid, the world's leading provider of digital 3d models for visualization, films, television, and games.
3d_export
$5

laser sword
...laser sword
3dexport
it is a blue laser sword with a metal frame
3d_ocean
$19
Laser Turret
...be used in any sf type of game, especially in tower defense games. - laser turret: 3025 polygons - props: 270 polygons - textu...
3d_export
free
workbee cnc laser mount for opt lasers
...the specifications of engraving and cutting laser heads this mount was designed for, please take a look at the following website:
3d_export
free

shapeoko cnc laser mount for opt lasers
...ind out the opportunities that adding a cutting and engraving laser head to your cnc can bring, take a look at the website below:
Cut
design_connected
$11
e15 Cut Cutting Boards
...e15 cut cutting boards
designconnected
e15 cut cutting boards computer generated 3d model.
design_connected
$16
Cut
...cut
designconnected
lapalma cut computer generated 3d model. designed by rota, francesco.
3d_export
$5
cutting machine
...cutting machine
3dexport
crop cutting machine
3d_export
$5

cutting board
...cutting board
3dexport
12 models for cutting boards
3d_export
$20
wire laser cutting peeling cutting machine ffc cutting machine
...and receiving machine, with the structure of this drawing, you don't need to draw by yourself, welcome to collect, thank you.
3ddd
$1
Lapalma CUT
... cut
фабрика: lapalma
коллекция: cut
размер:↑ 74 cm, ↔ 55 см.
описание: стул, ткань, кожа, дерево.
сайт: www.lapalma.it
3ddd
$1
стул lapalma cut
...стул lapalma cut
3ddd
lapalma , cut
стул lapalma cut
3ddd
$1

Lapalma CUT
...
коллекция: cut
размер:↑ 74 cm, ↔ 55 см.
описание: стул, порошковое покрытие, черный, белый, ткань, пластик.
сайт: www.lapalma.it
design_connected
$16
Hi Cut
...hi cut
designconnected
kartell hi cut computer generated 3d model. designed by starck, philippe.
3ddd
$1
Vorwerk Cut
...vorwerk cut
3ddd
ковер
vorwerk cut
прямоугольный:
размеры : 2400mm x 3200mm
круглый:
размеры : 2400mm