Thingiverse
Tevo Tornado Oversized Control Box (3 versions) by Zinoberrot
by Thingiverse
Last crawled date: 3 years ago
Edit : I've uploaded Fusion 360 files of the two boxes (lost the file of the third). Feel free to remix them as you see fit.
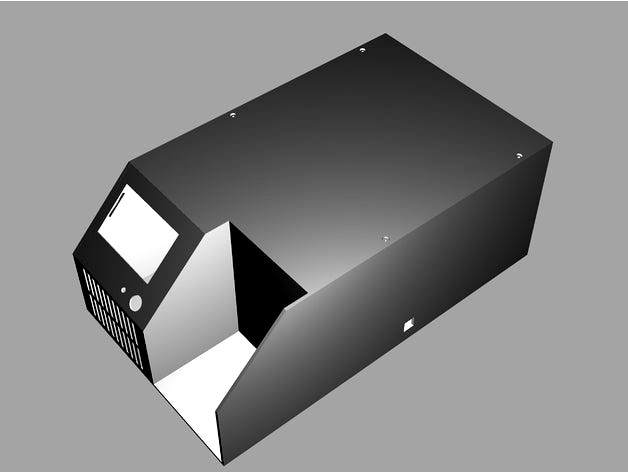
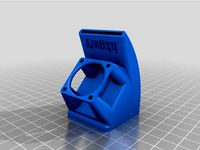
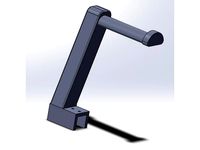
I am not particularly fond of tight spaces and I particularly hate noise whenever I can avoid it. Things got especially tricky when I wanted to replace the PSU and the board, as I would have to mod the living hell out of the small control box. Since space next to the printer is not a problem for me, I decided to design a new, much larger control box for the Tevo Tornado.
Edit: There are now three versions of this design.
Version 1
The box comes in two parts - front and rear. The front part opens from the bottom and the rear part from the top. They print separately and are held together by five screws.
Regarding the front part:
Not much to say here, it is designed to hold the stock LCD screen. You will notice a lot of dead space at the front. I intended to place a small tool holder there for the various bits and parts (glues, Allen keys, etc.) but I left it open for each one to insert whatever is most useful for them.
Regarding the rear part:
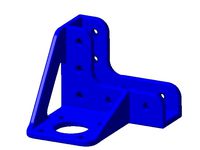
The rear is designed to hold an MKS Gen L or MKS Gen V1.4 board. You can fit the stock board by printing the MKS Gen L adapters and fitting them in reverse (if you are changing the whole control box, chances are that the stock board is paperweight by now).
It fits the stock AC relay and the stock PSU (on the side). It can also fit the Meanwell NES-24-150 or the LRS-24-200 PSUs just in case you want/need more power, as well as the "standard size" NES-24-100 or LRS-24-150 if you just want something more reliable.
It fits two 120mm fans, one in the middle and one in the rear. They create a "wind tunnel" from the front to the rear of the box. Obviously, the airflow of these fans is manyfold greater than that of the stock 40 mm fans, so low-speed high flow fans ought to work great and be relatively quiet. The holes are 3mm, meant for rubber standoffs. Normal fan screws should hold as well. Chances are you'll want to use quiet and widely available PC fans, so there is a slot for a small 5A DC-DC converter next to the main board. The screws fit all 5 × 2.4 cm converters that you can easily find everywhere for like a $/€ each.
It fits the stock AC switch and the two stock GX16 cables. There is a 25 mm open hole for the rest of the cables. The size was intended to fit widely available 25 mm rubber grommets.
There is plenty of space to work with, add more hardware (e.g. Pi mounts), cable management, etc.
I haven't added any feet to the design (yet). They are not really necessary but you can add your own or just $0.1 rubber pads from a hardware store.
What you'll need:
-Longer LCD cables. The 60-70cm ones that are selling for a couple of bucks per set will do just fine.
-About twenty M3×12 screws (forgot to count). Self-tapping screws might work better.
-Two 120 mm fans (duh) and a DC-DC converter if they are 12V fans.
-New wires from/to the PSU (the stock ones will most likely be far too short for this box).
-25 mm rubber grommets are optional.
-Coffee.
Edit :
-Added screw holes for 140 mm fans. I'm not sure why people even asked for them, the cooling from the 120 mm fans is already insane, but who am I to argue.
-Removed the fan guards. After testing I realized that they cause air turbulence noise. If you want/need a fan guard, a simple fan guard will do (it is likely that one will be included if you purchase retail fans).
-Optimized the position of the front panel openings, they ought to be closer to where they should be now.
Version 2
The second version of the box was designed with my own personal needs in mind. It is somewhat shorter than the first version but has certain limitations.
It comes in three parts: front, rear, and the top cap.
Main differences compared to the first version:
-The front prints fine without supports.
-It supports only the MKS Gen L board.
-It can be used with the stock LCD connectors.
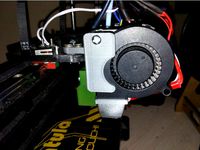
-The board is rotated and its USB connector facing inside the box. It is supposed to be connected to an Orange Pi that will also be mounted inside the box but it is possible to use a USB cable that will be permanently connected and exit alongside the other cables from the rear of the box.
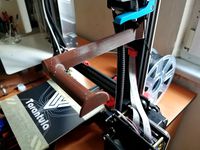
-There is space and holes for an Orange Pi PC or Orange Pi Lite to be mounted right underneath the MKS Gen L board (as seen in my pictures). These little things sell for like $15 and are plenty powerful for running Octoprint, I find them more cost-efficient than Rasperries.
-An SSR heatsink is required for the mounting of the AC relay. I found that my relay was getting quite hot, so its better to be safe than sorry (costs like $2.5 in Aliexpress).
You will need long copper spacers/pillars for the mounting of the board above the Orange Pi. I recommend getting eight 10 mm spacers and four 20 mm spacers. This will allow the Pi to be mounted 10 mm above the box's bottom and the MKS Gen L to be mounted 20 mm above it. Plenty of clearance for heatsinks as well.
The best place to mount DC-DC converters is on the PSU, using copper spacers. The PSU has mounting holes on its sides, so just insert a spacer and attach the board on it (two can be seen in my pictures, one is 5V for the Pi and one is 12V for the fans).
Version 3
That's an even smaller, simpler version that I made for a friend. This can be printed in a single go (it's less than 300 mm long). It uses two 80 mm fans instead but everything that fits in V2 also fits here. Once again, an SSR heatsink is required for the AC relay, there is space for an MKS Gen L board and for an Orange Pi PC.
I am not particularly fond of tight spaces and I particularly hate noise whenever I can avoid it. Things got especially tricky when I wanted to replace the PSU and the board, as I would have to mod the living hell out of the small control box. Since space next to the printer is not a problem for me, I decided to design a new, much larger control box for the Tevo Tornado.
Edit: There are now three versions of this design.
Version 1
The box comes in two parts - front and rear. The front part opens from the bottom and the rear part from the top. They print separately and are held together by five screws.
Regarding the front part:
Not much to say here, it is designed to hold the stock LCD screen. You will notice a lot of dead space at the front. I intended to place a small tool holder there for the various bits and parts (glues, Allen keys, etc.) but I left it open for each one to insert whatever is most useful for them.
Regarding the rear part:
The rear is designed to hold an MKS Gen L or MKS Gen V1.4 board. You can fit the stock board by printing the MKS Gen L adapters and fitting them in reverse (if you are changing the whole control box, chances are that the stock board is paperweight by now).
It fits the stock AC relay and the stock PSU (on the side). It can also fit the Meanwell NES-24-150 or the LRS-24-200 PSUs just in case you want/need more power, as well as the "standard size" NES-24-100 or LRS-24-150 if you just want something more reliable.
It fits two 120mm fans, one in the middle and one in the rear. They create a "wind tunnel" from the front to the rear of the box. Obviously, the airflow of these fans is manyfold greater than that of the stock 40 mm fans, so low-speed high flow fans ought to work great and be relatively quiet. The holes are 3mm, meant for rubber standoffs. Normal fan screws should hold as well. Chances are you'll want to use quiet and widely available PC fans, so there is a slot for a small 5A DC-DC converter next to the main board. The screws fit all 5 × 2.4 cm converters that you can easily find everywhere for like a $/€ each.
It fits the stock AC switch and the two stock GX16 cables. There is a 25 mm open hole for the rest of the cables. The size was intended to fit widely available 25 mm rubber grommets.
There is plenty of space to work with, add more hardware (e.g. Pi mounts), cable management, etc.
I haven't added any feet to the design (yet). They are not really necessary but you can add your own or just $0.1 rubber pads from a hardware store.
What you'll need:
-Longer LCD cables. The 60-70cm ones that are selling for a couple of bucks per set will do just fine.
-About twenty M3×12 screws (forgot to count). Self-tapping screws might work better.
-Two 120 mm fans (duh) and a DC-DC converter if they are 12V fans.
-New wires from/to the PSU (the stock ones will most likely be far too short for this box).
-25 mm rubber grommets are optional.
-Coffee.
Edit :
-Added screw holes for 140 mm fans. I'm not sure why people even asked for them, the cooling from the 120 mm fans is already insane, but who am I to argue.
-Removed the fan guards. After testing I realized that they cause air turbulence noise. If you want/need a fan guard, a simple fan guard will do (it is likely that one will be included if you purchase retail fans).
-Optimized the position of the front panel openings, they ought to be closer to where they should be now.
Version 2
The second version of the box was designed with my own personal needs in mind. It is somewhat shorter than the first version but has certain limitations.
It comes in three parts: front, rear, and the top cap.
Main differences compared to the first version:
-The front prints fine without supports.
-It supports only the MKS Gen L board.
-It can be used with the stock LCD connectors.
-The board is rotated and its USB connector facing inside the box. It is supposed to be connected to an Orange Pi that will also be mounted inside the box but it is possible to use a USB cable that will be permanently connected and exit alongside the other cables from the rear of the box.
-There is space and holes for an Orange Pi PC or Orange Pi Lite to be mounted right underneath the MKS Gen L board (as seen in my pictures). These little things sell for like $15 and are plenty powerful for running Octoprint, I find them more cost-efficient than Rasperries.
-An SSR heatsink is required for the mounting of the AC relay. I found that my relay was getting quite hot, so its better to be safe than sorry (costs like $2.5 in Aliexpress).
You will need long copper spacers/pillars for the mounting of the board above the Orange Pi. I recommend getting eight 10 mm spacers and four 20 mm spacers. This will allow the Pi to be mounted 10 mm above the box's bottom and the MKS Gen L to be mounted 20 mm above it. Plenty of clearance for heatsinks as well.
The best place to mount DC-DC converters is on the PSU, using copper spacers. The PSU has mounting holes on its sides, so just insert a spacer and attach the board on it (two can be seen in my pictures, one is 5V for the Pi and one is 12V for the fans).
Version 3
That's an even smaller, simpler version that I made for a friend. This can be printed in a single go (it's less than 300 mm long). It uses two 80 mm fans instead but everything that fits in V2 also fits here. Once again, an SSR heatsink is required for the AC relay, there is space for an MKS Gen L board and for an Orange Pi PC.
Similar models
thingiverse
free

Anet A8 PSU cover with switch, relays, fan and OctoPrint
...additional details) one power switch (note: there are two similar versions of this switch, one with countersink screw heads...
thingiverse
free

Tevo Tornado Standalone mod by roufster
...se.com/thing:2805000/https://www.thingiverse.com/thing:2868695/
feet can be found here:
https://www.thingiverse.com/thing:2993206
thingiverse
free

Tevo Tarantula mount for MKS Gen L v1.0 control board by fmlive
...new fan cover. the stepper drivers i was using are subject to run hotter so i included a cover with two 40 mm fans on the cover.
thingiverse
free

MKS Gen L Dual 40mm Fan Mount by Majix007
...mks gen l dual 40mm fan mount by majix007
thingiverse
remixed to fit an mks gen l board.
thingiverse
free

Simple MKS Gen-L Base Plate by cbaoth
...e ties to fixate the base plate on top of my printer's psu.
remix of reggaemanu's mks gen l adapter for creality ender-3
thingiverse
free

MKS Gen L Enclosure by arrowSPAS
...mks gen l enclosure by arrowspas
thingiverse
this enclosure is for mks gen l v1.0 board. you can use two 40x40 fan.
thingiverse
free

Robin Lite, SKR 1.3, MKS Gen L, SKR Mini, Raspberry Pi Control Box by jonbourg
...in_title?ie=utf8&psc=1
fan: https://www.amazon.com/gp/product/b00t9d680u/ref=ppx_yo_dt_b_search_asin_title?ie=utf8&psc=1
thingiverse
free

MKS Gen-L mount for ender-2 by Tylon
...th this adapter you can mount an mks gen-l board into the stock case without drilling new holes.
i got this file from an fb-group
grabcad
free

(v2.0) Trigorilla Motherboard Replacement Bracket for SKR 1.3 / SKR 1.4 / MKS SGEN L / MKS GEN L V2.1 Boards w/ Cooling Fan Duct
...is)
8pcs m3x15 screw (for stepper driver cooling fans)
4pcs m3x5 screw (you can use screws from the old motherboard)
8pcs m3 nuts
thingiverse
free

TronXY X3 and X3A PSU relocation Brackets by Creat3DPrints
...back brackets. you will need some legs to raise you 3d printer up for these to word. check out my remixed legs, as the work well/
Zinoberrot
thingiverse
free

ATX PSU Bracket for 2020 extrusions by Zinoberrot
...tx psu on 2020 extrusions.
the first version is meant to hold the psu between two extrusions, the second onto a single extrusion.
thingiverse
free

Engine Throttle Cover for BMW E46 M43 by Zinoberrot
...ly and the dealership wants $120 for it. instead of leaving the engine without a cover, i simply designed my own iteration of it.
thingiverse
free

Xiaomi Wowstick 1P+ Holder (remix) by Zinoberrot
... if necessary.
ps. my design holds 16 bits + 1 on the driver. the driver comes with 18 bits so at least one will have to go away.
thingiverse
free

Bowden Tube Push Fit Lock by Zinoberrot
...rotrude from the thing.
no supports are necessary anywhere. just print the parts with the flat surface touching your build plate.
thingiverse
free

DAEMON 3D Printable 3D Printer MKS Gen L mount by Zinoberrot
...ort. i did not bother creating a notch for it because i do not think anybody would want to run octoprint on such a small printer.
thingiverse
free

Piper 2 Simple Belt Tensioner by Zinoberrot
...u can also print the idlers if you do not have any spares laying around. their roundness hardly matters and the force is minimal.
thingiverse
free

DAEMON 3D Printable 3D Printer MKS TFT24 Front Panel by Zinoberrot
...9v psu stuck between the lcd and the board).
the bottom part needs to be glued to the top part (or it can be skipped altogether).
thingiverse
free

Fan holder/mount for E3D v6 Volcano by Zinoberrot
...ed the 30/40mm fans side wings here but saldot has designed more. check his work out at:
https://www.thingiverse.com/thing:780379
thingiverse
free

DAEMON 3D Printable 3D Printer T8 Lead Screw Bed by Zinoberrot
...250-300 grams of plastic but it does not wobble. the reinforced version also has slots for 8mm springs for smoother bed leveling.
thingiverse
free

Simple Wall Hook / Hanger with 4.5 mm tapered screw hole by Zinoberrot
...tle on purpose so that it will be clearly visible. normally the head of the screw should be flat with the surface of the hanger.)
Tornado
3ddd
$1

диван Tornado
...диван tornado
3ddd
tornado
диван tornado
turbosquid
$20
Tornado
... available on turbo squid, the world's leading provider of digital 3d models for visualization, films, television, and games.
turbosquid
free

tornado
... available on turbo squid, the world's leading provider of digital 3d models for visualization, films, television, and games.
3d_export
$75

Tornado 3D Model
...tornado 3d model
3dexport
tornado low polygon
tornado 3d model mikemu 64260 3dexport
turbosquid
$20

Tornado Small
...yalty free 3d model tornado small for download as max and fbx on turbosquid: 3d models for games, architecture, videos. (1383489)
turbosquid
$100

Tornado GR4
... available on turbo squid, the world's leading provider of digital 3d models for visualization, films, television, and games.
turbosquid
$1

Tornado FumeFX
... available on turbo squid, the world's leading provider of digital 3d models for visualization, films, television, and games.
turbosquid
$5
Tornado
...
turbosquid
royalty free 3d model aletta for download as max on turbosquid: 3d models for games, architecture, videos. (1152155)
3d_export
$199

Tornado F3 3D Model
...tornado f3 3d model
3dexport
tornado f3 fighter aircraft airplane plane military
tornado f3 3d model drguz 67 3dexport
3d_ocean
$15

Panavia Tornado GR4
...t panavia plane soar tornado transport
low polygon and nicely detailed panavia tornado gr4 . check out my profile for more items!
Oversized
design_connected
$13

Oversized Iron Chair
...oversized iron chair
designconnected
n/a oversized iron chair armchairs computer generated 3d model. designed by n/a.
3ddd
$1

Clift Oversized Glass Pendant
... clift
pottery barn, clift oversized glass pendant
диаметр люстры 46 см
в архиве файлы в 2014 и 2011 3dsmax, obj.
turbosquid
$20

Dandrea Oversized Chair and Dandrea Ottoman
...ndrea oversized chair and dandrea ottoman for download as max on turbosquid: 3d models for games, architecture, videos. (1637566)
3ddd
$1

Настенные часы Hawthorne Oversized Tower
...wthorne oversized tower 38 inch wall clock
размер: д 900ммhttp://www.hayneedle.com/product/oversizedtowerwallclock.cfm
turbosquid
$25

Oversized Lounge Chair by Nico Klaeber
... available on turbo squid, the world's leading provider of digital 3d models for visualization, films, television, and games.
3d_export
$19

Ashley Lena Putty Oversized Chair 3D Model
...set collection contemporary photorealistic detailed textured
ashley lena putty oversized chair 3d model humster3d 65999 3dexport
3d_ocean
$14

Ashley Durapella Olive Oversized Chair.
...sized chair – 3d model. chair with ottoman. material: microfiber. color: olive. dimensions: 56”w x 41”d x 39”h. this model is ...
3ddd
free

POTTERY BARN Capiz Oversized Flushmount
...flower-oversized-flush-mount-ceiling-fixture/
цена: 399$
в архиве модель со всеми материалами в формате max2010 + fbx
3ddd
free

Oversize Brass Deer Candle Holder
... подсвечник , канделябр
подсвечник в форме оленя. винтаж.
3d_export
$19

Ashley Durapella Basketweave Olive Oversized Cha 3D Model
...terior collection photorealistic home sitting
ashley durapella basketweave olive oversized cha 3d model humster3d 72082 3dexport
Tevo
thingiverse
free

TEVO Logo by limwenyao
...verse
tevo logo - for customizing your builds to look cooler with the tevo logo! pdf version is editable with adobe illustrator.
thingiverse
free
Tevo Tornado e3d Tevo Flash Style fan Mount by DemolitionX
...an mount by demolitionx
thingiverse
just messing around and made a tevo flash style fan mount for the e3d v6 on the tevo tornado
thingiverse
free
BODEN TUBE CLAMP FOR TEVO TARANTULA PRO AND TEVO TORNADO
... and tevo tornado
thingiverse
bodwen tube clamp. printable adjustable tension clamp for tevo tarantula pro and tornado extruder.
thingiverse
free
TEVO Tornado Model by JMDesigns
...tevo tornado model by jmdesigns
thingiverse
tevo tornado model
thingiverse
free
Tevo Tarantula FanDuct by hkgary_g
...tevo tarantula fanduct by hkgary_g
thingiverse
fanduct for tevo tarantula
thingiverse
free
FAN TEVO TARANTULA by llprokall
...fan tevo tarantula by llprokall
thingiverse
fan tevo tarantula
thingiverse
free
Tevo Tarantula filament by Xbertus
...tevo tarantula filament by xbertus
thingiverse
suport for filamente tevo tarantula
thingiverse
free
TEVO Top Brackets by _Godoy_
...tevo top brackets by _godoy_
thingiverse
top brackets for tevo tarantula
thingiverse
free
Tevo Tarantula Spool Holder
...tevo tarantula spool holder
thingiverse
strong spool holder for tevo tarantula
thingiverse
free

tevo tarantula spacer by poundskinnyboy
...tevo tarantula spacer by poundskinnyboy
thingiverse
it's a tevo tarantula spacer
Control
3d_ocean
$4
Controller TQFP32
...qfp32
3docean
chip controller cpu electronic gpu mcu micro controller silicon smd tqfp wafer
a micro controller in tqfp32 package
3d_ocean
$4
Controller TQFP44
...44
3docean
chip controller cpu electronic gpu mcu micro controller package smd tqfp tqfp44
a micro controller in a tqfp44 package
3d_export
$15
control unit
...control unit
3dexport
control unit
3ddd
$1
Yacht control
...yacht control
3ddd
yacht control
3d_export
$5
controle pgdm
...controle pgdm
3dexport
carcaca controle pgdm
turbosquid
free
controler
... available on turbo squid, the world's leading provider of digital 3d models for visualization, films, television, and games.
3ddd
$1

Control
...
http://www.schmitz-leuchten.de/html-ru/einzelleuchten-lampentyp-details.php?lamptype_no=700&group;=917&id;=731
3d_ocean
$4
Controller TQFP100
...100
3docean
chip computer cpu electronic gpu mcu micro controller pin platine silicon wafer
a micro controller in tqfp100 package
3d_ocean
$4
Controller TQFP64
...qfp64
3docean
chip computer cpu gpu mcu micro controller package silicon tqfp tqfp64 wafer
a micro controller in a tqfp64 package
3d_ocean
$7

Remote controller
... control switcher tv remote
remote controller for tv, sound systems etc easy to edit textures photo real rendered with mental ray
Box
archibase_planet
free

Box
...box
archibase planet
box carton cardboard box
box 2 - 3d model (*.3ds) for interior 3d visualization.
archibase_planet
free

Box
...box
archibase planet
carton cardboard box box
box 1 - 3d model (*.3ds) for interior 3d visualization.
3d_export
$6

box
...box
3dexport
box
3d_export
$5

Box
...box
3dexport
box
3d_export
$5

box
...box
3dexport
box
3d_export
$5

box
...box
3dexport
box
archibase_planet
free

Box
...box
archibase planet
box box for paper notebook pencil
box - 3d model (*.gsm+*.3ds) for interior 3d visualization.
archibase_planet
free

Box
...box
archibase planet
box carton cardboard box
box n170111 - 3d model (*.gsm+*.3ds) for interior 3d visualization.
archibase_planet
free

Box
...box
archibase planet
box carton cardboard box
box n050411 - 3d model (*.gsm+*.3ds) for interior 3d visualization.
archibase_planet
free

Boxes
...boxes
archibase planet
boxes box case bin
boxes n281213 - 3d model (*.gsm+*.3ds+*.max) for interior 3d visualization.
Versions
3ddd
$1
Diamond version
...nd , version , ванна
visionnaire - diamond bath
turbosquid
$50
LibraryMini Version
...free 3d model librarymini version for download as max and jpg on turbosquid: 3d models for games, architecture, videos. (1617724)
design_connected
$34

Barocco Version 01
...barocco version 01
designconnected
zanotta barocco version 01 computer generated 3d model. designed by progetti, emaf.
design_connected
$27

Barocco Version 02
...barocco version 02
designconnected
zanotta barocco version 02 computer generated 3d model. designed by progetti, emaf.
turbosquid
free
![Door [2 versions]](/t/13243146.jpg)
Door [2 versions]
...rbosquid
free 3d model door [2 versions] for download as fbx on turbosquid: 3d models for games, architecture, videos. (1223985)
turbosquid
$2
seat version 0.1
...
royalty free 3d model seat version 0.1 for download as blend on turbosquid: 3d models for games, architecture, videos. (1432653)
turbosquid
$12
Chip Version 03
...lty free 3d model chip version 03 for download as c4d and fbx on turbosquid: 3d models for games, architecture, videos. (1241145)
3d_export
$10

magnolia grandiflora mature version
...magnolia grandiflora mature version
3dexport
magnolia grandiflora mature version
3d_export
$8
room assets and voxel version
...room assets and voxel version
3dexport
room assets and voxel version
turbosquid
$35

Zil Civilian version
... model zil civilian version for download as cgf, fbx, and obj on turbosquid: 3d models for games, architecture, videos. (1639420)
3
turbosquid
$10

Mountain Bike 3 -3 of 3
...model mountain bike 3 (#3 of 3) for download as fbx and blend on turbosquid: 3d models for games, architecture, videos. (1438752)
turbosquid
$6

Rock 3-3
...urbosquid
royalty free 3d model rock 3-3 for download as obj on turbosquid: 3d models for games, architecture, videos. (1628065)
turbosquid
$29

Books 150 pieces 3-3-3
...books 150 pieces 3-3-3 for download as max, obj, fbx, and stl on turbosquid: 3d models for games, architecture, videos. (1384033)
turbosquid
$3

Genesis 3 Clothing 3
... available on turbo squid, the world's leading provider of digital 3d models for visualization, films, television, and games.
3d_export
$5

hinge 3
...hinge 3
3dexport
hinge 3
3ddd
$1

Розетка 3
...розетка 3
3ddd
розетка
розетка 3
turbosquid
$50

is-3
... available on turbo squid, the world's leading provider of digital 3d models for visualization, films, television, and games.
turbosquid
$10

Mountain Bike 3 -2 of 3
...model mountain bike 3 (#2 of 3) for download as fbx and blend on turbosquid: 3d models for games, architecture, videos. (1438750)
turbosquid
$10

Mountain Bike 1 -3 of 3
...model mountain bike 1 (#3 of 3) for download as fbx and blend on turbosquid: 3d models for games, architecture, videos. (1438743)
3d_export
$5

3 CATS
...3 cats
3dexport
3 cats pen holder