Thingiverse

Tevo Little MOnster Enclosure by Cinpro
by Thingiverse
Last crawled date: 3 years, 1 month ago
I recommend going with the other enclosure mounts that I made as they are more stable you will need slightly longer M4 screws but otherwise you should be good.
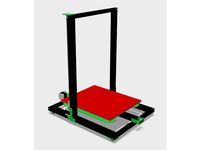
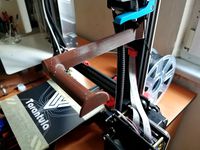
Pretty basic enclosure, I have gone through and test fit these parts and haven't had any problems. I included my cable top cap to pass just the main wires through (the tube may fit too, I just never tried it) and a spool spacer and hub adapter for less rolling resistance.
Things you will need:
at least one sheet of 36x48 inch plexiglass 2.4mm thick
M4 screws,I chose button head to spread the pressure out and not crack the plexi so easily.
M4 T-nuts for 20x20 extrusions
I ordered these in 100 piece lots, they are cheap enough and I would rather have extra than not enough.
I recommend having a hex screw drivers instead of those little keys, makes your life much easier
plexiglass cutter or table saw to make your panels. if you got the saw route like I did be sure you use a blade made for fine cuts and has a lot of teeth. 80+ teeth.
M3 x 35 socket head cap screws to use as hinge pins.
You are going to be cutting this in 36" tall segments, be sure you marking in the right direction before you cut or you will be buying another sheet.
Your are going to need 6 short side panels; 2 11/16, 2 large side panels; 13 1/8 x 36, 2 Doors; 6 1/2 x 36 (this will change depending on how you cut the plexi so measure for yourself before you commit) if you are going to use a table saw for this you can easily bevel the long edges of the panels for a better fit. (if your a wood worker you already know how to do this)
3 short lower panels 3x 13 1/8 to 13 1/4 better to be a little long here
6 short side lower panels 2 11/16 x 2 3/16
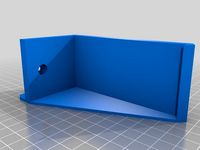
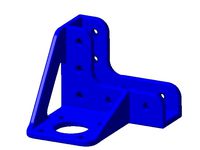
there are little brackets to go on the top and bottom to hold the larger plexi in place, as well as holders that wrap around in the middle to keep it against the shorter pieces. You cannot use the wrap around parts on the side with the doors as it would keep them from opening at all, so a made some with no hooks at the end just for that side.
I will be adding more pictures as I progress myself, but its pretty obvious where things will line up.
Pretty basic enclosure, I have gone through and test fit these parts and haven't had any problems. I included my cable top cap to pass just the main wires through (the tube may fit too, I just never tried it) and a spool spacer and hub adapter for less rolling resistance.
Things you will need:
at least one sheet of 36x48 inch plexiglass 2.4mm thick
M4 screws,I chose button head to spread the pressure out and not crack the plexi so easily.
M4 T-nuts for 20x20 extrusions
I ordered these in 100 piece lots, they are cheap enough and I would rather have extra than not enough.
I recommend having a hex screw drivers instead of those little keys, makes your life much easier
plexiglass cutter or table saw to make your panels. if you got the saw route like I did be sure you use a blade made for fine cuts and has a lot of teeth. 80+ teeth.
M3 x 35 socket head cap screws to use as hinge pins.
You are going to be cutting this in 36" tall segments, be sure you marking in the right direction before you cut or you will be buying another sheet.
Your are going to need 6 short side panels; 2 11/16, 2 large side panels; 13 1/8 x 36, 2 Doors; 6 1/2 x 36 (this will change depending on how you cut the plexi so measure for yourself before you commit) if you are going to use a table saw for this you can easily bevel the long edges of the panels for a better fit. (if your a wood worker you already know how to do this)
3 short lower panels 3x 13 1/8 to 13 1/4 better to be a little long here
6 short side lower panels 2 11/16 x 2 3/16
there are little brackets to go on the top and bottom to hold the larger plexi in place, as well as holders that wrap around in the middle to keep it against the shorter pieces. You cannot use the wrap around parts on the side with the doors as it would keep them from opening at all, so a made some with no hooks at the end just for that side.
I will be adding more pictures as I progress myself, but its pretty obvious where things will line up.
Similar models
thingiverse
free

Ultimaker enclosure by MassassiOrder
... used file to make the edges smooth. then i used copper polish to make them shine
i would love to see your prints of this design.
thingiverse
free

Panel Partitions by mikecannon
... on each side) https://www.amazon.com/gp/product/b079g3ymvr
i have also used blue duct tape to seal and protect the acrylic panel
thingiverse
free

Plexiglass Enclosure for 3d Printer by randomdude
...e
prototype corner pieces to hold together plexiglass sheets as a 3d printer enclosure. cut plexi to size, slot it in, and glue.
thingiverse
free

Circular saw 2 x 4 straight cut by cghunter32
... used m3 x 15 mm for the screws that hold the upright on.
i have also included the f3d file if you would like to edit the design.
thingiverse
free

1/4 Solidoodle 3 Plexiglass side clip enclosure by marcvw79
...2. the 1/4 wide clips secure the top and will side up to insert or remove the side. i used 3/8 x 1/8 foam tape to seal the sides.
thingiverse
free

Sapphire pro enclosure by NikNakTak
...ps://www.thingiverse.com/thing:4816975 (optional)
in case of questions feel free to comment.
your suggestions are always welcome.
thingiverse
free

Enclosure doorknob by daandw94
...rknob for plexiglass doors.
simply use m4 screw and some washers the thickness of your plexiglass.
may also work without washers.
thingiverse
free
Prusa Lack Enclosure Modified PSU Holder by cjsharp1
...hole to the side of the holder, and it provides a little more room for the wires to fit between the psu and the leg of the table.
thingiverse
free

TEVO Little Monster - Enclosure by Elzariant
...package for 3mm-thick panels
2018-09-21 - added a zip package for 4mm-thick panels
2019-10-30 - added step versions for 3 and 4mm
thingiverse
free

Kossel mini enclosure by miharix
...holder needed.
also you need:
12x m4 20mm screw
12x m4 10mm wing nut
12x m3 screw
12x m4 hex nut
3x 2mm plexi glass (cca 375x500)
Cinpro
thingiverse
free

Delta style Nozzle caddy by Cinpro
...delta style nozzle caddy by cinpro
thingiverse
just a simple holder to keep spare nozzles in.
thingiverse
free

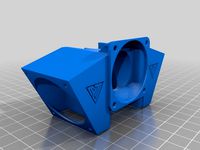
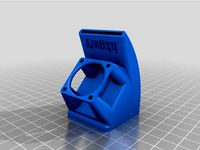
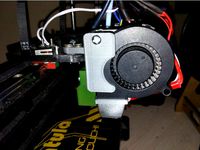
Tevo Little Monster fan shroud replacment by Cinpro
...nster fan shroud replacment by cinpro
thingiverse
not much to it, print with all solid layers for the front, 1 wall for the side
thingiverse
free

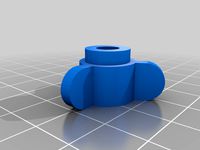
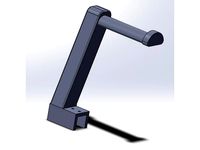
Tevo Little MOnster magball arm adapter by Cinpro
...r magball arm adapter by cinpro
thingiverse
adapter made for the little monster to use magball arms for the duet smart effector.
thingiverse
free

Delta "cubes" by Cinpro
... just putting it here. you will need to rotate it and correct the angle once its on its base as it is pointed too far to one side
thingiverse
free

Filament oiler/filter by Cinpro
...d" for it to make it east to print and change the sponge when needed. the other one i had, had a smallish hole to work with.
thingiverse
free

Filament Clip for eSun clear spools by Cinpro
... simple little clip, the one i downloaded moved around too much and was kind of weak, so i drew this up. hope you find it useful.
thingiverse
free

Tevo Little MOnster Enclosure Update by Cinpro
...oors sag. i used light 2 inch hardware store hinges for this. i will upload photos when i get my back together after maintenance.
thingiverse
free

Steampunked Light Switch by Cinpro
... i don't know how well they will hold up to use
2/21/18 added some alternate parts for a b version, the nut remains the same.
thingiverse
free

Mono X endstop spacer for use with a flex plate by Cinpro
...se
just a simple spacer for the monox to extend the endstop trigger enough that you can set z=0 and the stepper won't grind.
thingiverse
free

Tevo Little MOnster Effector by Cinpro
...uld make other parts to fit. however i think you could print it if you wanted to. will need supports for all the "ears"
Tevo
thingiverse
free

TEVO Logo by limwenyao
...verse
tevo logo - for customizing your builds to look cooler with the tevo logo! pdf version is editable with adobe illustrator.
thingiverse
free
Tevo Tornado e3d Tevo Flash Style fan Mount by DemolitionX
...an mount by demolitionx
thingiverse
just messing around and made a tevo flash style fan mount for the e3d v6 on the tevo tornado
thingiverse
free
BODEN TUBE CLAMP FOR TEVO TARANTULA PRO AND TEVO TORNADO
... and tevo tornado
thingiverse
bodwen tube clamp. printable adjustable tension clamp for tevo tarantula pro and tornado extruder.
thingiverse
free
TEVO Tornado Model by JMDesigns
...tevo tornado model by jmdesigns
thingiverse
tevo tornado model
thingiverse
free
Tevo Tarantula FanDuct by hkgary_g
...tevo tarantula fanduct by hkgary_g
thingiverse
fanduct for tevo tarantula
thingiverse
free
FAN TEVO TARANTULA by llprokall
...fan tevo tarantula by llprokall
thingiverse
fan tevo tarantula
thingiverse
free
Tevo Tarantula filament by Xbertus
...tevo tarantula filament by xbertus
thingiverse
suport for filamente tevo tarantula
thingiverse
free
TEVO Top Brackets by _Godoy_
...tevo top brackets by _godoy_
thingiverse
top brackets for tevo tarantula
thingiverse
free
Tevo Tarantula Spool Holder
...tevo tarantula spool holder
thingiverse
strong spool holder for tevo tarantula
thingiverse
free

tevo tarantula spacer by poundskinnyboy
...tevo tarantula spacer by poundskinnyboy
thingiverse
it's a tevo tarantula spacer
Enclosure
3d_export
free

electrical enclosure
...l enclosure where electrical devices like (relays, contactors, busbars ) are kept in order to protect from hazardous environment.
turbosquid
$100

GPU Enclosure
...yalty free 3d model gpu enclosure for download as obj and stl on turbosquid: 3d models for games, architecture, videos. (1381061)
3d_export
$5

Electrical Enclosure
...ed. also has tower lights attaced on the top.<br>file format that are available:<br>.step<br>.obj<br>.stl
archive3d
free

Enclosure 3D Model
...closure 3d model
archive3d
shower enclosure-acquarius- 3d model for interior 3d visualization.
archive3d
free

Enclosure 3D Model
...enclosure 3d model
archive3d
shower enclosure-omega- 3d model for interior 3d visualization.
archive3d
free

Enclosure 3D Model
...enclosure 3d model
archive3d
shower enclosure-vega - 3d model for interior 3d visualization.
archive3d
free

Enclosure 3D Model
...enclosure 3d model
archive3d
shower enclosure-zenith - 3d model for interior 3d visualization.
turbosquid
$20

shower enclosure
... available on turbo squid, the world's leading provider of digital 3d models for visualization, films, television, and games.
turbosquid
$14

Dumpster Enclosure
... available on turbo squid, the world's leading provider of digital 3d models for visualization, films, television, and games.
turbosquid
$25

3d printer enclosure
... model 3d printer enclosure for download as ipt, skp, and fbx on turbosquid: 3d models for games, architecture, videos. (1634310)
Monster
3d_export
$5
monster
...monster
3dexport
very realistic monster
3d_export
free

monster
...monster
3dexport
bloody monster! (looks terrifying)
3d_ocean
$12

Monster
... this code “envatoguest2016” . visit our store high details 3d character model for small monster , useful for animations, movi...
3d_ocean
$15

Monster
...monster
3docean
android game ios java main model monster playdesign
polycount :1118 texture :1024×1024png
3d_ocean
$8

Monster Man
...monster man
3docean
giant monster
monster man software: 3ds max, mental ray.
3d_export
free

monster head
...monster head
3dexport
monster head
turbosquid
$60

MONSTER
...turbosquid
royalty free 3d model monster for download as max on turbosquid: 3d models for games, architecture, videos. (1220728)
turbosquid
$60
Monster
...turbosquid
royalty free 3d model monster for download as fbx on turbosquid: 3d models for games, architecture, videos. (1320840)
turbosquid
$19

Monster
...turbosquid
royalty free 3d model monster for download as max on turbosquid: 3d models for games, architecture, videos. (1248452)
turbosquid
$15

Monster
...turbosquid
royalty free 3d model monster for download as max on turbosquid: 3d models for games, architecture, videos. (1293042)
Little
3d_ocean
$8
Little Zombie
...little zombie
3docean
little zombie
little zombie
3d_export
$60
Little Badger
...little badger
3dexport
little badger
3d_export
$5

little house
...little house
3dexport
little house
3d_ocean
$10
Little Wolf
...little wolf
3docean
wolf
little wolf for game
3d_export
$5
a little home
...a little home
3dexport
a little home for your games)
3d_export
$5

little monster
...little monster
3dexport
little toothy funny monster
3ddd
$1

little squirt
...little squirt
3ddd
детская
коллекция обоев little squirt
design_connected
$20

Little Bloom
...little bloom
designconnected
devon&devon little bloom computer generated 3d model.
design_connected
$16

Little Albert
...little albert
designconnected
moroso little albert computer generated 3d model. designed by arad, ron.
3d_ocean
$5

Little Bag
...little bag
3docean
accessory bag bundle design fashion handbag interior
a little bag model.