Thingiverse
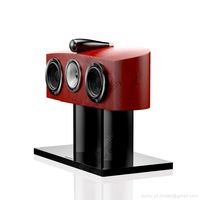
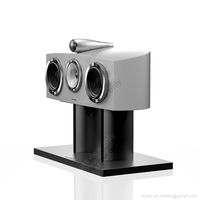
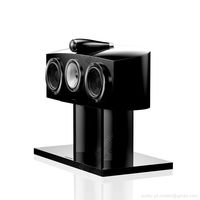
Tenlog TL-D3 Pro (Dual) 5015 Fan Mod for Stock Metal Shroud by Buriaku
by Thingiverse
Last crawled date: 2 years, 10 months ago
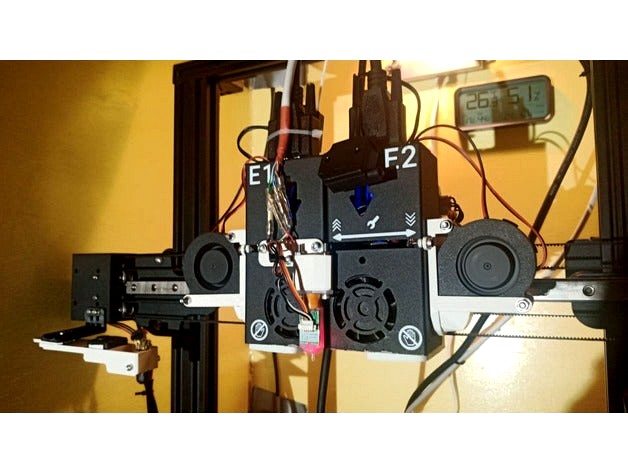
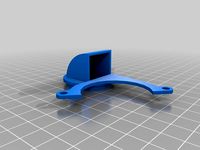
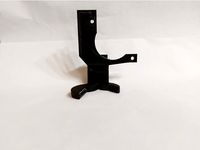
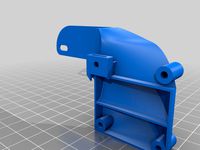
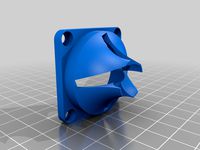
This is a modification for the stock metal shroud of the Tenlog TL-D3 Pro to use two (or one) 5015 fans per extruder. Air is sent to the back and front of the nozzle and distributed quite evenly. Airflow was examined using fluid simulation (Simscale) and water tests. For assembly, the metal shroud needs to be modified by removing the part sitting under the cooling fan by breaking or sawing it off.
The fans I used are from Winsinn.
Original Inventor files and exported STEP files of the whole assembly are provided.
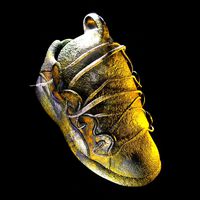
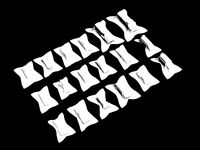
Last two photos are printing examples of the "cooling fan torture test" by TeachingTech.
The single 5015 fanduct design was also used in the "Tenlog TL-D3 BMG Extruder V2" by andrewseago.
Printing:
Print with supports on build plate and the flattest part laying on the build plate (side for fanholder, bottom for fanduct). Check, that there is no support inside the fanducts before printing. I used 0.2mm layer heights with 0.3mm initial layer height. Inner divider walls are 0.84mm, which is the recommended width in PrusaSlicer for two walls at 0.45mm outlines, so check whether there are actually two walls.
Assembly:
Remove the metal shroud, disconnect the fans from the board and unscrew both fans before modifying.
The fanduct parts go on the inside and the fanholder parts go on the outside of the shroud joined through the air intake hole of the original part cooling fan. No holes need to be bored into the shroud for assembly, but the metal "flap" sitting under the heatsink fan needs to be removed by breaking it off (flexing back and forth with pliers until the metal yields) or sawed off (after bending it down). To prevent injury, remove any sharp edges with a file after removal. The inside and outside parts are joined using two screws, one through the side hole of the shroud and one through the long slit on the front of the shroud. Two longer screws are used to fix the fans to the fanholder. All screw holes are designed for M3 screws.
If using two fans, they need to be connected in parallel. Search for examples, if unsure what that means. On the blue/yellow cable of the original Tenlog fan, blue is negative (black) and yellow is positive (red).
The fans I used are from Winsinn.
Original Inventor files and exported STEP files of the whole assembly are provided.
Last two photos are printing examples of the "cooling fan torture test" by TeachingTech.
The single 5015 fanduct design was also used in the "Tenlog TL-D3 BMG Extruder V2" by andrewseago.
Printing:
Print with supports on build plate and the flattest part laying on the build plate (side for fanholder, bottom for fanduct). Check, that there is no support inside the fanducts before printing. I used 0.2mm layer heights with 0.3mm initial layer height. Inner divider walls are 0.84mm, which is the recommended width in PrusaSlicer for two walls at 0.45mm outlines, so check whether there are actually two walls.
Assembly:
Remove the metal shroud, disconnect the fans from the board and unscrew both fans before modifying.
The fanduct parts go on the inside and the fanholder parts go on the outside of the shroud joined through the air intake hole of the original part cooling fan. No holes need to be bored into the shroud for assembly, but the metal "flap" sitting under the heatsink fan needs to be removed by breaking it off (flexing back and forth with pliers until the metal yields) or sawed off (after bending it down). To prevent injury, remove any sharp edges with a file after removal. The inside and outside parts are joined using two screws, one through the side hole of the shroud and one through the long slit on the front of the shroud. Two longer screws are used to fix the fans to the fanholder. All screw holes are designed for M3 screws.
If using two fans, they need to be connected in parallel. Search for examples, if unsure what that means. On the blue/yellow cable of the original Tenlog fan, blue is negative (black) and yellow is positive (red).
Similar models
thingiverse
free

Tenlog TL-D3 BMG Clone Extruders by andrewseago
...tock 40mm fan
2 stock d3 hotend assemblies
2 stock tenlog d3 vga breakout boards
1 capacitive probe (optional)
assorted 3mm bolts
thingiverse
free

Filament switch Tenlog TL-D3 Pro Dual by hirsch5
... tenlog tl-d3 pro dual v2
direct mount on extruder
mirror print for e1/e2
printed in 0.3mm pla 20% infill
2 screws m3 20mm + 30mm
thingiverse
free

Spool Holder for Tenlog TL-D3 Pro by BirdiesGalore
...o by birdiesgalore
thingiverse
spool holder for tenlog tl-d3 pro or any other printer that uses 20mm rails -- no support needed.
thingiverse
free

FanHolder for Printrbot Play by enhydra
...mm screws for mounting the fanholder to the extruder base.
4 pcs m3 by 16 screws for fixing fan and mini-shroud to the fanholder.
thingiverse
free

Diamond Hotend Fan Shroud by LHartmann
...diamond hotend fan shroud by lhartmann
thingiverse
part cooling fan mount and shroud for this mount, uses a 5015 radial fan.
thingiverse
free

Fanduct5015 for TenLOG D3 PRO by StikkaDesign
...grades (bltouch, led lights, etc.)
the rectangular holes are for the electrical clamps and the internal wiring of the fan cables.
thingiverse
free

V6 Extruder Heatsink Fan Duct for 5015 Centrifugal Fan by jammi
...o the shroud and the shroud itself snaps onto the heatsink.
print as-is, or with supports. bridging worked fine for me, but ymmv.
thingiverse
free

Tenlog TL-D3 Pro Fan Mount
...2 - strengthened the mount screw area
update - v3 for p2 shroud released - trimmed edge on left side down to give room for hotend
thingiverse
free

CR-10 5015 Radial Cooling Fan duct / shroud (original metal case) by sassymaker
...se) by sassymaker
thingiverse
cr-10 cooling fan mod using original metal case for extruder fan.
see photo for print orientation.
thingiverse
free

eB Fan Shroud - Remixed to use stock fan screws by mparker03
... the hotend fan and deleted the part cooling fan mounting holes.
printed in pla, 50% infill, print with cooling fan flange down.

Tenlog
thingiverse
free

Tenlog D3 Pro tool holder by shahfil
...tenlog d3 pro tool holder by shahfil
thingiverse
tool holder for tenlog printer
thingiverse
free

Tenlog D3 Filament Guide by akwerdesigns
...ent guide by akwerdesigns
thingiverse
filament guide for a tenlog d3 that keeps the filament from loosening on a full the spool.
thingiverse
free

Poignée Tenlog pour le plateau, Handle Bed TENLOG, tenlog tl-d3 pro by ArtDesChoix
...andle logo" et "handle single" que vous pourrez fusionner pour imprimer en é couleurs.
bonne impression
art3dchoix
thingiverse
free

Duet Tenlog TL D3 pro by denisvdb
...t tenlog tl d3 pro by denisvdb
thingiverse
replacing the tenlog motherboard with a duet 2 wifi + duex5. modification in progress
thingiverse
free

V-Slot Cover for Tenlog TLD3pro by jspivey13
...3pro by jspivey13
thingiverse
this is a remix of: https://www.thingiverse.com/thing:3379068 for the v-slots on my tenlog tld3pro
thingiverse
free

Tenlog Dial Indicator Mount by jammin32j
...he tenlog tl-d3 pro extruder. it holds the dial indicator and can be used for setting bed height and checking for a warped bed.
thingiverse
free

Tenlog / Hictop bmg+v6 by kanocz
...to onshape work: https://cad.onshape.com/documents/795ed0e8f7593bda6683f376/w/3a61c6ec6cc35afb6e159085/e/d0a1e93d030008aedf0c4812
thingiverse
free
Spool Holder for Tenlog TL-D3 Pro by BirdiesGalore
...o by birdiesgalore
thingiverse
spool holder for tenlog tl-d3 pro or any other printer that uses 20mm rails -- no support needed.
thingiverse
free

Tenlog TL-D3 Bed level and nozzle offset test by Samuelheiner1
...enlog tl-d3 bed level and nozzle offset test by samuelheiner1
thingiverse
economical bed level test for the tenlog idex printer.
thingiverse
free

ebox support pour Tenlog TLD3 Pro by jvida
...r tenlog tld3 pro by jvida
thingiverse
support pour ebox sur chassis de tenlog tl d3 pro
permet de fixer la ebox sur le portique
D3
turbosquid
$60
Albatros D3
...osquid
royalty free 3d model albatros d3 for download as 3ds on turbosquid: 3d models for games, architecture, videos. (1206830)
turbosquid
$110
Albatros D3
... available on turbo squid, the world's leading provider of digital 3d models for visualization, films, television, and games.
turbosquid
$8
D3 Bookcase
...d3 bookcase for download as ma, 3ds, max, obj, fbx, and blend on turbosquid: 3d models for games, architecture, videos. (1339364)
3ddd
free

ODESD2 D3
...м шпонированная дубом фанера, мдф, фурнитура blum
размеры: ширина: 425мм, длина: 1200мм, высота: 800ммhttp://odesd2.com
3d_export
$5

Buggy d3 3D Model
...buggy d3 3d model
3dexport
buggy
buggy d3 3d model 1201314354 62357 3dexport
turbosquid
$20
Bowers & Wilkins HTM2 D3 Rosenut on FS HTM D3 Black
... available on turbo squid, the world's leading provider of digital 3d models for visualization, films, television, and games.
turbosquid
$100

Motorola RAZR D3
... available on turbo squid, the world's leading provider of digital 3d models for visualization, films, television, and games.
turbosquid
$20
Bowers & Wilkins HTM2 D3 Satin White on FS HTM D3 Silver
... available on turbo squid, the world's leading provider of digital 3d models for visualization, films, television, and games.
turbosquid
$20
Bowers & Wilkins HTM2 D3 Gloss Black on FS HTM D3 Black
... available on turbo squid, the world's leading provider of digital 3d models for visualization, films, television, and games.
turbosquid
$99
Osiris D3 Skate shoe
...ree 3d model osiris d3 skate shoe for download as obj and fbx on turbosquid: 3d models for games, architecture, videos. (1403308)
Tl
design_connected
$13

TL
...tl
designconnected
bonaldo tl computer generated 3d model. designed by viganò, giuseppe.
3ddd
$1

felicita tl
...felicita tl
3ddd
торшер felicita tl
turbosquid
$15

TL symbol
... available on turbo squid, the world's leading provider of digital 3d models for visualization, films, television, and games.
turbosquid
$4

Tl Light
... available on turbo squid, the world's leading provider of digital 3d models for visualization, films, television, and games.
turbosquid
$1

TL SYMBOL
... available on turbo squid, the world's leading provider of digital 3d models for visualization, films, television, and games.
3ddd
$1

Pataviumart TL 2461
...pataviumart tl 2461
3ddd
pataviumart
модель pataviumart tl 2461/02nj41
размеры ш.в.г. - 31х56х20
+obj
3ddd
$1

SEDIA Traffic-TL
...sedia traffic-tl
3ddd
sedia
sedia traffic-tl
внимание!
в архиве имеются 2011 и 2014 версии!
приятного пользования!
humster3d
$75

3D model of Goggomobil TL 250 (TL 400) Transporter Van 1956
...bil tl 250 (tl 400) transporter van 1956 in various file formats. all our 3d models were created maximally close to the original.
3d_export
$99

Acura TL 2009 3D Model
...acura tl 2009 3d model
3dexport
acura tl 2008 2009 2010 2011 sedan sporty usa honda
acura tl 2009 3d model squir 9457 3dexport
3d_export
$10

Solid Tl-1 3D Model
...solid tl-1 3d model
3dexport
solid tl-1 3d model slaz 97581 3dexport
5015
3ddd
$1

Скамья RUGIANO - COPERTINA BRONZA, 5015/130GL
...a bronza, 5015/130gl
3ddd
rugiano , скамья
скамья rugiano - copertina bronza, 5015/130gl
3d_export
$15

3d hair style for girl v94
...: 4811 - edges : 9836 - faces : 5015 - tris : 9642 - uvs : 5364 file...
thingiverse
free

5015 fan duct
...5015 fan duct
thingiverse
5015 fan duct
thingiverse
free

5015 Fan Guard
...5015 fan guard
thingiverse
5015 fan guard
3dfindit
free

294-5015
...294-5015
3dfind.it
catalog: wago
thingiverse
free
40MM to 5015 Adapter by 360alaska
...by 360alaska
thingiverse
this will adapt a 5015 fan to a 40mm fan mount. the 5015 fan mounts at a right angle and rotates fully.
thingiverse
free
Chiron 5015 blower by DK_Davis
...chiron 5015 blower by dk_davis
thingiverse
anycubic chiron 5015 blower
thingiverse
free

single 5015 to 50mnm by Kyledavis417
...single 5015 to 50mnm by kyledavis417
thingiverse
single 5015 to 50mm for tevo controller box
thingiverse
free
Cetus 3D 5015 Duct
...cetus 3d 5015 duct
thingiverse
twisted 5015 fan duct for cetus 3d mk2
thingiverse
free

Dual 5015 to 50mm by Kyledavis417
...dual 5015 to 50mm by kyledavis417
thingiverse
dual 5015 fan adapter for tevo tornado controller box
Shroud
3d_export
$500

Centrifugal pump volute casing with impeller
...casing with impeller 3dexport volute casing with impeller and shroud ...
3d_export
$35
The Holy Face base relief 3D Model
...the holy face base relief 3d model 3dexport shroud turin veronica veronica's veil gospel ikon jesus holy face...
3d_export
$20
present car cloth presentation transport transportation shape concepts show celebration cover showro
...transportation shape concepts show celebration cover showroom covered revealin shroudd cover covering tarp draped fabric cloth showroom reveal revealing...
3d_export
$5

Lockheed F-117 Nighthawk lowpoly stealth bomber
...initial operating capability status in 1983. the aircraft was shroudd in secrecy until it was revealed to the public...
3d_export
$49
kriss vector gen 2 sub-d
...rear flip sight.<br>- vector ejection port.<br>- vector crb square shroud / 16"" sliencer.<br>- ds150 stock.<br>- .ma (maya 2020 ascii)<br>-...
3d_export
$10

vichy dining table
...in oak, sycamore and walnut marquetry.<br>even if the restaurant shroud the vichy in a long table cloth, two slender...
3d_export
$500

us navy pcu sterett ddg-104 arleigh burke class destroyer flight iia max
...the position has been shifted.<br>q. where are the exhaust shroud for the stacks?<br>a. since ddg-89, the exhaust system was...
thingiverse
free

shroud by samshay317
...shroud by samshay317
thingiverse
shroud
thingiverse
free

Fan Shroud
...fan shroud
thingiverse
this is a fan shroud for a 140mm fan
thingiverse
free
40mm fan shroud
...40mm fan shroud
thingiverse
40mm fan shroud
Dual
turbosquid
free

Dual Pistols
...ls
turbosquid
free 3d model dual pistols for download as fbx on turbosquid: 3d models for games, architecture, videos. (1320360)
turbosquid
$2

Dual Axe
...urbosquid
royalty free 3d model dual axe for download as fbx on turbosquid: 3d models for games, architecture, videos. (1332372)
turbosquid
$10

Dual Lesaths
... available on turbo squid, the world's leading provider of digital 3d models for visualization, films, television, and games.
3ddd
$1

плитка Dual Bianco (Испания)
...й плитки venis dual (испания). технические качества: устойчивость к стирания, отличная геометрия, отсутствие проблем при укладке.
turbosquid
$35

Dual Mesh Fonts
...ree 3d model dual mesh fonts for download as ma, obj, and fbx on turbosquid: 3d models for games, architecture, videos. (1352989)
turbosquid
$29

Dual Flask with Bungs
...del dual flask with bungs for download as obj, fbx, and blend on turbosquid: 3d models for games, architecture, videos. (1210512)
turbosquid
$19

Dual Socket Plug
...3d model dual socket plug for download as obj, fbx, and blend on turbosquid: 3d models for games, architecture, videos. (1303912)
turbosquid
$13

Dual Adjustable Pulley
... available on turbo squid, the world's leading provider of digital 3d models for visualization, films, television, and games.
turbosquid
$10

Amoi N809 Dual
... available on turbo squid, the world's leading provider of digital 3d models for visualization, films, television, and games.
turbosquid
$5

Dual Turret Tank
... available on turbo squid, the world's leading provider of digital 3d models for visualization, films, television, and games.
Mod
design_connected
$13

MOD. 4233 - MOD. 4234 Table Lamp
...mod. 4233 - mod. 4234 table lamp
designconnected
arcahorn mod. 4233 - mod. 4234 table lamp computer generated 3d model.
design_connected
$11

MOD.1095
...mod.1095
designconnected
mod.1095 computer generated 3d model. designed by sarfatti, gino.
3ddd
$1

fireplaces mod Spec
...fireplaces mod spec
3ddd
камин
fireplaces mod spec 180x90x125h
3ddd
free

Flos Mod. 2129
... mod
фабрика: flos
модель: mod. 2129
описание: подвесной светильник, металл, белый, черный.
сайт: www.flos.com
turbosquid
$34
Mod Lamp.c4d
... available on turbo squid, the world's leading provider of digital 3d models for visualization, films, television, and games.
turbosquid
$32

MOD A 001
... available on turbo squid, the world's leading provider of digital 3d models for visualization, films, television, and games.
turbosquid
$29

Maars Mod
... available on turbo squid, the world's leading provider of digital 3d models for visualization, films, television, and games.
turbosquid
$15

Mod 70..
... available on turbo squid, the world's leading provider of digital 3d models for visualization, films, television, and games.
turbosquid
$10

MOD Sofa
... available on turbo squid, the world's leading provider of digital 3d models for visualization, films, television, and games.
turbosquid
$1

Mod-Lite
... available on turbo squid, the world's leading provider of digital 3d models for visualization, films, television, and games.
Stock
turbosquid
$19

Stocks
... available on turbo squid, the world's leading provider of digital 3d models for visualization, films, television, and games.
3d_ocean
$7

Christmas Stockings
...christmas stockings
3docean
christmas gift holiday present sock stocking
sock and 2 gift.
turbosquid
$30

Christmas Stocking
...
royalty free 3d model christmas stocking for download as fbx on turbosquid: 3d models for games, architecture, videos. (1660476)
turbosquid
$2

sexy stockings
...uid
royalty free 3d model sexy stockings for download as max on turbosquid: 3d models for games, architecture, videos. (1350546)
turbosquid
$2

sexy stockings
...uid
royalty free 3d model sexy stockings for download as max on turbosquid: 3d models for games, architecture, videos. (1354968)
turbosquid
$2

sexy stockings
...uid
royalty free 3d model sexy stockings for download as max on turbosquid: 3d models for games, architecture, videos. (1351029)
turbosquid
$3
Iron Stocks
...yalty free 3d model iron stocks for download as blend and obj on turbosquid: 3d models for games, architecture, videos. (1596546)
turbosquid
$6

Prison Stocks
...free 3d model prison stocks for download as obj, c4d, and fbx on turbosquid: 3d models for games, architecture, videos. (1454023)
turbosquid
$29

Christmas Stocking
...del christmas stocking for download as 3ds, obj, c4d, and fbx on turbosquid: 3d models for games, architecture, videos. (1344671)
turbosquid
$5
Medieval Stocks
... model medieval stocks for download as 3ds, obj, c4d, and fbx on turbosquid: 3d models for games, architecture, videos. (1291222)
Fan
3d_export
$5

fan
...fan
3dexport
fan 3d model, table fan, fan, electric fan, ventilator
archibase_planet
free

Fan
...fan
archibase planet
fan large fan
fan out n260707 - 3d model for interior 3d visualization.
archibase_planet
free

Fan
...fan
archibase planet
fan ceiling fan ventilator
fan stealth n300615 - 3d model (*.gsm+*.3ds) for interior 3d visualization.
3d_export
$15

fan
...fan
3dexport
is an ancient fan
3ddd
$1

Fan-C-Fan by marco gallegos
...n-c-fan by marco gallegos
3ddd
вентилятор , marco gallegos
fan-c-fan by marco gallegos
3d_export
$10

fan
...fan
3dexport
a detailed fan designed for home or space blowing is now available for only 19.99!
turbosquid
$1

Fan
...fan
turbosquid
free 3d model fan for download as on turbosquid: 3d models for games, architecture, videos. (1427865)
turbosquid
$14

Fan
...fan
turbosquid
royalty free 3d model fan for download as on turbosquid: 3d models for games, architecture, videos. (1415642)
3ddd
$1

Светильник Fan
...светильник fan
3ddd
fan , italamp
светильник fan, производитель italamp
turbosquid
$25

Fan
...fan
turbosquid
royalty free 3d model fan for download as c4d on turbosquid: 3d models for games, architecture, videos. (1483246)
Pro
turbosquid
$29

Pro
...ree 3d model mac pro for download as obj, c4d, fbx, and blend on turbosquid: 3d models for games, architecture, videos. (1505782)
turbosquid
$15

Apple Mac Pro and Pro Display
...ee 3d model apple mac pro and pro display for download as max on turbosquid: 3d models for games, architecture, videos. (1417078)
3d_export
$5

iphone 13 pro max and pro
...3 pro max and 13 pro the model is made in four colors (graphite, gold, silver, and blue), all of which are attached in the files.
3d_export
free

sapphire pro
...sapphire pro
3dexport
sapphire pro 3d printer head mask
3d_export
$4

macbook pro
...macbook pro
3dexport
macbook pro 13" inch 2020 years model
3ddd
free

GentleLase Pro
... syneron , candela
gentlelase pro аппарат для лазерной эпиляции
turbosquid
$25

PRO frame
...rbosquid
royalty free 3d model pro frame for download as max on turbosquid: 3d models for games, architecture, videos. (1148329)
turbosquid
$5

Alien pro
...osquid
royalty free 3d model alien pro for download as blend on turbosquid: 3d models for games, architecture, videos. (1678446)
turbosquid
$5

iphone11 pro
...uid
royalty free 3d model iphone11 pro for download as blend on turbosquid: 3d models for games, architecture, videos. (1562707)
3ddd
$1

Mac Pro (appel)
...mac pro (appel)
3ddd
компьютер , apple
mac pro
Metal
3d_ocean
$10

Metal Barrel
...metal barrel
3docean
barrel barrels metal metal barrel wood barrel
metal barrel
turbosquid
$14

Metals
...als
turbosquid
royalty free 3d model metals for download as on turbosquid: 3d models for games, architecture, videos. (1486252)
3d_ocean
$18
Metal Furniture
...metal furniture
3docean
design desk indoor industrial metal metal furniture restoration table
metal furniture 3d model
3d_export
$5
metal table
...metal table
3dexport
metal table.blend
3d_export
$5

Metal Shelf
...metal shelf
3dexport
metal shelf
3d_export
free

metal detector
...metal detector
3dexport
metal detector
3ddd
$1
metal lux
...metal lux
3ddd
dedalo , metal lux
люстра и бра metal lux коллекция dedalo.
3ddd
$1
bonded metal
...bonded metal
3ddd
https://www.forms-surfaces.com/bonded-metal
boded tiled metal
3ddd
$1
Metal
...metal
3ddd
1280-1024 бесшовный 8-)
3d_export
$5

cgaxis metal
...cgaxis metal
3dexport
notebook cgaxis metal