Thingiverse
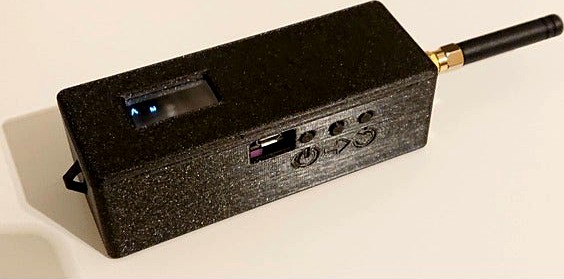
TBeam Case Screwless (T22_v1.1 20191212 with SX1262, NEO-M8 and IPEX) by drewsed
by Thingiverse
Last crawled date: 3 years, 3 months ago
Hi everyone,
I am not very satisfied with the existing cases for the TTGO TBeams, so I simply created my own one ;)
It is completely screwless, and very easy to print.
You can choose different bodies, one with and one without a hook. On both bodies the appropriate symbols for the buttons are integrated. Furthermore the button in the middle is 1mm longer, the power and reset buttons are even with the surface, but still easy to press.
There are also different lids:
without a LCD cutout/window
with a LCD cutout/window
with a window and a inserted PET window
Instructions for printing the lid with inserted glass window:
I use a plastic (PET) box of a DDR RAM memory module. The PET glass is very clear and rigid. It is 0.5mm thick, so with 0.2mm layers I chose 0.6mm free space within the glass cutout. Cut a piece of plastic with 38x24mm (or smaller) and clean it with isoprop. Make sure you have some glue at hand, the plastic is too light and will be blown away by the part cooling fan, or some filament on the nozzle. So you need to glue it, trust me ;)
In your slicer software, insert a pause command before top layer of the cutout section is printed. It takes about 30 minutes then the printer will pause and you can insert the "glass".
Put a very small drop of glue onto the four edges and press it down gently with your fingers. Click resume print, but make sure there is no filament oozing out of the nozzle. (This could cause the inner frame (first layer on the PET plastic glass) to get loose and the frame won't be perfect.) See pictures for reference)
Soldering the LCD:
The 4 pins (short side) should be solderd to the LCD first. After that align the LCD parallel to the TBeam PCB and make sure the capacitor on the bottom of the LCD PCB sits on the IC on TBeam PCB. See pictures for reference.
Antenna cable management:
When mounting the antenna itself, put all rings and the nut outside of the case.
Bend it down to the bottom, do a loop an go through the hole where the GPS antenna cable is located. The bend radius is not very tight, so there will be no problem.
See the position of the GPS antenna on the pictures. Make sure the antenna does not short circuit with the via un the bottom of the USB port. This will set at least the antenna cable on fire: Isolate this via properly!
Insert PCB:
There is a nipple in each of the four corners. After inserting the TBeam PCB you should use a pen to push down the PCB in each corner. After that it fits very tight. If you dont want it this tight, remove one or all nipples by simply cracking it with a screwdriver, knife, etc.
Closing the lid:
Fit one of the small edges and push it all the way down to the other side. See pictures for reference.
Opening the case:
Use a knife to remove the lid. I did this about seven times and now the lid becomes a bit loose. Before it always did fit/close perfectly.
Removing the PCB:
If you want to remove the PCB, you can do that via the USB cutout. If you want to remove the PCB often, i suggest to remove some or all of the small nipples which hold the PCB in the four corners. Simply crack them away with a screwdriver or a knife.
Printed PLA and PETG so far without problems.
If you have any questions, feel free to ask ;)
Similar models
thingiverse
free

LCD Buck converter case
... additional clips to hold everything in place. the clips are not very tight, so removing them to access the buttons is very easy.
thingiverse
free

Pi Zero w/ Hat Case Riser (screwless) by mavera
...spberry pi zero case lid and base. tolerances on the tabs are pretty tight so make sure you have good resolution on your printer.
thingiverse
free

ZumPiZeroW by kc9rqi
...6" lcd display. the lid is tight so you may need to "scrape" the sides down some depending on your print quality.
thingiverse
free

MicroPi - Mini VGA Raspberry Pi Zero Case by BrainFever
...n was made right to the gpio pins directly.
anyway, the wiring is pretty basic and i will add more details later if it is needed.
thingiverse
free

MySensors Repeater Stick by titvs
...ons afterwards.
the lid is a bit a work in progress so at the moment it doesnt have any kind of way to attach it to the main box.
thingiverse
free

DDS-generator case by bzijlstra
...move the lcd and place it later back on again. top will be published later. 3d printed or lasercut, both files will be published.
thingiverse
free

RZUSBStick Cover by athielker
...case body. you will need a knife or something similar to remove the cap from the case body. if...
cults
free

GPS Antenna Holder
...r of a window (in my case, a roof window). simply put some velcro in the corner and on the mount, and the bottom of the antenna.
thingiverse
free

Simply case for Orange Pi Lite. by mayka
...(one position inside case).
i use 2.5*12mm screw.
todo:
1) add a removable lid for easy access to gpio.
2) window for ir receiver
thingiverse
free

Buck converter case for XL4015 by ExtremeExtruder
...e it is kind of hard to remove. you can do it with a flat head screwdriver, but it is not designed to be opened and closed often.

Sx1262
grabcad
free

LILYGO® TTGO T-Weigh ESP32 T-Micro32 LoRa SX1262 868Mhz 915Mhz Drahtlose Modul 4-Gruppe 4-Weg HX711 Unterstützung Expansion Wiegen
...a sx1262 868mhz 915mhz drahtlose modul 4-gruppe 4-weg hx711 unterstützung expansion wiegen
grabcad
rought sketch for placeholder
grabcad
free

E22-900M22S
...grabcad ebyte e22-900m22s module lora module based on semtech sx1262 chip....
grabcad
free

Waveshare 1262 Lora Module
...waveshare 1262 lora module grabcad core1262 lf/hf lora module, sx1262 chip, long-range communication, anti-interference, suitable for sub-ghz...
grabcad
free

ISP4520
...isp4520 module combines a nordic nrf52832 and a semtech sx1262 chip. provides ble and lora communication options....
grabcad
free

SMD Wireless Module E22-900T22S
...a wireless serial port module (uart) based on semtech's sx1262 rf chip. it has multiple transmission modes, working in...
Tbeam
thingiverse
free

TTGO Tbeam version 1.0 case
...ttgo tbeam version 1.0 case
thingiverse
removed font on the top, cause its was weakening , and made the display hole bigger
thingiverse
free

Single-screw TBeam case by bensonk42
...sign -- i've re-exported the sma stls as well, which are slightly different than the originals -- those have sma in the name.
thingiverse
free

Makerbeam 1010 for computer case by ManiacMagic
...acrylic for side panels as it fits into the tbeam and secures it nice. so i remade this ......
thingiverse
free

makerbeam corner cube extended 1010 by ManiacMagic
...part of the bracket that would 'fit' into the tbeam slot, due to the nut being flush on a...
grabcad
free

TTGO TBeam V1.0
...ttgo tbeam v1.0
grabcad
ttgo tbeam v1.0
20191212
thingiverse
free

TTGO T-Beam case with IPEX connector (T22_v1.1 20191212) by construprint
...: gps neo-m8n of lilygo® ttgo t-beam v1.1 esp32 lora 433/868/915/923mhz wifi wireless bluetooth module ipex 18650 battery holder
thingiverse
free

TTGO T-Beam T22_v1.1 20191212 Case (IPEX Version) by jangrewe
...tons are labeled p, u and r for power, user and reset. the user button has a small nub on it, so you can find it without looking.
thingiverse
free

TTGO T-Beam V1.1 NEO-6M (Meshtastic) Case by tpatrickwalsh
...one fits my board which is labeled t22 v1.1 20191212 i added an additional angled face on the bottom...
thingiverse
free

SoftRF case v5 ( for TTGO T-Beam ) by xkremator
...-v11 suffix are best suited for most recent v11 (20191212 v1.1) revision of the board. if you are unable...
3dwarehouse
free

pokrov posode 20191212
...pokrov posode 20191212
3dwarehouse
#model
3dwarehouse
free

GOezGO 20191212 加拿大陳先生 V13
...goezgo 20191212 加拿大陳先生 v13
3dwarehouse
幼兒園
Ipex
thingiverse
free
TTGO T-Beam case with IPEX connector (T22_v1.1 20191212) by construprint
...: gps neo-m8n of lilygo® ttgo t-beam v1.1 esp32 lora 433/868/915/923mhz wifi wireless bluetooth module ipex 18650 battery holder
thingiverse
free
TTGO T-Beam T22_v1.1 20191212 Case (IPEX Version) by jangrewe
...tons are labeled p, u and r for power, user and reset. the user button has a small nub on it, so you can find it without looking.
thingiverse
free

DEVO 7E 4-in-1 RF Module Mount by KritzelKratzel
...mount rf-module: https://www.banggood.com/cc2500-nrf24l01-a7105-cyrf6936-4-in-1-rf-module-for-walkera-d7e-d10-transmitter-p-1096707.html 2.4 ghz antenna with ipex connector: https://www.banggood.com/3dbi-brass-2_4g-receiver-antenna-omnidirectional-ipexport-compatible-futaba-jr-wfly-p-1032401.html ...
thingiverse
free

R9MM Receiver Case by MaxLansing_MI7
...protective case for the r9mm receiver from frsky. the ipex antenna connector is prone to breaking while handling and...
thingiverse
free

SMA Adapter Holder ZMR 250 by lblm89
...the top plate of your drone. sma to ipex adapter:https://www.banggood.com/1pcs-l-type-90-degree-sma-female-to-ipexadapter-extend-cable-connetor-15cm-for-rc-racing-p-1179729.html?rmmds=search&cur_warehouse=cn clover leaf...
thingiverse
free

Spektrum DX10T Antenna Mod by Gauch0
...the radio i replaced the original antenna with an ipex to sma female cable to be able to screw...
thingiverse
free

Ifligfht IX5 FPV whip antenna Guard by axl_baaam
...guard for 5.8ghz monopol whip antennas this antenna fits perfect:https://www.banggood.com/5x-micro-5_8g-fpv-vtx-antenna-ipex55mm-for-eachine-x73-cm275t-vtx01-vtx02-vtx03-camera-p-1134978.html?rmmds=myorder ...
thingiverse
free

Martian II iA6C reciever + Eachine VTX02 mount by arctic_cougar
...eachine vtx02. has cutouts for cable ties to hold ipex connector to vtx and for heatshrinking receiver antennae. i...
thingiverse
free

HiKam S5 / S6 - Backcover with external antenna by Hasenpups
...have opened the hikam s6 and saw that a ipex connector is available to connect an external antenna. i...
T22
turbosquid
$18

BENCH A01-T22
...free 3d model bench a01-t22 for download as max, obj, and fbx on turbosquid: 3d models for games, architecture, videos. (1467195)
turbosquid
$39

T22 Writing desk
...model t22 writing desk for download as 3ds, max, obj, and fbx on turbosquid: 3d models for games, architecture, videos. (1305011)
turbosquid
$59

T22S Bipedal Robot
... available on turbo squid, the world's leading provider of digital 3d models for visualization, films, television, and games.
thingiverse
free

T22 German torpedo ship by RCcrazy
...ion of parts of the t22 torpedo ship that i have so far. i havent printed these yet, if anyone does let me know how it turns out.
thingiverse
free

T22 medium tank
...t22 medium tank
thingiverse
wotb tier x soviet collector tank. new year gift too you guys! happy new year!
thingiverse
free

Innokin T22 Vape Stand by terahurts
... while in the stand.
the fusion 360 timeline is a bit of a mess, but it should be tweakable. please let me know if you print one.
3d_sky
free

Bra factory "Illuminati", Italy.
...bra factory "illuminati", italy. finish metal, cloth. dimensions: d15, t22 b43. texture and fbx (vray) in the...
3d_sky
free

Bra factory "Illuminati", Italy.
...bra factory "illuminati", italy. finish metal, cloth. dimensions: d45, t22 b43. texture and fbx (vray) in the...
thingiverse
free

Flying Glider Hangable Cards by exosequitur
...thingiverse print these great flying mini f44 jet and t22 club gliders as gifts, decorations, or cards! use a...
thingiverse
free

Touchpad Housing by jolang
...fits a ps/2-touchpad connected to the ps/2-usb adapter (1. t22 vcc; 2. t10 clk; 3. t11 data; 4. t23...
Screwless
thingiverse
free

Pedestal for the Screwless Heart by sterling500
...pedestal for the screwless heart by sterling500
thingiverse
needed a pedestal for the screwless heart gear i made.
thingiverse
free

Screwless megaspool by Domonoky
...t.
you can find more info about it here:http://ifeelbeta.de/index.php/production/screwless-megaspool
warning, this thing is big !
thingiverse
free

Freedeck Screwless enclouser by thijseigenwijs
...with the screws in the original, so i made it screwless!
thanks a lot for everyone in the project for making this awesome device!
thingiverse
free

Stand for Screwless Heart Gears by rhmorrison
...heart gears made bigger by a factor of 1.8. andrev requested the same stand for the original screwless heart gears so here it is.
thingiverse
free

Arduino UNO case screwless with leg by BJ3D
...arduino uno case screwless with leg by bj3d
thingiverse
arduino uno (dccduino) case screwless with leg
thingiverse
free

Soil Moisture screwless case by peterbirkas
...crewless case by peterbirkas
thingiverse
it's just a simple screwless case for common soil moisture sensor.
hole radial: 8mm
thingiverse
free

Infrared Thermometer ikea screwless stacker by death4u
...ea screwless stacker by death4u
thingiverse
combined a infrared thermometer holder with a screwless stacker for ikea lack tables
thingiverse
free

screwless heart gear
...screwless heart gear
thingiverse
want a gift for your girl. here is the best gift to have fun with. happy valentine.
thingiverse
free

Arduino Screwless Hobby Top Case by Superflex_Plastic_Fantastic
...ttom or mountable screwless bottom linked here:https://www.thingiverse.com/thing:2244535https://www.thingiverse.com/thing:2243237
thingiverse
free

Screwless Lasercut Reuleaux Triangle by wizard23
...e "screwlessness" was inspired by the "screwless cube gears" by emmett http://www.thingiverse.com/thing:10483
Neo
design_connected
$18

Neos
...neos
designconnected
wilkhahn neos computer generated 3d model. designed by wiege.
design_connected
$7

Neos
...neos
designconnected
gruppo feg neos computer generated 3d model. designed by nunziati, matteo.
turbosquid
$7

NEO
...
royalty free 3d model neo for download as max, obj, and fbx on turbosquid: 3d models for games, architecture, videos. (1219070)
turbosquid
$30

Neo
... available on turbo squid, the world's leading provider of digital 3d models for visualization, films, television, and games.
3ddd
$1
Neo chair
...neo chair
3ddd
кресло
http://www.ufficidea.com/schedaprodotto_2720_seduta-direzionale-neo-chair.php
3ddd
$1
Riho NEO
... угловая
угловая акриловая ванна neo 140л.
фабрика изготовитель - riho
страна производитель: чехия
размер: 140 x 140 см
3ddd
$1
DUNE - NEO
... панель
186536 neo
29x29 cm./ 11,42”x11,42” d935
8 mm. de espesor/thicknesshttp://www.dune.es
3ddd
$1
Neo
...neo
3ddd
3d max 2009,vray 1.5 sp2+fbx
3ddd
$1
Russion neo classic
...russion neo classic
3ddd
lustra russion neo classic
3d_export
$7
neo matrix 1999
...neo matrix 1999
3dexport
neo matrix 1999 под печать
M8
3d_ocean
$19
M8 Tank
...my game ready low poly m8 military tank us vehicle world war
low poly m8 world war 2 us tank, 2048×2048 diffuse texture included.
3d_ocean
$15

HTC One M8
...you see, were rendered in maya without any 3rd party plugin and photoshop manipulation! materials : maya and cinema 4d materia...
3ddd
$1
Wooder Miola Model M8
...wooder miola model m8
3ddd
wooder , дверь
дверь wooder, коллекция miola, модель m8
3d_export
free

barrett m8
...barrett m8
3dexport
in maya 2019 for free low poly<br>convert to .stl
turbosquid
$24

AN-M8 Smoke Grenade
... available on turbo squid, the world's leading provider of digital 3d models for visualization, films, television, and games.
turbosquid
$20

Polar Grill M8
... available on turbo squid, the world's leading provider of digital 3d models for visualization, films, television, and games.
turbosquid
$20

M8 Smoke Grenade
... available on turbo squid, the world's leading provider of digital 3d models for visualization, films, television, and games.
turbosquid
$17

HTC One M8
... available on turbo squid, the world's leading provider of digital 3d models for visualization, films, television, and games.
cg_studio
$49

HTC M8 Gray3d model
...tphone
.max .obj .mb .lwo .fbx .c4d .3ds - htc m8 gray 3d model, royalty free license available, instant download after purchase.
3d_ocean
$15

Htc one m8
...e screen) like image preview and it included in maps folder as (screen, screen2, screen3) - the preview images were rendered o...
V1
turbosquid
$35

v1
... available on turbo squid, the world's leading provider of digital 3d models for visualization, films, television, and games.
3d_export
$10

street tree v1
...street tree v1
3dexport
street tree v1
3d_export
$5
potato v1
...potato v1
3dexport
turbosquid
$20

Kitchen V1
...bosquid
royalty free 3d model kitchen v1 for download as max on turbosquid: 3d models for games, architecture, videos. (1153622)
turbosquid
$12
sofa v1
...turbosquid
royalty free 3d model sofa v1 for download as max on turbosquid: 3d models for games, architecture, videos. (1283267)
turbosquid
$3

Chair V1
...urbosquid
royalty free 3d model chair v1 for download as fbx on turbosquid: 3d models for games, architecture, videos. (1486093)
turbosquid
$15

Cupboard v1
...royalty free 3d model cupboard v1 for download as max and fbx on turbosquid: 3d models for games, architecture, videos. (1444568)
3d_export
$5

tram v1
...tram v1
3dexport
3d_export
$8
lumber car v1
...lumber car v1
3dexport
lumber car v1 printable, low poly model.
turbosquid
$20

DELTALIGHT v1
...free 3d model deltalight v1 for download as max, max, and obj on turbosquid: 3d models for games, architecture, videos. (1630928)
Case
3d_export
$1

case
...case
3dexport
case
archibase_planet
free

Case
...case
archibase planet
showcase show-case glass case
glass-case + cakes - 3d model for interior 3d visualization.
archibase_planet
free

Case
...case
archibase planet
showcase show-case glass case
glass-case for chips - 3d model for interior 3d visualization.
archibase_planet
free

Case
...case
archibase planet
case shelving drawer
case - 3d model for interior 3d visualization.
archibase_planet
free

Case
...case
archibase planet
case rack locker
case - 3d model for interior 3d visualization.
archibase_planet
free

Case
...case
archibase planet
case drawer kitchen furniture
case - 3d model for interior 3d visualization.
archibase_planet
free

Case
...case
archibase planet
case cupboard shelving
glass case - 3d model for interior 3d visualization.
archibase_planet
free

Case
...case
archibase planet
case handbag suitcase
case - 3d model (*.gsm+*.3ds) for interior 3d visualization.
archibase_planet
free

Case
...case
archibase planet
case suitcase
case 5 - 3d model (*.gsm+*.3ds) for interior 3d visualization.
archibase_planet
free

Case
...case
archibase planet
locker case dresser
case - 3d model (*.gsm+*.3ds) for interior 3d visualization.
1
turbosquid
$69

armchairs(1)(1)
... available on turbo squid, the world's leading provider of digital 3d models for visualization, films, television, and games.
turbosquid
$15

ring 1+1
... available on turbo squid, the world's leading provider of digital 3d models for visualization, films, television, and games.
turbosquid
$10

chair(1)(1)
... available on turbo squid, the world's leading provider of digital 3d models for visualization, films, television, and games.
turbosquid
$8

Chair(1)(1)
... available on turbo squid, the world's leading provider of digital 3d models for visualization, films, television, and games.
turbosquid
$2

RING 1(1)
... available on turbo squid, the world's leading provider of digital 3d models for visualization, films, television, and games.
turbosquid
$1

house 1(1)
... available on turbo squid, the world's leading provider of digital 3d models for visualization, films, television, and games.
turbosquid
$1

Table 1(1)
... available on turbo squid, the world's leading provider of digital 3d models for visualization, films, television, and games.
turbosquid
$59

Formula 1(1)
...lty free 3d model formula 1 for download as max, fbx, and obj on turbosquid: 3d models for games, architecture, videos. (1567088)
design_connected
$11

No 1
...no 1
designconnected
sibast no 1 computer generated 3d model. designed by sibast, helge.
turbosquid
$2

desert house(1)(1)
...3d model desert house(1)(1) for download as 3ds, max, and obj on turbosquid: 3d models for games, architecture, videos. (1055095)