Thingiverse

TAZ 6 Spool Holder Shaft by russell_i_brown
by Thingiverse
Last crawled date: 3 years, 1 month ago
I've been using https://www.thingiverse.com/thing:1608830 on my TAZ 6 for a while and it works very well... except... the spool often seems to hangup on the shaft and then go over centre with a loud CLUNK! :-( I even tried a bit of polished 22mm copper pipe as the shaft but that still went CLUNK! as the spool went round.
I don't like machines that make unexpected CLUNK! noises (and having a kilo of filament bouncing on the top of the printer doesn't sound like a great feature) so I designed this totally over-engineered bearing mounted shaft with tapered inserts to fit multiple spool sizes.
Using this shaft, the spool very gently rotates as the filament is pulled down by the extruder.
As well as the printed parts you'll also need:
2 x 10x26x8 bearings (I used 6000ZZ; very common and a couple of quid off EBay)
1 x 20mm OD, 17mm ID tube around 127mm long.
1 x M6x8 grub or set screw.
I say 'around' 127mm for the tube as that wasn't the original length I used (started at 130mm IIRC) and had to tweak it a bit as the upstands in the original design do have some flex along the shaft axis.
Anyway, I've includes links below for the Fusion 360 CAD files if you need to change anything.
Printing.
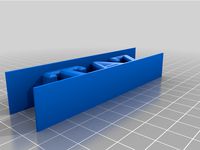
You need support turned on for both the spindle nut and the tube inserts but not for the other parts.
I used a 2mm wall thickness and 30% triangular infill for the tube inserts. 1mm and 20% for the other parts.
Assembly.
The tube inserts were designed to be a 'tight sliding' fit into the tube and bearing. This fit obviously depends on the accuracy of your printer. A slightly loose fit can be accomodated with a dab of bearing retainer (aka superglue). A tight fit means a bit of post-processing or tweak the model and reprint.
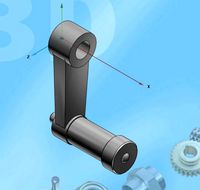
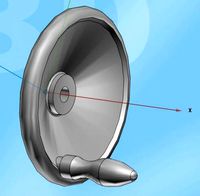
I would suggest you assemble the back tube insert (the left hand red bit in the rendering above) and tube then offer them up to your printer with the front tube insert held alongside so you can tweak the tube length if needed. I aimed for ~1mm clearance between the outside of each bearing and the upstand wall.
Before fitting the outer bearing, tap (M6) one or more of the 5mm holes in the threaded shaft and insert the m6x8 grub screw (setscrew in some parts of the world). Fit the threaded shaft onto the tube, nip down the grub screw and lastly fit the outer bearing.
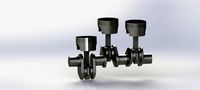
The tapered cups and spindle nut just slide over the front bearing and front tube insert.
Drawings:
Tube Inserts: https://a360.co/2wrVHHm
Tapered Inserts: https://a360.co/2K2XuV3
Spool Nut: https://a360.co/2Klaals
Threaded Shaft: https://a360.co/2I283eN
Enjoy.
Updated the spool shaft to have a slightly thicker body after I had one split around the base of the threaded portion.
Nov '19 - Added holders for the Colorfabb 2Kg reels. These reels are not only larger diameter but thicker than the 1Kg reels. The inner fits to the shaft as normal and the nut has an integral 'cone' for the 52mm core together with a bit of reduced depth to accomodate the 2Kg reels.
You may also need high spool mounts so I've included a version of those too.
I don't like machines that make unexpected CLUNK! noises (and having a kilo of filament bouncing on the top of the printer doesn't sound like a great feature) so I designed this totally over-engineered bearing mounted shaft with tapered inserts to fit multiple spool sizes.
Using this shaft, the spool very gently rotates as the filament is pulled down by the extruder.
As well as the printed parts you'll also need:
2 x 10x26x8 bearings (I used 6000ZZ; very common and a couple of quid off EBay)
1 x 20mm OD, 17mm ID tube around 127mm long.
1 x M6x8 grub or set screw.
I say 'around' 127mm for the tube as that wasn't the original length I used (started at 130mm IIRC) and had to tweak it a bit as the upstands in the original design do have some flex along the shaft axis.
Anyway, I've includes links below for the Fusion 360 CAD files if you need to change anything.
Printing.
You need support turned on for both the spindle nut and the tube inserts but not for the other parts.
I used a 2mm wall thickness and 30% triangular infill for the tube inserts. 1mm and 20% for the other parts.
Assembly.
The tube inserts were designed to be a 'tight sliding' fit into the tube and bearing. This fit obviously depends on the accuracy of your printer. A slightly loose fit can be accomodated with a dab of bearing retainer (aka superglue). A tight fit means a bit of post-processing or tweak the model and reprint.
I would suggest you assemble the back tube insert (the left hand red bit in the rendering above) and tube then offer them up to your printer with the front tube insert held alongside so you can tweak the tube length if needed. I aimed for ~1mm clearance between the outside of each bearing and the upstand wall.
Before fitting the outer bearing, tap (M6) one or more of the 5mm holes in the threaded shaft and insert the m6x8 grub screw (setscrew in some parts of the world). Fit the threaded shaft onto the tube, nip down the grub screw and lastly fit the outer bearing.
The tapered cups and spindle nut just slide over the front bearing and front tube insert.
Drawings:
Tube Inserts: https://a360.co/2wrVHHm
Tapered Inserts: https://a360.co/2K2XuV3
Spool Nut: https://a360.co/2Klaals
Threaded Shaft: https://a360.co/2I283eN
Enjoy.
Updated the spool shaft to have a slightly thicker body after I had one split around the base of the threaded portion.
Nov '19 - Added holders for the Colorfabb 2Kg reels. These reels are not only larger diameter but thicker than the 1Kg reels. The inner fits to the shaft as normal and the nut has an integral 'cone' for the 52mm core together with a bit of reduced depth to accomodate the 2Kg reels.
You may also need high spool mounts so I've included a version of those too.
Similar models
thingiverse
free

PRUSA MMU2 Wall mount spool holder by ad_lamy
...two threaded mainshaft, with or without bearings, for the bearing version you need hk1012 needle rollers and rectified steel rod.
grabcad
free

Prusa i3 MK3 MMU2 Spool Holder
...two threaded mainshaft, with or without bearings, for the bearing version you need hk1012 needle rollers and rectified steel rod.
thingiverse
free

Dual Reel Adapter by backlash63
...do so with minimal materials. i included an insert for separation of the two reels if you feel it is necessary. fits 52mm spools.
thingiverse
free

Filament spool holder with bearings by dgeral
...mm spools.
you need a 5mm threaded shaft, 2 nuts and 2 bearings (16mm ext diameter).
you can attach a filament oiler at the base.
thingiverse
free

Fidget Spinner by Shinns
...ss the fusion 360 designs here:
2-6 bearing: http://a360.co/2qflz6z
7 bearing: http://a360.co/2qedxrm
cap: http://a360.co/2qn95at
thingiverse
free

Ultimate Spool Holder for Ultimaker by enur
...earing on the shaft and also reduces friction. you can manually adjust the how freely the reel is spinning by the nut at the end.
thingiverse
free

Duplicator 6 Spool Holder by leocov
...lls but not too fast.
screw the centering cone on all the way on and off a few times to chase the threads and make them smoother.
thingiverse
free

Tevo Little Monster filament spool replacement with bearings by mlinuxguy
...pool.
it reduces the friction quite a bit on the spool allowing for the flying extruder to easily pull new filament off the roll.
thingiverse
free

Solder Spool Sleeve
...ownloadable file that will allow the parameters to easily be changed to whatever size you need.
a360 fileshttps://a360.co/357iiph
thingiverse
free

CR-6 SE Spool Holder by pclapp19
... do not want any drag at all just replace the tension nut with a nylon nut and don't tighten the spindle to the mounting nut.
Russell
turbosquid
$10

Minotti RUSSELL
...id
royalty free 3d model minotti russell for download as max on turbosquid: 3d models for games, architecture, videos. (1563186)
turbosquid
$59

Jack Russel
... available on turbo squid, the world's leading provider of digital 3d models for visualization, films, television, and games.
turbosquid
$30

Russel Dining Chair
...royalty free 3d model russel dining chair for download as max on turbosquid: 3d models for games, architecture, videos. (1363536)
turbosquid
$10

Minotti Russell Lounge
...alty free 3d model minotti russell lounge for download as max on turbosquid: 3d models for games, architecture, videos. (1563963)
3d_export
$59

Jack Russel 3D Model
...jack russel 3d model 3dexport jack russell dog terrier tail pet square isolated on white mammal...
turbosquid
$125

George Russell 2019
... russell 2019 for download as ma, 3ds, obj, c4d, fbx, and dae on turbosquid: 3d models for games, architecture, videos. (1481510)
turbosquid
$180

Jack Russell Terrier dog
...ty free 3d model jack russell terrier dog for download as c4d on turbosquid: 3d models for games, architecture, videos. (1333226)
turbosquid
$10

Minotti Russell Ottoman Set
...model minotti russell ottoman set for download as max and obj on turbosquid: 3d models for games, architecture, videos. (1493341)
turbosquid
$25

Russel Wright Cocktail Set
... russel wright cocktail set for download as max, obj, and fbx on turbosquid: 3d models for games, architecture, videos. (1218482)
turbosquid
$14

Minotti Russell Armchair 1
... minotti russell armchair 1 for download as max, max, and fbx on turbosquid: 3d models for games, architecture, videos. (1602745)
Taz
3d_ocean
$19

TAZ RIGGED
...ax version only texture is used only for wb logo, taz dont need texture no special render engine needed, just unzip and render...
3d_export
$5

Taz character 3D Model
...taz character 3d model
3dexport
taz toon character cartoon
taz character 3d model supercigale 22095 3dexport
cg_studio
$10

Taz 3D3d model
...taz 3d3d model
cgstudio
.3ds .max - taz 3d 3d model, royalty free license available, instant download after purchase.
cg_studio
$15

Taz Rigged3d model
...ged3d model
cgstudio
.3ds .fbx .max .obj - taz rigged 3d model, royalty free license available, instant download after purchase.
3d_export
$10

Taz Toy Calendar 3D Model
... 3d model
3dexport
taz toy calendar day month year looney tunes cartoon kid child
taz toy calendar 3d model nkfrds 49687 3dexport
3d_export
$10

Taz Tasmanian Devil RIGGED 3D Model
...y tunes anime bunny rigged material fantasy creature diable dessin
taz tasmanian devil rigged 3d model supercigale 28390 3dexport
3d_export
$19
Thylacine 3D Model
...animalia chordata mammalia marsupial dog extinct animals tiger tassie taz thylacine 3d model poly3dmodels 90790...
3d_export
$12

Bowl Decorated 3D Model
...bowl decorated 3d model 3dexport bowl tazn elements ceramics kitchen plastic cup container decorative cake biscuits...
3ddd
$1

Crate & Barrel Serveware
...crate & barrel поднос -http://www.crateandbarrel.com/feast-platter/s186961 набор ножей для сыра -http://www.crateandbarrel.com/tazcheese-knife-3-piece-set/s681377 бокал...
thingiverse
free
TAZ by Taz8373
...taz by taz8373
thingiverse
my 1st print
Shaft
3d_export
$5
shaft handle
...shaft handle
3dexport
shaft handle
3d_export
$5

shaft bracket
...shaft bracket
3dexport
shaft bracket
turbosquid
$3

Shaft
... available on turbo squid, the world's leading provider of digital 3d models for visualization, films, television, and games.
turbosquid
$2

shaft
... available on turbo squid, the world's leading provider of digital 3d models for visualization, films, television, and games.
3d_export
free
crank shaft
...crank shaft
3dexport
crank shaft with piston with different materials
3d_export
$8
shaft bearing
...shaft bearing
3dexport
shaft bearing m10, m12,m16, m20 and m27
3d_export
$5
hexagonal shaft knob
...hexagonal shaft knob
3dexport
hexagonal shaft knob
3d_export
$5
shaft hand wheel
...shaft hand wheel
3dexport
shaft hand wheel
3d_export
$5
triangular shaft knob
...triangular shaft knob
3dexport
triangular shaft knob
3d_export
$5
octagonal shaft knob
...octagonal shaft knob
3dexport
octagonal shaft knob
Spool
3ddd
$1

spool c53301
...spool c53301
3ddd
spool
spool c53301 650х350х145
turbosquid
$3

Cable Spool
...royalty free 3d model cable spool for download as max and fbx on turbosquid: 3d models for games, architecture, videos. (1457009)
turbosquid
free

Pallets and Spool
... available on turbo squid, the world's leading provider of digital 3d models for visualization, films, television, and games.
turbosquid
$10

Spool of String
...ol of string pink for download as c4d, 3ds, fbx, obj, and stl on turbosquid: 3d models for games, architecture, videos. (1647892)
3ddd
$1

Подвесные светильники Spool
...ye/podvesnoy_svetilnik_spool_d320/ http://www.cosmorelax.ru/catalog/podvesnyye/podvesnoy_svetilnik_spool_d420/
3ddd
free

Spool 001 sofa
...spool 001 sofa
3ddd
roda
roda
collection spool
design rodolfo dordoni
dimensions:
lenght 90 cm
depth 94 cm
height 79 cm
turbosquid
$15

Roda Spool Sofa
...ee 3d model roda spool sofa for download as max, obj, and fbx on turbosquid: 3d models for games, architecture, videos. (1502650)
turbosquid
$95
wire spools 3ds
... available on turbo squid, the world's leading provider of digital 3d models for visualization, films, television, and games.
turbosquid
$20
spool of TV wire
... available on turbo squid, the world's leading provider of digital 3d models for visualization, films, television, and games.
turbosquid
$3

Simple and Fast Spool Holder
...ree 3d model simple and fast spool holder for download as stl on turbosquid: 3d models for games, architecture, videos. (1548546)
Brown
3ddd
free

Dialma Brown
...dialma brown
3ddd
комод , dialma brown
dialma brown
3d_ocean
$9

Purple and Brown
...purple and brown
3docean
ballon brown cartoon purple
purple and brown
3ddd
$1

Dialma Brown
...dialma brown
3ddd
dialma brown , комод
комод dialma brown
3ddd
$1

Dialma Brown
...dialma brown
3ddd
dialma brown , камин
камин dialma brown
3ddd
$1

Dialma brown
...dialma brown
3ddd
dialma brown
диван dialma brown sofa
3ddd
$1

Dialma Brown
...dialma brown
3ddd
dialma brown
итальянская фабрика dialma brown
www.dialmabrown.it
3ddd
$1

Dialma Brown
...3ddd
dialma brown , библиотека
библиотека итальянской фабрики dialma brown, арт.db001646
3ddd
$1

Dialma Brown
...dialma brown
3ddd
dialma brown
dialma brown. элемент декора в современном стиле
3ddd
$1

Dialma Brown
...dialma brown
3ddd
dialma brown
настенный светильник итальянской фабрики dialma brown. арт. db002647
3ddd
$1

Dialma Brown
...dialma brown
3ddd
dialma brown
настольный светильник итальянской фабрики dialma brown. арт. db002658
Holder
archibase_planet
free

Holder
...holder
archibase planet
holder toilet paper holder
holder paper n070712 - 3d model (*.gsm+*.3ds) for interior 3d visualization.
archibase_planet
free

Holder
...e planet
holder rack toilet paper holder
holder toilet roll n240715 - 3d model (*.gsm+*.3ds+*.max) for interior 3d visualization.
archibase_planet
free

Holder
...holder
archibase planet
pen holder support prop
pen holder - 3d model for interior 3d visualization.
archibase_planet
free

Holder
...holder
archibase planet
pole post holder
сhurch cross pole holder - 3d model for interior 3d visualization.
archibase_planet
free

Holder
...holder
archibase planet
holder bathroom ware
shower holder - 3d model (*.gsm+*.3ds) for interior 3d visualization.
archibase_planet
free

Holder
...oilet paper holder
holder paper devon&devon; time black n241113 - 3d model (*.gsm+*.3ds+*.max) for interior 3d visualization.
archibase_planet
free

Holder
...holder
archibase planet
holder hanger hanger for towel
holder 7 - 3d model (*.gsm+*.3ds) for interior 3d visualization.
archibase_planet
free

Holder
...holder
archibase planet
holder hanger hanger for towel
holder 3 - 3d model (*.gsm+*.3ds) for interior 3d visualization.
archibase_planet
free

Holder
...holder
archibase planet
holder towel rack towel-horse
holder - 3d model (*.gsm+*.3ds) for interior 3d visualization.
archibase_planet
free

Holder
...lder
archibase planet
holder hanger hanger for towel
holder towel n250912 - 3d model (*.gsm+*.3ds) for interior 3d visualization.
6
3d_export
$18

tulip 6
...tulip 6
3dexport
tulip 6
3d_export
$5
hinge 6
...hinge 6
3dexport
hinge 6
3ddd
$1

MASIERO / FLASHWOOD STL 6 + 6
...6
3ddd
masiero
торшер flashwood stl 6 + 6 фабрики masiero
http://www.masierogroup.com/c87_697/it/flashwood%20stl%206%20+%206.ashx
turbosquid
$110

Atmos Cannon 2000 6*6
...yalty free 3d model atmos cannon 2000 6*6 for download as skp on turbosquid: 3d models for games, architecture, videos. (1528591)
turbosquid
$1
ae 6 6 electric locomotive
... free 3d model ae 6 6 electric locomotive for download as obj on turbosquid: 3d models for games, architecture, videos. (1707537)
turbosquid
$39
A-6
... available on turbo squid, the world's leading provider of digital 3d models for visualization, films, television, and games.
3ddd
$1
6 ковров
...6 ковров
3ddd
ковры , ковер
6 ковров
turbosquid
$12

Calligraphic Digit 6 Number 6
...hic digit 6 number 6 for download as max, obj, fbx, and blend on turbosquid: 3d models for games, architecture, videos. (1389336)
turbosquid
$19

Case For Phone 6 Girl 6
... available on turbo squid, the world's leading provider of digital 3d models for visualization, films, television, and games.
turbosquid
$35

Iphone 6 & 6 Plus All
... available on turbo squid, the world's leading provider of digital 3d models for visualization, films, television, and games.