Thingiverse
Taz 4 or 5 Bearing and Extruder Holder Mods by jaln
by Thingiverse
Last crawled date: 3 years ago
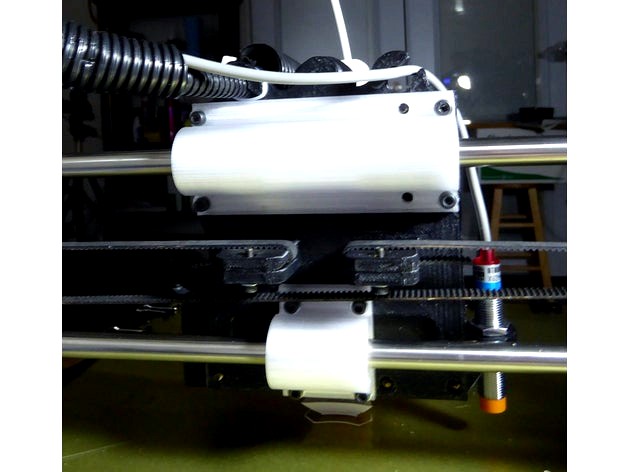
This mod addresses the slop in Taz 4 (or Taz 5, 3, etc.) bearings and extruder holders.
The slop translates into uneven surfaces which are readily apparent on large flat horizontal surfaces, but also affect every other print in some way.
There are a few mods here and you can try all or one at a time.
First off, the bearing holders on the X carriage. You will notice that on a Taz 6 that Lulzbot started using bearing holder without a break in the circumference. There are two replacements here that fit existing inserts. Also, the bearings are changed out for the precision versions of the 10mm Igus bearings. I used the RJ4JP-01-10 version. Lulzbot uses a different precision bearing version on the bed of the Taz 6 which will also work. The 'P' in the part number is for 'precision' which has a tighter tolerance than the ones they used on the Taz 4 and 5 stock. I got mine on eBay for a decent price.
This mod alone will noticeably help with the X carriage slop.
The bearings can be difficult to install. I used a small vice for the single bearing with rubber protectors and a 7/16 long socket and a rawhide mallet for the double bearings. Do not use metal hammers and un-faced vices. The Igus bearing are soft and can be damaged if not handled properly. Slow and steady and light tapping only! If you need to get the bearings out of the double holder, cut the holder in half in the middle first. The single bearing can be a bit difficult without the right tools. You can remove some of the retainer ring at the insertion end to make it easier to install the bearing. It really only takes 1/4 to 1/2 of the ring to retain the bearing so you can use and X-Acto knife to cut some of the locking ring away to make the insertion easier. However the bearing will press into the one without modification if you just take it slow and use a c-clamp or small vice with rubber protection, or a long 7/16 (10mm) socket for a driver with a light mallet over a hole or bridged in a vice.
The next part is to stiffen up the extruder holder. if you grab the stock holder or large gear you will see that it moves around too much without much effort. The stiffened holder will stop that. You will need to replace the existing screw with an m3 x 30mm screw, using the old washer. This design makes it easier to install the nuts for the latch. You will have to use some supports on the bearing socket that faces the printer bed. I used sight support inside the nut chambers and struggled a bit with getting the support out through the small holes.
If I were to do it again, I would forego the supports in those slots and chambers. Make sure not to over-tighten the 3/8 lock nut on reassembly and remember the two washers outside of the rear bearing.
I also changed the bearings on the Y-axis bed, but did not use the newer bearing holders and only two of the precision bearings instead of all four because I could not get the bed to slide easily with all of those thing changed. I suspect is was because the two 10mm rails were not parallel, and I did not try adjusting the frame. That may have allowed changing out all the bearings and holders. I just settled for using the stock single bearing holders and two of four precision bearings which improved the slop in the bed. Changing everything out without adjusting the frame was binding too much to be used.
Similar models
thingiverse
free

Lulzbot Universal Filament holder by mde091234
...eed 4 - m3-.5 3.8mm heatset insert and 4 m3 socket head cap screws. insert the heatset inserts into the spool holder attachment.
thingiverse
free

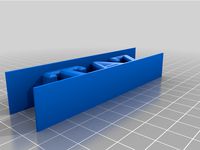
Single Bearing Holder Lulzbot taz by slashed_wings
...sion (which i broke twice trying to fit these bearings) also as the screw is supported all the way though they are a tighter fit.
thingiverse
free

12mm Y rod mounting hardware for the Lulzbot Taz 6 printer by piercet
... bearings, whatever the one in the taz 12mm single bearing holder on the carriage is
2 500mm long 12mm rods (preferably hardened)
thingiverse
free

Taz 6 Mod - Revised 10mm Y-Axis Bearing Holder from the Taz Pro
...he pro and that it can be bolted onto the 6 without mods.
voids warranty, use at your own risk, yadda yadda yadda.
happy modding!
thingiverse
free

Non-intrusive PCB Mill Vice Bed Mod for Lulzbot TAZ by solarnetone
...nserted in the provided holes, securing each pair of rails together. you will need to print two of each file for a complete set.
thingiverse
free

12mm LM12UU Bearing Holder for Lulzbot TAZ 6 by ant0ny
...side diam of 21mm.
i have not changed the outer dimensions of the housing, so it should just bolt onto the original lulzbot taz 6
thingiverse
free

Spool holder for Lulzbot Taz 6 by MuchHat
...he orientation on the files: the bearing with the wider part flat on the bed, and the "u" bar vertically when printing.
thingiverse
free

TAZ 5 Strengthened Hexagon Extruder Body by wantmys2000
...9.
all the base models used in this change were based on the freecad drawings included by lulzbot on the sd card with my taz 5.
thingiverse
free

Lulzbot Extruder Mod for Printing Flexible Filaments by CheeseJam
... ex for the mini: https://devel.lulzbot.com/print-profiles/cura/mini_flexystruder_v2/ change the nozzle size from 0.6mm to 0.5mm!
thingiverse
free

Custom Taz X Ends and X Carriage based off Lulzbot Mini by TechsavvyCNC
...ount can be downloaded from the lulzbot website: http://devel.lulzbot.com/easy_taz_mini/daffodil/production_parts/printed_parts/
Jaln
thingiverse
free

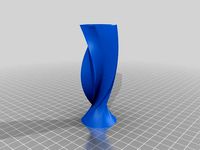
Vase-X3 by jaln
...awn.
there are two sizes of this triangle to hex transition.
they are printed upside to insure that they stay stuck to the bed.
thingiverse
free

AmanteVase by jaln
...is especially useful when you are using pause to change filament colors. pausing on the inner wall will help conceal the change.
thingiverse
free
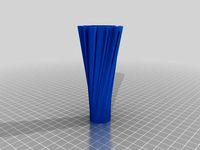
Vase-X4 by jaln
...t 100mm.
the smaller one is printed upside down for stability while printing.
this design is my favorite of this series.
enjoy!
thingiverse
free
Turbowlz II by jaln
...r the other designs to make your own designs.
lid knob made bigger on 01/22/15. deleted old file-- new file has a designation.
thingiverse
free

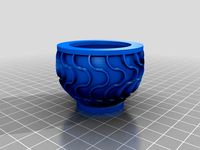
Turbo-Bowl: Turbo-Vase+, the Sequel Continues by jaln
...the sequel continues by jaln
thingiverse
here's some matching bowls for vase10a.
(turbo-vase+, the sequel).
scaled 1x and 2x
thingiverse
free

TurBowlz I by jaln
...ed .33mm layers, i am amazed that this even printed with no support!
a testament to lulzbot taz4 and gizmo dorks transparent abs.
thingiverse
free

BublaVase by jaln
... print job. not intentional, but i often recommend printing partial prints to make bowls from vases. some look great both ways.
thingiverse
free
Vase-X2 three versions by jaln
...previous vases were rotations, sweeps along splines, and boolean functions.
scale em, stretch em. have fun.
show us your work.
thingiverse
free

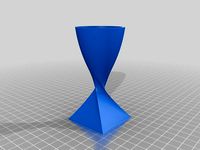
FlamoVase by jaln
...nt at about 30% of its full height, it makes a great screw on lid for the full print of the same scale. see the last two photos.
thingiverse
free
Vase-X1 by jaln
...ave slots. x3 is thicker.
the x1 in the photo was printed right side up and decided to leave the heated bed prior to completion.
Taz
3d_ocean
$19

TAZ RIGGED
...ax version only texture is used only for wb logo, taz dont need texture no special render engine needed, just unzip and render...
3d_export
$5

Taz character 3D Model
...taz character 3d model
3dexport
taz toon character cartoon
taz character 3d model supercigale 22095 3dexport
cg_studio
$10

Taz 3D3d model
...taz 3d3d model
cgstudio
.3ds .max - taz 3d 3d model, royalty free license available, instant download after purchase.
cg_studio
$15

Taz Rigged3d model
...ged3d model
cgstudio
.3ds .fbx .max .obj - taz rigged 3d model, royalty free license available, instant download after purchase.
3d_export
$10

Taz Toy Calendar 3D Model
... 3d model
3dexport
taz toy calendar day month year looney tunes cartoon kid child
taz toy calendar 3d model nkfrds 49687 3dexport
3d_export
$10

Taz Tasmanian Devil RIGGED 3D Model
...y tunes anime bunny rigged material fantasy creature diable dessin
taz tasmanian devil rigged 3d model supercigale 28390 3dexport
3d_export
$19

Thylacine 3D Model
...animalia chordata mammalia marsupial dog extinct animals tiger tassie taz thylacine 3d model poly3dmodels 90790...
3d_export
$12

Bowl Decorated 3D Model
...bowl decorated 3d model 3dexport bowl tazn elements ceramics kitchen plastic cup container decorative cake biscuits...
3ddd
$1

Crate & Barrel Serveware
...crate & barrel поднос -http://www.crateandbarrel.com/feast-platter/s186961 набор ножей для сыра -http://www.crateandbarrel.com/tazcheese-knife-3-piece-set/s681377 бокал...
thingiverse
free
TAZ by Taz8373
...taz by taz8373
thingiverse
my 1st print
Mods
design_connected
$13

MOD. 4233 - MOD. 4234 Table Lamp
...mod. 4233 - mod. 4234 table lamp
designconnected
arcahorn mod. 4233 - mod. 4234 table lamp computer generated 3d model.
design_connected
$11

MOD.1095
...mod.1095
designconnected
mod.1095 computer generated 3d model. designed by sarfatti, gino.
3ddd
$1

fireplaces mod Spec
...fireplaces mod spec
3ddd
камин
fireplaces mod spec 180x90x125h
3ddd
free

Flos Mod. 2129
... mod
фабрика: flos
модель: mod. 2129
описание: подвесной светильник, металл, белый, черный.
сайт: www.flos.com
turbosquid
$34
Mod Lamp.c4d
... available on turbo squid, the world's leading provider of digital 3d models for visualization, films, television, and games.
turbosquid
$32

MOD A 001
... available on turbo squid, the world's leading provider of digital 3d models for visualization, films, television, and games.
turbosquid
$29

Maars Mod
... available on turbo squid, the world's leading provider of digital 3d models for visualization, films, television, and games.
turbosquid
$15

Mod 70..
... available on turbo squid, the world's leading provider of digital 3d models for visualization, films, television, and games.
turbosquid
$10

MOD Sofa
... available on turbo squid, the world's leading provider of digital 3d models for visualization, films, television, and games.
turbosquid
$1

Mod-Lite
... available on turbo squid, the world's leading provider of digital 3d models for visualization, films, television, and games.
Extruder
3ddd
$1

Extruded Chair
...extruded chair
3ddd
extruded , tom dixon
inspired by tom dixon extruded chair
turbosquid
$15

Extruded Table
... extruded table for download as blend, dae, fbx, obj, and stl on turbosquid: 3d models for games, architecture, videos. (1634137)
turbosquid
$2

3D Printer Extruder
...d
royalty free 3d model 3d printer extruder for download as on turbosquid: 3d models for games, architecture, videos. (1537359)
turbosquid
$1

Zombie extruded text
...oyalty free 3d model zombie extruded text for download as obj on turbosquid: 3d models for games, architecture, videos. (1322198)
turbosquid
$4

Extruder conical screw
...el extruder conical screw for download as sldpr, ige, and stl on turbosquid: 3d models for games, architecture, videos. (1524433)
turbosquid
$50

3d PRINTER - Extruder
... available on turbo squid, the world's leading provider of digital 3d models for visualization, films, television, and games.
turbosquid
$15

Extruded Table 2
...xtruded table 2 for download as blend, dae, fbx, obj, and stl on turbosquid: 3d models for games, architecture, videos. (1621846)
turbosquid
$10

Maya Extrude Tool
... available on turbo squid, the world's leading provider of digital 3d models for visualization, films, television, and games.
3d_export
$5

world earth extrude map
...world earth extrude map
3dexport
3ddd
$1

Simply Elegant Extruded Tree Coffee Table Design
...ble by link studios. the silhouette of a tree is visible at one angle, extruded from the surface to create the support structure.
Bearing
3d_export
$6
Bear
...bear
3dexport
bear
3d_export
$5
bearing
...bearing
3dexport
bearing
3d_export
$12
bear
...bear
3dexport
bear for 3d printing toy
3d_ocean
$9
Bearing
...ne ball ballbea bearing bearings engine hard industrial machine mechanic metal part piece plastic ring screw sphere steel
bearing
archibase_planet
free

Bear
...bear
archibase planet
statuette bear picturesque element
bear - 3d model (*.gsm+*.3ds) for interior 3d visualization.
3d_export
$5

bear
...bear
3dexport
bear have a stl.,3dm files
archibase_planet
free

Bear
...bear
archibase planet
bear animals omnivorous animal
bear angry n250907- 3d model (*.gsm+*.3ds) for interior 3d visualization.
archibase_planet
free

Bear
...bear
archibase planet
bear animals omnivorous animal
bear easy n250907 - 3d model (*.gsm+*.3ds) for interior 3d visualization.
3ddd
$1

Teddy bear
...teddy bear
3ddd
teddy bear , медведь
teddy bear :)
3d_ocean
$12
Bear
... formats. created with 3d max 9.0. this file is very useful for learning & rigging. it can be used for any professional work.
Holder
archibase_planet
free

Holder
...holder
archibase planet
holder toilet paper holder
holder paper n070712 - 3d model (*.gsm+*.3ds) for interior 3d visualization.
archibase_planet
free

Holder
...e planet
holder rack toilet paper holder
holder toilet roll n240715 - 3d model (*.gsm+*.3ds+*.max) for interior 3d visualization.
archibase_planet
free

Holder
...holder
archibase planet
pen holder support prop
pen holder - 3d model for interior 3d visualization.
archibase_planet
free

Holder
...holder
archibase planet
pole post holder
сhurch cross pole holder - 3d model for interior 3d visualization.
archibase_planet
free

Holder
...holder
archibase planet
holder bathroom ware
shower holder - 3d model (*.gsm+*.3ds) for interior 3d visualization.
archibase_planet
free

Holder
...oilet paper holder
holder paper devon&devon; time black n241113 - 3d model (*.gsm+*.3ds+*.max) for interior 3d visualization.
archibase_planet
free

Holder
...holder
archibase planet
holder hanger hanger for towel
holder 7 - 3d model (*.gsm+*.3ds) for interior 3d visualization.
archibase_planet
free

Holder
...holder
archibase planet
holder hanger hanger for towel
holder 3 - 3d model (*.gsm+*.3ds) for interior 3d visualization.
archibase_planet
free

Holder
...holder
archibase planet
holder towel rack towel-horse
holder - 3d model (*.gsm+*.3ds) for interior 3d visualization.
archibase_planet
free

Holder
...lder
archibase planet
holder hanger hanger for towel
holder towel n250912 - 3d model (*.gsm+*.3ds) for interior 3d visualization.
5
turbosquid
$6

Rock 5-5
...urbosquid
royalty free 3d model rock 5-5 for download as obj on turbosquid: 3d models for games, architecture, videos. (1639063)
3d_export
$5

hinge 5
...hinge 5
3dexport
hinge 5
turbosquid
$10

A-5
... available on turbo squid, the world's leading provider of digital 3d models for visualization, films, television, and games.
turbosquid
$2

A-5
... available on turbo squid, the world's leading provider of digital 3d models for visualization, films, television, and games.
turbosquid
$12

Calligraphic Digit 5 Number 5
...hic digit 5 number 5 for download as max, obj, fbx, and blend on turbosquid: 3d models for games, architecture, videos. (1389333)
3ddd
$1

5 роз
...5 роз
3ddd
5 роз в стеклянной вазе
design_connected
$11

iPhone 5
...iphone 5
designconnected
apple iphone 5 computer generated 3d model.
3ddd
$1

Lola 5
...lola 5
3ddd
miniforms
lola 5 miniforms 300*65*134
3ddd
$1

Nexus 5
...dd
nexus , phone , телефон
google nexus 5 phone
3d_ocean
$15

iPhone 5
...iphone 5
3docean
3d 4d apple cinema iphone model modeling phone screen texture
iphone 5 3d model and texture realistic iphone 5.
4
turbosquid
$9

Office Chair 4-4
... available on turbo squid, the world's leading provider of digital 3d models for visualization, films, television, and games.
3d_export
$5

doors- 4
...doors- 4
3dexport
doors 4
3d_export
$5

hinge 4
...hinge 4
3dexport
hinge 4
3ddd
$1

Штора №4
...штора №4
3ddd
штора №4
3d_export
free

playstation 4
...playstation 4
3dexport
playstation 4
turbosquid
$1

re 4-4 electric locomotive
... free 3d model re 4 4 electric locomotive for download as obj on turbosquid: 3d models for games, architecture, videos. (1707845)
3ddd
$1

nexus 4
...nexus 4
3ddd
lg , телефон
nexus 4
3ddd
$1

4 Poufs
...4 poufs
3ddd
пуф
4 soft poufs
turbosquid
$12

Calligraphic Digit 4 Number 4
...hic digit 4 number 4 for download as max, obj, fbx, and blend on turbosquid: 3d models for games, architecture, videos. (1389332)
3ddd
$1

Dauphin 4+
...dauphin 4+
3ddd
кресло
dauphin 4+ конференц кресло