Thingiverse

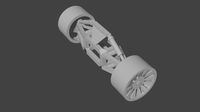
Tamiya Grasshopper Rear Suspension and Gearbox conversion kit
by Thingiverse
Last crawled date: 4 years, 3 months ago
Again, this is an upgrade to my forever favorite tamiya grasshopper!
Grasshopper's gearbox with rigid axle is what makes this car very unique, and everyone loves it's durability, simple structure, and even very good performance on easy roads! which made it a perfect beginner's buggy for everyone in this globe around my age^^
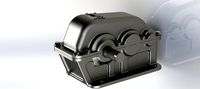
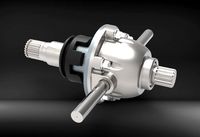
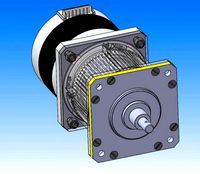
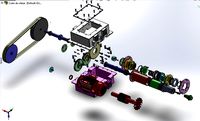
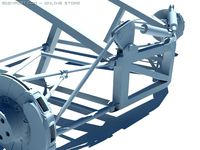
This conversion kit enables users to simply upgrade their hopper or hornet into a VW dune buggy style 'trailing arm' based independent suspension, with new designed gear box enabling rear positioned motor for better rear grip and shock absorbing.
I tested the kit and am pretty satisfied, except the center gear nut(Gearbox5_nut.stl), which is not strong enough for life-time warrantee. This nut part have endured more than 3 pack runs, but will need to be upgraded to metal parts (will update when metal part is available and tested) if you are a serious heavy user. If you are not, this PLA nut may be enough, you can always reprint if it wears out.
The benefit of conversion :
far enhanced rear grip, -> better road holding in any roads
higher road clearance -> better performance rough terrain, such as grasses and sands
scale look -> similar architecture to real dune buggy, or more scale vehicles such as wild one/FAV
This kit is a hop-up kit, just print, assemble and attach it to it's chassis, without any cut or modification to your original grasshopper/hornet kit.
However you need below additional parts to make this kit run :
Tamiya M03 or any touring car's gearbox joint hub
Tamiya M03/05 drive shaft (30mm), OR M03 option swing shaft(54410)
Tamiya Frog/Brat's wheel axle hub, OR Frog/Brat option Universal Shaft set (53908)
6 O-rings for axle/joint hub, OR some silicone pipe
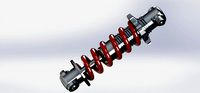
70mm damper/spring, I used DT03's front CVA shock set
All the hopper/hornet's internal gear parts will be reused.
I will update with further build instructions in my youtube channel soon, but I guess the build is pretty straight forward if you have basic RC skills.
Few things to be careful when building the kit :
You need to be very careful with screw holes. 3D printed parts are not as durable and acurate as commercial kits, you need to trim every screw holes with 2.6mm drill bit before screwing.
Some parts will warp during printing, do set your printer well to minimize any warps
Please visit my youtube channel for further information later. I will upload detailed build instruction video soon!
Test run : https://youtu.be/Z_58uAlQDb8
Build instructions : to be updated!
Please post comments in thingiverse or youtube for any feedback or queries!
Enjoy!
Grasshopper's gearbox with rigid axle is what makes this car very unique, and everyone loves it's durability, simple structure, and even very good performance on easy roads! which made it a perfect beginner's buggy for everyone in this globe around my age^^
This conversion kit enables users to simply upgrade their hopper or hornet into a VW dune buggy style 'trailing arm' based independent suspension, with new designed gear box enabling rear positioned motor for better rear grip and shock absorbing.
I tested the kit and am pretty satisfied, except the center gear nut(Gearbox5_nut.stl), which is not strong enough for life-time warrantee. This nut part have endured more than 3 pack runs, but will need to be upgraded to metal parts (will update when metal part is available and tested) if you are a serious heavy user. If you are not, this PLA nut may be enough, you can always reprint if it wears out.
The benefit of conversion :
far enhanced rear grip, -> better road holding in any roads
higher road clearance -> better performance rough terrain, such as grasses and sands
scale look -> similar architecture to real dune buggy, or more scale vehicles such as wild one/FAV
This kit is a hop-up kit, just print, assemble and attach it to it's chassis, without any cut or modification to your original grasshopper/hornet kit.
However you need below additional parts to make this kit run :
Tamiya M03 or any touring car's gearbox joint hub
Tamiya M03/05 drive shaft (30mm), OR M03 option swing shaft(54410)
Tamiya Frog/Brat's wheel axle hub, OR Frog/Brat option Universal Shaft set (53908)
6 O-rings for axle/joint hub, OR some silicone pipe
70mm damper/spring, I used DT03's front CVA shock set
All the hopper/hornet's internal gear parts will be reused.
I will update with further build instructions in my youtube channel soon, but I guess the build is pretty straight forward if you have basic RC skills.
Few things to be careful when building the kit :
You need to be very careful with screw holes. 3D printed parts are not as durable and acurate as commercial kits, you need to trim every screw holes with 2.6mm drill bit before screwing.
Some parts will warp during printing, do set your printer well to minimize any warps
Please visit my youtube channel for further information later. I will upload detailed build instruction video soon!
Test run : https://youtu.be/Z_58uAlQDb8
Build instructions : to be updated!
Please post comments in thingiverse or youtube for any feedback or queries!
Enjoy!
Similar models
thingiverse
free

Tamiya Grasshopper Rear Sus and Gearbox conversion Final (3/31) by miniguy71
...terrain, such as grasses and sands scale look -> similar architecture to real dune buggy, or more scale vehicles...
thingiverse
free

Diff-Lock part for tamiya grasshopper and hornet by miniguy71
...hannel featuring grasshopper running with all the above 3d printed parts!https://www.youtube.com/channel/ucxkwi63gperbpdmnlkgih7q
thingiverse
free

Tamiya Grassshopper 2 suspension conversion kit (21.03.07) by miniguy71
... out my youtube channel for full build videohttps://youtu.be/ngaz7aoulma
upgrade parts test run videohttps://youtu.be/kfvv89my2o4
thingiverse
free

Tamiya Grasshopper 2 II, Super Hornet 2.2 Dish Wheels by shadowfocus603
...e.com/thing:4159329
these are the same as my wheels for the hornet but with a different rear offset to suit the grasshopper 2/ii.
thingiverse
free

1.9 Stock Style Tamiya Grasshopper Buggy Wheels by MrGreyZ
... 3d v2 at .1313 resolution
requires
4 11x5 bearings / bushings
2 hex adapters
some trimming of the standard bumper may be needed.
thingiverse
free

Tamiya Grasshopper II : Gearbox brace by miniguy71
..., upgrade is complete!
check my youtube channel for details of upgrade
https://youtu.be/shmhjkirgmi
https://youtu.be/kfvv89my2o4
grabcad
free

Tamiya 70093 3-Speed Crank-Axle Gearbox Kit
...abcad
tamiya 70093 3-speed crank-axle gearbox kit
i just draw the gearbox housing, the gear and motor is downloaded from grabcad
thingiverse
free

Tamiya HEX Wheel Hub for Grasshopper II by Engineer6
...nt for the original ones to use standard rc wheels with the "hex-hub"
might also fit other tamiya buggys from that age.
3dwarehouse
free

Tamiya Yellow Driver Gear
...ry. use inner circle to align to another axle using the blue or the yellow crown gear. #36t #3mm_shaft #driver #spur_gear #tamiya
3dwarehouse
free

Tamiya Yellow Bushing
...bushing
3dwarehouse
part of kit #70168, twin gear box. friction fit to the 3mm round axle #70168 #bushing #gearbox #tamiya #twin
Grasshopper
design_connected
$16

Grasshopper
...grasshopper
designconnected
gubi grasshopper computer generated 3d model. designed by grossman, greta magnusson.
turbosquid
$79

Grasshopper
...y free 3d model grasshopper for download as max, obj, and fbx on turbosquid: 3d models for games, architecture, videos. (1366774)
3d_export
$35

Grasshopper
...grasshopper
3dexport
lowpoly cartoon character
turbosquid
free

grasshopper
... available on turbo squid, the world's leading provider of digital 3d models for visualization, films, television, and games.
3ddd
$1

Grasshopper Arm Chair
...grasshopper arm chair
3ddd
grasshopper
grasshopper arm chair
3d_ocean
$35

Robotic Grasshopper
...tailed fi grasshopper insect materials mechanical robot robotic sci
here is a 3d model of robotic grasshopper including materials
design_connected
free

Grasshopper chair
...grasshopper chair
designconnected
tectona grasshopper chair free models computer generated 3d model. designed by n/a.
archive3d
free

Grasshopper 3D Model
...el
archive3d
grasshopper grig insect
grasshopper - 3d model (*.gsm+*.3ds) for 3d visualization.
3d_export
$35

Grasshopper 3D Model
...shopper 3d model
3dexport
grasshopper insect wild animal grass nature locust garden
grasshopper 3d model rmilushev 81488 3dexport
turbosquid
$17

Lubber Grasshopper
...l lubber grasshopper for download as blend, obj, stl, and fbx on turbosquid: 3d models for games, architecture, videos. (1683238)
Tamiya
3d_export
$35

Lets go tamiya cars body 3D Model
...rt
car toy tamiya
lets go tamiya cars body 3d model download .c4d .max .obj .fbx .ma .lwo .3ds .3dm .stl mohd9011 103666 3dexport
3d_export
$69

tamiya avante amd japan cup
...u the full service!<br>oh i'm using v-ray 5, it's really fast and good result. easy controll and i'm satisfied!
3d_export
$23

3D TAMIYA MINI 4WD SONIC MAGNUM AVANTE CAR TOY
...rque gives more acceleration and allows the car to better withstand the difficulties of climbing slopes or running through turns.
thingiverse
free

Stand Tamiya
...stand tamiya
thingiverse
stand pour tamiya, colle 60ml et flacons peinture acrylique 10ml
thingiverse
free

tamiya keyring by sagandbag2012
...tamiya keyring by sagandbag2012
thingiverse
tamiya keyring
thingiverse
free

Horn Tamiya by Gawo
...horn tamiya by gawo
thingiverse
horn tamiya
thingiverse
free

Tamiya NN2 by TITANIUM94010
...tamiya nn2 by titanium94010
thingiverse
tamiya nn2 part for xv01
thingiverse
free

TAMIYA KEYCHAIN by gsorrentino88
...tamiya keychain by gsorrentino88
thingiverse
keychain tamiya plastic models
thingiverse
free

rc tamiya grasshopper by sagandbag2012
...rc tamiya grasshopper by sagandbag2012
thingiverse
tamiya grasshopper is another tamiya car
thingiverse
free

Llavero TAMIYA by Garcinsky
...llavero tamiya by garcinsky
thingiverse
llavero de pared con el logo de tamiya(c).
tamiya's(c) key holder.
Gearbox
3d_export
$7

planetary gearbox
...planetary gearbox
3dexport
planetary gearbox
3d_export
$5
transmission gearbox
...transmission gearbox
3dexport
transmission gearbox
3d_export
$30
differential gearbox
...differential gearbox
3dexport
3d model of a differential gearbox.<br>modeled in solidworks.<br>rendered in keyshot.
turbosquid
$4

planetary gearbox
...royalty free 3d model planetary gearbox for download as blend on turbosquid: 3d models for games, architecture, videos. (1423384)
3d_export
$5
three stage planetary gearbox
...three stage planetary gearbox
3dexport
three stage planetary gearbox
turbosquid
$31
2 speed reducer Gearbox
... dual stage helical speed reducer gearbox for download as iam on turbosquid: 3d models for games, architecture, videos. (1650029)
3d_export
$15
automatic processing line for gearbox pump body
...automatic processing line for gearbox pump body
3dexport
automatic processing line for gearbox pump body
3d_export
$1000

Automobile Manual Transmission mechanism Gearbox 3D Model
...ox 3d model
3dexport
transmission gearbox
automobile manual transmission mechanism gearbox 3d model daveterminator 24996 3dexport
3d_export
$8
tool replacement gearbox
...tool replacement gearbox
3dexport
eccentric lifting mechanism, you can process according to available drawings.
3d_export
$7
milling machine spindle drive diagram - milling gearbox
... n = 4500 rin / min; maximum power p = 7.5 kw. bt40 spindle, like welcome to download to learn. there are igs format files in it.
Suspension
3ddd
free

Circolo Suspension
...circolo suspension
3ddd
circolo , suspension
this is the circolo led suspension
3d_export
$20
suspension
...pension
3dexport
suspension it is used in bicycle, motorcycle; and many more object<br>rendering is done in photo view 360
3ddd
$1
Fieltebek suspension
...fieltebek suspension
3ddd
fieltebek , suspension
fieltebek
3d_export
free
suspension
...suspension
3dexport
3ddd
$1
Botti Suspension
...botti suspension
3ddd
botti
люстра botti suspension
turbosquid
$25

suspension
... available on turbo squid, the world's leading provider of digital 3d models for visualization, films, television, and games.
turbosquid
$8

suspension
... available on turbo squid, the world's leading provider of digital 3d models for visualization, films, television, and games.
turbosquid
$1
SUSPENSION
... available on turbo squid, the world's leading provider of digital 3d models for visualization, films, television, and games.
3ddd
$1
DELIGHTFULL MATHENY | SUSPENSION
... matheny , suspension
delightfull matheny | suspension
design_connected
$16

Vaeder Suspension
...vaeder suspension
designconnected
modular lighting instruments vaeder suspension computer generated 3d model.
Conversion
3ddd
$1

Conversation Seat
...шетка
the conversation seat made in englandhttp://www.squintlimited.com/products/the_conversation_seat/gold
+ max 2011
3d_export
$10

Converse 3D Model
...converse 3d model
3dexport
converse shoe pc unix mac
converse 3d model electropainter17075 38067 3dexport
turbosquid
$100

converse-shoe
...quid
royalty free 3d model converse-shoe for download as c4d on turbosquid: 3d models for games, architecture, videos. (1398427)
turbosquid
$10

Conversation Furniture
... available on turbo squid, the world's leading provider of digital 3d models for visualization, films, television, and games.
turbosquid
$7

Converse Allstars
... available on turbo squid, the world's leading provider of digital 3d models for visualization, films, television, and games.
design_connected
$16

Conversation Club Chair
...conversation club chair
designconnected
donghia conversation club chair chairs computer generated 3d model. designed by n/a.
design_connected
$27

Hemicycle Conversation Chair
...rsation chair
designconnected
ligne roset hemicycle conversation chair computer generated 3d model. designed by nigro, philippe.
3d_export
$24

Converse keds 3D Model
...converse keds 3d model
3dexport
converse all star ked shoe clothes sports
converse keds 3d model vermi1ion 26201 3dexport
3ddd
$1

Converse All-Star Shoes
...converse all-star shoes
3ddd
кеды , обувь
converse all-star shoes
design_connected
$18

CONVERSE Jack Purcell Sneakers
...converse jack purcell sneakers
designconnected
converse jack purcell sneakers computer generated 3d model.
Rear
3d_export
$48
engine case rear
...re efficient as it eliminates the need for the propeller shaft while the differential merges with the transmission to save space.
turbosquid
$39
rear rim
... available on turbo squid, the world's leading provider of digital 3d models for visualization, films, television, and games.
3d_export
$5
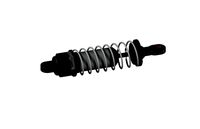
Rear Suspension 3D Model
... suspension 3d model
3dexport
rear suspension spring sport car disc brake chasis
rear suspension 3d model bayazoff 30675 3dexport
turbosquid
$20

Rear sport wheel
...del rear sport wheel for download as ige, obj, stl, and sldas on turbosquid: 3d models for games, architecture, videos. (1227527)
turbosquid
$99
Rear tyre set
... available on turbo squid, the world's leading provider of digital 3d models for visualization, films, television, and games.
turbosquid
$49
Wet Rear tyre
... available on turbo squid, the world's leading provider of digital 3d models for visualization, films, television, and games.
turbosquid
$49
Hard rear tyre
... available on turbo squid, the world's leading provider of digital 3d models for visualization, films, television, and games.
turbosquid
$49
Medium Rear tyre
... available on turbo squid, the world's leading provider of digital 3d models for visualization, films, television, and games.
turbosquid
$49

Supersoft Rear tyre
... available on turbo squid, the world's leading provider of digital 3d models for visualization, films, television, and games.
turbosquid
$39
tractor rim rear
... available on turbo squid, the world's leading provider of digital 3d models for visualization, films, television, and games.
Kit
turbosquid
$3

Bathroom Kit Baño kit
... available on turbo squid, the world's leading provider of digital 3d models for visualization, films, television, and games.
turbosquid
$19

Kit
... available on turbo squid, the world's leading provider of digital 3d models for visualization, films, television, and games.
3d_export
$20

Drift Kit
...drift kit
3dexport
turbosquid
$40

BitCoin Kit
...urbosquid
royalty free 3d model bitcoin kit for download as on turbosquid: 3d models for games, architecture, videos. (1519068)
turbosquid
$9

Industrial kit
...osquid
royalty free 3d model industrial kit for download as on turbosquid: 3d models for games, architecture, videos. (1144117)
turbosquid
$6

Kit Vases
...
turbosquid
royalty free 3d model kit vases for download as on turbosquid: 3d models for games, architecture, videos. (1285114)
turbosquid
free

Survival Kit
...rbosquid
royalty free 3d model survival kit for download as on turbosquid: 3d models for games, architecture, videos. (1637721)
turbosquid
$50

Ninja Kit
...rbosquid
royalty free 3d model ninja kit for download as fbx on turbosquid: 3d models for games, architecture, videos. (1672364)
turbosquid
$35

Brushes Kit
...osquid
royalty free 3d model brushes kit for download as max on turbosquid: 3d models for games, architecture, videos. (1216721)
turbosquid
$19
Medical kit
...osquid
royalty free 3d model medical kit for download as fbx on turbosquid: 3d models for games, architecture, videos. (1486089)