Thingiverse

Tabletop Repair / Presentation Dock by Markusx26
by Thingiverse
Last crawled date: 3 years, 1 month ago
The Intention was that in every storyline they say "Mech/Titans were build in a fabric".
But i can´t find anything from Warhammer or Online. So i made something. This is an absolute unique idea. Dimension: 25cm x 23cm x 45cm height
Here are the pictures with basic airbrush, 2x blue LED in front, 2x in the back are white. 3x green LED in the top and 1x white for spot light. Now you can print yourself a display unit for your Warhammer stuff. The defense tower is 360° rotable and the LED powerline goes through the middle pin. All planed in.
The plate is self created. Used the terminal from here (https://www.thingiverse.com/thing:2552113) and part of the barrels (https://www.thingiverse.com/thing:418975) for decoration.
The stairs are a mix of pw_jameson (https://www.thingiverse.com/thing:2246090).
The beams are self created.
The LED Spots are a remix of (https://www.thingiverse.com/thing:1232648) but i included a reflector. Looks better.
The defense tower is an absolute frankenstein idea. Took the cockpit&side parts of (https://www.thingiverse.com/thing:2538713) made it hollow, cut out 5mm holes for LED/cables, removed the wings and then build the moving arms. Hold together by 20x3 mm screw.
The file "LED Spots" has the spots, cable lines, holder and stuff inside for building the electricity. For Connecting take the Volt Plate and glue 2x 2Pin Wago Connectors on. Take the holders and put the cable in the cable lines and glue the holders in the steel frames as needed.
For the LED Spots i used normal LED (green, blue, red, white, yellow, blink LED,..) and a 470 Ohm Widerstand. Standard 12 Volt Wiring with LED. To get the needed 12 Volt DC take a 3x18650 holder and 3 Akkus. They bring enough power for 20 hours or more.
ATTENTION: The eyes of the skulls are not going complete through. With bright LED you don´t need, but with coloured standard LED and a black basic coat you need to drill the holes out. I drilled from the back and made a round hole, then push through the eye.
AND DON´T NAIL IN YOUR FINGER. Grr
When you put a 100 Ohm or more Potentiometer (2-3 Euro) between the + cable and the 12 Volt DC Source you can dimm the LED down to zero if it´s too bright. Please check the mcd of your LED you use. You don´t need extra bright LED´s cause your are getting blind when you see it the hole time. Less is sometimes more. Maybe someone can make something for a standard 3x18650 12 Volt DC holder and potentiometer build in? Please.
If you want other weapons for the defense tower contact me with thingi source, then i remix and upload the desired weapon for printing. Blaster, Plasmaguns,...
NEW: The crane is also online. Need some time for printing all and the LED stuff then come the real pictures. Total height with crane: mighty 67 cmhttps://www.thingiverse.com/thing:2657301
The name Warhammer ©, ... are licensed names under Games Workshop ©. I didn´t scanned any stuff, used only Things from Thingiverse. This is an unofficial project not under offizial lizenz of Games Workshop. The rest is completely unique designed to fit with original Space Marines ©, ... from Games Workshop ©. It should also fit on the standard 48x72 playground. If Games Workshop © disagree, please contact me.
Die Idee war, weil immer in den Geschichten steht "Mech/Titans werden in Fabriken gebaut". Leider kann ich nichts dazu bei Warhammer oder sonst Online finden. Daher einfach selbst was gebaut. Maße: 25cm x 23cm x 45cm Höhe.
Türen hab ich zwar auch, doch die sind windschief. Könnt euch ja auch selbst noch welche designen, oder einen Seitenkran? Mal sehn. Sieht ohne aber auch genial aus und Ihr habt eine Displayeinheit bzw. könnt es im Spiel als Werkstatt oder so verwenden.
Hier die Bilder mit Basis Airbrush, 2x blaue LED vorne, 2x weiß hinten. 3x grün für die Schädel und Weiß für den Scheinwerfer. Der Verteidigungstower läßt sich um 360° drehen und das Stromkabel geht in der Mitte durch den Pin. Alles eingeplant.
Die Platte ist selbst gestaltet. Habe das Terminal hier eingebaut (https://www.thingiverse.com/thing:2552113) und ein paar Fässer aus (https://www.thingiverse.com/thing:418975) für Dekoration.
Das Geländer hinten sind Teile von pw_jameson (https://www.thingiverse.com/thing:2246090).
Die Stahlträger sind selbst gestaltet wie auch das Dach.
Den doppelkopf Adler habe ich nicht eingescannt, sondern eine fertige Vorlage verwendet. Ich habe nichts eingescannt sondern nur eine Kopie des Adlers aus Thingiverse verwendet.
P.S.: Der Adler ist ein Markenzeichen von Games Workshop und egal wer sich hier aufführt sollte sich erst mal den Paragraph über geistiges Eigentum auf der Games Workshop Seite ansehen.
Die LED Spots sind ein Remix von (https://www.thingiverse.com/thing:1232648) aber ich habe noch Reflektoren ergänzt. Sieht besser aus und Licht streut nicht so arg.
Der Verteidungstower ist ein Frankenstein Projekt gewesen aus (https://www.thingiverse.com/thing:2538713) ausgehöhlt, Flügel ab, Löcher für LED´s und Kabel, dann die beweglichen Arme dazu. Zusammen gehalten von 2x 20x3 mm Schraube.
Achtung: Die Augen der Totenköpfe gehen nicht komplett durch. Mit weißen oder sehr hellen LED´s braucht Ihr nicht zu bohren. Allerdings mit bunten standart LED´s und schwarzem Basislack habe ich von hinten ein rundes Loch in die Rückseite gemacht. Danach mit etwas spitzem durch die Augen stechen. UND NICHT IN DIE FINGER STECHEN. Grrr
In der Datei LED Spots sind die Spots, Kabelführungen/Verblendungen, Halter, Verteilerplatte um die Elektrik zu verlegen. Auf die Verteilerplatte einfach 2 Wago Klemmen (2pol) aufkleben. Für die LED Spots habe ich einfache standart LED (weiß, gelb, grün, blau, rot) mit 470 Ohm Widerstand für 12 Volt DC verwendet. Um die benötigten 12 Volt zusammen zu bekommen, einfach einen 3fach 18650 Halter kaufen und ein paar Akkus dazu.
Falls Ihr für den Verteidungunsturm andere Waffen möchtet, einfach mit der Thingi Quelle anschreiben, dann kann ich nach dem slicen das gewünschte Modell hoch laden. Plasmakanonen, 1-3 läufige Waffen, gibt vieles für die Mechs/Titans/Knights. Muss aber auch Druckbar sein.
Wenn Ihr zwischen der + Leitung und der 12 Volt DV Quelle einen 100 Ohm oder größer Potentiometer dazwischen macht, könnt Ihr die LED´´s auch noch dimmen. Funktioniert so schon einwandfrei. Könnte vielleicht jemand ein Gehäuse für einen Standard 3x18650 12 DC Halter samt Potentiometer machen? Bitte, hab dafür gerade keinen Nerv. Bzw. welche Connector nimmt man denn da?
NEU: Der Kran ist auch fertig, brauch aber noch zum drucken, LED und Airbrush. Dann kommen noch die echten Bilder. Gesamthöhe mit Kran mächtige 67 cm.https://www.thingiverse.com/thing:2657301
Die Namen Warhammer © usw. sind eingetragene Warenzeichen von Games Workshop ©. Das ist ein inoffizielles Projekt welches von mir nicht kommerziell zu Geld gemacht wird. Die Projekt ist aus vielen Vorlagen anderer User zusammen gestellt worden. Ich habe keine Gegenstände von Games Workshop eingescannt. Sollte Games Workshop hier nicht über einstimmen, bitte Kontakt aufnehmen. Leider kann ich nicht den Detailgrad eines Original Teils auf einen 3D Drucker erreichen. Für optimale Details müsst Ihr euch original Ware (Spritzguss) von Games Workshop © kaufen. Aber es gibt ja noch Feilen, Dremel, Schleifpapier,.... um Alterungsspuren zu machen.
Similar models
thingiverse
free

Nespresso Kapselspender by Macfly123
...kapseln passt. diese sind am rand zu dünn. für die kapseln von jacobs ist er optimal. aber auch kapseln von aldi und lidl passen.
3dwarehouse
free

Stall
... noch einmal hoch wenn die details auch engebaut sind . #entmistung #kran_für_den_milchtank #nd_noch_vieles_mehr_ #rohrmelkanlage
thingiverse
free

MaXYpulti Frontplatte by Misterfloppy
...splay und cnc handwheel sollte jetzt auch passen.
ebenfalls wurden die löcher für die einzelnen tasten ein wenig vergrößertjetzt.
thingiverse
free

Garden Sprinkler by konst57
...d besser.
der innendurchmesser der aufnahme ist 23 mm.
ich habe noch die klemme und 2 verbindungsstücke für 1/2 " beigefügt.
thingiverse
free

LED Ring Ausgleichsbehälter Wasserkühlung 60cm by ColdGamer99
...führen.
den ring habe ich noch schwarz lackiert, da ich kein schwarzen filament hatte. das ist natürlich jedem selbst überlassen.
thingiverse
free

Western Lok by Angbar
...lle habe ich mit fusion360 vorgenommen.
ganz herzlichen dank an depronized und dagnal53 für die gute beschreibung ihrer projekte.
thingiverse
free

Tablet holder by dr-snow
...uck auf den bilder ist leider etwas unsauber, da meine düse komplett fertig war und ich noch keine neue hatte.
viel spaß damit...
thingiverse
free

32700 LiFePo4 Batterie holder by schwindb
...14.5 x 9 mm.
für den 4fach halter habe ich auch noch einen laderegler zusatz der
einfach unter den halter geschraubt werden kann.
thingiverse
free

Familien Sparclub, Spardose by Schneeking
...h meine sachen gefallen würde ich mich sehr über eine kleine spende freuen. klickt auf den linkhttps://www.paypal.me/fadekofolien
thingiverse
free

Ender 3 Spulenhalterung by MachWas
...rung empfohlen wie solche hier auf thingiverse zu finden sind..
dies ist ein design von und für: http://www.machwas-makerspace.ch
Markusx26
thingiverse
free

Chillum Diffusor by Markusx26
... 9 mm
just a quick project to put down the preasure in the chillum when in use
and to get a better cooling/mixing with the water.
thingiverse
free

Wellenadapter for Speed Tank by Markusx26
...europa the wellenadapter for the 11 z ritzel from 3,17 mm to 5 mm. couldn´t find something here, so i made one. should also work.
thingiverse
free

Lipo Holder for Speed Tank by Markusx26
...lipo´s.
arbeite am speed tank und jeder benutzt nur kabelbinder zum befestigen. habe daher einen halter für den 2s akku gemacht.
thingiverse
free

Connector for Speed Tank by Markusx26
...you around 60-70 degree angle between the two tank parts.
i modified the original base plate and the front plate with connectors.
thingiverse
free

Spider Tank Remix Movable Legs by Markusx26
...e main gun. the body is the second file. take the original tower, basket and machine gun from the original.
hope you like it. :-)
thingiverse
free

Crane for Tabletop Garage / Presentation Display by Markusx26
...uss) von games workshop © kaufen. aber es gibt ja noch feilen, airbrush, dremel, schleifpapier,.... um alterungsspuren zu machen.
thingiverse
free

Tabletop Base 28 mm by Markusx26
...e (spritzguss) von games workshop © kaufen. aber es gibt ja noch feilen, dremel, schleifpapier,.... um alterungsspuren zu machen.
thingiverse
free

Remix of Star Farer from Star Citizens by Markusx26
...https://www.thingiverse.com/thing:2702291
pilot (https://www.thingiverse.com/thing:1761697)
legs and weapons from my last remixes
Tabletop
archibase_planet
free

Tabletop
...tabletop
archibase planet
rostrum platform stage
tabletop lecturn- 3d model for interior 3d visualization.
3ddd
$1
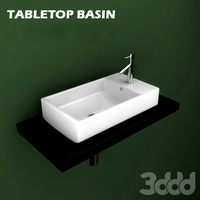
Tabletop Washbasin
...tabletop washbasin
3ddd
tabletop
modern design of tabletop washbasin
3d_export
$5

TABLETOP GREENHOUSE
...tabletop greenhouse
3dexport
tabletop greenhouse with accessories
turbosquid
free

Tabletop Decor
...urbosquid
free 3d model tabletop decor for download as blend on turbosquid: 3d models for games, architecture, videos. (1634208)
3ddd
$1
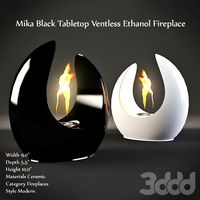
Mika White Tabletop
...mika white tabletop
3ddd
mika white tabletop ventless ethanol fireplace
turbosquid
$20

tabletop radio
...d model tabletop radio for download as 3ds, max, obj, and fbx on turbosquid: 3d models for games, architecture, videos. (1167277)
turbosquid
free

Tabletop Sign
... available on turbo squid, the world's leading provider of digital 3d models for visualization, films, television, and games.
archive3d
free

Tabletop 3D Model
...odel
archive3d
rostrum platform stage
tabletop lecturn- 3d model for interior 3d visualization.
3ddd
free
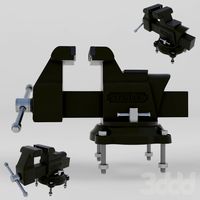
Bench Vise Clamp Tabletop
...bench vise clamp tabletop
3ddd
тиски
bench vise clamp tabletop
turbosquid
$10

Ivanhoe Tabletop Lamp
... ivanhoe tabletop lamp for download as max, obj, fbx, and stl on turbosquid: 3d models for games, architecture, videos. (1411186)
Repair
3d_export
$5

Phone repair
...phone repair
3dexport
turbosquid
$9

Repair Drone
... free 3d model repair drone for download as max, obj, and fbx on turbosquid: 3d models for games, architecture, videos. (1237490)
turbosquid
$10

Future Repair
... available on turbo squid, the world's leading provider of digital 3d models for visualization, films, television, and games.
turbosquid
$1

auto repair
... available on turbo squid, the world's leading provider of digital 3d models for visualization, films, television, and games.
3d_ocean
$8

Dove Intense Repair
...ense repair 3d model dove product dove product 3d model pack pack shot product
dove intense repair is dove 3d model product pack.
turbosquid
$30

Auto Repair Service
...royalty free 3d model auto repair service for download as c4d on turbosquid: 3d models for games, architecture, videos. (1292504)
turbosquid
$19

Military Repair kit
...free 3d model military repair kit for download as obj and fbx on turbosquid: 3d models for games, architecture, videos. (1235658)
turbosquid
$24

Schwarzkopf Gliss Kur Hair Repair Shampoo Ultimate Repair 400ml 2019
...repair shampoo ultimate repair 400ml 2019 for download as max on turbosquid: 3d models for games, architecture, videos. (1450103)
turbosquid
$24

Schwarzkopf Gliss Kur Hair Repair Shampoo Total Repair 400ml 2019
...ir repair shampoo total repair 400ml 2019 for download as max on turbosquid: 3d models for games, architecture, videos. (1450101)
turbosquid
$10

Repair Drone Class A
... available on turbo squid, the world's leading provider of digital 3d models for visualization, films, television, and games.
Dock
design_connected
$20
Docks
...docks
designconnected
gandia blasco docks computer generated 3d model. designed by romero vallejo.
turbosquid
$5

Dock
...squid
royalty free 3d model dock for download as 3ds and fbx on turbosquid: 3d models for games, architecture, videos. (1159328)
turbosquid
$20

Dock
... available on turbo squid, the world's leading provider of digital 3d models for visualization, films, television, and games.
turbosquid
$10
Dock
... available on turbo squid, the world's leading provider of digital 3d models for visualization, films, television, and games.
turbosquid
$10
Dock
... available on turbo squid, the world's leading provider of digital 3d models for visualization, films, television, and games.
turbosquid
$2
dock
... available on turbo squid, the world's leading provider of digital 3d models for visualization, films, television, and games.
3d_export
$65

dock
...dock
3dexport
simple rendering of the scene file
design_connected
$16

Dry-Dock
...dry-dock
designconnected
restoration hardware dry-dock computer generated 3d model.
3d_ocean
$6
The Boat Dock
...s you see are separate, so you can remove the tyres and ladder and extend out the main section of the dock to make a long section
3ddd
$1
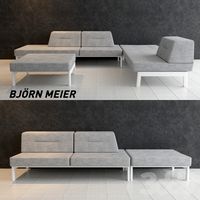
Bjorn Meier docks
... docks , модульный
bjorn meier docks
vray+corona
Presentation
turbosquid
free

Present
...present
turbosquid
free 3d model present for download as fbx on turbosquid: 3d models for games, architecture, videos. (1360474)
turbosquid
$12

Present
...turbosquid
royalty free 3d model present for download as max on turbosquid: 3d models for games, architecture, videos. (1352783)
turbosquid
$1

Present
...turbosquid
royalty free 3d model present for download as obj on turbosquid: 3d models for games, architecture, videos. (1324876)
turbosquid
$18

present
...lty free 3d model present for download as obj, fbx, and blend on turbosquid: 3d models for games, architecture, videos. (1353024)
turbosquid
$4

Present
...oyalty free 3d model present for download as ma, fbx, and obj on turbosquid: 3d models for games, architecture, videos. (1571172)
turbosquid
$10

Present
... free 3d model present for download as 3ds, max, obj, and fbx on turbosquid: 3d models for games, architecture, videos. (1353007)
turbosquid
$23

Present
... available on turbo squid, the world's leading provider of digital 3d models for visualization, films, television, and games.
turbosquid
$19

present
... available on turbo squid, the world's leading provider of digital 3d models for visualization, films, television, and games.
turbosquid
$15

Present
... available on turbo squid, the world's leading provider of digital 3d models for visualization, films, television, and games.
turbosquid
$6

Presents
... available on turbo squid, the world's leading provider of digital 3d models for visualization, films, television, and games.