Thingiverse

Sylvie 2021 - Animatronic Eye Mechanism + Rbpi Camera!
by Thingiverse
Last crawled date: 4 years, 2 months ago
Note: Due to a thingiverse bug, no Thingiview previews are available.. but the .stl's are ready to download!
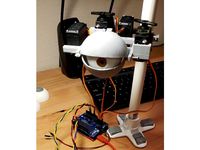
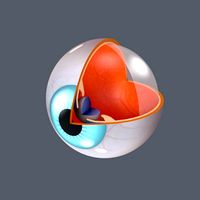
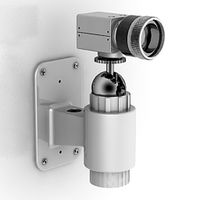
Animatronic Eye Mechanism for Sylvie 2021, featuring Raspberry Pi v2.1 Camera module with extended sensor.
Is easier to assemble compared to older models I've created.
Glue the eyeball holder to the eyeball with epoxy or ABS slurry, if using ABS.
Sand your eyeballs.
Glue the bottom parts of your eyelid/eyeball holders with epoxy or ABS slurry.
File down any rough edges that may get in the way.
Use gyroscopic rings in order to join eyeballs to the front holder.
Use heatshrink to join eyelids at the joints.
Use fishing line in order to hold the eyelids.
Use 10mm m3 screws to join servo holder and eyelid holder to the platform.
Use fishing line threaded through the eyelid holder in order to hold the eyelids.
Use fishing line to join the linear actuators to the servos, to the eyelids.
Use fishing line to move the eyeballs (don't make knots at the eyeballs.. just go in and out and then make the knot at the servo! Do this twice for both Y axis and X axis).
Important: Use the two holes inside the platforms to alternate from left to right on X axis, and top to bottom on y axis.. with your fishing line. There's also tiny holes in the front holder where you can thread up to 2x lots of fishing line. The servo in effect behaves like a pulley with a timing belt.
You will have to experiment with different tensions in order to get the right balance and movement, like tuning a guitar. Use your code in order to change the XY offsets for every eye.
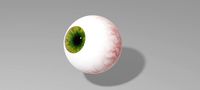
For realistic eyeballs with Raspberry Pi Camera:
Print a 13mm diameter iris using a 2d printer (use a whole page in case you need backups).
Use 6mm hole-puncher to open up your pupil to give way to Rbpi Camera v2.1 sensor (you must get special IMX219 8 megapixel extended sensor from Aliexpress or Amazon)
Use translucent/transparent ABS in order to print your Termoforming Plastic. (don't use PETG as you will never get it off your cabochons! You can also just use regular thermoforming plastic, if you can find a good sheet...)
Use your thermoforming plastic to create your cornea. This needs to be heated in the oven (grill) on top of a cabochon. Use 14mm diameter glass cabochons (Aliexpress, Amazon). Wait for it to melt until it is crystal clear and until no 3d printing lines are visible (30 minutes). Let it cool and then cut it out. Remove the cabochon first. This is now your camera lens.
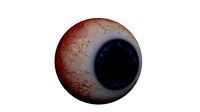
File down your camera lens around the edges, being very careful not to scratch the surface, and being very careful not to crack the plastic (it is now brittle after being baked in the oven).
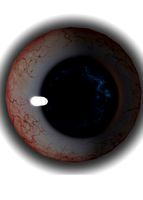
Squeeze the iris texture on a cabochon in order to give it a concave shape. Take your time to get it nice and smooth. Plastic wrap helps.
Use a few drops of Clear Cast Resin in order to stick and embed your printed eyeball texture. Put your camera lens on top of the iris. You only want the resin to touch the outer edges of the lens, so it creates a large airbubble that takes up 95% of the dome. Wait 4 hours.
Use XTC 3d to seal and coat the entirety of the eyeball. (Kleer Kast resin cures with a sticky surface when applied as a coat. Only use XTC-3d!)
Let cure for 24 hours. More the merrier.
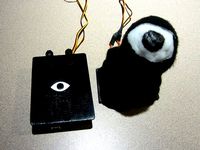
Attach your IMX219 sensor to your preferred eyeball.. carefully with gluegun around the edges (don't get any of it into the sensor at the front!)
Apply some insulation tape at the back of the ribbon cable so that the gyroscopic rings don't scratch it.
The eyeball that doesn't have the camera should use a 6mm Placeholder (included in stls) covered in heatshrink. Secure it with gluegun.
For silicone animatronic skin:
Attach 3 pieces cotton cloth to each eyelid prior to rigging. Secure them with gluegun at the back (don't put gluegun anywhere else, as it will rub against your eyeballs)
Cloth on eyelids serves two functions: It protects the eyeballs from scratches due to the coarse nature of the plastic eyelids, and also allows you to glue the eye mechanism to the silicone skin using SilPoxy (only use a tiny bit so that you can then remove it in future without damaging the skin.)
It also cleans the eyes with each blink, removing dust and debris.. just like real eyes!
Demo:https://www.youtube.com/watch?v=K7CSV4H_rmc
Animatronic Eye Mechanism for Sylvie 2021, featuring Raspberry Pi v2.1 Camera module with extended sensor.
Is easier to assemble compared to older models I've created.
Glue the eyeball holder to the eyeball with epoxy or ABS slurry, if using ABS.
Sand your eyeballs.
Glue the bottom parts of your eyelid/eyeball holders with epoxy or ABS slurry.
File down any rough edges that may get in the way.
Use gyroscopic rings in order to join eyeballs to the front holder.
Use heatshrink to join eyelids at the joints.
Use fishing line in order to hold the eyelids.
Use 10mm m3 screws to join servo holder and eyelid holder to the platform.
Use fishing line threaded through the eyelid holder in order to hold the eyelids.
Use fishing line to join the linear actuators to the servos, to the eyelids.
Use fishing line to move the eyeballs (don't make knots at the eyeballs.. just go in and out and then make the knot at the servo! Do this twice for both Y axis and X axis).
Important: Use the two holes inside the platforms to alternate from left to right on X axis, and top to bottom on y axis.. with your fishing line. There's also tiny holes in the front holder where you can thread up to 2x lots of fishing line. The servo in effect behaves like a pulley with a timing belt.
You will have to experiment with different tensions in order to get the right balance and movement, like tuning a guitar. Use your code in order to change the XY offsets for every eye.
For realistic eyeballs with Raspberry Pi Camera:
Print a 13mm diameter iris using a 2d printer (use a whole page in case you need backups).
Use 6mm hole-puncher to open up your pupil to give way to Rbpi Camera v2.1 sensor (you must get special IMX219 8 megapixel extended sensor from Aliexpress or Amazon)
Use translucent/transparent ABS in order to print your Termoforming Plastic. (don't use PETG as you will never get it off your cabochons! You can also just use regular thermoforming plastic, if you can find a good sheet...)
Use your thermoforming plastic to create your cornea. This needs to be heated in the oven (grill) on top of a cabochon. Use 14mm diameter glass cabochons (Aliexpress, Amazon). Wait for it to melt until it is crystal clear and until no 3d printing lines are visible (30 minutes). Let it cool and then cut it out. Remove the cabochon first. This is now your camera lens.
File down your camera lens around the edges, being very careful not to scratch the surface, and being very careful not to crack the plastic (it is now brittle after being baked in the oven).
Squeeze the iris texture on a cabochon in order to give it a concave shape. Take your time to get it nice and smooth. Plastic wrap helps.
Use a few drops of Clear Cast Resin in order to stick and embed your printed eyeball texture. Put your camera lens on top of the iris. You only want the resin to touch the outer edges of the lens, so it creates a large airbubble that takes up 95% of the dome. Wait 4 hours.
Use XTC 3d to seal and coat the entirety of the eyeball. (Kleer Kast resin cures with a sticky surface when applied as a coat. Only use XTC-3d!)
Let cure for 24 hours. More the merrier.
Attach your IMX219 sensor to your preferred eyeball.. carefully with gluegun around the edges (don't get any of it into the sensor at the front!)
Apply some insulation tape at the back of the ribbon cable so that the gyroscopic rings don't scratch it.
The eyeball that doesn't have the camera should use a 6mm Placeholder (included in stls) covered in heatshrink. Secure it with gluegun.
For silicone animatronic skin:
Attach 3 pieces cotton cloth to each eyelid prior to rigging. Secure them with gluegun at the back (don't put gluegun anywhere else, as it will rub against your eyeballs)
Cloth on eyelids serves two functions: It protects the eyeballs from scratches due to the coarse nature of the plastic eyelids, and also allows you to glue the eye mechanism to the silicone skin using SilPoxy (only use a tiny bit so that you can then remove it in future without damaging the skin.)
It also cleans the eyes with each blink, removing dust and debris.. just like real eyes!
Demo:https://www.youtube.com/watch?v=K7CSV4H_rmc
Similar models
thingiverse
free

Animatronic Eye Mech by sideburn
...e back of the eyeball itself as shown in the snapshots.
video: https://www.youtube.com/watch?v=n3nvzmhascs&feature=youtu.be
thingiverse
free

Animatronic Eye Mechanism v4 for Sylvie 2021 (Reupload) by TwinLizzie
...to solve.
demo:https://youtu.be/fq-ccqshtukhttps://www.youtube.com/watch?v=thimdls6zwihttps://www.youtube.com/watch?v=uzvevmwtkvi
grabcad
free

Animatronic Eyes
...nt all movement is controlled through servo sg90 motors.
all parts can be 3d printed and assembled, proper clearance is provided.
thingiverse
free

Animatronic eyelid v2 by Tioh
...ngiverse
this eyelid was made for a eye with 6cm diameter. i printed it in taulman bridge nylon.
i'l use it in a costume.
cg_trader
$14

Brown Eyeball
...wn eyeball
cg trader
3d model brown eyeball eyeball eye cornea iris lens sphere, formats fbx, c4d, ready for 3d animation and ot
cg_trader
free

3d model Human eyeball free
...yeball eyes eye iris pupil man cornea eyesclera lens vision woman anatomy science medical human anatomy human eye medical anatomy
thingiverse
free

Simple Animatronic Eye Mechanisam V1 by kinetic-mcf
...solid wire small enough to fit into the servo horns
rc receiver, arduino, or other servo-controlling device of your choice
video:
cg_trader
$23

Human Eye with Eyelids
...lashes and a wetline around the eye.
this way you can easily choose, which part of the eye you want to have in your own project.
cg_trader
$3

Realistic procedural eyeball with Red iris
...uy my all iris colors eyes pack. ball eye iris veins character anatomy realistic procedural pupil blue cyan celeste brown eyeball
thingiverse
free

Eyeball Anatomy by UpTempoTech
...lens visible in the model. the other model is a 3d model of an eyeball with the cornea, eyelid, sclera, and optic nerve visible.
Rbpi
thingiverse
free

RBPi Timelapse Camera Mount by TiNkiN
...ww.thingiverse.com/thing:427546
i really liked how well the lid for the raspberry pi camera snapped together! props to aegys3d!
thingiverse
free

Raspberry Pi Camera Module Casing by atyadav
...pi camera module casing by atyadav thingiverse casing for rbpi camera...
thingiverse
free

Prusa Octoprint Mount for Raspberry Pi and Camera by timskloss
...the part 'grows down' in the time lapse. the rbpi brackets easily attach to the 30 mm extrusion by...
3dwarehouse
free

unit a of palingon 2 rbpi townhomes project
...unit a of palingon 2 rbpi townhomes project
3dwarehouse
3 bedroom duplex
Sylvie
thingiverse
free

Sylvie keychain by unix1
...sylvie keychain by unix1
thingiverse
it's a simple keychain create since fusion 360!
create by unix1
3dbaza
$4

Sylvie Armchair (279382)
...t;br>xform: yes<br>box trick: yes<br>model parts: 3<br>render:v-ray<br>formats: 3ds max 2017, obj, fbx
3d_sky
free

made goods sylvie dining chair
...vie-dining-chair-gold.html more pictures previewhttps://www.behance.net/gallery/24393483 / 3d-model-of-chair?
thingiverse
free

NEW Main Skull for Sylvie 2021 by CARO4711
...the material from 149gr to 103gr.
it`s only a rough optimization... and not tested !
many thx to twinlizzi for the great work !!
thingiverse
free

Personalized Sylvie Keychain / Tag by tyrus
...ychain / tag by tyrus
thingiverse
based on a tinkercad tutorial https://tinkercad.com/quests/2deflyhiqct-lesson-key-ring-letters
3dbaza
$4

Chair Meridiani Sylvie (198756)
...;br>xform: yes<br>box trick: no<br>model parts: 4<br>render: corona<br>formats: 3ds max 2014, obj, fbx
thingiverse
free

Sylvie 2021 Robot Arm
... and more updates to come, as this is being built on a deadline for a channel 4 uk mini-documentary.
https://youtu.be/taoo2xi_bk8
3dbaza
$4

Armchair Sylvie By Meridiani (137928)
....47<br>xform: yes<br>box trick: yes<br>model parts: 2<br>render:<br>formats: 3ds max 2015, obj, fbx
3dbaza
$4

Sylvie dining chair and T1692 table (168420)
...s recommended to install a version not lower than 1.5, since the glossiness of the materials is adjusted taking into account pbr.
3dbaza
$4

Sylvie accent armchair (320411)
...;br>xform: yes<br>box trick: yes<br>model parts: 3<br>render: v-ray<br>formats: 3ds max 2017, obj, fbx
Animatronic
turbosquid
free
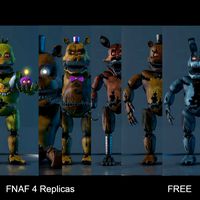
FNAF 4 Animatronic Replicas
... available on turbo squid, the world's leading provider of digital 3d models for visualization, films, television, and games.
thingiverse
free
animatronic eye by Twisttmann
...animatronic eye by twisttmann
thingiverse
this is the mechanic fore a simple animatronic eye.
thingiverse
free
Animatronic Tail by rwinscot
...animatronic tail by rwinscot
thingiverse
for costumes, cosplay, and animatronic cats! well... anything that has a tail.
thingiverse
free
Animatronic Eye Mechanism by Murtaza_Hassan
...animatronic eye mechanism by murtaza_hassan
thingiverse
3d design of a animatronic eye mechanism
thingiverse
free
Animatronic Eye Mechanism by Murtaza_Hassan
...animatronic eye mechanism by murtaza_hassan
thingiverse
3d design of a animatronic eye mechanism.
thingiverse
free
Animatronic Eye by johnbradley
...around when it is controlled by two knobs or via a webserver over a usb connection.
more at:http://makerjohn.com/animatronic-eye/
unity_asset_store
$20

Creepy Animatronic Anims
...low with the creepy animatronic anims asset from ramsterz. find this & other animations options on the unity asset store.
thingiverse
free

Animatronic Sunflower by Hendrikx
...r arduino codes, mp3 files and much more, please support me on patreon: http://www.patreon.com/hendrikxworkshop
thanks, enjoy it!
thingiverse
free
Animatronic Eye
... in action:https://youtu.be/t7kjidlbsdo
the controller used in the video was taken from:https://www.thingiverse.com/thing:2669820
thingiverse
free

animatronic shop arduino case by natmaxex
...animatronic shop arduino case by natmaxex
thingiverse
animatronic shop arduino casehttp://www.animatronicshop.com/
2021
turbosquid
$15

Human-2021
...turbosquid
royalty free 3d model human-2021 for download as on turbosquid: 3d models for games, architecture, videos. (1175117)
3d_export
$26

Peugeot 208 2021
...peugeot 208 2021
3dexport
peugeot 208 2021 low poly version
turbosquid
$1

Present 2021
...y free 3d model present 2021 for download as ma, fbx, and obj on turbosquid: 3d models for games, architecture, videos. (1673576)
3d_export
$26

Shelby GT500 2021
...shelby gt500 2021
3dexport
shelby gt500 2021 low poly version with interior
3d_export
free

stone 2021
...stone 2021
3dexport
subscribe to my youtube channel:
3d_export
$8

imac 2021
... magic mouse and magic keyboard with pbr textures in the colors of the set. includes model in fbx and obj. does not include hdri.
3d_export
$10

racing 2021
...racing 2021
3dexport
c4d , v ray<br>3d environment
turbosquid
$29

Bull Head 2021
...uid
royalty free 3d model bull head 2021 for download as ztl on turbosquid: 3d models for games, architecture, videos. (1675814)
turbosquid
$3
2021 style armchair
... 2021 style armchair for download as blend, fbx, obj, and stl on turbosquid: 3d models for games, architecture, videos. (1694756)
turbosquid
free

New Year 2021
...del new year 2021 for download as c4d, obj, fbx, dae, and 3ds on turbosquid: 3d models for games, architecture, videos. (1547633)
Eye
3ddd
$1

Best / Eye Eye
...пристенная best eye eye.
1660 полигонов.
wall mounted range hood best eye eye.
1660 polygons.
file: max 2010, 2012; fbx; obj.
3d_export
$5

eyes
...eyes
3dexport
eyes
3d_ocean
$5

3D EYE
...ocean
body cornia dynamic eye eye eyes human human eye iris nurbs eye organ
detailed eye . purchase and use it for any purpose ..
3d_ocean
$5
3d Eye
...3d eye
3docean
3d eye eyes
this is 3d eye model
3d_export
$5
Human eye
...human eye
3dexport
human eye, iris, eyeball, eye anatomy
turbosquid
free

Eye
...eye
turbosquid
free 3d model eye for download as c4d on turbosquid: 3d models for games, architecture, videos. (1429061)
turbosquid
free

Eyes
...eyes
turbosquid
free 3d model eyes for download as blend on turbosquid: 3d models for games, architecture, videos. (1153269)
turbosquid
$25
eye
...e
turbosquid
royalty free 3d model eye for download as blend on turbosquid: 3d models for games, architecture, videos. (1371896)
turbosquid
$10

Eye
...eye
turbosquid
royalty free 3d model eye for download as c4d on turbosquid: 3d models for games, architecture, videos. (1303492)
turbosquid
$5
Eye
...e
turbosquid
royalty free 3d model eye for download as blend on turbosquid: 3d models for games, architecture, videos. (1343488)
Mechanism
3d_export
$50

Mechanism
...mechanism
3dexport
mechanism -------- animation is present only in the blender file.
3d_export
$5

mechanics
...mechanics
3dexport
turbosquid
$50
mechanic
... available on turbo squid, the world's leading provider of digital 3d models for visualization, films, television, and games.
3ddd
$1
Mechanical Wasp
...mechanical wasp
3ddd
робот
mechanical wasp
3d_export
$20
Mechanical tail
...mechanical tail
3dexport
mechanical tail<br>four-part movement
3d_export
$5
mechanical ballista
...mechanical ballista
3dexport
a mechanical ballista useful for medieval or fantasy games does not contain animations
turbosquid
$59

Mechanical Part
...id
royalty free 3d model mechanical part for download as c4d on turbosquid: 3d models for games, architecture, videos. (1410833)
turbosquid
$50
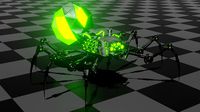
Mechanical Spider
...royalty free 3d model mechanical spider for download as blend on turbosquid: 3d models for games, architecture, videos. (1599864)
turbosquid
$45

Mechanical Pencil
...royalty free 3d model mechanical pencil for download as blend on turbosquid: 3d models for games, architecture, videos. (1503379)
turbosquid
$35

Mechanical fish
...id
royalty free 3d model mechanical fish for download as max on turbosquid: 3d models for games, architecture, videos. (1152530)
Camera
archibase_planet
free
Camera
...base planet
camera surveillance camera video camera
camera surveillance n090211 - 3d model (*.3ds) for interior 3d visualization.
archibase_planet
free
Camera
...hibase planet
camera security camera video camera
camera security n210515 - 3d model (*.gsm+*.3ds) for exterior 3d visualization.
archibase_planet
free
Camera
...se planet
camera web camera webcam
camera butterfly usb pc camera n090713 - 3d model (*.gsm+*.3ds) for interior 3d visualization.
archibase_planet
free
Camera
...mera
archibase planet
surveillance camera video camera camcorder
camera n011211 - 3d model (*.3ds) for exterior 3d visualization.
archibase_planet
free
Camera
...camera
archibase planet
camera digital camera
camera canon digital n041211 - 3d model (*.3ds) for interior 3d visualization.
archibase_planet
free
Camera
...camera
archibase planet
camera film camera phototechnique
camera n100214 - 3d model (*.gsm+*.3ds) for interior 3d visualization.
archibase_planet
free

Camera
...amera
archibase planet
camera video camera camcorder
camera video n070315 - 3d model (*.gsm+*.3ds) for interior 3d visualization.
archibase_planet
free
Camera
...rchibase planet
camera video camera camcorder
camera studio n101213 - 3d model (*.gsm+*.3ds+*.max) for interior 3d visualization.
archibase_planet
free
Camera
...ibase planet
digital camera camera phototechnique
camera canon ixus 400 n310311 - 3d model (*.3ds) for interior 3d visualization.
archibase_planet
free
Camera
...ase planet
photocamera video camera camera
camera sony t300 black n291010 - 3d model (*.gsm+*.3ds) for interior 3d visualization.