Thingiverse
SwitchDoc SkyWeather Printed Parts by Svejk
by Thingiverse
Last crawled date: 3 years, 3 months ago
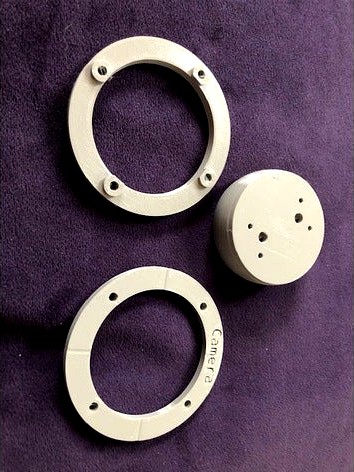
BIG NEWS! - Adjustable Camera Mount. - 12/18/2020
I added an optional camera mount that allows for minor pan, tilt, and horizon adjustments of the camera. It fits in place of the flat, square camera mount. Simply attach the camera to the base plate, put the two rings on the base plate as shown in the pictures (with spacers facing the opposite ring), and place it in the box. Leave the screws slightly loosened in order to make adjustments then when you are satisfied, snug them down. The pressure of the rings sandwiches the baseplate in place and it will not move until you loosen the screws again.
Window v3 - no print supports needed! - 11/19/2020
In pursuit of Perfection...
There is now a version 3 of the window. Same screw-in insert to hold the glass, but if you print it face down then no supports are required, and you won't feel like a dentist when it comes to yanking out the supports. (Unless you actually are a dentist, in which case you will enjoy version 2.)
New Camera and Sunlight Sensor Windows - 11/17/2020
Never one to leave well enough alone, I improved the design of the sensor windows for holding the glass. Rather than sandwich the glass between the frame and the box as in v1, I changed the design to recess the glass and o-ring further into the frame and use a threaded insert to hold it together and apply pressure to seal the glass against the o-ring. That way it is much easier to safely assemble the glass to the frame, and easier to secure the frame to the box. Finger-tightening the insert is sufficient and I put a couple of notches in it so that you can use your fingernails to aid in tightening and removing.
Snug the ring down only enough as is needed to create a seal - don't crank it down too hard as it could break the glass if you do. To test the seal place the assembled frame face up on a paper towel and fill the recessed area of the window with water. Let it sit for a while and if the towel remains dry the seal is good. (See photos for an example of the water test).
I left the original window designs in the files section but marked them as v1. If you choose to use v2 you will need to print 2 each of the window and threaded inserts. The mounting plates are in a separate file now.
Print the windows with supports on build plate only but set the overhang threshold as low as possible so as not to print supports under the threads. Print the threaded insert with no supports. Do whatever you want with the mounting plates.
ORIGINAL POSTING - 11/13/2020
These are redesigns of the SwitchDoc printed parts for the SkyWeather Project.
Air Quality Housing
This is designed to better resist horizontal rain to protect the AQI PCB while allowing adequate airflow. You will need to print it open side up with supports - this minimizes the amount of support material used. The AQI board will fit snugly into the recessed area at the bottom if you angle the board in connector edge down first. While it will remain in place snugly, I took the extra precaution of placing a small blob of hot glue on the top of opposing corners, lapping over onto the printed housing. If necessary it is easily peeled off again with no damage to the PCB. Mount to the project box with M3 screws.
Temp Sensor Housing
This is identical to the original design but also includes an integral mount for the SHT30 temperature probe. It also features four screw holes to mount it more securely to the project box. Use M3 screws and nuts to join the two halves of the temperature probe mount. Assemble the halves loosly, slip the probe in, and snug the screws down until the probe is secure. Use M3 screws to mount it to the project box.
Lightning Detector Pylon
A complete redesign with the whimsical twist of looking like a Tesla Coil... after all, what better way to house a lightning detector? The complete assembly requires printing of four parts: the pylon, the torus bottom and top, and a threaded insert.
The pylon base mounts to the project with four M3 screws and uses an o-ring to create a weatherproof seal. The bottom part of the torus screws onto the post of the pylon base. The lightning detector mounts to the posts with 2 M2.5 screws and it is angled to allow space for the Grove connectors underneath. (Be sure to mark the other ends of your Grove cables before assembly to identify where each plugs into the boards in the project box.) Screw in the threaded insert, then screw on the top.
Why did I create a threaded insert as opposed to integrating it into the top or bottom? In order to get a very clean and tight mating surface for the two halves of the torus I needed to print each part face down on the print bed. However, if the threads are integrated into one of the halves it will require supports to print with a resultant loss in a good, smooth mating surface. No supports are needed for the pylon or threaded insert, but be certain to use supports for the torus sections and flip them over to print face down on the print bed.
Camera and Sun Sensor Windows
Like the lightning pylon these use o-rings to seal to the project box. They also incorporate o-rings to seal the glass against the window frames. Print these parts o-ring side down with supports, however, be certain to set your overhang threshold low enough that you do not fill the o-ring grooves with support material. They are small enough to print without support. Use M3 screws to mount to the project box. Be very careful when attaching to the box - you want to assure that the glass is properly centered in the recess of the printed part, otherwise you will break the glass while tightening. It is purposely raised above the bottom of the recess in order to allow for compression of the o-ring to create an adequate seal. Tighten screws gradually on diagonals in order to equalize pressure against the glass. If you tighten screws unevenly you risk breaking the glass.
General hints and tips
I used stainless steel screws and nuts for all exposed hardware. You can find them at any good hardware store, but if you are unable to locate them locally then they are easily found on Amazon.
How to get a perfect alignment of screw holes: Don't assume the screw hole positions are the same as in the SkyWeather box assembly instructions. Rather, place the printed part in the desired position on the box and mark just ONE hole. Remove the part, drill that hole, and put the part back on with a screw through the part and the box. Rotating the part on that screw as needed, re-position the part into your desired position and mark another hole - just ONE. Drill that hole, put the part on with both screws, and mark and drill the remaining holes. You can easily mark through the printed part with a sharpie or a spring-loaded center punch.
In order to perfectly center the opening for the windows and for the lightning detector cables use a good straight edge and draw diagonal lines between the centers of pairs of opposing screw holes on the project box. The two lines will intersect at the exact center of the part you wish to mount. Drill a 3/8" hole for Grove cables to pass into the box (lightning detector), and you can drill a 15/16" or 1" hole for the windows. Hole saws work nicely for this purpose, but be certain to drill a small guide hole first to help guide the larger centering bit of the hole saw.
Finally, I used electrician's duct seal to seal the holes where Grove cables pass into the box. It remains flexible forever and is easily removed if needed. Available at any hardware store.
O-rings
I got mine on Amazon as follows:
031 Silicone O-Ring, 70A Durometer, Red, 1-3/4" ID, 1-7/8" OD, 1/16" Width (Pack of 25)https://www.amazon.com/gp/product/B000FMYO6Y/ref=ppx_yo_dt_b_search_asin_title?ie=UTF8&psc=1
023 Silicone O-Ring, 70A Durometer, Red, 1-1/16" ID, 1-3/16" OD, 1/16" Width (Pack of 100)https://www.amazon.com/gp/product/B000FMWORU/ref=ppx_yo_dt_b_search_asin_title?ie=UTF8&psc=1
You don't have to go with these, but if you want to find your own remember 2 things: 1.) You want the softest material available - the ones I used are 70A Durometer and I would not go any higher than that. 2.) For the o-rings size really does matter. They are precision fit - no other size will do.
Similar models
thingiverse
free

PVC Art Shelf Brackets
... hole, use a 1" screw to hold it, turn it over and mark the hole on the second side, drill and now you have a straight hole.
thingiverse
free

Electrical box D1 mini pro mount by mmattice
...e screw mount threads down with supports from the bed.
the higher resolution printing is to ensure the threads print well enough.
thingiverse
free

Huanyang VFD Line Filter Enclosure / Extension Box With Strain Relief by JimbalNy
...9;re unsure if it will fit i've provided a fitment test you can print to see if it will work before printing the whole thing.
thingiverse
free

Dremel Drill Holder
...and rear supports can be printed on their sides.
you will need to run a 3 mm tap down the screw holes or use self tapping screws.
thingiverse
free

TLP100 Spool body for narrow materials (POS Printer MPrint Terra Nova) by filimonic
...make few turns by hand to make sure the ribbon is anchored well. then you can continue doing it manually or use a winding helper.
thingiverse
free

Egg Box by bgill
...t i used support material which get cut off after the print.
after printing the o-ring gets screwed on the lower part of the egg.
thingiverse
free

Nest Protect Adapter by NormanF
...w through the mounting plate and into hole 2 of the adapter. now continue the rest of the installation in the nest instructions.
thingiverse
free

Makermade M2 Rigid 22002 mount by moskk83
...ted mine with 2 walls and 20% infill and its holding, but it wouldn't hurt to double the walls and infill for extra strength.
thingiverse
free

19" Rack mount support by mojo_replica
...gh strength. after printing use a m6 thread cutter on the two holes before inserting the m6 mounting screws.
cheers,
mojo_replica
thingiverse
free

Standard Camera Platform For GoPro Mounts by noslenwerdna
...couldn't use them for mounting one of my small video cameras that had a standard 1/4-20 mounting screw. so, now there is one.
Switchdoc
thingiverse
free

Weather Client for Switchdoc WeatherPlus by bonnette
...rclient
12/1/2017
i discovered that the wind speed was reading in kph instead of mph. so i fixed the arduino file to read in mph
thingiverse
free

Solar Panel Bracket and Component Clips for GroveWeatherPi by TexAg
...tutorial for building the groveweatherpi can be found at: http://www.switchdoccom/2016/12/tutorial-part-1-building-a-solar-powered-raspberry-pi-weather-station-groveweatherpi/ for those interested in re-mixing the stls, i've included...
thingiverse
free

GroveWeatherPi Sunlight Sensor WINDOW FRAME by leemaisel
...if you order the special silica quartz glass from switchdoc it will slide right in the slot i've made....
thingiverse
free

Pi Zero with 3.5 TFT display case by bonnette
...to enclose a weather station client that queries a switchdoc pi weather station. 8/21/2020 added a storage space for...
thingiverse
free

SkyWeather 3D parts
...this is a collection of 3d printable parts for switchdoc lab's skyweather weather station. this is still a "work...
Svejk
turbosquid
$22

Svejk 18 Table Lamp by Bankeryd
...k 18 table lamp by bankeryd for download as max, fbx, and stl on turbosquid: 3d models for games, architecture, videos. (1607197)
turbosquid
$22

Wall Sconce 2 Colors by BANKERYD
...by bankeryd turbosquid royalty free 3d model d:\eno - 2\hyper-realism\lamp2\451\svejk 13 wall sconce 2 colors by bankeryd for download...
thingiverse
free

Better Tape Splicing Blocks by Svejk
... where a knife blade could wear on the block), and i used a .1mm layer thickness for a smoother x-axis finish in the tape groove.
thingiverse
free

Levolor Riviera Micro Blind (Old Style) Parts by Svejk
...r blind colors. you could also just print the parts in a neutral color and skip painting them altogether, but that looks cheesy.
cg_trader
$10

Svejk 13 Table Lamp by BANKERYD
...svejk 13 table lamp by bankeryd
cg trader
svejk 13 table lamp by bankeryd 3d model, available formats max obj fbx stl
cg_trader
$10

Svejk 18 Table Lamp by Bankeryd
... bankeryd
cg trader
svejk 18 table lamp by bankeryd 3d model , formats include max, obj, fbx, stl, ready for 3d animation and ot
cg_trader
$10

Svejk 13 Wall Sconce 2 Colors by BANKERYD
...yd
cg trader
3d model svejk 13 wall sconce 2 colors by bankeryd , available in max, obj, fbx, stl, ready for 3d animation and ot
3dwarehouse
free

Railway station Humenne
...hasek). #homonna #humenne #petros #railway #slovakia #slovensko #stanica #station #svejk #vlakova...
3dwarehouse
free

Water Tower Humenne by petros
...soldier švejk can be found. #beton #concrete #humenne #reservoir #svejk #tower #veza #vodojem...
Parts
3d_export
$5

Parts
...parts
3dexport
parts
3d_export
$5
Part
...part
3dexport
part
3d_export
$5

Part
...part
3dexport
machine part
3d_export
$65

Part
...part
3dexport
simple rendering of the scene file
3d_export
$65

Part
...part
3dexport
simple rendering of the scene file
3d_export
$30

fan part
...fan part
3dexport
this is a part of fan of pedastal
3d_export
$10
machine parts
...machine parts
3dexport
3d part modeling work ,contact for 3d work
turbosquid
$17
Road parts
...bosquid
royalty free 3d model road parts for download as 3ds on turbosquid: 3d models for games, architecture, videos. (1192967)
turbosquid
$9

Cutter Parts
...squid
royalty free 3d model cutter parts for download as stl on turbosquid: 3d models for games, architecture, videos. (1220010)
turbosquid
$8

Drum parts
...bosquid
royalty free 3d model drum parts for download as max on turbosquid: 3d models for games, architecture, videos. (1631178)
Printed
design_connected
$27

...print
designconnected
moroso print computer generated 3d model. designed by wanders, marcel.
3ddd
free

Eichholtz Prints
...- eichholtz print central station i
13 - eichholtz print central station ii
14 - eichholtz print marisa
15 - eichholtz print tish
3ddd
$1

Eichholtz Prints
...print abstract - set of 2
10 - eichholtz print orange abstract
11 - eichholtz print buddha right
12 - eichholtz print buddha left
turbosquid
$1

... available on turbo squid, the world's leading provider of digital 3d models for visualization, films, television, and games.
3ddd
free

Eichholtz Prints
...of 4
2 - print dunbar 2 set of 4
3 - print guadeloupe 1 set of 4
4 - print guadeloupe 2 set of 4
5 - print giles
6 - print trett
3ddd
$1

Eichholtz Prints
...nt tutti frutti
3 - eichholtz prints watson - set of 2
4 - eichholtz prints antique nautilus - set of 2
5 - eichholtz print tiara
3d_export
$5

Monster for printing
...monster for printing
3dexport
monster 3d model printing
3ddd
free

printed rug
...printed rug
3ddd
ковер
very creative printed rug
3ddd
free

Eichholtz Prints
...иал: бумага
габариты (вхш): 72 x 62 см
описание: print sweetmeat - постер в деревянной раме.
3 - prints varsity set of 2
арти
3ddd
free

Art Print Posters
...art print posters
3ddd
прованс
art print posters by patrician prints