Thingiverse

Sushi Roll Game Parts Tray by deemended
by Thingiverse
Last crawled date: 4 years, 1 month ago
Sushi Roll is another really enjoyable game that falls short on the packaging. It really needed at a minimum a cheap vacuformed plastic tray to keep the bits and pieces organized, but I guess if companies can shave a nickel per unit off of the manufacturing cost by omitting it, then they will. Le sigh.
That's where this community steps in, I s'pose, and I'm not one to leave well enough alone and be grudgingly accepting of eight plastic baggies to keep the tokens and coins sorted.
So, here's my take on a parts tray for Sushi Roll. It holds all the coins and chits in a manner that makes them easy to sort and store, they are easily retrievable form their individual wells, the whole tray comes out and goes in the middle where all the players can reach it so no one person has to be the "chit bank" and dole them out to everyone, it fits in the original box and packaging and is kept from sliding around too much by the player cards, and it has a lid to keep everything in place during storage and transport.
I use eight 6mm x 2mm cylindrical magnets to ensure the lid stays on nicely. I use these quite a bit, so I order a bunch at a time from Amazon to keep on hand. The magnets can be found here: Deryun 180 Pack Refrigerators Magnets Fridge Magnets for Whiteboard
Please note, the magnets in the middle are off-center (owing to keeping this a compact design to fit in the box), so make sure you get the lid in the correct orientation when closing it.
WARNING: Be extremely careful with your magnet pole orientation! You need to make sure the poles are correctly aligned to attract the lid to the tray. Also, printers and print settings will vary, and the magnets may be nice and snug in the slot, or they may go in fairly easily... it is advised to dry-fit the magnets before gluing them in - snug is good, but you don't want to have to use extreme force to press them in. You can carefully shave the walls down with an x-acto blade if necessary. You can use a sparse drop of CA glue in each slot or the tiniest dollop of 5-minute epoxy and press each magnet in.
I'm including two versions of this model:
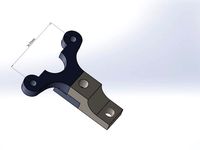
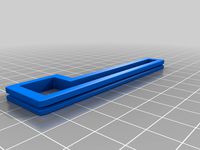
Split versions with left and right pieces for smaller format printers. For the tray you'll want to print 2 of the triangular "big splice" pieces, and 2 of the triangular "small splice" pieces (3 of each, if you're like me and prone to dropping one irretrievably into the black hole that is the back of my printing table). The "big splice" are for the two holes near the bottom, the "small splice" are for the holes near the top. For the lid, print only one of it's splices... it's meant to bridge the gap on the three sides where the two lid pieces meet. A bit of 5-minute epoxy will make the multiple parts as one. Be careful to not get glue in the magnet holes until you're ready to glue those in last.
Whole versions that can be printed as a single piece for larger format printers.
Also, a note to say that I've tried many different variations of shape and size for splice pieces, and I've gotta' say my recent foray into using the triangular shape has me well pleased. It's easy to print flat so you don't have an obvious shear weakness along the radius like you do with a cylindrical splice that needs to be printed upright, and it acts like a keyed join to increase the accuracy of part alignment.
That's where this community steps in, I s'pose, and I'm not one to leave well enough alone and be grudgingly accepting of eight plastic baggies to keep the tokens and coins sorted.
So, here's my take on a parts tray for Sushi Roll. It holds all the coins and chits in a manner that makes them easy to sort and store, they are easily retrievable form their individual wells, the whole tray comes out and goes in the middle where all the players can reach it so no one person has to be the "chit bank" and dole them out to everyone, it fits in the original box and packaging and is kept from sliding around too much by the player cards, and it has a lid to keep everything in place during storage and transport.
I use eight 6mm x 2mm cylindrical magnets to ensure the lid stays on nicely. I use these quite a bit, so I order a bunch at a time from Amazon to keep on hand. The magnets can be found here: Deryun 180 Pack Refrigerators Magnets Fridge Magnets for Whiteboard
Please note, the magnets in the middle are off-center (owing to keeping this a compact design to fit in the box), so make sure you get the lid in the correct orientation when closing it.
WARNING: Be extremely careful with your magnet pole orientation! You need to make sure the poles are correctly aligned to attract the lid to the tray. Also, printers and print settings will vary, and the magnets may be nice and snug in the slot, or they may go in fairly easily... it is advised to dry-fit the magnets before gluing them in - snug is good, but you don't want to have to use extreme force to press them in. You can carefully shave the walls down with an x-acto blade if necessary. You can use a sparse drop of CA glue in each slot or the tiniest dollop of 5-minute epoxy and press each magnet in.
I'm including two versions of this model:
Split versions with left and right pieces for smaller format printers. For the tray you'll want to print 2 of the triangular "big splice" pieces, and 2 of the triangular "small splice" pieces (3 of each, if you're like me and prone to dropping one irretrievably into the black hole that is the back of my printing table). The "big splice" are for the two holes near the bottom, the "small splice" are for the holes near the top. For the lid, print only one of it's splices... it's meant to bridge the gap on the three sides where the two lid pieces meet. A bit of 5-minute epoxy will make the multiple parts as one. Be careful to not get glue in the magnet holes until you're ready to glue those in last.
Whole versions that can be printed as a single piece for larger format printers.
Also, a note to say that I've tried many different variations of shape and size for splice pieces, and I've gotta' say my recent foray into using the triangular shape has me well pleased. It's easy to print flat so you don't have an obvious shear weakness along the radius like you do with a cylindrical splice that needs to be printed upright, and it acts like a keyed join to increase the accuracy of part alignment.
Similar models
thingiverse
free

Antique Lock by VanOaksProps
...se you can drop magnets into the holes in the top of the body and glue magnets to the matching ends on the "top" piece.
thingiverse
free

Part Trays by Kisssys
... them. i thought about printing a lid but i like to be able to see what's in the bin.
prints without support.
cheers
kisssys
thingiverse
free

Shower sink lid by sgonzalezlopez
...so the sink, you have to press the "button" on the lid to separate a bit both pieces.
comments are welcome.
enjoy it!!!
thingiverse
free

Bit Driver Tray Organizer - 4 x 12
...netic tape on the bottom. it's perfect for a metal toolbox. if you do this, i recommend printing the part without a bottom.
thingiverse
free

Shadespire Token Tray and Lid by comma44
...pth of the magnet recesses so they'll sit flush. also, increased the size of the notches on that lid to allow for easier fit.
thingiverse
free

Bit Trays for Milwaukee Packout Rolling Toolbox by benjamenjohnson
...holders from milwaukee accessory boxes, or you can make you own with my generator here: https://www.thingiverse.com/thing:3808539
thingiverse
free

Scoville Insert - Sleeves friendly by GeekZolda
...th the lid.
print one of each except the player trays, you gotta print 6 of them.
contact me if you got any questions, have fun !
thingiverse
free

Compact Bits holder for Makita LXT (Magnetic, Customizable)
...eight, and thus adjust for how strong you want the bits to feel.
ps: make sure to align the magnet poles when you push them in :)
thingiverse
free

Raspberry Pi Relay Case by markr959
... screwed it up and i didn't want to print a whole new one.
there are 2 holes in the base to screw it on to whatever you want.
thingiverse
free

Love Ball, with magnetic clasp by random11
...ll percentage, around 40-50% and then all the other parts at 5-10%. that way it will be bottom heavy and not roll around as much.
Deemended
thingiverse
free

Catan Robber - Sandstorm by deemended
...ert theme. i also made it a little more squat as the base is narrower than the original, and i cropped the top at a jaunty angle.
thingiverse
free

Catan Robber - Stack o' Sheep Thief - Wider Base by deemended
...e is 24.25mm in diameter - close enough to the 25mm of the number tokens. i only remixed the original with the built-in supports.
thingiverse
free

.grip Hollow Handle by deemended
...et something in exchange for my loss. good thing i had a spool of gray lying around, as you can see in the preview picture above.
thingiverse
free

Bottle Transfer Couplers by deemended
...it can be squeezed out of. who knows, someone might find it useful.
print, use, enjoy, then marvel your newfound quality of life.
thingiverse
free

Base for The Ultimate Spool Holder - 1 kg Spool by deemended
...ramount 1 kg spools. it's a little wide for 3d soultech spools, but is working out ok for them so far with a wee inward lean.
thingiverse
free

Catan Player Pieces Hex Storage Box by deemended
...esign by adding the catan logo to the lid. go me, standing on the shoulders of giants and basking in the adoration of the masses.
thingiverse
free

Catan Number Token Storage Tubes by deemended
...n cap (feel the lanolin!)
wheat hexagon cap (not gluten free!)
enjoy your new stylish token armored protective containment units.
thingiverse
free

Catan Number Tokens - 6 Player Set by deemended
...t i used rawlogic's superb change filament at z cura plugin to print mine duo-color. i heartily recommend that over painting.
thingiverse
free

Catan Number Tokens - 4 Player Set by deemended
...t i used rawlogic's superb change filament at z cura plugin to print mine duo-color. i heartily recommend that over painting.
thingiverse
free

Brandon the Brave Game Box Insert by deemended
... a cylindrical splice that needs to be printed upright, and it acts like a keyed join to increase the accuracy of part alignment.
Sushi
thingiverse
free

sushi stick
...sushi stick
thingiverse
sushi stick for eat!!
thingiverse
free

SushI Cube ( 0shizusi Sushi Box ) by Zannddor
...x ) by zannddor
thingiverse
sushi box to make oshizushi ( sushi in the box )
fill density 40% minimumhttp://youtu.be/htwmn0gklvg
thingiverse
free

Sushi mattonella by emanuelcracco
...sushi mattonella by emanuelcracco
thingiverse
sushi make
thingiverse
free

Sushi tondo by emanuelcracco
...sushi tondo by emanuelcracco
thingiverse
round sushi make
thingiverse
free

Sushi Spinner by Poiler
...so be careful to do not bombing sushi.
you will need; one 698 sized bearing, and ca glue.
tolerance: 0.4 mm with the bearing hole
thingiverse
free

Sushi cake mold by dgeral
...sushi cake mold by dgeral
thingiverse
mold for sushi cake
moule pour sushi cake
thingiverse
free

Sushi Server by Stanistani
...sushi server by stanistani
thingiverse
small server for one appetizer-size serving of sushi.
thingiverse
free

Sushi easy sticks
...sushi easy sticks
thingiverse
ideal if you don't control sushi sticks very well.
thingiverse
free

Trancheur à Sushis by Didier502
...trancheur à sushis by didier502
thingiverse
trancheur à sushis
thingiverse
free

Sushi Chopsticks Support by amalacu26
...sushi chopsticks support by amalacu26
thingiverse
sushi chopsticks support
Roll
thingiverse
free

Rolle Rolle Food Truck
...rolle rolle food truck
thingiverse
rolle rolle food truck
thingiverse
free

Roll by Mykhailo
...roll by mykhailo
thingiverse
this is rolls
thingiverse
free

Spool roll
...spool roll
thingiverse
spool roll
thingiverse
free

roll by celsiusm
...roll by celsiusm
thingiverse
roll by celso [created on 3dtin]
thingiverse
free

Roll holder for all roll sizes by Lillchrille
...for all roll sizes by lillchrille
thingiverse
roll holder for all sized rolls.
use 5mm steel rods as axels and 16x5x5mm bearings
thingiverse
free

Cloth Rolls
...cloth rolls
thingiverse
three simple rolls of cloth, best to print upright.
thingiverse
free

Roll Holder by Arrow_to_the_Knee
...roll holder by arrow_to_the_knee
thingiverse
this is a small roll holder. it holds rolls...
thingiverse
free

Rolling stand by TheDarkAce
...rolling stand by thedarkace
thingiverse
rolling stand for hand-rolled cigarrettes
thingiverse
free

Tesafilm Rolle / Tesa Roll spare part by Abratzo
...tesafilm rolle / tesa roll spare part by abratzo
thingiverse
tesa roll spare part
works fine , and you cant buy this roll
thingiverse
free

Rolling Pin by AustinCluck
...ncluck
thingiverse
this is a rolling pin. it can be used to roll dough or any of food item that may need rolling in the kitchen.
Tray
thingiverse
free

Tray
...tray
thingiverse
tray 190x130mm
size can be changed
thingiverse
free

Beer tray or bottle tray by multirap
...beer tray or bottle tray by multirap
thingiverse
very useful tray for soccer wm 2014
thingiverse
free

tray by 3Dvillain
...tray by 3dvillain
thingiverse
tray
thingiverse
free

tray by yama4ta
...tray by yama4ta
thingiverse
tray
thingiverse
free

Tray by LincolnE
...tray by lincolne
thingiverse
just a tray.
thingiverse
free

Silverware Tray
...silverware tray
thingiverse
silverware tray
thingiverse
free

Soap Tray
...soap tray
thingiverse
a soap tray.
thingiverse
free

Soap Tray
...soap tray
thingiverse
soap tray
thingiverse
free

Paperclip tray
...paperclip tray
thingiverse
paperclip tray
thingiverse
free

Tray by RobertCampo
...tray by robertcampo
thingiverse
just a tray!
Game
thingiverse
free

screwdriver for game boy games
...screwdriver for game boy games
thingiverse
needed a screwdriver for game boy games
thingiverse
free

games by
...games by
thingiverse
nothing special
thingiverse
free

Game Boy Games Case by HannahA31
...to place, but it holds the games securely side by side. the game boy logo is on the front while the nintendo logo is on the back.
thingiverse
free

The Peg Game
...the peg game
thingiverse
the peg game
thingiverse
free

Game Boy Game Display Tower by sanzliot
...y game display tower by sanzliot
thingiverse
display up to 11 game boy, game boy color or game boy advance games in a 360 tower.
thingiverse
free

D6 for game
...d6 for game
thingiverse
dice for a friends game.
thingiverse
free

L Game
...strategy.https://www.youtube.com/watch?v=64pa31_wja0
play a digital version of the game here:https://hwwmath.looiwenli.com/l-game
thingiverse
free

Fractions Game
...fractions game
thingiverse
this is a game that help kids to learn fractions.
thingiverse
free

games by nick_rage
...games by nick_rage
thingiverse
mini game not sure how to spell it crokenole
thingiverse
free

game of thrones board game by nefilim
...game of thrones board game by nefilim
thingiverse
miniature per il gioco del trono di spade
Parts
thingiverse
free
part part part by ease
...part part part by ease
thingiverse
part part part
thingiverse
free

part
...part
thingiverse
part
thingiverse
free

part
...part
thingiverse
3d test fan part
thingiverse
free
part
...part
thingiverse
part i made for friend
thingiverse
free

Turbo Part by part by Thellgti
...turbo part by part by thellgti thingiverse turbocharger in parts ...
thingiverse
free
Part Stand Part Holder
...is a part holder i designed for holding small parts for painting can be scaled up or down to...
thingiverse
free

Part by WizxGamer
...part by wizxgamer
thingiverse
part
thingiverse
free
PART by leonk
...part by leonk
thingiverse
part
thingiverse
free

Part by empirekitchen
...part by empirekitchen
thingiverse
part
thingiverse
free

part by migueljb01
...part by migueljb01
thingiverse
part