Thingiverse
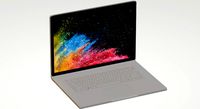
Surface Pro 3 Vertical Stand by legochuck
by Thingiverse
Last crawled date: 3 years, 3 months ago
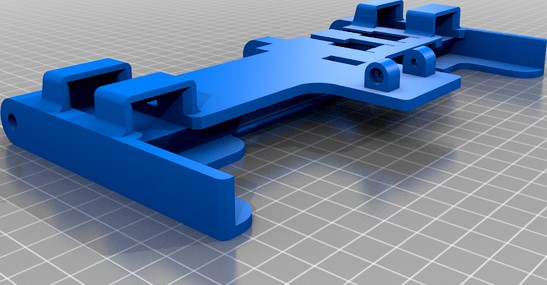
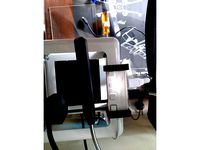
This computer stand is designed to display the Microsoft Surface Pro 3 vertically and includes slots for docking with the charging, USB, and MiniDisplay ports. It also includes space to secure an Amazon basics USB hub, which is listed in the additional materials section. All parts will require supports with the exception of the display base. The following additional parts are required:
Hardware
x2 40mm M3 Screw
x1 30mm M3 Screw
x1 18mm M3 Screw
x4 M3 Lock Nuts
Structural Materials - I used wood, though these could be printed or machined out of metal as desired
x2 Rectangular Beams approx 11 x 18.5 x 240mm
x1 Beam with one filleted edge and one tapered edge with M3 screw hole approx 15 x 10 x 110mm
Optional Materials
Large Rubber Feet: https://smile.amazon.com/gp/product/B07PXNTT7K/ref=ppx_yo_dt_b_asin_title_o01_s00?ie=UTF8&psc=1
USB Hub: https://smile.amazon.com/gp/product/B003M0NURK/ref=ppx_yo_dt_b_asin_title_o02_s00?ie=UTF8&psc=1
MiniDisplay to HDMI: https://smile.amazon.com/gp/product/B00YONKZ72/ref=ppx_yo_dt_b_asin_title_o03_s00?ie=UTF8&psc=1
To assemble, the surface slot and display base are attached using the two longest and one shortest M3 screws and lock nuts. The long rectangular beams can be inserted into the back of the surface slot, and the shorter tapered beam can be attached to the back of the surface slot through the screw hole with the medium M3 screw. The filleted edge should be closest to the surface slot part to allow it to rotate around the screw while the tapered edge should mate with the grooves in the display base. The charging cable can simply be snapped into place in the surface slot, and if the USB or miniDisplay ports are chosen, the cable can be fed through the back of the surface slot. Then the top and bottom port clamps can be placed around the cable, and that assembly can be slid back into the surface slot in the correct location and orientation.
Some sanding may be required to ensure all parts mate properly. Additional, I used scotch tape to ensure the charging cable and USB hub stay put in their respective locations.
Similar models
thingiverse
free

Sidewinder X1 USB plug housing by JEFFRYSC
...if not, here is an assortment: https://smile.amazon.com/gp/product/b07s337wbb/ref=ppx_yo_dt_b_search_asin_title?ie=utf8&psc=1
thingiverse
free

Nextion Lap Timer by sp33dfr34k
...https://www.amazon.de/gp/product/b08dhyd73q/ref=ppx_yo_dt_b_asin_title_o08_s02?ie=utf8&psc=1
m3 screws + nuts
micro usb cable
thingiverse
free

Artillery Sidwinder X1 - Rasbperry Pi & StepDownConverter Mount
...ie=utf8&psc=1
usb power cable:https://www.amazon.de/gp/product/b07k1qr2k9/ref=ppx_yo_dt_b_search_asin_title?ie=utf8&psc=1
thingiverse
free

Smok Nord 4 Pod/Charging Station by neoc2003
...ge.
2 pod slots
usb cable used - https://www.amazon.com/gp/product/b07yxwxrtv/ref=ppx_yo_dt_b_search_asin_title?ie=utf8&psc=1
thingiverse
free

Lighted Curved Lithophane Box with Switch by Handler5785sd
...1
powered by 12 v transformer https://smile.amazon.com/gp/product/b01hcrugpw/ref=ppx_yo_dt_b_asin_title_o00_s00?ie=utf8&psc=1
thingiverse
free

Vive motion control magnetic charging dock by smokeaudio
...0?ie=utf8&psc=1
usb splitter url:https://www.amazon.com/gp/product/b00fjg5t4w/ref=oh_aui_detailpage_o08_s00?ie=utf8&psc=1
thingiverse
free
M3d - USB Hub clips by mrhea00
...arch_detailpage?ie=utf8&psc=1
fan:https://www.amazon.com/gp/product/b003xn24gy/ref=oh_aui_search_detailpage?ie=utf8&psc=1
thingiverse
free

Travel/Home Charging Station
...p/product/b006zb30ve/ref=ppx_yo_dt_b_asin_title_o08_s00?ie=utf8&psc=1
power supply: hp hstns-pl14 (generic p/n: 499249-201)
thingiverse
free

Usb 4 port hub bracket by t0xic_ruin
....amazon.com/gp/product/b00jx1zs5o/ref=oh_aui_detailpage_o06_s01?ie=utf8&psc=1) hub and also the usb 2.0 and powered variants.
thingiverse
free

Ikea Cable Desk Organizer with USB Hub Holder by jhhg
...7 mm desk, holds this usb hub - https://www.amazon.com/gp/product/b07l32b9c2/ref=ppx_yo_dt_b_asin_title_o06_s00?ie=utf8&psc=1
Legochuck
thingiverse
free
Tree of Life by legochuck
...based on the disney tree of life from the walt disney world theme park. the model is split into two pieces for ease of printing.
thingiverse
free

Pound Sterling Coin Display by legochuck
...oinage depicting the royal coat of arms. the coins are arranged in such a way as to line up the shield on the back of each coin.
thingiverse
free

8-Bit Magnets by legochuck
...inted separately and can be glued into their recessed slots on the body. holes for magnets on the back fit 6mm diameter magnets.
thingiverse
free

8 Bit Magnets by legochuck
... printed as a separate piece then glued into a slot on the main body. holes on the back of the body accept 6mm diameter magnets.
thingiverse
free

Space Invaders Speaker Cover by legochuck
...speakers you may be using. the nominal distance between the holes along the diagonal is 84mm, and the screw holes fit #6 screws.
thingiverse
free

Madame Leota Headstone Eye Animatronics by legochuck
...
parts were printed on the prusa i3 mk3s in petg at .2mm layer height. with correct orientation no supports should be necessary.
Surface
design_connected
$9

Surface
...surface
designconnected
rosenthal surface computer generated 3d model.
3d_export
$18

surface-cracked surface 27
...surface 27
3dexport
surface-cracked surface 27<br>max 2015 v-ray 3 max 2015<br>textures<br>all files in zip...
3d_export
$18
surface-cracked surface 27
...surface 27
3dexport
surface-cracked surface 27<br>max 2015 v-ray 3 max 2015<br>textures<br>all files in zip...
3d_export
$5
surface base
...surface base
3dexport
surface base
3ddd
$1
vibia fold surface
...vibia fold surface
3ddd
vibia fold surface , vibia
vibia fold surface
3d_export
$18
surface-yellow river dam-horizontal surface 03
...surface-yellow river dam-horizontal surface 03
3dexport
surface-yellow river dam-horizontal surface 03<br>3ds max 2015
3d_export
$18
surface-yellow river dam-horizontal surface 01
...surface-yellow river dam-horizontal surface 01
3dexport
surface-yellow river dam-horizontal surface 01<br>3ds max 2015
3d_export
$10
surface book 2
...surface book 2
3dexport
surface book 2 laptop
3ddd
$1
Modular Kurk Surface
...modular kurk surface
3ddd
modular
modular kurk surface
turbosquid
$38
Barrier Surface
...ree 3d model barrier surface for download as ma, obj, and fbx on turbosquid: 3d models for games, architecture, videos. (1233275)
Vertical
3ddd
$1
Vertical curtain
...vertical curtain
3ddd
роллеты
vertical curtain
modern curtain
design_connected
$11
Mr.Tubes Vertical
...mr.tubes vertical
designconnected
tonone mr.tubes vertical computer generated 3d model.
3ddd
free

Vertical gardening
... фитомодуль , фитостена
vertical gardening
2000x1000x165
vizpark
$5

Einstein Vertical
...tical is a set of 3d brick textures for modern buildings, including mulit-textures and 4k tileable textures with material layers.
turbosquid
$5

brazier vertical
... free 3d model brazier vertical for download as sldas and ige on turbosquid: 3d models for games, architecture, videos. (1647570)
turbosquid
$18
Vertical blinds
...ee 3d model vertical blinds for download as max, obj, and fbx on turbosquid: 3d models for games, architecture, videos. (1604868)
3d_export
$40

vertical stirling engine
...vertical stirling engine
3dexport
vertical stirling engine
turbosquid
$6
vertical fence
...d model vertical fence for download as c4d, 3ds, dxf, and obj on turbosquid: 3d models for games, architecture, videos. (1571631)
turbosquid
$50

Vertical Garden
... available on turbo squid, the world's leading provider of digital 3d models for visualization, films, television, and games.
turbosquid
$20

vertical flag
... available on turbo squid, the world's leading provider of digital 3d models for visualization, films, television, and games.
Pro
turbosquid
$29

Pro
...ree 3d model mac pro for download as obj, c4d, fbx, and blend on turbosquid: 3d models for games, architecture, videos. (1505782)
turbosquid
$15

Apple Mac Pro and Pro Display
...ee 3d model apple mac pro and pro display for download as max on turbosquid: 3d models for games, architecture, videos. (1417078)
3d_export
$5

iphone 13 pro max and pro
...3 pro max and 13 pro the model is made in four colors (graphite, gold, silver, and blue), all of which are attached in the files.
3d_export
free

sapphire pro
...sapphire pro
3dexport
sapphire pro 3d printer head mask
3d_export
$4

macbook pro
...macbook pro
3dexport
macbook pro 13" inch 2020 years model
3ddd
free

GentleLase Pro
... syneron , candela
gentlelase pro аппарат для лазерной эпиляции
turbosquid
$25

PRO frame
...rbosquid
royalty free 3d model pro frame for download as max on turbosquid: 3d models for games, architecture, videos. (1148329)
turbosquid
$5

Alien pro
...osquid
royalty free 3d model alien pro for download as blend on turbosquid: 3d models for games, architecture, videos. (1678446)
turbosquid
$5

iphone11 pro
...uid
royalty free 3d model iphone11 pro for download as blend on turbosquid: 3d models for games, architecture, videos. (1562707)
3ddd
$1

Mac Pro (appel)
...mac pro (appel)
3ddd
компьютер , apple
mac pro
Stand
turbosquid
$50

stand watermelon stand
...yalty free 3d model stand watermelon stand for download as ma on turbosquid: 3d models for games, architecture, videos. (1528284)
archibase_planet
free
Stand
...stand
archibase planet
stand post pole
stand - 3d model for interior 3d visualization.
archibase_planet
free
Stand
...stand
archibase planet
stand sport barbell
stand kettler - 3d model for interior 3d visualization.
archibase_planet
free
Stand
...stand
archibase planet
locker drawer stand
stand 897810 - 3d model for interior 3d visualization.
archibase_planet
free
Stand
...stand
archibase planet
stand rack post
stand 2 - 3d model for interior 3d visualization.
archibase_planet
free
Stand
...stand
archibase planet
stand storefront shelving
stand 3 - 3d model for interior 3d visualization.
archibase_planet
free
Stand
...stand
archibase planet
stand shelf shelving
stand 4 - 3d model for interior 3d visualization.
archibase_planet
free
Stand
...stand
archibase planet
stand post stall
stand 5 - 3d model for interior 3d visualization.
archibase_planet
free
Stand
...stand
archibase planet
stand post stall
stand 6 - 3d model for interior 3d visualization.
archibase_planet
free
Stand
...stand
archibase planet
stand post shelving
stand 7 - 3d model for interior 3d visualization.
3
turbosquid
$10

Mountain Bike 3 -3 of 3
...model mountain bike 3 (#3 of 3) for download as fbx and blend on turbosquid: 3d models for games, architecture, videos. (1438752)
turbosquid
$6

Rock 3-3
...urbosquid
royalty free 3d model rock 3-3 for download as obj on turbosquid: 3d models for games, architecture, videos. (1628065)
turbosquid
$29

Books 150 pieces 3-3-3
...books 150 pieces 3-3-3 for download as max, obj, fbx, and stl on turbosquid: 3d models for games, architecture, videos. (1384033)
turbosquid
$3

Genesis 3 Clothing 3
... available on turbo squid, the world's leading provider of digital 3d models for visualization, films, television, and games.
3d_export
$5

hinge 3
...hinge 3
3dexport
hinge 3
3ddd
$1

Розетка 3
...розетка 3
3ddd
розетка
розетка 3
turbosquid
$50

is-3
... available on turbo squid, the world's leading provider of digital 3d models for visualization, films, television, and games.
turbosquid
$10

Mountain Bike 3 -2 of 3
...model mountain bike 3 (#2 of 3) for download as fbx and blend on turbosquid: 3d models for games, architecture, videos. (1438750)
turbosquid
$10

Mountain Bike 1 -3 of 3
...model mountain bike 1 (#3 of 3) for download as fbx and blend on turbosquid: 3d models for games, architecture, videos. (1438743)
3d_export
$5

3 CATS
...3 cats
3dexport
3 cats pen holder