Thingiverse

SteinMore DeltaMax by Rotorbugjl
by Thingiverse
Last crawled date: 3 years, 1 month ago
This is my version of the following Thing:https://www.thingiverse.com/thing:923830
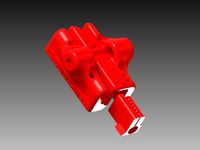
You will need parts from the above. The Lower and Upper corners only.
Use 2020 for the uprights (1000mm long x 3 units). 2060 (400mm long 3 units) for the base and 2020 (400mm long 3 units) at the top.
The effector spacing between rods are 60mm. I used 10mm Neodymium magnetic balls glued to the effector and carriers.
Use the "M5 allen cap screw mounts" for a magnetic setup. I used m5 allencap screws inside the mounts. Or you can insert 10mm x 3mm bucket style magnets. Please make sure that you insert your magnets into the mount and rods. Then attach the Magnetic balls to the rods. Only then should you glue your magnet balls to the Effector and carriers. Otherwise you will end up with opposing magnetic fields and the effector will release with the slightest of touch.
Total length for the rods are 400mm on my setup.
Or you can use this effector and the "BallJoint mounts" to convert the printer to Ball Joint/Rod end.https://www.thingiverse.com/thing:1015846
See it run....:https://youtu.be/DNQ4mvcmFyU
Sorry for the funky orientation of the stl files..Fusion tends to turn everything on its side...Grrr.
Update:
Add support for the top of the Printer:
Delta Top Support Arm x 3 units
Delta Top Support Centre x 1 unit.
Assemble the 3 parts. (you need to mark drill the centre piece)
Clip it in. No need to screw it to the 2020 profiles. This thing goes in with a fight and a tight fit.
Update2:
Added Crossbrace. Print three. One for each upright. I used 10mm Aluminium tubing to connect the three to create a brace.
Similar models
thingiverse
free

Orbiter adapter for Duet Smart effector Delta printers by lorinczroby
... nuts + 2x m3 insert nuts in the adapter for mounting the orbiter on top.
thanks frank g. for helping and supporting this design.
thingiverse
free

magnetic delta rod mount cap by patrick_lee
...agnetic delta rod mount cap by patrick_lee
thingiverse
the magnetic mount of delta
10mm ball
r10mm carbon rod
r10mmx10mm magnet
thingiverse
free

Cherry Pi Delta 3D Printer by AndyCart
...the idler bearing belt guides - they disintegrated on me! i've posted a modified design on the 'files' section
andy
thingiverse
free

Magnetic Effector Plate for a Delta printer by daveb500
...to be bonded into the hollows. i have used this style effector plate on my delta machine for about a year now with great success.
thingiverse
free
Infill 3D Delta Bot Carrier by Infill3D
...39;ll start working on the non-magnetic version of the effector soon.
updates can be found here https://infill3d.com/20-downloads
thingiverse
free

Delta Bad Boy Magnet Carriage Kit by pindemand
...in 12mm to fit "enlarged rostock" please let me know, also if you want it for specific project i help you out if i can.
thingiverse
free

Rostock reused effector and carriage magnetic solution by kakbit
...ue gun to attach the magnets
i reused the m3 screws and nuts to mount the magnet and ball holders, that earlier mounted the rods.
thingiverse
free

Delta magnetic effector and carriage with smaller ball holes by Olooki3D
...diameter to accept his ball studs.
link for haydn huntley's mag rods and ball studs.http://www.thingiverse.com/thing:299263
thingiverse
free

MS-Delta Frame by Spaceman9105
...d. it will have an outo bed leveling function and rods will be connected with magnets. https://www.thingiverse.com/thing:2938171
thingiverse
free

double Hotend Effector for Delta style printers by daveb500
... look to your printer. it is slightly smaller than the mk1 version.
the effector mount requires 2 x 30mm fans and 2 x 40 mm fans.

