Thingiverse

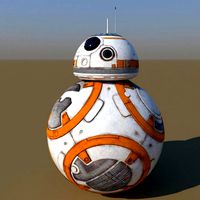
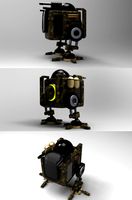
Star Wars BB-9E by falconman
by Thingiverse
Last crawled date: 3 years, 1 month ago
This is a remix of wkarraker's nice BB-8 and uses his BB-8 body design as a foundation for bB-8's nemesis, BB-9E. This is a work in progress and I will be adding the other pieces as I complete the design and test fit the parts..
Printing Instructions:
Printed using Monoprice Select Mini V1 - I used a combination of .0875 and .175 layer heights. These are multiples of the "magic numbers" for the stock MP Select Mini. I will note what layer height was used for each piece. I used a top and bottom thickness of 1.2 and sides of 1.2. In general I used 10% infill and 50mms for travel speed, except as noted.
BB-9E_Head_New.stl - Print one copy. I used a combination of Black and Silver PLA. I printed the head at .0875 layer height, 35 mms & 10% infill. I edited the GCODE to add an M600 command at layers 8, 16, 205, 225, 236 and 242. I started using black PLA and when the pauses occured, alternated between silver and black. If your printer is tuned in well, this will result in a much cleaner line than could be obtained with paint.
BB-9E_Head_Eye.stl - Print one copy. I used black and silver PLA. I used .0875 layer height, 25mms and 100% infill. Edit the GCODE to add an M600 command at layer 24. Start with black and switch to silver at the pause.
BB-9E_Head_Bottom.stl - Print one copy. I used black PLA at .0875 layer height, 10% infill, 35mms.
BB-9E_Head_Bottom_Ring.stl - Print one copy. I sued silver PLA at .0875 layer height, 10% infill and 35mms.
BB-9E_Head_Blue_Lens.stl - Print one copy. I used sme translucent blue PLA and printed at .0875 layer height, 100% infill and 25mms.
Edit 1: I've added BB-9E's body ball. There are holes inside the body to accept 8mm x 3mm magnets. I used a dot of super glue to hold the magnets at the bottom of the hole. Make sure you align the magnets in the proper pole orientation to match the other magnets in the body so the head will attach to the body. I used the following magnets for this part of the project: https://www.amazon.com/gp/product/B01MZ6EJE2
Edit 2: I've added the two pieces that make up the bottom of BB-9E's head. The solid ring with the concave section (BB-9E_Bottom.stl) receives a single 6mmx3mm magnet. Be sure this magnet is aligned so that the poles match and attract the body magnets. Press the magnet in so it is flush with the inside of the concave part of the bottom. It will extend above the piece a bit, but there is room inside the bottom ring that will hold the extra height.
The segmented ring (BB-9E_Bottom_Ring.stl) holds three 6mmx3mm magnets. Before inserting the magnets add a length of wire that runs through the transverse hole between the rim and center hub. Cut the wire so it extends fully between that span (see photo). The photo shows stranded wire, but I ended up using wire wrap wire instead. it worked very well. Press the magnets in from the solid bottom side. Make sure the magnets extend just barely above the surface so the magnets can make solid contact with the magnets in the head. This will create a way to switch off the LED's in the head by rotating the top part of the head 90 degrees. Now you can nest the bottom to the bottom ring. The center magnet should be enough to hold them together, but I glued the two together using super glue.
This is the source for the 6mmx3mm magnets I used:
https://www.amazon.com/gp/product/B01MXWMF7Q
Edit 3: Added the Dome Eye and Blue Lens for BB-9E's head. I used a 3mm white LED with a 120 ohm resistor attached to the positive lead of the LED (long leg). I then attached a length of red wire to the positive leg and used shrink wrap tubing to cover. This assembly will be inserted into the blue lens (BB9E-Blue_Lens.stl). I attached the LED assembly with super glue.
I used a 3mm red LED wired to a 200 ohm resistor attached to the long leg of the LED. I then attached a length of red wire to the positive leg and used shrink wrap tubing to cover. This assembly will be inserted into the Dome Eye (BB-9E_Head_Eye.stl). I attached the LED assembly with super glue.
I used the following LED's from Amazon:
https://www.amazon.com/gp/product/B018NQ77HG
The head (BB-9E_Head.stl) takes 5 of the magnets. In the next installment, I will include a wiring diagram.
More to follow!
I recommend using jpvanderendt's excellent stand design for your completed BB-9E: https://www.thingiverse.com/thing:1718534
Similar models
thingiverse
free

Happy Ghosty The Ghost by nejcsever
...6 mm
eyes layer height: 0.12 mm
mouth layer height: 0.12 mm
filament: 3djake ecopla glow, extrudr pla nx2 black
happy printing :)
thingiverse
free

Mushroom Stamp by shutinhorror
...amp was printed in tpu at 4% infill with 2 bottom layers
both printed at .2 layer height and used super glue to hold stamp to top
thingiverse
free

BB-8 Head with LEDs by falconman
...t-jewelry-making/dp/b00qv3zag4
6mm x 3mm magnets (so the batteries can be replaced): https://www.amazon.com/gp/product/b01mxwmf7q
thingiverse
free

Overwatch illuminated ring box by ehdrien
...through the bottom.
-push on the bottom of the box. this should be a nice tight fit.
edit may 22 2018 - updated wire information
thingiverse
free

RPi Camera Enclosure Front with LED Ring Holder
...'s ring and make sure the cables are on the very bottom (there is a little relief for them), such that the ring fits tightly.
thingiverse
free

YETI Magslider spout cover
...instead of sticking.
used pla for my print - handwash only. not dishwasher safe.
update: improved bottom side grooves for venting
thingiverse
free

MIB Noisy Cricket Base by falconman
... gcode at layer 24 so i could swap filaments, printed it at .0875 layer height and 25 mm/sec so i could get the detail down well.
thingiverse
free

Nike Air max LED by Twinos
...you can drill a little hole on the back for the led strip wire.
glue with hot glue the pattern with cover, and... that's it !
thingiverse
free

Fridge magnet "Cat's Paw" V2 by Phil86B
... change the color at 6.0mm and 6.6mm height.
i use to scratch the face of the magnet before gluing it (using epoxy glue).
enjoy !
thingiverse
free

Qbat by geniusdesign
...s3d with custom support, so i can create my own support. i only use support on the fist area.
print at 100%
print with silver pla
Falconman
thingiverse
free

MicroSD Extender Panel Mount by falconman
...of trying to use tweezers to insert the microsd card into my mp select mini and so i purchased an extender for the microsd slot.
thingiverse
free

Label Holder by falconman
...and side loading designs. i printed these at .2 layer height, .8 mm top, bottom and sides and 20% infill using white inland pla.
thingiverse
free

Futurama Planet Express Logo Extruder Spinner by falconman
...net express logo combined with the extruder base from flying ace spinner in order to create the extruder spinner using tinkercad.
thingiverse
free

Secure Axial Fan Mount by falconman
...m hex socket screw and 3m3 nut. i printed diesel dave's fan shroud using red inland petg and my mount using red inland pla.
thingiverse
free

MP Select Mini 12V Accessory Buss by falconman
...s other applications as well.
i got the dual headers at my local microcenter, but they are available through a number of sources.
thingiverse
free
MIB Noisy Cricket Base by falconman
... gcode at layer 24 so i could swap filaments, printed it at .0875 layer height and 25 mm/sec so i could get the detail down well.
thingiverse
free

MP Select Mini 40mm ABS Fan Housing by falconman
...ing using fdm guru's design as a starting point..
for those interested in the grill:
http://www.thingiverse.com/thing:1686342
thingiverse
free

MP Maker Select V2 80mm Fan Backplate by falconman
...icro center. i paired it with an 80mm fan guard i found elsewhere on thingiverse.
printed at .175mm layer height with 20% infill.
thingiverse
free

MP Select Mini Panel by falconman
...n the bed. i split the panel into two parts with what, in woodworking terms would be a dutchman, to hold the two halves together.
thingiverse
free

Small Parts Cabinet by falconman
...fully align the long slots and press into place.
slide the drawers into the frame and fill with nuts, bolts or other small parts.
9E
3ddd
$1

Blanco Axia II 9E
...blanco axia ii 9e
3ddd
мойка , blanco
угловая мойка blanco axia ii 9e
l. 1117 p. 700
3ddd
free

Blanco / Zia 9E
...blanco / zia 9e
3ddd
blanco , мойка
мойка blanco_zia_9e со смесителем
turbosquid
$19

Sink Blanco Lantos 9E
...model sink blanco lantos 9e for download as max, obj, and fbx on turbosquid: 3d models for games, architecture, videos. (1195409)
turbosquid
$7

Sink Blanco Lantos 9E
...model sink blanco lantos 9e for download as max, obj, and fbx on turbosquid: 3d models for games, architecture, videos. (1248819)
3ddd
$1

кухонная мойка Blanco Viva 9E
...blanco viva 9e
3ddd
мойка
примерные размеры 930х510 (делал по фото мойки blanco viva 9e). в архиве сам файл и превью. без текстур
3d_export
$69

bb-9e star wars droid
...ender and materials (1.50 sp4a)<br>all textures include in *.rar files<br>lighting setup is not included in the file!
3ddd
$1

Мойка Blanco LEXA 9E и смеситель BLANCO ELIPSO-S II
...ль blanco.
модификаторturbosmooth в стеке.
модель в реальных размерах.
3ds max 2010 версии и выше, v-ray, fbx.
текстуры в архиве
3ddd
$1

IKEA ОРГЕЛЬ
...ikea оргель 3ddd ikea смоделировано по каталогуhttp://www.ikea.com/ru/ru/search/?query=%d0%9ed0%a0%d0%93%d0%95%d0%9b%d0%ac ...
3ddd
free

Подушка ИКЕА облачко ФЬЕДЕРМОЛЬН
...3ddd ikea , подушка , облако подушка икеа облачко фьедермольнhttp://www.ikea.com/ru/ru/catalog/products/20264429/?query=%d0%a4%d0%ac%d0%95%d0%94%d0%95%d0%a0%d0%9c%d0%9ed0%9b%d0%ac%d0%9d ...
3ddd
free

Ковер Орстед - IKEA
...габаритные размеры - 240x170 см. ссылка на сайт производителя -http://www.ikea.com/ru/ru/catalog/products/10211672/?query=%d0%9ed0%a0%d0%a1%d0%a2%d0%95%d0%94 !! спасибо авторам моделей игрушек и кресла, они использовались...
Bb
design_connected
$13
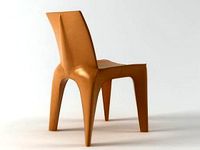
BB
...bb
designconnected
poliform bb computer generated 3d model. designed by borghi, matteo.
turbosquid
$5

bbs
... available on turbo squid, the world's leading provider of digital 3d models for visualization, films, television, and games.
turbosquid
free
bb
... available on turbo squid, the world's leading provider of digital 3d models for visualization, films, television, and games.
3ddd
$1
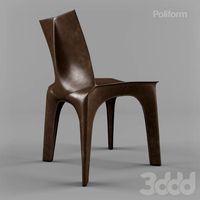
Poliform Bb chair
...poliform bb chair
3ddd
poliform , bb
poliform bb chair
3ddd
$1
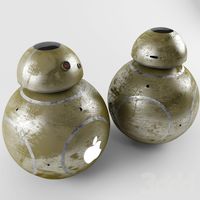
bb-8 apple
...bb-8 apple
3ddd
apple
bb-8 apple
turbosquid
$49
BB ROBOT
...urbosquid
royalty free 3d model bb robot for download as max on turbosquid: 3d models for games, architecture, videos. (1556522)
turbosquid
$11

ROBOT BB
...bosquid
royalty free 3d model robot bb for download as blend on turbosquid: 3d models for games, architecture, videos. (1336640)
turbosquid
$4
sofa bb
...turbosquid
royalty free 3d model sofa bb for download as obj on turbosquid: 3d models for games, architecture, videos. (1658053)
3ddd
$1
Quasar Royal BB
... , quasar
светильник royal bb
бренд: quasar
страна:голландия
дизайнер: van vliet edward
3d_export
free
BBS disc
...bbs disc
3dexport
Wars
3d_ocean
$10
War machine
...war machine
3docean
camuflage machine robot war war machine
war machine created in 3dmax 2009 15.497-poly count
turbosquid
$45

War
...rbosquid
royalty free 3d model war 3d model for download as on turbosquid: 3d models for games, architecture, videos. (1512087)
3d_export
$5

robot war
...robot war
3dexport
modern war robot
3d_export
$29

world war 2 and 1 war scene
...world war 2 and 1 war scene
3dexport
world war level scene
3d_export
$65

war
...war
3dexport
simple rendering of the scene file
3d_export
$5

war mech
...war mech
3dexport
war mech with texthure, animation, low poly,
3d_export
$22

war scene
...gtrader.com/3d-models/military/character/war-army https://fruits124.artstation.com/store/dbkxr/war-scene use it a complete scene.
3d_export
$5

war kitbash
...war kitbash
3dexport
kitbash included sword, spear, shield, knife, helmet, an axe for war
3d_export
$5

at at - star wars
...at at - star wars
3dexport
modelo de at at de star wars listo para texterizar, renderizar y animar.
3d_export
$5

war cannon
...war cannon
3dexport
war cannon modeling in zbrush and 3dmax unwap; yes material in substance painter and vray
Star
3ddd
$1

Rolling Stars Antic Star
...rolling stars antic star
3ddd
rolling stars , вентилятор
rolling stars antic star
turbosquid
$2

Star Shuriken (Throwing Star)
... available on turbo squid, the world's leading provider of digital 3d models for visualization, films, television, and games.
design_connected
$18
Star
...star
designconnected
helen amy murray star computer generated 3d model. designed by murray, helen amy.
3d_ocean
$2
sea star
...sea star
3docean
game star sea star space star
this model is, normally poly model. use for games screen.
3d_export
$2

star gingerbread
...star gingerbread
3dexport
"star" gingerbread in the style of the movie star wars.
turbosquid
$10

STAR
...ar
turbosquid
royalty free 3d model star for download as max on turbosquid: 3d models for games, architecture, videos. (1338162)
turbosquid
$1

Star
...ar
turbosquid
royalty free 3d model star for download as c4d on turbosquid: 3d models for games, architecture, videos. (1564546)
3d_export
$5

star sword
...star sword
3dexport
star sword
3d_export
$5

Star building
...star building
3dexport
star building
3d_export
free

ikosaedr-star
...ikosaedr-star
3dexport
ikosaedr-star