Thingiverse

Standoff for Heat Bed Power Module Expansion Board (MOSFET) for Monoprice Maker Select, Wanhao i3, Cocoon Create by rawlogic
by Thingiverse
Last crawled date: 3 years ago
If you like this thing, please, please subscribe to the 3D Printing YouTube channel "Ethan Makes". The kid really needs your support, and his goal is to reach 500 subscribers:http://goo.gl/ELT7ii
UPDATED: New and improved and addtional configurations
You may need to rotate the model to fit on your bed.
There are multiple models so that you can choose your configuration. The left configuration seems to be the most popular. If you want the MOSFET board on the left, pick the model marked left.
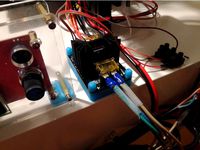
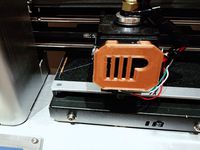
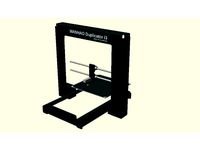
Probably everyone with a Monoprice Maker Select, Wanhao i3, or Cocoon Create who uses the heated bed should consider moving the high current and heat off of the main Melzi board to ensure long life of the main board.
The Heat Bed Power Module Expansion (MOSFET) board achieves that and is easy to install:
There are various sellers of this board, available from multiple sources such as Amazon, eBay, and Ali Express.
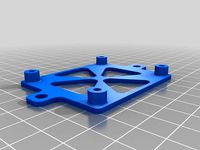
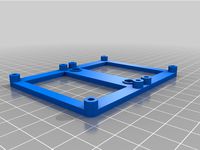
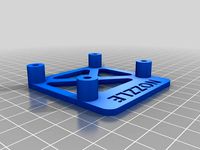
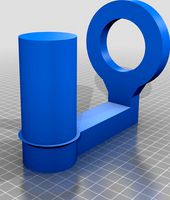
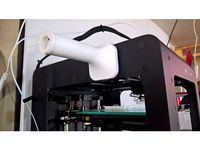
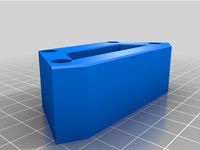
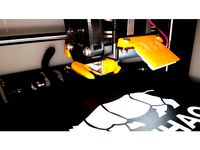
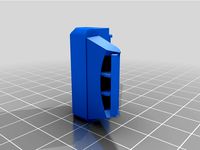
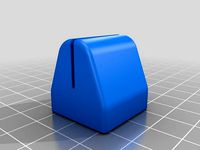
Some people are printing standoffs and taping or hot gluing them in. I wanted something a bit easier and more secure. This standoff fits over two of the existing standoffs for the main board, and so it is firmly screwed in place.
Parts needed (single MOSFET board):
4 x M3x5mm 0.5mm pitch screws (can use up to 6mm length)
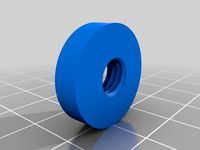
4 x nylon washers
14awg or 12awg wire
The threads on the standoff are M3 0.5mm, the same as the original standoffs for the main board. Buy 4 M3X5mm (0.5mm pitch) screws and 4 nylon washers. You'll use the 4 screws and washers to mount the expansion board to the standoff.
Purchase Links:MOSFET board14awg WireRing TerminalsTerminal Connectors (preferred)Terminal Connectors (pluggable)
Installation Instructions:
Remove the SD card from your printer's control box
Disassemble the control box
Remove the existing Melzi main board from the control box (keep the screws and washers)
Screw the MOSFET expansion board to the printed standoff using the 4 new washers and screws
Place the larger, unthreaded, holes of the printed standoff over the middle two standoffs built into the control box cover for the main board. (Note: You can install the standoff feet up or feet down.)
Screw the main board back in over top, using the original 4 washers and screws
Use the wiring diagram for your MOSFET board (provided by the seller) to finish the installation
Be sure to remove the SD card before you remove the main board to ensure that you don't damage the SD slot when removing the board.
Read more about the problem here:The Melzi Problem, or, Why Did My Wanhao i3 Duplicator Catch on Fire?
Control box disassembly video:https://www.youtube.com/watch?v=bXQ1gAid17Y
UPDATED: New and improved and addtional configurations
You may need to rotate the model to fit on your bed.
There are multiple models so that you can choose your configuration. The left configuration seems to be the most popular. If you want the MOSFET board on the left, pick the model marked left.
Probably everyone with a Monoprice Maker Select, Wanhao i3, or Cocoon Create who uses the heated bed should consider moving the high current and heat off of the main Melzi board to ensure long life of the main board.
The Heat Bed Power Module Expansion (MOSFET) board achieves that and is easy to install:
There are various sellers of this board, available from multiple sources such as Amazon, eBay, and Ali Express.
Some people are printing standoffs and taping or hot gluing them in. I wanted something a bit easier and more secure. This standoff fits over two of the existing standoffs for the main board, and so it is firmly screwed in place.
Parts needed (single MOSFET board):
4 x M3x5mm 0.5mm pitch screws (can use up to 6mm length)
4 x nylon washers
14awg or 12awg wire
The threads on the standoff are M3 0.5mm, the same as the original standoffs for the main board. Buy 4 M3X5mm (0.5mm pitch) screws and 4 nylon washers. You'll use the 4 screws and washers to mount the expansion board to the standoff.
Purchase Links:MOSFET board14awg WireRing TerminalsTerminal Connectors (preferred)Terminal Connectors (pluggable)
Installation Instructions:
Remove the SD card from your printer's control box
Disassemble the control box
Remove the existing Melzi main board from the control box (keep the screws and washers)
Screw the MOSFET expansion board to the printed standoff using the 4 new washers and screws
Place the larger, unthreaded, holes of the printed standoff over the middle two standoffs built into the control box cover for the main board. (Note: You can install the standoff feet up or feet down.)
Screw the main board back in over top, using the original 4 washers and screws
Use the wiring diagram for your MOSFET board (provided by the seller) to finish the installation
Be sure to remove the SD card before you remove the main board to ensure that you don't damage the SD slot when removing the board.
Read more about the problem here:The Melzi Problem, or, Why Did My Wanhao i3 Duplicator Catch on Fire?
Control box disassembly video:https://www.youtube.com/watch?v=bXQ1gAid17Y
Similar models
thingiverse
free

Adapter to install BigTreeTech SKR V1.4 in Wanhao Duplicator i3 (Replacing Melzi board) by bensigsworth
...ting pillars for the skr and mosfet m3 as required.
print 4 washers to trap the bracket into position using the 4 original screws
thingiverse
free

Wanhao I3 v2 / Maker Select mounting bracket for FYSETC 67*32mm mosfet by ej0rge
...mosfet: https://www.ebay.com/itm/3d-printer-heating-controller-30a-heatbed-mks-mos-mosfet-module-expansion-te828/372426348189 https://www.aliexpress.com/item/new-hot-3d-printer-accessories-heating-controller-30a-heatbed-mks-mos-mosfet-module-expansion-8/32888946495.html inspired by but not remixed from similar ...
thingiverse
free

Mount for BIQU Heated Bed MOSFET Board
...fan shroud
bracket for thorped's fan duct
adjustable bltouch front mount for wanhao i3
mount for biqu heated bed mosfet board
thingiverse
free

Standoff for Heat Bed Power Module Expansion Board For BQ Prusa I3 Hephestos by dazzlesp
... to screw the mosfet board, and made two parts (holes) so i can attach it to the side of the printer with a bracket. (easy peasy)
thingiverse
free

Wanhao I3 Control Box Extension For MOSFET & 120mm Fan
...so, i want to suspend my control box under my lack enclosure, so having the box extension flush on the top surface was essential.
thingiverse
free

Wanhao i3: Ramps, Rasp Pi, and Mosfet Control Box Combo Adapter by OmNomNomagon
...switch out sd cards, however this is not really an issue if you also are also moving to octopi.
i also recommend this ramps guide
thingiverse
free

Monoprice Maker Select v2 Mosfet Mount by Ngoc1d
... the melzi board mount screw base. please attach the bracket to the mosfet first then mount it under the melzi board screw base.
thingiverse
free

TriGorilla mosfet bracket for Wanhao Duplicator/ Monoprice Maker Select by CerialPhreak
...with the controller board. this will fit around the mounting standoffs for the controller board on the display-side of the board.
thingiverse
free

Wanhoa i3 Mosfet bracket by rcflyers
...board screws and slip this bracket over the 2 case studs nearest to the lcd display.
then refit the board and connect the wiring.
thingiverse
free

Shorter MOSFET Mounting Bracket for Monoprice Maker Select V2, Cocoon Create, Wanhao i3 by patprints
...iring info: http://3dprinterwiki.info/wiki/wanhao-duplicator-i3/di3-advanced-mods/heatbed-terminal-burning-fix-with-mosfet-board/
Rawlogic
thingiverse
free

Gazebo Bird Feeder Cap (Cherry Valley, Woodlink, Kay Home Products) by rawlogic
...iverse
in case the squirrels chewed yours off too. here's a replacement. hopefully, you can print faster than they can chew.
thingiverse
free

Filament Guide by rawlogic
...you shouldn't need a raft or any supports. if you have problems with shrinkage and lifting on the bottom corners, try a brim.
thingiverse
free
Prusa MK3 vs CR-10S4 Cube Vase Test by rawlogic
.... print with pla. nozzle temp is 215c.
more info about the prusa issue here:https://github.com/prusa3d/prusa-firmware/issues/602
thingiverse
free

Vinyl Picket Fence Cap (7/8" x 3") by rawlogic
...ort:http://goo.gl/elt7ii
replacement cap for your 7/8" x 3" vinyl picket fence. comes in any color to match your fence.
thingiverse
free

Pyramid Puzzle by rawlogic
...or the best.
put the glue in a small bead all the way around the filament "pegs", then snap together and hold or clamp.
thingiverse
free

Fidget Bi-Spinner Knurled 608 Bearing by rawlogic
...to print mine at 100.8% on the x and y for tolerances, otherwise the bearings were too tight. your filament and printer may vary.
thingiverse
free

Part Remover Razor Scraper by rawlogic
...s too snug to fit over the razor blade. this will depend on your printer tolerances, filament, and the razor blades that you buy.
thingiverse
free

Identical Twins Puzzle by rawlogic
...to 98.7654%. if your first layer is too squished, you will probably need to trim off the brim. the pieces are intentionally snug.
thingiverse
free

Maytag Refrigerator Temperature Knob by rawlogic
... there are some overhangs on the bottom, but it's not in a place that will be visible. your printer should be able to bridge.
thingiverse
free

Personalized Glowing Valentines for Kids Remake by rawlogic
...rameter.
make sure the .dxf files are in the same folder as the .scad file.
just in case, maybe tell the kids not to eat them. :)
Cocoon
turbosquid
$29

cocoon
...y free 3d model cocoon for download as c4d, obj, fbx, and 3ds on turbosquid: 3d models for games, architecture, videos. (1559035)
3ddd
$1

Cocoon
...cocoon
3ddd
roche bobois
1600x1600
3ddd
$1
Heal Cocoon Chair
...heal cocoon chair
3ddd
heal , cocoon
heal cocoon chair
3d_export
$6

COCOON - PURIST BATH
...cocoon - purist bath
3dexport
inspired by cocoon -
3d_export
$6

COCOON - ZEN BATH
...- zen bath
3dexport
bathtub from cocoon ( bycocoon ) with cocoon jp collection faucets. manufacturer : preview renders - corona
archive3d
free

Cocoon 3D Model
...hive3d
cocoon seat canopy
cocoon canopy - 3d model (*.gsm+*.3ds) for interior 3d visualization.
3ddd
$1

MacMaster Cocoon Pendant Light
...macmaster cocoon pendant light
3ddd
macmaster , cocoon
подвесная люстра от серии cocoon
turbosquid
$14
Cocoon armchair
...ee 3d model cocoon armchair for download as max, obj, and fbx on turbosquid: 3d models for games, architecture, videos. (1396538)
3ddd
$1

Eglo / Cocoon Pinneti 91903
...03
3ddd
eglo
eglo cocoon pinneti 91903http://www.eglo.com/international/produkte/interior-lighting/cocoon/pinneti/91903
3ddd
$1

Cocoon Couture
...cocoon couture
3ddd
вешалка
https://www.cocooncouture.com/room_accessories.php
Mosfet
3d_export
$5

IC SMD Package TO263
...used for different types of semiconductors, such as transistor, mosfet voltage regulators and etcetra. a surface mount device for...
thingiverse
free
Support Mosfet
...support mosfet
thingiverse
support mosfet
remplissage 20%
thingiverse
free

i3 MOSFET Holder / i3 MOSFET Halter by JMDesigns
...i3 mosfet holder / i3 mosfet halter by jmdesigns
thingiverse
i3 mosfet holder / i3 mosfet halter
thingiverse
free
MOSFET Holder / MOSFET Halter 20x20 Extrusion by JMDesigns
...mosfet holder / mosfet halter 20x20 extrusion by jmdesigns
thingiverse
mosfet holder / mosfet halter 20x20 extrusion
thingiverse
free

TO-220 MOSFET Holder
...to-220 mosfet holder
thingiverse
this will hold 3x to-220 mosfets. the mosfets will snap into place.
free3d
free

MOSFET
...mosfet
free3d
metal oxide semiconductor field effect transistor
thingiverse
free
Double Mosfet Holder for Lerdge Mosfet Board by LorDXEO
... board by lordxeo
thingiverse
dual mosfet holder for lergde mosfet modules.
holes for m3 screws, you can also use brass inserts.
thingiverse
free
MOSFET Case by Nbbwarhammer
...mosfet case by nbbwarhammer
thingiverse
a case for mosfet.
thingiverse
free
MOSFET Support
...
2 3mm screws
design
i have uploaded the freecad design that i made, so you can remix it and mod it.
i hope it is useful for you!
thingiverse
free
mosfet holders by paulsonia
...mosfet holders by paulsonia
thingiverse
two mosfet holders
Monoprice
thingiverse
free

Display frame for Monoprice MP10
...display frame for monoprice mp10
thingiverse
display frame for monoprice mp10
thingiverse
free

Bridge covers Monoprice MP10
...bridge covers monoprice mp10
thingiverse
bridge covers monoprice mp10
thingiverse
free
Monoprice Coin by Peyton_Guyot
...monoprice coin by peyton_guyot
thingiverse
print this!
thingiverse
free
Voxel Monoprice spool holder by avalero
...voxel monoprice spool holder by avalero
thingiverse
voxel monoprice spool holder
thingiverse
free
Monoprice select mini knob by BramRausch
...monoprice select mini knob by bramrausch
thingiverse
this is a replacement knob for the monoprice select mini.
thingiverse
free

Monoprice 3d printer hook by dmitriyf
...monoprice 3d printer hook by dmitriyf
thingiverse
this is an attachment to monoprice select 3d printer v2
thingiverse
free
monoprice ultimate spool mount by death4u
...older by danmannert to monoprice ultimate 3d printer. it clips into the slot on the top of the printer for the optional enclosue.
thingiverse
free
Monoprice Mini Delta Foot
...a foot for a monoprice mini delta. it helps to increase airflow under the printer. it also helps to reduce the volume of the fan.
thingiverse
free
Monoprice Select Mini Fan Guard
...y fan protection. this is an essential upgrade.
used it on the monoprice select mini pro (from www.3dprinthings.be).
perfect fit!
thingiverse
free

Monoprice Cable Tie Mount
... but had to cut down the straps a bit to make them work. designed a quick mount that fits the full strap, item 6457 on monoprice.
Wanhao
thingiverse
free
Wanhao Logo Plate / Wanhao Logo Schild by JMDesigns
...wanhao logo plate / wanhao logo schild by jmdesigns
thingiverse
wanhao logo plate / wanhao logo schild
thingiverse
free
Wanhao logo by nebtio
...wanhao logo by nebtio
thingiverse
wanhao logo
thingiverse
free
Wanhao keychain by Rein3003
...wanhao keychain by rein3003
thingiverse
a keychain with the logo of wanhao
thingiverse
free
Wanhao Di3 v2 Light / Wanhao Di3 v2 Beleuchtung by JMDesigns
...wanhao di3 v2 light / wanhao di3 v2 beleuchtung by jmdesigns
thingiverse
wanhao di3 v2 light / wanhao di3 v2 beleuchtung
thingiverse
free
TUSH For Wanhao by wtmi1992
...tush for wanhao by wtmi1992
thingiverse
the ultimate spool holder, modified for the top of the wanhao control box. fits snug.
thingiverse
free
fanduct wanhao d12 by theopoilmek
...fanduct wanhao d12 by theopoilmek
thingiverse
fanduct pour wanhao d12
thingiverse
free
Wanhao i3 Marlin by johan21
...wanhao i3 marlin by johan21
thingiverse
marlin for wanhao i3 rampsboard 1.4.
thingiverse
free
Wanhao Duplicator i3 by imagineering4
...wanhao duplicator i3 by imagineering4
thingiverse
these are the stl files for the improvements to the wanhao duplicator i3, v2
thingiverse
free

Wanhao D6 filament guard
...wanhao d6 filament guard
thingiverse
this is a filament guard for wanhao d6 machine to avoid the filament unrolling
thingiverse
free
Wanhao Duplicator i3 Model by Hilde3D
...wanhao duplicator i3 model by hilde3d
thingiverse
wanhao duplicator i3 model
Standoff
cg_studio
$30

AGM-154A Joint Standoff Weapon3d model
...
.3ds .c4d .lwo .max - agm-154a joint standoff weapon 3d model, royalty free license available, instant download after purchase.
3d_export
$5

smoke from standoff 2
...m uv.<br>texturs – substanse painter.<br>render - substanse painter iray.<br>model for octane render, unreal 4.
cg_studio
$89

Aim-9M3d model
...joint direct attack munition jdam aim9x aim-9x aim-9m jsow standoff raytheon usaf war warfare combat air semi sidewinder snake...
3d_export
$60

northrop grumman b-2 spirit
...the only acknowledged aircraft that can carry large air-to-surface standoff in a stealth...
3d_export
$15

nimrod anti tank missile
...industries. while primarily designed for anti-tank use, it provides standoff strike capability against a variety of point targets such...
thingiverse
free

20x20 standoff
...20x20 standoff
thingiverse
standoff for 8mm linear rails.
standoff distance 20mm
thingiverse
free

Standoff by charlespax
...standoff by charlespax
thingiverse
this is a standoff created to hold up a friend's monitor.
thingiverse
free

Standoff Holder by jfaller
...standoff holder by jfaller
thingiverse
holder for for m3x6 standoff.
thingiverse
free

Commodore 64 Standoffs
...odore 64. cut off old standoffs, sand smooth then attach these standoffs with epoxy. be sure to align with the holes in the case.
thingiverse
free

BTS7960 Standoff by AlbaTito
...bts7960 standoff by albatito
thingiverse
standoff for bts7960. m3 hardware
Expansion
turbosquid
$42

Expansion tank
...d model expansion tank for download as 3ds, max, obj, and fbx on turbosquid: 3d models for games, architecture, videos. (1207393)
3d_export
$50

Expansion Joint 3D Model
...expansion joint 3d model
3dexport
expansion joint 3d model stargazer 4537 3dexport
turbosquid
$25
Titanic Expansion Joint
... available on turbo squid, the world's leading provider of digital 3d models for visualization, films, television, and games.
3d_export
$5
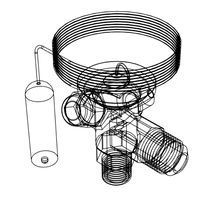
thermostatic expansion valve
...thermostatic expansion valve
3dexport
3d model stl of fusion 360.
3d_ocean
$15
Dungeon Tileset01 Expansion 1
...m/dungeon-tileset01-base/4625640 including stairs, tiles to make large rooms and a new texture that works with the tiles in th...
turbosquid
$20

Cartoon Corgi Banana Costume Expansion Pack
...artoon corgi banana costume expansion pack for download as ma on turbosquid: 3d models for games, architecture, videos. (1445388)
3ddd
$1

Hichory chair Ingold Oval Expansion
...kitchen-furniture/1911-collection/i510089-ingold-oval-expansion-top-mahogany-and-185-11-ingold-3-leg-pedestal-base.aspx
turbosquid
$299

Sci-Fi Dark Space Game Kit plus Expansion Pack
... available on turbo squid, the world's leading provider of digital 3d models for visualization, films, television, and games.
3d_export
$5

Swedish wall
...swedish wall 3dexport swedish wall, expansion wall bars, stairs for children, horizontal bar for...
3d_export
$10

External HDD 3D Model
...hard disk drive external seagate usb storage hdd portable expansion data mobile external hdd 3d model nkfrds 47740...
I3
3d_export
$10

suv i3
...suv i3
3dexport
suv i3 2013 series
3d_ocean
$89

BMW i3 2012
...y, in real units of measurement, qualitatively and maximally close to the original. model formats: - *.max (3ds max 2008 scanl...
cg_studio
$99

BMW i3 20143d model
...
cgstudio
.3ds .c4d .fbx .lwo .max .obj - bmw i3 2014 3d model, royalty free license available, instant download after purchase.
cg_studio
$99

BMW i3 20123d model
...tudio
.3ds .c4d .fbx .lwo .max .mb .obj - bmw i3 2012 3d model, royalty free license available, instant download after purchase.
cg_studio
$99

BMW i3 20143d model
...tudio
.3ds .c4d .fbx .lwo .max .mb .obj - bmw i3 2014 3d model, royalty free license available, instant download after purchase.
humster3d
$75

3D model of BMW i3 2014
...
buy a detailed 3d model of bmw i3 2014 in various file formats. all our 3d models were created maximally close to the original.
humster3d
$40

3D model of Kitchen Set I3
...uy a detailed 3d model of kitchen set i3 in various file formats. all our 3d models were created maximally close to the original.
3d_ocean
$30

Kitchen set i3
...ensils oven plates shelves sink table ware
kitchen set i3 include 3d models: cooker, oven, sink, cupboards, table, chair, plates.
3d_ocean
$89

BMW i3 2014
...y, in real units of measurement, qualitatively and maximally close to the original. model formats: - *.max (3ds max 2008 scanl...
cg_studio
$99

BMW i3 Concept 20113d model
...i3
.3ds .c4d .fbx .lwo .max .obj - bmw i3 concept 2011 3d model, royalty free license available, instant download after purchase.
Select
3ddd
$1

TUBADZIN SELECT
...max 2014, 2011.
fbx 2014, 2013, 2011,
obj
_____________________________________http://www.tubadzin.pl/en/collection/324
3ddd
$1
Плитка Selection
... supergres , плитка
плитка selection - supergres ceramiche
turbosquid
$15
Christmas Selection
...royalty free 3d model christmas selection for download as fbx on turbosquid: 3d models for games, architecture, videos. (1696333)
turbosquid
$39

Vases selection
... available on turbo squid, the world's leading provider of digital 3d models for visualization, films, television, and games.
turbosquid
free

SELECTIVE RACKING SYSTEM
...yalty free 3d model selective racking system for download as on turbosquid: 3d models for games, architecture, videos. (1282512)
turbosquid
$10
Hansgrohe ShowerTablet Select
...ee 3d model hansgrohe showertablet select for download as max on turbosquid: 3d models for games, architecture, videos. (1336955)
turbosquid
$29
Chill selectional sofa
...odel chill selectional sofa for download as max, obj, and fbx on turbosquid: 3d models for games, architecture, videos. (1465691)
3ddd
free

Lunaria - Nova, ASA Selection
... asa selection , dried flowers
ветка лунарии в вазе nova, asa selection
3ddd
$1
inno SELECT SLIM chair
...inno select slim chair
3ddd
inno
high detailed inno select slim chair
turbosquid
$29

Select Chaise Lounge
... available on turbo squid, the world's leading provider of digital 3d models for visualization, films, television, and games.
Heat
3d_export
$5
heat
...heat
3dexport
heat tool
3ddd
$1
electric heating
...electric heating
3ddd
обогреватель
electric heating
3d_export
$6
The heating module
...any questions also you can email to me. designed with solidworks 2017, render with keyshot **************************************
turbosquid
$2
Heating Radiator
...
royalty free 3d model heating radiator for download as blend on turbosquid: 3d models for games, architecture, videos. (1561908)
3d_export
$35
heating instalation with heat pump and solar system
...el , please contact me. before buying a model, you can try to download one of my free models and testing. thank you for watching.
turbosquid
$29
Heating Mantle
... available on turbo squid, the world's leading provider of digital 3d models for visualization, films, television, and games.
turbosquid
$25
Heating Radiator
... available on turbo squid, the world's leading provider of digital 3d models for visualization, films, television, and games.
turbosquid
$20
AT_airship_control_stand_(heated)
... available on turbo squid, the world's leading provider of digital 3d models for visualization, films, television, and games.
turbosquid
$20
AT_airship_(heated)
... available on turbo squid, the world's leading provider of digital 3d models for visualization, films, television, and games.
turbosquid
$10

Heating radiator
... available on turbo squid, the world's leading provider of digital 3d models for visualization, films, television, and games.
Module
turbosquid
$4

Module
...
turbosquid
royalty free 3d model module for download as max on turbosquid: 3d models for games, architecture, videos. (1259603)
3d_export
free

Martian module
...martian module
3dexport
martian module objects 18 textures are missing
design_connected
$39

Kennedee Moduls
...kennedee moduls
designconnected
kennedee moduls computer generated 3d model. designed by massaud, jean-marie.
design_connected
$39
Sayonara Moduls
...sayonara moduls
designconnected
bbb emmebonacina sayonara moduls computer generated 3d model. designed by decursu, giorgio.
design_connected
$27

Togo Moduls
...togo moduls
designconnected
ligne roset togo moduls computer generated 3d model. designed by ducaroy, michel.
design_connected
$34
Nuvola Moduls
...nuvola moduls
designconnected
bonaldo nuvola moduls 2-seater computer generated 3d model. designed by giuseppe viganò.
3d_export
free
Hibernation module
...hibernation module
3dexport
design_connected
$27
Sabi moduls
...sabi moduls
designconnected
paola lenti sabi moduls 2-seater computer generated 3d model. designed by francesco rota.
3d_export
$50

pls concrete module
...pls concrete module
3dexport
pls concrete module<br>pls with concrete mobile mixer module m5
turbosquid
free

Hibernation module
...squid
free 3d model hibernation module for download as blend on turbosquid: 3d models for games, architecture, videos. (1667696)
Board
archibase_planet
free
Board
...e planet
board information board bulletin board
board information n310813 - 3d model (*.gsm+*.3ds) for interior 3d visualization.
archibase_planet
free
Board
...board
archibase planet
board cutting board kitchen ware
board n051011 - 3d model (*.gsm+*.3ds) for interior 3d visualization.
archibase_planet
free

Board
...board
archibase planet
board blackboard school board
board school n290114 - 3d model (*.gsm+*.3ds) for interior 3d visualization.
archibase_planet
free

Board
...board
archibase planet
slate board
board - 3d model (*.gsm+*.3ds) for interior 3d visualization.
archibase_planet
free
Board
...board
archibase planet
blackboard board school furniture
board - 3d model for interior 3d visualization.
archibase_planet
free
Board
...board
archibase planet
board shelf stand
board - 3d model (*.gsm+*.3ds) for interior 3d visualization.
archibase_planet
free

Board
...board
archibase planet
kitchen ware board
board - 3d model (*.gsm+*.3ds) for interior 3d visualization.
archibase_planet
free

Board
...board
archibase planet
kitchen ware board
board n150410 - 3d model (*.gsm+*.3ds) for interior 3d visualization.
archibase_planet
free

Board
...board
archibase planet
board office supplies stationery
board - 3d model (*.gsm+*.3ds) for interior 3d visualization.
archibase_planet
free

Board
...board
archibase planet
board gym
board evminov n240613 - 3d model (*.gsm+*.3ds) for interior 3d visualization.
Power
turbosquid
$100

power
...ower
turbosquid
royalty free 3d model power for download as on turbosquid: 3d models for games, architecture, videos. (1421990)
3d_export
$5

Power
...power
3dexport
3d_export
$5

power outlets
...power outlets
3dexport
power outlets
3ddd
$1

lion power
...lion power
3ddd
лев , статуя
lion power gold sculpture
3ddd
$1

Sea Power
...
компас , море , часы
часы с компасом sea power
3ddd
free

Meridiani / Power
...power
3ddd
meridiani , круглый
стол power производитель meridiani, диаметр 120,высота 67
3d_export
$5

Power Surge
...power surge
3dexport
the power surge is a all mesh carnival ride to lower in game part count and lag
turbosquid
$8

Airport Ground Power Unit (AXA Power )
... available on turbo squid, the world's leading provider of digital 3d models for visualization, films, television, and games.
turbosquid
$50

Power Houser
...rbosquid
royalty free 3d model power houser for download as on turbosquid: 3d models for games, architecture, videos. (1333800)
3d_export
$5

power outlet
...power outlet
3dexport
power outlet<br>format file maya 2018, 3d max 2017, obj, fbx
Bed
3ddd
$1

bed
...bed
3ddd
bed , постельное белье
bed
3ddd
$1

bed
...bed
3ddd
bed , постельное белье
bed
3ddd
$1

bed
...bed
3ddd
bed , постельное белье
bed
3ddd
$1

bed
...bed
3ddd
bed , постельное белье
bed
3ddd
$1

bed
...bed
3ddd
bed , постельное белье
bed
3ddd
$1

bed
...bed
3ddd
bed , постельное белье
bed
3ddd
free

bed
...bed
3ddd
bed , постельное белье
bed
3ddd
free

bed
...bed
3ddd
bed , постельное белье
bed
3ddd
$1

Bed
...bed
3ddd
bed , постельное белье , постель
bed
3d_export
$7

bed adairs bed
...rs bed
3dexport
bed adairs bed in modern style. if you want a smoother surface, please turn on turbosmooth in the modifier list.
Maker
3d_ocean
$17
Coffee Maker
...coffee maker
3docean
breakfast coffee drip electric maker morning
detailed coffee maker and a plug.
3ddd
$1
coffee maker
...coffee maker
3ddd
кофемашина
coffee maker
3d_export
$10
chapati maker
...chapati maker
3dexport
it is a indian traditional chapati maker
archibase_planet
free
Coffee maker
...aker
archibase planet
percolator coffee-machine coffee maker
coffee maker - 3d model (*.gsm+*.3ds) for interior 3d visualization.
archibase_planet
free
Coffee maker
...aker
archibase planet
percolator coffee-machine coffee maker
coffee maker - 3d model (*.gsm+*.3ds) for interior 3d visualization.
archibase_planet
free
Coffee maker
...aker
archibase planet
percolator coffee-machine coffee maker
coffee maker - 3d model (*.gsm+*.3ds) for interior 3d visualization.
archibase_planet
free

Сoffee maker
...er
archibase planet
coffee maker percolator coffee-machine
сoffee maker n020112 - 3d model (*.3ds) for interior 3d visualization.
archibase_planet
free

Coffee maker
...aker
archibase planet
coffee maker percolator coffee-machine
coffee maker - 3d model (*.gsm+*.3ds) for interior 3d visualization.
3ddd
$1

Juice Maker
...juice maker
3ddd
соковыжималка
fully detailed kenwood juice maker
archibase_planet
free
Coffee maker
...hibase planet
coffee maker percolator coffee-machine
coffee maker n140611 - 3d model (*.gsm+*.3ds) for interior 3d visualization.
Create
turbosquid
free

creates
... available on turbo squid, the world's leading provider of digital 3d models for visualization, films, television, and games.
turbosquid
free

creat
... available on turbo squid, the world's leading provider of digital 3d models for visualization, films, television, and games.
3ddd
$1
Диван Create Classics
...диван create classics
3ddd
диван create classics
3d_export
$5

Blank for creating a robot
...blank for creating a robot
3dexport
a blank for creating a female robot, or an anthropomorphic creature.
turbosquid
$38

Create a snow scene
...royalty free 3d model create a snow scene for download as fbx on turbosquid: 3d models for games, architecture, videos. (1493726)
turbosquid
$30

Create a tropical scene
...lty free 3d model create a tropical scene for download as fbx on turbosquid: 3d models for games, architecture, videos. (1493052)
turbosquid
$10

Ammo Create Set
...lty free 3d model ammo create set for download as max and fbx on turbosquid: 3d models for games, architecture, videos. (1349983)
turbosquid
$4

Hand Painted Create
...free 3d model hand painted create for download as max and fbx on turbosquid: 3d models for games, architecture, videos. (1304173)
turbosquid
$15
Sculptural Twists And Turns Create
... model sculptural twists and turns create for download as max on turbosquid: 3d models for games, architecture, videos. (1449864)
turbosquid
$30

Wacom Bamboo Create Tablet
... available on turbo squid, the world's leading provider of digital 3d models for visualization, films, television, and games.