Thingiverse
Stacking Pet Food Pod Dispenser (For Sheba-Style Food Pods) by wrthg
by Thingiverse
Last crawled date: 2 years, 10 months ago
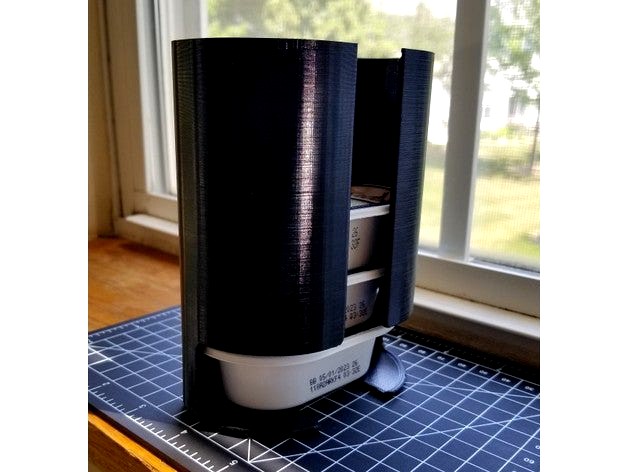
Stacking pet food pod dispenser for Sheba-Style single-serving pet food containers! This design enables you to quickly load and dispense individual pods for your pet's meal, saving shelf real-estate and allowing for easy scalability when additional capacity is desired!
DESCRIPTION:
Each stack (A) is designed to contain a total of six (6) individual meal Pods with each additional stack (B) adding an extra six to your maximum Pod capacity. Below are the required combinations based on the total Pods purchased.
6 Pods: Stack A 00
12 Pods: 1X Stack A00, 1X Stack B00
18 Pods: 1X Stack A00, 2X Stack B00
24 Pods: 1X Stack A00, 3X Stack B00
INSTALLATION:
Hardware: #6 Screws and compatible Drywall Anchors. Double-sided adhesive tape can be used however is not recommended.
Tools: Phillips Head Screwdriver; Drill w/ #6 Anchor compatible drill bit.
Begin by aligning and leveling Stack A00 in the desired location and orientation. Mark the screw/anchor location by tracing the through-hole slots located on the rear wall of Stack A00. Remove the Stack and install two Drywall Anchors (or equivalent). Once complete, mount Stack A00 via two #6 screws and hand-tighten. All Stacks feature mounting "slots" to adjust and level the Stack after installation. This configuration allows for a maximum of six total Pods to be inserted.
To increase Pod capacity:
Print and mount layers of Stack B00 onto Stack A00 to reach desired Pod capacity. It is advised to use an additional Drywall Anchor (or equivalent) for the top-most mounting hole of the top-most Stack, and/or every other Stack, depending on the total count. As detailed in the installation of Stack A00, initially fit each Stack B00 and trace the desired wall location for Anchor installation. Once the hole is drilled and Anchor installed, re-insert each Stack B00 and hand-tighten the #6 screws to retain the assembly. The final assy can be re-adjusted by shifted the stack(s) along the slotted mounting holes.
Once installed, load your Pods into the completed Stack and dispense by drawing the bottom-most Pod. The remaining Pod stack will drop down to present the next available Pod for dispensing!
Similar models
grabcad
free

Helmet Holder
...helmet holder
grabcad
top hole needs longer screw or plastic anchor if installing in drywall
thingiverse
free

Audi b7 Grille Wall Mount by SLC3DP
...l bit
i have added a .jpg of the layout for where to make the holes on the wall. i would highly recommend having a level near by.
cults
free

iPhone 6, 6S and 6+ wall dock
...rywall anchor. drill out the hole, place the anchor and secure the wall cleat with a drywall screw. slide iphone dock onto cleat.
thingiverse
free

mikes plant shelf by mikesnyder2019
...helf by mikesnyder2019
thingiverse
just my design of a plant shelf just drill two holes to mount using drywall anchors simple.
thingiverse
free

Drywall Anchor by xxsxx
...elt like making one instead of trying someone else's. works pretty well. made to fit a 1/4" hole and a #6 drywall screw.
thingiverse
free

Coat/Utility Hook by DROP_DB
...coat/utility hook by drop_db
thingiverse
holes are sized to fit this style of self-drilling drywall anchor.
thingiverse
free

furniture wall mount by JASTANG86
...e
requires drywall anchor and 2 pocket screws. screw mount to the wall using anchor then attach to furniture using pocket screws
thingiverse
free

RONRAYSING X-POD RACER V2 by RONRAYSING
...r unibody of your choice for screw mounts, or glue it if desired. (gluing is not recomeneded)
customize it however you wanted it.
turbosquid
$19

Pet Food Sheba Classics in Pastete Salmon 85g 2021
...assics in pastete salmon 85g 2021 for download as max and max on turbosquid: 3d models for games, architecture, videos. (1712053)
thingiverse
free

Drywall Screw Anchor Split
...dded a split to the original thing in order to get better support when installed in dryawall. anchor will expand when screwed in.
Sheba
turbosquid
$99

Ancient Sheba civilization
...ent sheba civilization for download as 3ds, obj, dxf, and fbx on turbosquid: 3d models for games, architecture, videos. (1689945)
turbosquid
$19
Pet Food Sheba Classics in Pastete Salmon 85g 2021
...assics in pastete salmon 85g 2021 for download as max and max on turbosquid: 3d models for games, architecture, videos. (1712053)
thingiverse
free

Cat food tray holder for Sheba 85g trays by reefab
... trays do not have a standard shape so existing holders do not work.
this requires 4x 10mm diameter and 4mm height stick-on feet.
grabcad
free

Sheba Coin
...sheba coin
grabcad
golden sheba coin
grabcad
free

ETHIOPIAN AIRLINES
...ethiopian airlines grabcad queen of sheba ...
grabcad
free

Wholesale Ethiopian Opal Gemstones Beads Strands
...opal gemstones beads strands grabcad the legend of queen sheba#39;s adoration of ethiopian opal adds to its allure and...
3dwarehouse
free

Sheba
...sheba
3dwarehouse
another one of my cats. she is a lot bigger now. #cat #gray #kitten #orange #sheba
3dwarehouse
free

Glou-Sheba House
...glou-sheba house
3dwarehouse
a house in windhoek, namibia #gloudina #house #ludwigsdorf #namibia #sheba #windhoek
3dwarehouse
free

Sheba island
...nd
3dwarehouse
this is a island from dog world i first thought of this when i was in second grade #large_exiting_buildings_cliff
Wrthg
thingiverse
free

Exacto Knife Blade Sheath by wrthg
...erse
very simple blade and handle cover for your hobby knives. this will accept any standard exacto knife handle and blade type.
thingiverse
free

Universal(ish) Appliance Knob by wrthg
...shaft size is a standard so this would work for any appliance, just double check to be safe. designed around a broken dryer knob.
thingiverse
free

SHOWER SOAP TRAY (REMOVABLE) by wrthg
...ng. i have also included the solidworks part if anyone wants to change the double sided tape dimensions to utilize 3m or similar.
thingiverse
free

Angle Translator by wrthg
...ulder bolt with a length of 45mm and a matching nut to mate the two sections. thread the bolt through and insert the nut. simple.
thingiverse
free

Anet A6 Y-Axis Motor Plate by wrthg
... makes it easy to rought 14 and 16 awg wires from the power supply to the main board. perfect for replacing your stock component.
thingiverse
free

Ultimaker 2+ Right Side Fan Duct by wrthg
...usion, a narrower air outlet for more forceful airflow as well as improved mounting holes to fit your ultimaker stock fan better.
thingiverse
free

Ulitmaker 2+ Left Fan Duct Replacement by wrthg
...xtrusion point of the printer head. remodeled the mounting holes so the stock ultimaker fans mount correctly and align perfectly.
thingiverse
free

Desktop Water Cooling Pump Base by wrthg
...ered by the radiator. with this mount you can extend the position of the pump away from the case and choose a better orientation.
thingiverse
free

Heat exhaust for Frankenstein E3D V6 carriage by wrthg
...t end exhaust and now my heat is dumped up and away from the carriage altogether. try it out for yourself and see what you think.
thingiverse
free

Anet A6 Y-Axis Limit Switch Mounting Plate by wrthg
...ensions with all original mounting features this will be a direct drop in replacement! works for both the anet a6 as well as a8.
Pods
design_connected
$13

Pod
...pod
designconnected
niche modern pod computer generated 3d model. designed by pyles, jeremy.
3d_export
$5

engine pod
...engine pod
3dexport
engine pod
turbosquid
$80
POD
...pod
turbosquid
royalty free 3d model pod for download as 3ds on turbosquid: 3d models for games, architecture, videos. (1234976)
3ddd
$1
Pod 325
...pod 325
3ddd
пуф
pod 325
turbosquid
$4
PODS
...oyalty free 3d model pods for download as blend, fbx, and obj on turbosquid: 3d models for games, architecture, videos. (1563118)
3d_export
$5

coworking pods
...coworking pods
3dexport
private pods for workspaces, offices
3ddd
$1

Pod Meeting
...pod meeting
3ddd
pod meeting , martela
146cm x 205cm
design_connected
$16

Pod 325
...pod 325
designconnected
department pod 325 computer generated 3d model.
3d_ocean
$5

Ariel Power Pod
...ariel power pod 3docean 3d pods ariel pods ariel products jell pods ariel power pod...
3ddd
$1

POD 325
...pod 325
3ddd
кресло мешок
кресло мешок pod 325, room 21 85x50x100cm.
Pod
design_connected
$13
Pod
...pod
designconnected
niche modern pod computer generated 3d model. designed by pyles, jeremy.
3d_export
$5
engine pod
...engine pod
3dexport
engine pod
turbosquid
$80
POD
...pod
turbosquid
royalty free 3d model pod for download as 3ds on turbosquid: 3d models for games, architecture, videos. (1234976)
3ddd
$1
Pod 325
...pod 325
3ddd
пуф
pod 325
turbosquid
$4
PODS
...oyalty free 3d model pods for download as blend, fbx, and obj on turbosquid: 3d models for games, architecture, videos. (1563118)
3d_export
$5
coworking pods
...coworking pods
3dexport
private pods for workspaces, offices
3ddd
$1
Pod Meeting
...pod meeting
3ddd
pod meeting , martela
146cm x 205cm
design_connected
$16
Pod 325
...pod 325
designconnected
department pod 325 computer generated 3d model.
3d_ocean
$5
Ariel Power Pod
...model ariel power pod ariel power pod, modeled in cinema 4d r14 and all materials are included. if you like it, please rate this
3ddd
$1
POD 325
...pod 325
3ddd
кресло мешок
кресло мешок pod 325, room 21 85x50x100cm.
Dispenser
archibase_planet
free

Dispenser
...dispenser
archibase planet
soap dispenser sanitary ware
soap dispenser - 3d model for interior 3d visualization.
archibase_planet
free

Dispenser
...dispenser
archibase planet
toilet paper dispenser sanitary ware
toilet paper dispenser - 3d model for interior 3d visualization.
archibase_planet
free

Dispenser
...hibase planet
dispenser water cooler cooler water
dispenser n040815 - 3d model (*.gsm+*.3ds+*.max) for interior 3d visualization.
3d_export
$10

soap dispenser
...soap dispenser
3dexport
soap liquid dispenser for top.
3ddd
$1

soda dispenser
...soda dispenser
3ddd
бар , кафе
soda dispenser
turbosquid
$5

dispenser
... available on turbo squid, the world's leading provider of digital 3d models for visualization, films, television, and games.
3d_ocean
$12
Water Dispenser
...dispenser furnishings lowpoly water
this is a water dispenser hot water for tea is winter and summer is cold for souls. have fun!
archive3d
free

Dispenser 3D Model
...aper towel dispenser mediclinics n280116 - 3d model (*.gsm+*.3ds) for interior 3d visualization.
archive3d
free

Dispenser 3D Model
...ater t6 purifier water dispenser n260216 - 3d model (*.gsm+*.3ds) for interior 3d visualization.
3d_export
$5

Soap dispenser
...ser
3dexport
soap dispenser for your bathroom interior design<br>include:<br>- pbr-materials<br>- 2 dispensers
Pet
3d_export
$5

PET Bottle
...pet bottle
3dexport
this is a pet bottle of clorina, deagreaser, glass cleaner of something similar
turbosquid
$35

Caxinha Pet
...osquid
royalty free 3d model caxinha pet for download as skp on turbosquid: 3d models for games, architecture, videos. (1178810)
turbosquid
$14
Pet Shoes
...rbosquid
royalty free 3d model pet shoes for download as max on turbosquid: 3d models for games, architecture, videos. (1332619)
turbosquid
$8

Pet Shop In
...bosquid
royalty free 3d model pet shop in for download as ma on turbosquid: 3d models for games, architecture, videos. (1388224)
turbosquid
$5

Pet Bowl
...urbosquid
royalty free 3d model pet bowl for download as max on turbosquid: 3d models for games, architecture, videos. (1709411)
turbosquid
$1

Bed Pet
...turbosquid
royalty free 3d model bed pet for download as ige on turbosquid: 3d models for games, architecture, videos. (1537522)
3d_export
$10

Wood Pet House Pet
...~ 100,000 model parts: 1 texture format: .png .jpg resolution: 1024*1024 pbr in substance painter formats: .obj .gltf .fbx .blend
3d_export
$5

pet house 001
...pet house 001
3dexport
house for pets: cat or small dog breeds.
turbosquid
$18
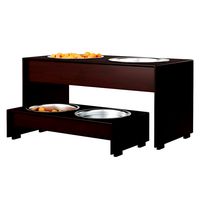
Pet feeder
...ee 3d model pet feeder for download as max, max, fbx, and obj on turbosquid: 3d models for games, architecture, videos. (1559898)
3d_ocean
$4

Pet Bottle
...max 2013. rendering, material and lighting varay. the polygon counting 450797. no extra material used. it is a house hold things.
Stacking
3d_ocean
$12

Box Stacks
...n
barrel box box stack shards
this is model of box stack with texture that equipped with its shards around the box to add detail.
3ddd
$1
Triptych Stacks
...sa
triptych stacks
современный светильникhttp://curiousaandcuriousa.co.uk/index.php/home/chandeliers1/hayward-gallery1
3ddd
$1

Stacking D
...stacking d
3ddd
leucos
stacking
manufacturer leucos
designer rockwell group
3d_ocean
$5

Stack of Dollars
... realistic stack
ready to render! textured photorealistic dollars are animated. stack of dollars are falling down over and over…
3d_export
$5

dollar stack
...dollar stack
3dexport
turbosquid
$16

Stack of Wood
...quid
royalty free 3d model stack of wood for download as max on turbosquid: 3d models for games, architecture, videos. (1360320)
3d_ocean
$5

Money Stacks
... formats: c4d (textured) – obj (untextured) texture type: standard engine materials poly count per stack: 120 important: this ...
turbosquid
$5

stack machine
...lty free 3d model stack machine for download as ige and sldas on turbosquid: 3d models for games, architecture, videos. (1226834)
turbosquid
$19
Stack of Barrels
...3d model stack of barrels for download as blend, fbx, and obj on turbosquid: 3d models for games, architecture, videos. (1472525)
turbosquid
$6

Brick Stack
...y free 3d model brick stack for download as 3ds, max, and obj on turbosquid: 3d models for games, architecture, videos. (1239828)
Food
archibase_planet
free

Food
...food
archibase planet
food fires fast food
food fires n180614 - 3d model (*.gsm+*.3ds) for interior 3d visualization.
3d_export
$10

food
...food
3dexport
this is a table with food.
turbosquid
$10

canteen food, fast food
... available on turbo squid, the world's leading provider of digital 3d models for visualization, films, television, and games.
3d_ocean
$6

Food Truck
...oly low poly food truck truck
low poly food truck for games or animation. it contains of rack, ventilation, stairs, and umbrella.
turbosquid
$3

Food
...osquid
royalty free 3d model food for download as ma and obj on turbosquid: 3d models for games, architecture, videos. (1443013)
3d_export
$5

Food container
...food container
3dexport
food container
3d_export
$5

food box
...food box
3dexport
it is box for food with a cover.
turbosquid
$5

food
... available on turbo squid, the world's leading provider of digital 3d models for visualization, films, television, and games.
turbosquid
$1

Foods
... available on turbo squid, the world's leading provider of digital 3d models for visualization, films, television, and games.
turbosquid
free

food
... available on turbo squid, the world's leading provider of digital 3d models for visualization, films, television, and games.
Style
3ddd
$1

style
...style
3ddd
манекен , одежда
style
3ddd
$1
BM Style
...bm style
3ddd
bm style
кресло bm style с материалами и тестурами
3d_export
$5
style handle
...style handle
3dexport
style handle
3d_export
$6

new style
...new style
3dexport
new style room
turbosquid
$1

style
... available on turbo squid, the world's leading provider of digital 3d models for visualization, films, television, and games.
3d_export
$5

Roman style
...roman style
3dexport
roman style architecture house
3ddd
$1

Ceppi Style
...ceppi style
3ddd
ceppi style
качественная модель классического стола ceppi style с текстурами и материалами v-ray
3ddd
$1

Kolo Style
...kolo style
3ddd
kolo
умывальник kolo style, арт. l21950
3ddd
$1
Banos Style
... style
производитель banos
модель style
в архиве присутствует дополнительная версия с материалами для corona
3ddd
$1
Кухня Free-style
...кухня free-style
3ddd
free-style
кухня free-style