Thingiverse

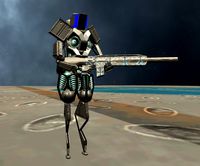
Spider-Bot from the movie Runaway by rkxone
by Thingiverse
Last crawled date: 3 years, 4 months ago
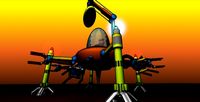
Spider-Bot from the movie Runaway
(November-15-2020: Check out my new Lock-On Bot from the movie here also: https://www.thingiverse.com/thing:4654995 )
Hello all, over the last week I have been sinking all my time into this prop reproduction from the movie Runaway (Tom Sellek and Gene Simmons 1984 - https://www.imdb.com/title/tt0088024/ ). I have always had a love for the killer robot spiders, so I decided to go looking for a print. Oddly enough there are none modelled off this amazing killer spider! So I decided to start toying with this. Slowly but surely over the course of 5 full days of modelling 16 hours a day I have what I consider a 90% faithful looking kit. I went through many versions of printing to get this to just the right level of building and look. I will continue to add some greebles to this as I finish the final building, but this is the base kit.
There are outside parts you will want/need to complete this.
Flexible cable conduit (for the top level, see the actual prop photos)
Misc wiring (for all over)
small Zip ties (for all over securing the wiring etc)
Optional (If you want more strength on the top rods): 2x 3mm Tubes or dowels (200 mm length each), steel for strength (a coat hanger may work here I have not tested that yet), 5mm tube for the main support
Wooden skewers from the grocery store will likely also work here as they are long enough and 3mm thick.
Superglue.
Assortment of M3 socket head cap screws (https://www.amazon.ca/gp/product/B06ZY36VDP/ref=ppx_yo_dt_b_search_asin_title?ie=UTF8&psc=1) (These are optional as you can glue it all together, but the extra realism you get with these and the ability to take this apart to add to it or work on it I find is well worth the upgrade)
Paint - Aluminum, or silver. Detail Paint: flat black, white, and any other touches you might like.
Optional: Instead of printing the battery pack I recommend just making one yourself from old AA or AAA batteries, this will add some nice weight, and cuts an hour from the print time ;)
Considerations
I am trying to make this as easy a print as possible while being faithful to the onscreen prop from the movie, you should be able to look at it and know exactly where it is from if you've seen it before :)
The legs are moveable strictly side to side, not the joints.
The gears go nowhere but do spin :), yes I know, this is not a working model kit, but to give the best approximation and to keep simplicity. they will never go anywhere, there are also some linkages missing and some small liberties taken so that the print looks right and will display nicely, yet giving you the options to explore adding your own greebles.
This is my first mega type build of this degree. It's not going to be perfect. And it's all designed in tinkercad. And I have now rebuilt almost all of the original to increase details, and improve the print quality. a few times over now :P
By the time this gets to thingaverse it will be fully printed and and issues I can't correct will be documented and explained. (see above :P )
This kit is meant to be printed on a 200mm bed. it's scaled for every part to fit, It's very close to the movie prop in size
Not all the print times are listed, there were a lot of changes and variations as I was trying to both write up this guide and get things done ;) It will likely take a day to print this at .2, 35mm/s and 20-80% fill.
Assembly:
While you can just glue everything together I used a mix of gluing some parts and bolting the frames together.
Sand edges (or exacto) to remove all elephants foot expansion and fill/sand to your desire. Then paint pretty much all silver and weather it with black wash. I barely had to sand anything, not much more than 10 minutes for the whole kit. A lot of thought went into fit here :)
Install pictures are below
General print settings
.20 quality (each part group is detailed so if something is different it is listed there)
Infill will vary from 20-80% and will be listed
35mm Print speed
Hot end temp: 205 degrees
Bed Temp 60 degree first layer 55 degree and gradating down to 0 depending on height
Ironing is on top layer only
other settings as best suits your style
Parts Breakdowns
Legs:
Grouped together for the middle sets and the end legs, all are split
Print the end legs twice for the right number (this is because I am impatient :P )
1.5 hour print for each pair of legs
Support everywhere at 60degrees
these print clean, the supports come off well, had to redesign these to make the springs prominent. this version works well, the posts are black, I would silver accent the spring edges
short legs go on the front and back, holes face the front, a very light sanding of the posts top and bottom so they are smooth. They are supposed to protrude from the top and bottom of the plates to mimic the prop mounting bolts. paint the top and bottom protrusions black
Radio box:
no support
30 minute print time
holes are included for attaching wiring,
this is a free mount part on the top deck on the riser above the top gear pack glue in place
Control arms
No support needed
15 minute print
Prints without issue as is
These are under/over control arms
a dab of glue on the top of the lower and the underside of the top with the bolt head.
if there is a fit issue (I had to change the dimension thickness of the chassis) hot water bend these to fit but mine fit perfect
Lower box and rod
No support needed
20 minute print
free mount for the base of the box, the rod will connect to the front motor in the hole, slight sanding will be required for fit
you can glue the box to the base or just leave it as a friction fit part
Lower back plate
7 minute print time on horizontal, 30 minutes vertical
print with support (unless printing vertical)
A bolt screws in through this, through the base plate, and through the servo hosing and into the servos.
Lower Main Plate
No Supports
printed at 40% infill
print time 3 hours
Increased the infill to 40% as I also thickened the plate from 1mm to 4mm, this gives a better quality print and a more realistic feel, I will be changing the gears to 3mm as I feel they were a bit thin also.
Slightly file the mounting holes for the legs only. the other holes should be left alone so the threads can grab.
Lower Gear Pod
No supports
50 minute print time
80% fill for rod strength
Minor filing of the holes may be required so they free spin
the base gear fits into the main plate indent and should be glued, and the gears will just stack on top
the main gear shaft will line up into the top plate hole (do not glue the rod to the top if you glued the bottom!)
Upper Gear Pod
No supports
50 minute print time
80% fill for rod strength
Minor filing of the holes may be required so they free spin
the base gear fits into the top plate indent and should be glued, and the gears will just stack on top
the main gear shaft will line up into the top riser hole (do not glue the rod to the top if you glued the bottom!)
Back Servos
no support
1 hour print time
colour black with white top gears
feel free to add linkages to other areas
mounted upside down in the servo holder via screws top and bottom
front motor
support is needed here but you can likely get away without it
1 hour print
front location, line up with the plate edging and top and bottom plate holes
add a zip tie around the top for the authentic prop look
run wiring and add holes to mount if you like (future version may get this)
Rods
No Support
80% fill
1 hour print
print horizontally (for strength)
These came out very well and I have high hopes for strength, sand the ends to insert into the fore and aft vertical plates, there will be a bit of a flat spot on the bottom, face that down if you glue these in (no glue required if bolting this together. rods are flush to the back when complete.
Vertical Support
print horizontal with support
40% fill as it's structural
the short end of this mounts in the box on the main bottom plate, you can glue the base or I used bolts from the bottom to add to the bottoms look, do not over tighten any bolts!
Upper and lower risers
40% fill
1 hour print time
Support as your preference
Upper riser has a hole for the upper gear pod
lower riser has no hole.
lower riser butts up against the vertical support holder, upper support butts up against the front plate, glue these down. (for the upper riser paint the area and gears first)
Top plates
40% fill
half hour print
both align to the front and back edges, either screw down with m3 bolts or glue directly
Server housing
40% fill
30 minute print
no support needed
line up the mounting holes, make sure the servos are inside (should move freely) bolt in place with longer m3 screws
I have about 100 hours of design time and 2 days of print time into this to create something cool! If you make one please post it as I would love to see it, if you have any questions please ask. :)
Enjoy! If you enjoy my prints please consider donating, even a dollar helps :) it's always appreciated :) https://www.paypal.me/RychardK
Similar models
thingiverse
free

6:1 Stackable Planetary Gear by DbC
...density
cover: 1 hour 42 minutes, 8.13 meters
ring gear: 1 hour 48 minutes, 8.43 meters
100% fill
sun gear: 7 minutes 0.46 meters
thingiverse
free

Drone stand which fits every drone! by Ratner
...per_part_example1"
3)glue the upper and lower part together
tip: use 0% infill and fill the stand after the print with sand.
thingiverse
free

pumpkin happy halloween
...al and energy.
printing
layer height 0.2 mm
filling density 20%
filling pattern, lines
no supports
the cura program
regards
lefan
thingiverse
free

Q450 Quad Landing Legs Gear Quadcopter by Imaginator3D
...unts. you will need slightly longer frame screws to attach the legs to the bottom of the frame. i used a 50% fill for strength.
thingiverse
free
Spinning Top by AKRAM3D
...equired if printing the "split" model. you can glow the upper and lower part together.
spins for more than two minutes!
thingiverse
free

Headphone Stand by Riven02
... the support up to match the top.
the accent pieces lightly snap together but i suggest a drop of superglue on all of the joints.
thingiverse
free

New gear for Star Tracker by martin_au by TTRCmedia
...den the hole for the threaded rod in the bottom plate to ~10mm and glue or screw the part "axis" onto the bottom plate.
thingiverse
free

Turkey Foot Prosthesis by RickDIY
...aused by this design. please consult a medical professional if your bird has sustained an injury, and prior to using this device.
thingiverse
free

lower ring bracket by bobbyshomerul
...ned a bracket to link it to the big gear.
you need to print 4 pcs and glue them to big gear and use upperring instead of lowering
thingiverse
free

Mid Century Modern Plant Stand by hotdogface
...o supports allow cooling.
legs - print multiples vertically arranged as opposed to laying flat. supports needed or allow cooling.
Runaway
3d_export
$5

IAI Sparrow X lowpoly concept fighter
...also enables short take off and landing on smaller runaway to operate even from the streets. it is equipped...
thingiverse
free

mk3s fan shroud to prevent thermal runaway
...ting at higher temperatures. this modification has so far fixed the problem for me. i could only find the stl, not the step file.
thingiverse
free

Runaway heart by DuncanShadow
...ureshttps://www.instagram.com/duncanlouca
i also have a website where i have other sculpts for sale.https://www.duncanshadow.com/
thingiverse
free
GASLANDS RC BOMB- RUNAWAY STYLE (LOCK-ON)
... resin printer.
update: modded them to have the target part removed..since it may not even print with some printers at its size.
thingiverse
free

Runaway Replacement Headband by AdamoRobinson
...ou'll need:
2x 20mm m2 bolts
2x m2 nuts
the m2 nut traps along the band itself are for bolting a cushion to, once i model it.
thingiverse
free

Runaway Island Christmas Village House by JmsDwh
...translucent filament. if you mask the windows and paint the model, the light from an led tealight will shine through the windows.
thingiverse
free

Ender 3 Pro filament runaway sensor, z axis endstop salvage - remix by Tse_Tso
...eems that creality had changed the design slightly. anyway, original design is not working for ender 3 pro.
print and enjoy :)
thingiverse
free

Lock-On Bot From the movie Runaway by rkxone
...u enjoy my prints please consider donating, even a dollar helps :) it's always appreciated :) https://www.paypal.me/rychardk
thingiverse
free

Runaway Blimp aka Raytheon JLENS by mstyle183
...y-military-2015-10 http://foxtrotalpha.jalopnik.com/this-giant-sensor-packed-balloon-is-about-to-watch-over-1635655334/1739241144
thingiverse
free

staff of one by Silkburrito27
...the staff of one nico minoru wields in the runaway hulu series will upload more pictures when i'm able...
Rkxone
thingiverse
free

Militech by rkxone
...militech by rkxone
thingiverse
militech sign
for more of my wall art: https://www.thingiverse.com/rkxone/collections/wall-art
thingiverse
free
Avengers Bookmark by rkxone
...kxone
thingiverse
avengers bookmark
check out my other bookmarks here: https://www.thingiverse.com/rkxone/collections/bookmarks
thingiverse
free
Atari Bookmark by rkxone
...y rkxone
thingiverse
atari bookmark
check out my other bookmarks here: https://www.thingiverse.com/rkxone/collections/bookmarks
thingiverse
free
Viper Bookmark by rkxone
...y rkxone
thingiverse
viper bookmark
check out my other bookmarks here: https://www.thingiverse.com/rkxone/collections/bookmarks
thingiverse
free
Ghostbusters Bookmark by rkxone
...e
thingiverse
ghostbusters bookmark
check out my other bookmarks here: https://www.thingiverse.com/rkxone/collections/bookmarks
thingiverse
free

Punisher Bookmark by rkxone
...kxone
thingiverse
punisher bookmark
check out my other bookmarks here: https://www.thingiverse.com/rkxone/collections/bookmarks
thingiverse
free
Shadowrun Bookmark by rkxone
...kxone
thingiverse
shadowrun bookmark
check out my other bookmarks here: https://www.thingiverse.com/rkxone/collections/bookmarks
thingiverse
free

Shadowhunter Bookmark by rkxone
...e
thingiverse
shadowhunter bookmark
check out my other bookmarks here: https://www.thingiverse.com/rkxone/collections/bookmarks
thingiverse
free

Stormtrooper Bookmark by rkxone
...e
thingiverse
stormtrooper bookmark
check out my other bookmarks here: https://www.thingiverse.com/rkxone/collections/bookmarks
thingiverse
free

Biotechnica Sign by rkxone
...hingiverse
biotechnica sign from cyberpunk 2077
for more of my wall art: https://www.thingiverse.com/rkxone/collections/wall-art
Bot
turbosquid
$19

Bot
... available on turbo squid, the world's leading provider of digital 3d models for visualization, films, television, and games.
turbosquid
$1
bot
... available on turbo squid, the world's leading provider of digital 3d models for visualization, films, television, and games.
turbosquid
free

Bot
... available on turbo squid, the world's leading provider of digital 3d models for visualization, films, television, and games.
3d_export
$10
scanner bot
...scanner bot
3dexport
cool scanner bot who scans for fixing things...
3d_ocean
$9
Apc Bot
...n bot games toys
an all-purpose-constructo-bot. for cartoon purposes. the model is not rigged. please use vray adv for rendering.
3d_export
$75
Bot 3D Model
...bot 3d model
3dexport
robot bot man kiborg character
bot 3d model evgen 19504 3dexport
turbosquid
free

Eye Bot
...eye bot
turbosquid
free 3d model eye bot for download as fbx on turbosquid: 3d models for games, architecture, videos. (1514059)
turbosquid
$29
Gorill-bot
...bosquid
royalty free 3d model gorill-bot for download as fbx on turbosquid: 3d models for games, architecture, videos. (1239456)
turbosquid
$25

Lamp Bot
...bosquid
royalty free 3d model lamp bot for download as blend on turbosquid: 3d models for games, architecture, videos. (1230121)
turbosquid
$10
Spectre Bot
...osquid
royalty free 3d model spectre bot for download as fbx on turbosquid: 3d models for games, architecture, videos. (1616378)
Spider
3d_export
$15

spider
...spider
3dexport
spider
3d_export
$5

Spider
...spider
3dexport
"the spider wants you to accept it." spider made in blender 3.0 from spheres and cylinders
3d_export
free

spider
...spider
3dexport
spider 3d 3dmodel animal free pack collection fbx
archibase_planet
free

Spider system
...stem spider glass system
spider system to fix glass stefano galli n050912 - 3d model (*.gsm+*.3ds) for interior 3d visualization.
design_connected
$11

Spider
...spider
designconnected
oluce spider floor lights computer generated 3d model. designed by joe colombo.
3d_export
$24

SPIDER ROBOT
...spider robot
3dexport
spider robot
3d_export
$5

metallic spider
...metallic spider
3dexport
spider formats
3d_export
$5

spider robot
...spider robot
3dexport
spider robot
turbosquid
$100

spider
...r
turbosquid
royalty free 3d model spider for download as ma on turbosquid: 3d models for games, architecture, videos. (1205083)
turbosquid
$10

Spider
...
turbosquid
royalty free 3d model spider for download as obj on turbosquid: 3d models for games, architecture, videos. (1674135)
Movie
3d_ocean
$9

Movie Theater
...movie theater
3docean
movie theater
movie theater building model
3ddd
$1
OFME / MOVIE
...ofme / movie
3ddd
ofme , movie
в архиве 8 моделей
3d_export
$5

movie clapboard
...xport
movie clapboard. lowpoly. here is video: >>>> https://rumble.com/vrjkbb-lowpoly-movie-clappboard-3d-model.html
3d_export
$5
syprocom movie
...5 mm length 320 mm https://svetsupermarket.ru/spoty/potolochnie-i-nastennie-spoty/potolochnye-spoty/movie-mv-movie_mv_181_18.html
design_connected
$16
2045 Movie
...2045 movie
designconnected
intertime 2045 movie computer generated 3d model. designed by crea team intertime .
turbosquid
$29

Movie Popcorn
...quid
royalty free 3d model movie popcorn for download as fbx on turbosquid: 3d models for games, architecture, videos. (1238386)
turbosquid
$10

Movie Slate
...ty free 3d model movie slate for download as ma, obj, and fbx on turbosquid: 3d models for games, architecture, videos. (1265231)
turbosquid
free

movie Screen
... 3d model movie screen for download as 3ds, max, obj, and fbx on turbosquid: 3d models for games, architecture, videos. (1452759)
3ddd
free
MOVIE 1 VISI
...movie 1 visi
3ddd
стул
стул офисный. movie 1 visi
turbosquid
$50

Movies Animation
... available on turbo squid, the world's leading provider of digital 3d models for visualization, films, television, and games.