Thingiverse

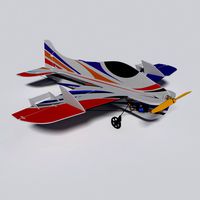
Speedy "Red Mini Wing" RC Plane by wersy
by Thingiverse
Last crawled date: 3 years ago
Here is a brood to the bird family. Related to the wingspan, it is a crossbreed of the
"Red Duck" http://www.thingiverse.com/thing:407766
and the
"Red Swan" http://www.thingiverse.com/thing:453090
Still small, but speedy and pretty manoeuvrable - a big fun for a real pilot.
Anyhow, Marcel, member of the ACNE http://www.aero-club-nieder-eschbach.de/
who piloted the maiden flight, had a lot of fun and this is his first impression:
"The small model is already very good, but some model flying experience is needed. For a wing type of this small size it flies even damned good. It’s not a plane for circling through thermics, of course it’s to small for that. The performance is shown when one flies it speedingly".
Uwe Heuer - experienced flying wing designer and Horton specialist - says about this square form of a flying wing, which he loves to call "panel plane":
"They do have a low damping and flight stability around the pitch axis (elevator), therefore you can fly snags in curves. This is why I love these “panel-planes”, these are also good-tempered against tilting to one side. But on the other side you pay that with the high sensitivity regarding wrong trimming of the CG and the elevator. During stall the wings stay level but for recovery they need a long dive to speed up again".
Besides my other planes it was flying at the InterEx 2016 in Versiox/Genevahttp://jivaro-models.org/interex_2016/index.html
They were very enthusiastic about of the speed which is possible.
But we dicovered that it is also posssible to land it slowly.
Here you can see how it flies:https://youtu.be/d8cFB1equikhttps://youtu.be/QrYqn8kItYM
This small plane is quickly printed.The biggest parts are 220mm high to print, but I also sliced them in half.
Wing fixating
Additional to fasten the wing with rubber band, it is important to secure it against sliding sidewards. You can do this by simply fixiating it with a short tape at front and at back to the fuselage.
Update 11.23.2015
Uploaded smaller wing segments:
wing middle left 110
wing middle right 110
wind left right 110
And smaller front fuselage segments:
fuselage front 1
fuselage front 2
fuselage interface front
Update 12.14.2015
Uploaded smaller back fuselage segments:
fuselage back 1
fuselage fback 2
fuselage interface back
Update 01.04.2016
Uploaded
winglet test 1 (1.5mm thick)
winglet 0.9 (0.9mm thick) which is successfully tested by "wytti"
print setting: three 0.3 solid layers
Update 01.07.2016
Wing fixiating and centering
"Scorpio 9999" made a good suggestion for improvement: Centering the wing by two little ribs on the bottom side of the middle wing part.
Thank you Scorpio!
I uploaded the files:
wing middle left 110 centered
wing middle right 110 centered
Additional I let the first files online in case anybody wants to extend the wingspan by simply add a wing section in the middle.
Update 01.21.2016
"Scorpio9999" published two parametric servo inserts for those who have different servos.http://www.thingiverse.com/thing:1264902
Update 1. August 2017
Uploaded bigger stabilizer. They are 14% bigger
base 90 mm
top 66 mm
hight 140 mm
Specifications
airfoil: ClarkYS
wing span: 794 mm
wing chord: 160 mm
aerodynamic center 27 mm
wing overall weight: 270 g
wing area: 12.7 dm²
fuselage empty weight 75 g
fuselage overall weight 270 g
wing loading: 42.5 g/dm²
longitudinal stability (Thies) STFs:
motor: Turnigy 2632 Brushless Motor 1000kv
motor camber: -3°
side pull: 2° right
propeller: Aeronaut CAM Aeronaut Carbon Classic 9 x 6.5" / 23 x 16.5 mm
static thrust: 500 g (3S Lipo)
battery: Turnigy nano-tech 950mah 3S 25~50C Lipo Pack
ESC: HobbyKing YEP 30A (2~4S) SBEC Brushless Speed Controller
receiver: OrangeRx R615X DSM2/DSMX Compatible 6Ch 2.4GHz Receiver w/CPPM
servos: Hitec HS-55
Print Settings
Attention
The wings are designed to print with 0.5 width, 0.3 hight and 2 bottom and top layer, NO infill.
If you print thinner, the perimeter of the upper side will not merge with the perimeter of the inner spars.
If you print thicker, the perimeter will not be printed continuesly in one turn.
The print must go as if you print in spiral vase mode. So you reach at least a smooth surface on the upper side.
If needed, you must try with 0.49 or 0.48 width. It depends on which slicer you use.
The second thing is, if you print with less layer hight, the inner spars will not connect the top and the bottom layer. There will be a gap inbetween.
All parts: layer height =0,3mm, width =0.5 mm, NO infill
wing
1 perimeter, 2 bottom layer, 2 top layer, hollow
wing servo: 3 bottom layer, spiral vase mode
aileron base: 5 bottom layer, spiral vase mode
aileron end: 2 bottom layer, spiral vase mode
aileron appendix: 1 perimeter, hollow
aileron interface: no bottom layer, spiral vase mode
fuselage
Note: The extrusion width must be thick enough to prevent printing infill between the two perimeters of the 1mm hull. You must try out and check it in the preview.
I had to set the width to 0.53mm.
fuselage front: 7 bottom layer, 3 top layer, 2 perimeter, extrusion width 0.53mm, 20% infill
fuselage back: 3 bottom layer, 3 top layer, 2 perimeter, extrusion width 0.53mm, 20% infill
fuselage interface: 2 perimeter 0.4 no bottom/top layer, holow
fin: 4 bottom layer, spiral vase mode
fin cover plate: 2 bottom layer, hollow
The bigger fin:
0.3 layer hight
0.5 width
3 solid bottom layer, spiral vase mode
The bigger fin plate:
3 solid bottom layer
1 perimeter
10% infill
Similar models
thingiverse
free

Speedy "Red Swept Wing" RC by wersy
...after the other, and see that you can get them out again, if needed. if both pipes are inside, the wings can not be pulled apart!
thingiverse
free

Flying Wing Buratinu by wersy
...ve designed a special fuselage nose.
fuselage 1 rear-mounted mc3
firewall rear-mounted
it has already integrated 3° motor camber.
thingiverse
free

Speedy Red Midi Wing by wersy
... in the slicer.
the cylinder must be printed hollow, with only 2 or 3 perimeters.
then you have to re-cut the bushing with a tap.
thingiverse
free

Delta Wilde Hummel by wersy
...se no solid bottom/top layers
acces panel brackets: print width 0.5mm, layer height 0.2mm, spiral vase no solid bottom/top layers
thingiverse
free

Speedy "Red Swept Wing 2" RC by wersy
...ery: turnigy 1800 mah 3s 40~50c lipo
motor camber: -4°
side pull: no
propeller: aeronaut cam aeronaut carbon classic 10 x 6"
thingiverse
free

Vase by MrNlCE
...d in abs
0.3 mm layer hight
spiral vase mode failed but managed to do it with 3 perimeters, 3 bottom layers, 0 top and 0% infill.
thingiverse
free

Speedy "Red Midi Swept Wing" by wersy
...0 mah 3s 40~50c lipo
motor camber: tilted -4 degrees
side pull: none
propeller: aeronaut cam aeronaut carbon classic 10 x 6"
cults
free

Speedy "Red Midi Swept Wing"
...0 mah 3s 40~50c lipo
motor camber: tilted -4 degrees
side pull: none
propeller: aeronaut cam aeronaut carbon classic 10 x 6"
thingiverse
free

Simple Vase by vikram31
...nozzle and set the layer height to 0.6 mm and line width to 1.0 mm)
for solid mode:
top layer - 0
infill - 0%
wall line count - 3
thingiverse
free

Simple Vase by vikram31
...nozzle and set the layer height to 0.6 mm and line width to 1.0 mm)
for solid mode:
top layer - 0
infill - 0%
wall line count - 3
Wersy
thingiverse
free

Fan 80 mm.stl by wersy
...fan 80 mm.stl by wersy
thingiverse
just a fan 80 mm for your planning.
thingiverse
free

LED Ring Mount for Printrbot by wersy
...led ring mount for printrbot by wersy
thingiverse
this mount can be fastened on one side of the extruder.
thingiverse
free

Penholder Tubes by wersy
...one for the kids with some more tubes.
it is by far not so artfully because i am just an engineer - though i hope you like it :-)
blendswap
free

WERSI Galaxis
...ocal z direction, the lights will switch on or of. for moving the hole organ there is a squared empty.
have fun with this peace.
thingiverse
free

Carrier to carry the Printrbot by wersy
...ty small and not so heavy it is a bit cumbersome to transport because the only stiff parts are the bases connected with the rods.
thingiverse
free

Prusa I2 holder for wersy's case for RRD full graphic LCD by byteborg
...i like the rrd smart lcd and have it integrated in wersy's case. i needed a way to mount it on my prusa i2, so here it is :)
thingiverse
free

Mount for the Full Graphic Smart LCD Controller Case by wersy 2020 3030
...ing for wersy's case holes... so i designed this mount parts for this great lcd case https://www.thingiverse.com/thing:87250.
thingiverse
free

Turbo Car RC (experimental) by wersy
...be/6tzpffwsd0q
tires:http://www.makeblock.com/tire-68-5x22mm-4-packhttps://www.kiwi-electronics.nl/band-68-5x22mm-4-stuks?lang=de
thingiverse
free

Case for the Full Graphic Smart LCD Controller by wersy
...is a case for the full graphic smart lcd controller. http://www.reprapdiscount.com/home/34-full-graphic-smart-lcd-controller.html
thingiverse
free

Mini Buratinu LW PLA by wersy
...m for this if the rear tubes are shortened. therefore i upload a remix of the modified rear fuselage.
fuselage rear 860 lwpla.stl
Speedy
3d_export
$15

Speedy Gonzales 3D Model
... duck silvester cat low poly
speedy gonzales 3d model download .c4d .max .obj .fbx .ma .lwo .3ds .3dm .stl buncic 107350 3dexport
turbosquid
$6

Speedy Envy MKII Wheel
... available on turbo squid, the world's leading provider of digital 3d models for visualization, films, television, and games.
turbosquid
$6

Speedy Envy MK V Wheel
... available on turbo squid, the world's leading provider of digital 3d models for visualization, films, television, and games.
turbosquid
$2

Speedy Envy MK V - low poly
... available on turbo squid, the world's leading provider of digital 3d models for visualization, films, television, and games.
3ddd
free

Стіл компютерний
...стіл компютерний 3ddd speedy , стол стіл компютерний speedy disegno 085 al-6-m. ...
archive3d
free

Table 3D Model
...table 3d model archive3d table desk furniture table speedy disegno 085 al-6-m n100612 - 3d model (*.3ds) for...
3d_export
$15

Slowpoke Rodriguez 3D Model
...mouse looney tunes toon cartoon low poly mexico mexican speedy gonzales cat slow fast slowpoke rodriguez 3d model download...
3d_export
$65

locomotive pm 36
...locomotive pm 36 3dexport pm 36-1. speedy steam engine of polish construction from 1937. equipped with...
thingiverse
free

speedy on chart by Syzguru11
...speedy on chart by syzguru11
thingiverse
speedy on chart
thingiverse
free

Speedy the Snail by O3D
...speedy the snail by o3d
thingiverse
speedy the snail was printed on the da vinci color
Rc
3ddd
$1
RC Helicopter
...rc helicopter
3ddd
вертолет
mini rc helicopter
93.329 polys
3d_export
$7
rc helicopter model
...rc helicopter model
3dexport
rc helicopter model
3d_ocean
$25
RC F1
...rc f1
3docean
auto car control f1 formula race rc remote speed
remote control f1 car
turbosquid
$10
rc plane
...lane
turbosquid
free 3d model rc plane for download as blend on turbosquid: 3d models for games, architecture, videos. (1295828)
turbosquid
$100
RC Helicopter
...free 3d model rc helicopter for download as 3ds, max, and obj on turbosquid: 3d models for games, architecture, videos. (1298511)
turbosquid
$59
Drone with RC
...3d model drone with rc for download as 3ds, max, obj, and fbx on turbosquid: 3d models for games, architecture, videos. (1363601)
turbosquid
$75
RC buggy
... available on turbo squid, the world's leading provider of digital 3d models for visualization, films, television, and games.
turbosquid
$39

RC Plane001
... available on turbo squid, the world's leading provider of digital 3d models for visualization, films, television, and games.
turbosquid
$30
RC Jet
... available on turbo squid, the world's leading provider of digital 3d models for visualization, films, television, and games.
turbosquid
$30
Rc airplane
... available on turbo squid, the world's leading provider of digital 3d models for visualization, films, television, and games.
Wing
3ddd
$1
The Wing
...the wing
3ddd
wing , appledesign
the wing seating by appledesignstudio
3d_export
$5

wings
...wings
3dexport
beautiful wings model.
archibase_planet
free

Wing
...wing
archibase planet
wing decoration ornament
wing angel n180215 - 3d model (*.gsm+*.3ds+*.max) for interior 3d visualization.
3ddd
$1

Wing Chair
...wing chair
3ddd
baker , wing
wing chair
3ddd
$1
Диван WING
...диван wing
3ddd
flexform , wing
модель дивана wing
производитель: flexform
3ddd
$1
Диван WING
...диван wing
3ddd
flexform , wing
модель дивана wing
производитель: flexform
3ddd
$1
Кушетка WING
...кушетка wing
3ddd
flexform , wing
модель дкушетки wing
производитель: flexform
turbosquid
free
A-Wing
...id
free 3d model a-wing for download as fbx and unitypackage on turbosquid: 3d models for games, architecture, videos. (1164828)
3ddd
$1

Кресло Wing
...кресло wing
3ddd
wing
кресло wing из каталога в двух сочетаниях конфигурации.
3d_export
$5
wing nut
...wing nut
3dexport
wing nut
Plane
3d_export
$5

Plane
...plane
3dexport
unusual plane)
archibase_planet
free

Plane
...plane
archibase planet
plane lath slat
plane n011207 - 3d model (*.gsm+*.3ds) for interior 3d visualization.
design_connected
$11

Plane
...plane
designconnected
tom dixon plane computer generated 3d model. designed by dixon, tom.
turbosquid
$20

Plane
...lane
turbosquid
royalty free 3d model plane for download as on turbosquid: 3d models for games, architecture, videos. (1214347)
turbosquid
$50

Plane
...e
turbosquid
royalty free 3d model plane for download as fbx on turbosquid: 3d models for games, architecture, videos. (1290318)
turbosquid
$20

Plane
...e
turbosquid
royalty free 3d model plane for download as max on turbosquid: 3d models for games, architecture, videos. (1214127)
turbosquid
$15

Plane
...e
turbosquid
royalty free 3d model plane for download as c4d on turbosquid: 3d models for games, architecture, videos. (1413357)
turbosquid
$5

plane
...ne
turbosquid
free 3d model plane for download as ma and obj on turbosquid: 3d models for games, architecture, videos. (1424281)
turbosquid
free

plane
...ne
turbosquid
royalty free 3d model plane for download as ma on turbosquid: 3d models for games, architecture, videos. (1655587)
turbosquid
free

Plane
...osquid
free 3d model plane for download as 3ds, obj, and fbx on turbosquid: 3d models for games, architecture, videos. (1385376)
Mini
turbosquid
$10

Mini Mini Luceplan
...
royalty free 3d model mini mini luceplan for download as max on turbosquid: 3d models for games, architecture, videos. (1227359)
3d_ocean
$39

Mini Cooper
...mini cooper
3docean
cabrioler cooper mini
mini cooper cabrioler
3d_export
$30

Mini lathe
...mini lathe
3dexport
mini lathe
3d_export
$5

mini mouse
...mini mouse
3dexport
mini mouse
3d_export
$5

mini house
...mini house
3dexport
mini house
3d_export
free

Mini Mecha
...mini mecha
3dexport
concept of mini mecha
3d_ocean
$20

Mini Gun
...mini gun
3docean
gatling gun gun machine gun mini gun weapon
model of a mini gatling gun.
3ddd
free

Herve mini
... кофейный , herve
http://www.mobiliavenanti.it/ru/products/hervè-mini
3d_export
$5

mini wall
...mini wall
3dexport
mini wall for living room
3d_export
$5

mini bank
...mini bank
3dexport
mini bank 3d model
Red
3ddd
$1

red bull
...red bull
3ddd
red bull
red bull can
3d_ocean
$4
Red brick
...red brick
3docean
brick low poly red
red brick
3d_export
$40

red panda
...red panda
3dexport
red panda
3d_export
$5

eggchair red
...eggchair red
3dexport
a red eggchair
3ddd
$1

Red curtain
...red curtain
3ddd
red curtain
3d_export
$5

Red barrel
...red barrel
3dexport
its a red barrel
3ddd
$1
Red bicycle
...red bicycle
3ddd
велосипед
red bicycle
3ddd
$1

RED COLLECTION
...red collection
3ddd
витрина
red collection
3ddd
$1
RED COLLECTION
...red collection
3ddd
обеденный
red collection
3ddd
$1

RED COLLECTION
...red collection
3ddd
витрина
red collection