Thingiverse
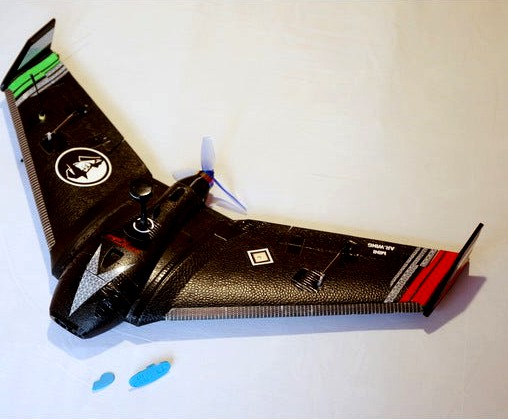
Sonicmodell AR 600 Mini Aerodynamic Bicam Kit by Mateyhv
by Thingiverse
Last crawled date: 3 years, 3 months ago
14/11/2020 EDIT. List of changes: 1- Reworked Nose section to avoid dark corners on Loris HD; 2- Added three Winter Operations air inlets for reduced cooling; 3- Added forgotten Cutting Stencil stl; 4- Added Printing Aid and picture for printing the Motor Firewall in Cura. 5- Added a few more pics. 6- Text and namings rearranged.
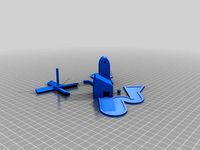
Complete aerodynamic kit for upgrading the Sonicmodel AR 600 Mini. The goal is to install the Caddx Loris 4K side by side with the Runcam Micro Eagle 2 for nice FPV and also to improve tail aerodynamics although the belly bump for example can be used standalone. The mod uses a stock foam nose which can also be bought separately, a quad 2205 motor (16x16mm screw hole distance on stand) plus 3x M2 screws and (optional) 8x 1mm insulating spacers, Everything else is 3D printed.
Weights are given in PLA/TPU although here is a list of some other materials:
PLA: rigid up to ~60ºC hard (in some cases easier to break), slightly heavier than the rest.
PETG: rigid up to ~80ºC, some degree of flexibility, slightly lighter than PLA.
ABS: rigid up to ~105ºC, hard, slightly lighter than the rest. Prone to warping.
TPU: flexible filament, for accessories and caps.
All parts are printed with 0,42mm wall line width.
Parts List
Nose uEagle2 Loris4K:
Extends the foam nose, keeps aerodynamic profile, moves cameras forward to maintain CG, improves cooling and reduces front cross section. Specifically for Runcam Micro Eagle and Caddx Loris 4K. Eliminates bullseye effect on both cameras.
Remove the center foam section by previously marking with the stencil (see Cutting Stencil bellow). Mount the cameras carefuly flexing the pilars to make them fit. Sometimes the pilar breaks so be prepared to print the nose section again. Test the cameras and only when fully ready apply a small amount of glue to the flat tabs and insert the assembly into the foam nose.
PETG good, ABS ok, PLA ok.
layer height: 0,15mm
walls/top/bottom: 2
infill: 16-20%
Rise printing temp 10ºC to improve layer adhesion for stronger and more flexible pilars.
Weight: 4,25gr
Nose uEagle2 Loris4K Cutting Aid:
Used as a stencil to mark the cutting line on the original foam nose. Place the side tabs just inside the foam rim and press so the foam gets marked. Cut the marked section with a very sharp blade and be conservative, you can always expand the hole later to fit the new nose with the cameras.
PLA, PETG and ABS are all OK.
Choose your preferred settings.
Loris Board Stands (Upper and Lower parts):
A couple of stands are fitted into the opposite sides of the board screw holes to maintain it stuck into the horizontal foam slot between the nose and the battery compartment. Insert the board diamond-like leaving the SD card and the REC button exposed. The big nose air inlets will keep good cooling.
ABS good, PETG and PLA ok. The board reaches 60ºC+ degrees on the ground although I haven't seen the PLA stand been affected so far.
layer height: 0,2mm
Weight (one couple): 0,15gr
Lens Cap Bicam:
For transport protection.
TPU (flexible) only
layer height: 0.2mm
walls: 2-3
top/bottom: 2-3
infill: ~80%
Lens Cap Loris only:
Protects only the 4K lens on landings when camera is not in use.
TPU (flexible) only
layer height: 0,2mm
walls: 2-3
top/bottom 2-3
infill ~80%
weight: 0,56gr
Belly Bump:
Used to streamline the finger bump on the lower fuselage. For printing position the flat side against the bed.
PETG, ABS, PLA are all ok.
layer height: 0,15mm
walls: 1
top: 1 / bottom: 2
infill: 0%
weight: 0,95gr
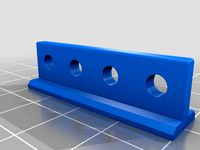
Motor Firewall:
Features full size ventilation port, wings trailing edge, 3 attachment points (2mm screw) for the tail cone.
Attach it to the wing with the original four screws. The holes might be slightly displaced due to manufacturing inconsistency, you can easily expand them with a hot rod aplied to the printed material. The tiny wings must be hollow to reduce weight. Can be done in Cura using modifiers and a square object, see part 5 ;-)
PLA, PETG and ABS are all good.
layer height: 0.15mm
walls/top/bottom: 2
infill: ~20%
wings infill: 0%
weight: 4,05gr
Motor Firewall Printing Aid:
To achieve the Motor Firewall with hollow wings in Cura use a pair of printing aid cubes (see pictures). Place them overlapping the wings and selecting Mesh Type menu (fifth icon on the left hand side toolbar) -> 'Modify settings for overlap'. Select 0% Infill. With the same method you can change other parameters if you wish.
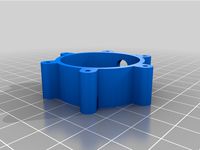
Tail Cone versions A and B:
Enlarged streamline shape, internal ventilation ports for cooling.
Version A is intended for use with 8x 1mm heat insulating spacers for the motor screws so that heat transfer over the printed material is reduced. If you don't have anything suitable you can print version B wich keeps the same geometry without spacers.
PETG or ABS, flexibility and heat resistance are both intersting. I don't have problems using PLA with version A cone because I am mainly cruising and motor keeps cold.
layer height: 0,15mm
walls: 2
top/bottom: 2-3 (affects weight and mostly the hardness of the motor base stand)
infill: 35 - 50% (high numbers needed mostly for the flat motor base printing)
Weight: 7,35gr
Winter Operations Air Inlets:
For those who fly in cold weather reduced cooling air Nose flow will maintain battery warm for better performance and will also protect the inlets from snow/debris. Available in three sizes, Medium, Small and Closed.
-TPU (flexible) only
layer height:0,2mm
walls: 2
top/bottom 2
infill 20-50%
weight: Medium 0,47gr, Small 0,52gr, Closed: 0,51gr
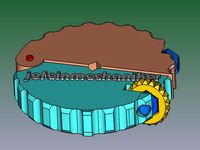
AR Mini Keychain Badge:
If you have ended up at this point you definitely deserve the greatest AR Mini pilots keychain badge :-) Looks like its for Inav users. "AR Mini" text is stamped on the reverse. Print from whatever material you like with your preferred settings and if you want to up/downscale it just do it on the X and Y axis since Z will mess up with details.
layer height: 0,2mm
ENJOY!!!
Complete aerodynamic kit for upgrading the Sonicmodel AR 600 Mini. The goal is to install the Caddx Loris 4K side by side with the Runcam Micro Eagle 2 for nice FPV and also to improve tail aerodynamics although the belly bump for example can be used standalone. The mod uses a stock foam nose which can also be bought separately, a quad 2205 motor (16x16mm screw hole distance on stand) plus 3x M2 screws and (optional) 8x 1mm insulating spacers, Everything else is 3D printed.
Weights are given in PLA/TPU although here is a list of some other materials:
PLA: rigid up to ~60ºC hard (in some cases easier to break), slightly heavier than the rest.
PETG: rigid up to ~80ºC, some degree of flexibility, slightly lighter than PLA.
ABS: rigid up to ~105ºC, hard, slightly lighter than the rest. Prone to warping.
TPU: flexible filament, for accessories and caps.
All parts are printed with 0,42mm wall line width.
Parts List
Nose uEagle2 Loris4K:
Extends the foam nose, keeps aerodynamic profile, moves cameras forward to maintain CG, improves cooling and reduces front cross section. Specifically for Runcam Micro Eagle and Caddx Loris 4K. Eliminates bullseye effect on both cameras.
Remove the center foam section by previously marking with the stencil (see Cutting Stencil bellow). Mount the cameras carefuly flexing the pilars to make them fit. Sometimes the pilar breaks so be prepared to print the nose section again. Test the cameras and only when fully ready apply a small amount of glue to the flat tabs and insert the assembly into the foam nose.
PETG good, ABS ok, PLA ok.
layer height: 0,15mm
walls/top/bottom: 2
infill: 16-20%
Rise printing temp 10ºC to improve layer adhesion for stronger and more flexible pilars.
Weight: 4,25gr
Nose uEagle2 Loris4K Cutting Aid:
Used as a stencil to mark the cutting line on the original foam nose. Place the side tabs just inside the foam rim and press so the foam gets marked. Cut the marked section with a very sharp blade and be conservative, you can always expand the hole later to fit the new nose with the cameras.
PLA, PETG and ABS are all OK.
Choose your preferred settings.
Loris Board Stands (Upper and Lower parts):
A couple of stands are fitted into the opposite sides of the board screw holes to maintain it stuck into the horizontal foam slot between the nose and the battery compartment. Insert the board diamond-like leaving the SD card and the REC button exposed. The big nose air inlets will keep good cooling.
ABS good, PETG and PLA ok. The board reaches 60ºC+ degrees on the ground although I haven't seen the PLA stand been affected so far.
layer height: 0,2mm
Weight (one couple): 0,15gr
Lens Cap Bicam:
For transport protection.
TPU (flexible) only
layer height: 0.2mm
walls: 2-3
top/bottom: 2-3
infill: ~80%
Lens Cap Loris only:
Protects only the 4K lens on landings when camera is not in use.
TPU (flexible) only
layer height: 0,2mm
walls: 2-3
top/bottom 2-3
infill ~80%
weight: 0,56gr
Belly Bump:
Used to streamline the finger bump on the lower fuselage. For printing position the flat side against the bed.
PETG, ABS, PLA are all ok.
layer height: 0,15mm
walls: 1
top: 1 / bottom: 2
infill: 0%
weight: 0,95gr
Motor Firewall:
Features full size ventilation port, wings trailing edge, 3 attachment points (2mm screw) for the tail cone.
Attach it to the wing with the original four screws. The holes might be slightly displaced due to manufacturing inconsistency, you can easily expand them with a hot rod aplied to the printed material. The tiny wings must be hollow to reduce weight. Can be done in Cura using modifiers and a square object, see part 5 ;-)
PLA, PETG and ABS are all good.
layer height: 0.15mm
walls/top/bottom: 2
infill: ~20%
wings infill: 0%
weight: 4,05gr
Motor Firewall Printing Aid:
To achieve the Motor Firewall with hollow wings in Cura use a pair of printing aid cubes (see pictures). Place them overlapping the wings and selecting Mesh Type menu (fifth icon on the left hand side toolbar) -> 'Modify settings for overlap'. Select 0% Infill. With the same method you can change other parameters if you wish.
Tail Cone versions A and B:
Enlarged streamline shape, internal ventilation ports for cooling.
Version A is intended for use with 8x 1mm heat insulating spacers for the motor screws so that heat transfer over the printed material is reduced. If you don't have anything suitable you can print version B wich keeps the same geometry without spacers.
PETG or ABS, flexibility and heat resistance are both intersting. I don't have problems using PLA with version A cone because I am mainly cruising and motor keeps cold.
layer height: 0,15mm
walls: 2
top/bottom: 2-3 (affects weight and mostly the hardness of the motor base stand)
infill: 35 - 50% (high numbers needed mostly for the flat motor base printing)
Weight: 7,35gr
Winter Operations Air Inlets:
For those who fly in cold weather reduced cooling air Nose flow will maintain battery warm for better performance and will also protect the inlets from snow/debris. Available in three sizes, Medium, Small and Closed.
-TPU (flexible) only
layer height:0,2mm
walls: 2
top/bottom 2
infill 20-50%
weight: Medium 0,47gr, Small 0,52gr, Closed: 0,51gr
AR Mini Keychain Badge:
If you have ended up at this point you definitely deserve the greatest AR Mini pilots keychain badge :-) Looks like its for Inav users. "AR Mini" text is stamped on the reverse. Print from whatever material you like with your preferred settings and if you want to up/downscale it just do it on the X and Y axis since Z will mess up with details.
layer height: 0,2mm
ENJOY!!!
Similar models
thingiverse
free

Sonicmodell AR 600 Mini Bicam v2 by Mateyhv
...ransport protection of the lenses.coming soon
winter operations air inlets v2:
inlets for reduced airflow.coming soon
enjoy!!!
thingiverse
free

MicroMotorWarehouse AIO Cam Mounts by JerryBoi831
... abs or pla if you so choose.
printed at .2 layer height and 40% infill.
supports not needed but recommended if printing with tpu
thingiverse
free

Pliers FPV Motors
...a thin layer of contact glue like bostik or similar you need also a m3x8 mm screw and a...
thingiverse
free

Ar Wing Pro 2x21700 li-ion Nose by Fagge
...2 of these betteries in the nose and 4 in the compartment as a 6s configuration, with perfect cg balancing without extra weights.
thingiverse
free

FT (FliteTest) Swappable Firewall by tyob1
...ine with pla, but would be more durable using asa, petg, or abs.
material weight could also be a consideration (see notes below).
thingiverse
free

Fancy Mustache TPU ReMix by OiDepp
...very comfortable (for my nose!)
printing in a solid material like pla abs petg will be not so comfortable as the original i think
thingiverse
free

Nose Plugs by cseanard
...
2 perimeter walls for more flexible nose plugs
3 perimeter walls for stiffer nose plugs
fine sanding required to ensure comfort.
thingiverse
free

Mushroom Stamp by shutinhorror
...amp was printed in tpu at 4% infill with 2 bottom layers
both printed at .2 layer height and used super glue to hold stamp to top
thingiverse
free

Feet for Microsoft digital media pro keyboard by leogala
...pro keyboard by leogala
thingiverse
printed with 0.2 mm layers, at least 50% infill, supports. pla is ok, petg/abs even better.
thingiverse
free

soft cover for car jack by motor-fuzzi
...t try to use petg, pla or abs as it witll break.
soft enough to not scratch the car and strong enough to lift a middle sized car.
Mateyhv
thingiverse
free

Foxeer Pagoda streamlined fairing by Mateyhv
...t type: any
layer height: 0.2mm
layer thickness: 0.42mm
walls/top/bottom: 2/3/3 layers
infill: 25-35%
supports: yes
weight: 3.2gr
thingiverse
free

Armsoar Fury canopy retainer by Mateyhv
...ls/bottom/top: 2 layers (the piece will become solid)
infill: doesn't matter since its solid
weight: 0.75gr
enjoy the fury!!!
thingiverse
free

Armsoar Fury through calibration gauges by Mateyhv
...nge: at layer 6
for gauge_color_rudder.stl color changes are at layers:
1 black
6 white
8 yellow
9 red
11 black
enjoy the fury!!!
thingiverse
free
Sonicmodell AR 600 Mini Bicam v2 by Mateyhv
...ransport protection of the lenses.coming soon
winter operations air inlets v2:
inlets for reduced airflow.coming soon
enjoy!!!
Sonicmodell
thingiverse
free

Sonicmodell Binary servo
...sonicmodell binary servo
thingiverse
sonicmodell binary
thingiverse
free

Sonicmodell HD Motor Mount
...sonicmodell hd motor mount
thingiverse
motor mount for sonicmodell hd wing.
thingiverse
free

Sonicmodell Binary front gear
...sonicmodell binary front gear
thingiverse
sonicmodell binary front landing gear
thingiverse
free

Sonicmodell Binary
...tbs unify pro32 hv mmcx + luminier ax2 micro
caddx tarsier mount in the back
for the big holes with m3 you need ruthex m3 inserts
thingiverse
free

Sonicmodell binary
...sonicmodell binary
thingiverse
filling is minimal. the petg material. the magnet is rectangular with dimensions 5-10-1 mm.
thingiverse
free

Sonicmodell binary landing gear
...erse
this is the complete landing gear without the wheels for sonicmodell binary 1200mm.
i used a savox 0255 servo for steering.
thingiverse
free

sonicmodell binary 1200mm motor mount by TimonDV
...sonicmodell binary 1200mm motor mount by timondv
thingiverse
motor mount for sonicmodell binary 1200
thingiverse
free

RC Plane Landing Gear Sonicmodell Binary
...rc plane landing gear sonicmodell binary
thingiverse
landing gear for the sonicmodell binary 1200 mm
thingiverse
free

Sonicmodell Binary Matek F405-wing board
...sonicmodell binary matek f405-wing board
thingiverse
sonicmodell binary matek f405-wing board
thingiverse
free

Sonicmodell Binary servo bracket
...sonicmodell binary servo bracket
thingiverse
servo bracket
Aerodynamic
thingiverse
free

A959 Aerodynamic Nose And Shell
...a959 aerodynamic nose and shell
thingiverse
an aerodynamic shell for an wltoys a959 or a959b.
thingiverse
free

Aerodynamic Spinner by BigBraggingBaby
...o be more aerodynamic for improved spinning at higher speeds.
made for standard 608 bearings.
center caps not part of this thing.
thingiverse
free

ZMR250 aerodynamic battery protector by Gundahar
...zmr250 aerodynamic battery protector by gundahar
thingiverse
an experimental aerodynamic enhancer for zmr250 race quadcopter
thingiverse
free

Aerodynamic Mirror Cover by DCullimore
...er the standard mirror as sold by greenpower and supplied with the kit car. fix to the mirror with adhesive applied to the edges.
thingiverse
free

Wltoys A959 Aerodynamic pack 1 by Yeps
...wltoys a959 aerodynamic pack 1 by yeps
thingiverse
wltoys a959 aerodynamic pack
thingiverse
free

Aerodynamic Birdy! by Proserpia
...c birdy! by proserpia
thingiverse
been working on this birdy and it keeps illuding me as to how to get the eyes and feet done...
thingiverse
free

SWIFT II aerodynamics servo covers by 0Pascal0
...swift ii aerodynamics servo covers by 0pascal0
thingiverse
aerodynamics servo covers for ms compsosit swift-ii
thingiverse
free

Aerodynamic Rocket #1 by nichutchinson1
...aerodynamic rocket #1 by nichutchinson1
thingiverse
rocket designed to fly straight up.
thingiverse
free

Aerodynamic Rocket #2 by nichutchinson1
...aerodynamic rocket #2 by nichutchinson1
thingiverse
another rocket designed to fly straight upwards.
thingiverse
free

Aerodynamic mudguard for an automotive vehicle by ILYAMII
... the first edition.
the part must be fixed on the vehicle sill (or on the bottom of the front doors), closer to the front wheels.
600
thingiverse
free

Kit CNC laser 600/600 by routch
...kit cnc laser 600/600 by routch
thingiverse
kit cnc laser 600/600
thingiverse
free

600-cell
... model i made.
more about this on: https://www.reddit.com/r/math/comments/dttg4y/oc_my_3d_printed_4d_objects_their_projections/ .
thingiverse
free
Airbus A300-600 by P6619
...airbus a300-600 by p6619
thingiverse
this is a airbus a300-600
thingiverse
free

Stabilizzatore trex 600 by saster
...stabilizzatore trex 600 by saster
thingiverse
stabilizzatore-pinna trex 600 spessore 2.5mm
thingiverse
free

Airbus A340-600 by 3DimensionPrinter
...airbus a340-600 by 3dimensionprinter
thingiverse
an airbus a340-600 ready for a 3d print.
thingiverse
free

600 Cell by wwebber
... is similar to my other 600 cell. http://www.thingiverse.com/thing:753001
the only difference is that this one has thicker edges.
thingiverse
free

Pic-600 programmer by turgrot
...pic-600 programmer by turgrot
thingiverse
a case for the pic-600 programer, it does not need screws
thingiverse
free

Campingaz 600 Handle by geri1403
...campingaz 600 handle by geri1403
thingiverse
replacement handle for a campingaz 600 sg/sv/st stove.
thingiverse
free

Trex 600 battery plate by yko66coupe
...trex 600 battery plate by yko66coupe
thingiverse
trex 600 battery plate
thingiverse
free

Honda 600 diversion by luberth77
...honda 600 diversion by luberth77
thingiverse
bague de guidage pour câble de compteur sur une honda 600 diversion
Kit
thingiverse
free

Kit Grappa - Kit Brandy by doctormao
...kit grappa - kit brandy by doctormao
thingiverse
kit grappa - kit brandy
thingiverse
free

AT-AT Kit Card by fresh1134206
...at-at kit card by fresh1134206
thingiverse
at-at kit card
thingiverse
free

Vixen Kit by eeprof
...vixen kit by eeprof
thingiverse
vixen kit
thingiverse
free

Sleeve Bonza Kit
...sleeve bonza kit
thingiverse
sleeve bonza kit
thingiverse
free

Fort Kit by MrWatermelon769
...fort kit by mrwatermelon769
thingiverse
fort kit for kids
thingiverse
free

Upholstery removal kit
...upholstery removal kit
thingiverse
upholstery removal kit
thingiverse
free

Organize Kit by Teobaldo
...organize kit by teobaldo
thingiverse
configure the organize kit with parameters.
thingiverse
free

sewing kit by ackee123
...sewing kit by ackee123
thingiverse
key fob that contains a sewing kit.
thingiverse
free

Column Kit by
...column kit by
thingiverse
you know...
thingiverse
free

Rocket Kit by IDEMLyon
...rocket kit by idemlyon
thingiverse
a little rocket kit to start using laser cutter.
Mini
thingiverse
free
mini castle mini mini golf by EdisonM
...mini castle mini mini golf by edisonm
thingiverse
play able with ball and putter in the "mini mini golf" model
thingiverse
free
Mini Clothesline - Mini Tendal
...mini clothesline - mini tendal
thingiverse
mini clothesline
mini tendal
thingiverse
free
mini mini golf by EdisonM
...mini mini golf by edisonm
thingiverse
actually playable mini mini golf course with putter and ball
thingiverse
free

Mini Schleuder / Mini Slingshot by Ju5tMak3
...mini schleuder / mini slingshot by ju5tmak3
thingiverse
mini schleuder / mini slingshot
have fun
thingiverse
free
mini bomba (mini pump) by neemiasmiranda
...mini bomba (mini pump) by neemiasmiranda
thingiverse
mini bomba
thingiverse
free

MINI by shteffs
...mini by shteffs
thingiverse
mini
thingiverse
free
Mini wrist, Mini poignet by Aleoduc74
...mini wrist, mini poignet by aleoduc74
thingiverse
mini poignet pour vitre ou petit meuble.
thingiverse
free

Mini Bat
...mini bat
thingiverse
mini bats.
thingiverse
free
Mini-Windeisen
...mini-windeisen
thingiverse
mini-windeisen
thingiverse
free
Mini cadeira
...mini cadeira
thingiverse
mini cadeira