Thingiverse

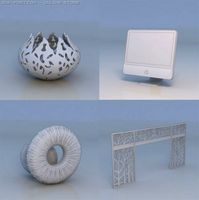
Snapmaker 2.0 A350 Touch Screen Enclosure Seat by Botverse7
by Thingiverse
Last crawled date: 3 years, 1 month ago
ONLY for the SnapMaker 2.0 A350 Enclosure. I do not know if it fits others.
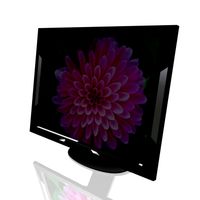
3 piece assembly so that the SnapMaker 2.0 A350 control pad is easily visible from the side. My 3D printer table setup has the longer side door panels facing me so the original touch screen holder is not easy to view. This makes the touch screen visible and accessible.
The touch screen is angled for better viewing and to clear the front door panel hole when opening.
These models are an updated version on the first build shown in the photos.
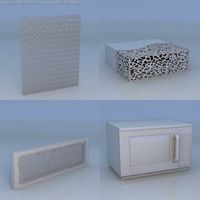
The build direction is important to make the cantilever seat stronger. For the panel, it is to make the main face flat as it faces the door panel. I used PLA and it holds up fine.
You will need to add supports to the 2 larger parts when printing.
Use cyano or epoxy to bond the parts.
I used Harbor Freight disc magnets (Rare Earth Magnets; SKU(s) 67488, 98371) in the 4 wells on the seat for the control pad.
To bond the magnets in place so the magnetic attraction is correct;
1) do a dry run to correctly orient the magnets in each well; place the control pad in position and carefully seat each magnet so it is attracted to the magnet in the control pad.
Repeat the above steps and glue the magnet into the wells.
3 piece assembly so that the SnapMaker 2.0 A350 control pad is easily visible from the side. My 3D printer table setup has the longer side door panels facing me so the original touch screen holder is not easy to view. This makes the touch screen visible and accessible.
The touch screen is angled for better viewing and to clear the front door panel hole when opening.
These models are an updated version on the first build shown in the photos.
The build direction is important to make the cantilever seat stronger. For the panel, it is to make the main face flat as it faces the door panel. I used PLA and it holds up fine.
You will need to add supports to the 2 larger parts when printing.
Use cyano or epoxy to bond the parts.
I used Harbor Freight disc magnets (Rare Earth Magnets; SKU(s) 67488, 98371) in the 4 wells on the seat for the control pad.
To bond the magnets in place so the magnetic attraction is correct;
1) do a dry run to correctly orient the magnets in each well; place the control pad in position and carefully seat each magnet so it is attracted to the magnet in the control pad.
Repeat the above steps and glue the magnet into the wells.
Similar models
thingiverse
free

Snapmaker 2.0 A350 Enclosure Spool Holder extension by CptBalu
... enclosure of a snapmaker 2.0 a350.
ideal when the snapmaker is placed against a wall, to hold the spool on top of the enclosure.
thingiverse
free

Snapmaker A350 Control Panel enclosure with door by alienkidmj12
...control panel else where. takes just under 7 hours to print the door with a raft, sorry dont have timings for the main enclosure.
thingiverse
free

Snapmaker 2.0 Enclosure Touchscreen Bracket by kd7jur
...ker enclosure.
bracket is designed to be attached to the right side of the enclosure, if you are using the long door as the front
thingiverse
free

Snapmaker 2.0 Touchpad Holder Enclosure Mount by VStepanets
...ou will need:
original magnetic touchpad mount (remains unused after installing the printer in the enclosure)
two short screws m4
thingiverse
free

Snapmaker 2.0 Enclosure Wire Clip by Dhuskins
...re-wire-clip/edit
version 2 is an easier fit as the distance between the clip and the long side piece are a little further apart.
thingiverse
free

Snapmaker 2.0 Corner Block by PliskinAJ
...hese blocks to square out the enclosure. there are 2 ø1/8" holes on each side of the block to aid in bolting items to them.
thingiverse
free

Snapmaker 2.0 Filament guard for A350 enclosure by N0cktambuLL
...en printer is in a350 enclosure.
resolution doesn't matter, prints well from 0.24 to 0.32mm.
infill 20-30%
no supports needed
thingiverse
free

Two side PTFE PC4-M6 connector for 12mm hole with nut for Snapmaker 2 A350 enclosure by VStepanets
...tion.
hole diameter - 12mm (fits to standard side hole in snapmaker 2.0 enclosure too)
2x pc4-m6 ptfe connectors can be installed
thingiverse
free

Remote Control Holder and Sidewall for Snapmaker 2.0 A350 by Dimanazzz
...ol to trigger shooting.
can be used on all snapmaker 2.0 models.
tutorial for shooting photos for timelapse available of youtube.
thingiverse
free

Snapmaker nameplate for A350 enclosure by Khurramst
...snapmaker nameplate for a350 enclosure by khurramst
thingiverse
designed in tinkercad for snapmaker a350 enclosure.
Snapmaker
thingiverse
free

「Snapmaker」Tiny Snapmaker by SnapmakerInc
...ker
designer:howard
info:this is a tiny snapmaker 3d printer
more information on snapmaker community : http://forum.snapmaker.com
thingiverse
free

FOR SNAPMAKER by darknessbot
...for snapmaker by darknessbot
thingiverse
i remade this for snapmaker
thingiverse
free

「Snapmaker」Reprap Snapmaker 3IN1 by SnapmakerInc
...「snapmaker」reprap snapmaker 3in1 by snapmakerinc
thingiverse
designer:
info:
setting:
thingiverse
free

Vibration Damper for Snapmaker 1 and Snapmaker 2 by kogomonier
...ry dampers of the snapmaker. snugs in perfectly and silences the snapmaker estimated by around 60-70%.
fits on snapmaker 1 and 2.
thingiverse
free

Snapmaker mounting plate
...snapmaker mounting plate
thingiverse
mounting plate for snapmaker actuator
thingiverse
free

「Snapmaker」Flowerpot by SnapmakerInc
...akerinc
thingiverse
name:flowerpot
designer:leonardo
info:
more information on snapmaker community : http://forum.snapmaker.com/
thingiverse
free

Snapmaker 2 Organizers
...ker 2 organizers
thingiverse
organizers for the snapmaker two. one is for a desk organizer, the other is if you want to hang it.
thingiverse
free

LED clips for snapmaker by ymmij
...led clips for snapmaker by ymmij
thingiverse
led clips for snapmaker.
thingiverse
free

snapmaker parts box by Shaocheng
...snapmaker parts box by shaocheng
thingiverse
parts box of snapmaker 3d printer
thingiverse
free

Snapmaker enclosure height extension
...on for the snapmaker enclosure to fit the height extended snapmaker 1. would be compatible with all parts of the enclosure frame.
A350
3d_export
$17

Airbus A350
...airbus a350
3dexport
airbus a350
turbosquid
$199

A350-800 Yemenia
... available on turbo squid, the world's leading provider of digital 3d models for visualization, films, television, and games.
turbosquid
$199

A350-800 Vietnam
... available on turbo squid, the world's leading provider of digital 3d models for visualization, films, television, and games.
turbosquid
$199

A350-800 Tunisair
... available on turbo squid, the world's leading provider of digital 3d models for visualization, films, television, and games.
turbosquid
$199

A350-800 TAP
... available on turbo squid, the world's leading provider of digital 3d models for visualization, films, television, and games.
turbosquid
$199

A350-800 Singapore
... available on turbo squid, the world's leading provider of digital 3d models for visualization, films, television, and games.
turbosquid
$199

A350-800 US
... available on turbo squid, the world's leading provider of digital 3d models for visualization, films, television, and games.
turbosquid
$199

A350-800 Qatar
... available on turbo squid, the world's leading provider of digital 3d models for visualization, films, television, and games.
turbosquid
$199

A350-800 Hawaiian
... available on turbo squid, the world's leading provider of digital 3d models for visualization, films, television, and games.
turbosquid
$199

A350-800 Finnair
... available on turbo squid, the world's leading provider of digital 3d models for visualization, films, television, and games.
Enclosure
3d_export
free

electrical enclosure
...l enclosure where electrical devices like (relays, contactors, busbars ) are kept in order to protect from hazardous environment.
turbosquid
$100

GPU Enclosure
...yalty free 3d model gpu enclosure for download as obj and stl on turbosquid: 3d models for games, architecture, videos. (1381061)
3d_export
$5

Electrical Enclosure
...ed. also has tower lights attaced on the top.<br>file format that are available:<br>.step<br>.obj<br>.stl
archive3d
free

Enclosure 3D Model
...closure 3d model
archive3d
shower enclosure-acquarius- 3d model for interior 3d visualization.
archive3d
free

Enclosure 3D Model
...enclosure 3d model
archive3d
shower enclosure-omega- 3d model for interior 3d visualization.
archive3d
free

Enclosure 3D Model
...enclosure 3d model
archive3d
shower enclosure-vega - 3d model for interior 3d visualization.
archive3d
free

Enclosure 3D Model
...enclosure 3d model
archive3d
shower enclosure-zenith - 3d model for interior 3d visualization.
turbosquid
$20

shower enclosure
... available on turbo squid, the world's leading provider of digital 3d models for visualization, films, television, and games.
turbosquid
$14

Dumpster Enclosure
... available on turbo squid, the world's leading provider of digital 3d models for visualization, films, television, and games.
turbosquid
$25

3d printer enclosure
... model 3d printer enclosure for download as ipt, skp, and fbx on turbosquid: 3d models for games, architecture, videos. (1634310)
Touch
3ddd
$1

Touch
...touch
3ddd
touch , альфа банк
электронный терминал для очереди
3ddd
$1

GSG / Touch
... ванна
http://www.ceramicagsg.com/sanitaryware-touch/bathtub-touch-free-standing.html
turbosquid
$10

Oculus Touch
...squid
royalty free 3d model oculus touch for download as skp on turbosquid: 3d models for games, architecture, videos. (1462433)
turbosquid
$64

iPod Touch
...ty free 3d model ipod touch for download as 3ds, max, and obj on turbosquid: 3d models for games, architecture, videos. (1299603)
3ddd
$1

iPod Touch 5
...ipod touch 5
3ddd
apple , плеер
модель ipod touch 5
3ddd
$1

Asnaghi "Touch"
...asnaghi "touch"
3ddd
asnaghi , touch
фабрика: asnaghi
модель: touch
3ddd
free

Japanese stone touch
...japanese stone touch
3ddd
фонарь
japanese stone garden touch
японский садовый фонарь
икеокоми-гата
3d_ocean
$15
IPOD TOUCH 5
...apple blender ipad iphone ipod mp3 nano player touch
3d model of ipod touch 5 in 3 colours. available in .3ds, .blend, .obj, .x3d
3d_ocean
$12

iPod touch 5G
...pod jobs nano steve touch
ipod touch 3d model. formats, fbx, obj, max(2010) textures and materials with multiple colors included.
3ddd
$1
HTC Touch HD
...http://www.gsmarena.com/htc_touch_hd-2525.php фото:http://i.smartphone.ua/img/phones/htc-touch-hd/foto_001.jpg
Screen
archibase_planet
free
Screen
...screen radiator screen radiator enclosure lattice
screen radiator n120315 - 3d model (*.gsm+*.3ds) for interior 3d visualization.
archibase_planet
free

Screen
...screen
archibase planet
screen group display
movie screen - 3d model for interior 3d visualization.
3ddd
$1
Screen
...screen
3ddd
screen
modern dressing wall partition
3d_ocean
$15

HP Screen
...test hp screen. it is has different object, so you can use it as a wall mounted screen or a stand on table. hope you all like it.
3d_export
$10
Accessories screen LCD screen 3D Model
...d screen 3d model
3dexport
accessories screen lcd 3d model interior
accessories screen lcd screen 3d model sunupcg 17831 3dexport
turbosquid
$25
SCREEN
... available on turbo squid, the world's leading provider of digital 3d models for visualization, films, television, and games.
turbosquid
$2
Screen
... available on turbo squid, the world's leading provider of digital 3d models for visualization, films, television, and games.
3d_export
$10
Screen metal screen microwave 3D Model
...ave 3d model
3dexport
screen metal microwave oven 3d model interior
screen metal screen microwave 3d model sunupcg 17847 3dexport
3d_ocean
$5
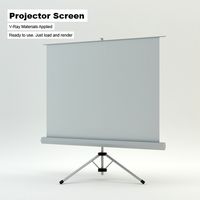
Projector Screen
...hat have presentations. the projector screen consists of an alluminum structure that holds the canvas up. this model can be us...
archive3d
free
Screen 3D Model
...rchive3d
screen folding screen
screen n020811 - 3d model (*.3ds) for interior 3d visualization.
0
turbosquid
$12

Calligraphic Digit 0 Number 0
...hic digit 0 number 0 for download as max, obj, fbx, and blend on turbosquid: 3d models for games, architecture, videos. (1389318)
3d_export
$6

set-0
...set-0
3dexport
turbosquid
$6

hedge 0
...yalty free 3d model hedge 0 for download as max, obj, and fbx on turbosquid: 3d models for games, architecture, videos. (1450353)
turbosquid
$5

Nuber 0
...oyalty free 3d model nuber 0 for download as ma, obj, and fbx on turbosquid: 3d models for games, architecture, videos. (1564674)
turbosquid
$22

0.jpg
... available on turbo squid, the world's leading provider of digital 3d models for visualization, films, television, and games.
turbosquid
free

Steam Locomotive Fowler 4F 0-6-0
... available on turbo squid, the world's leading provider of digital 3d models for visualization, films, television, and games.
turbosquid
$10

Liquid Number 0
... model liquid number 0 for download as c4d, 3ds, fbx, and obj on turbosquid: 3d models for games, architecture, videos. (1689919)
turbosquid
$45

Dragon360_perspShape_tmp.0.jpg
... available on turbo squid, the world's leading provider of digital 3d models for visualization, films, television, and games.
turbosquid
$8

Rocks Debris 0
... available on turbo squid, the world's leading provider of digital 3d models for visualization, films, television, and games.
3d_export
$18

wood-guardrail-fence 0
...wood-guardrail-fence 0
3dexport
wood-guardrail-fence 0<br>3ds max 2015
Seat
archibase_planet
free

Seats
...seats
archibase planet
seats seat
corpus modular 5 seats - 3d model for interior 3d visualization.
archibase_planet
free

Seats
...seats
archibase planet
bench seat seats
corpus modular 3 seats - 3d model for interior 3d visualization.
archibase_planet
free

Seats
...seats
archibase planet
seat seats bench
corpus modular 4 seats - 3d model for interior 3d visualization.
3d_export
$5

seat
...seat
3dexport
seat,wood
turbosquid
$10

Seating-Auditorium Seating
... seating-auditorium seating for download as max, fbx, and obj on turbosquid: 3d models for games, architecture, videos. (1713206)
archibase_planet
free

Seats
...seats
archibase planet
seats chairs furniture
seats - 3d model for interior 3d visualization.
archibase_planet
free

Seat
...seat
archibase planet
seat furniture
seat - 3d model (*.3ds) for interior 3d visualization.
archibase_planet
free

Seat
...seat
archibase planet
seat bench
seat - 3d model (*.gsm+*.3ds) for interior 3d visualization.
archibase_planet
free

Seat
...seat
archibase planet
seat bench
seat - 3d model (*.gsm+*.3ds) for interior 3d visualization.
archibase_planet
free

Seat
...seat
archibase planet
seat bench
seat - 3d model (*.gsm+*.3ds) for interior 3d visualization.
2
design_connected
$11

No 2
...no 2
designconnected
sibast no 2 computer generated 3d model. designed by sibast, helge.
turbosquid
$6

Cliff Rock 2-2
...uid
royalty free 3d model cliff rock 2-2 for download as obj on turbosquid: 3d models for games, architecture, videos. (1619161)
turbosquid
$29

Book variation 2 2
...3d model book variation 2 2 for download as max, obj, and fbx on turbosquid: 3d models for games, architecture, videos. (1366868)
turbosquid
$22

Classic baluster (2) (2)
...assic baluster (2) (2) for download as max, obj, fbx, and stl on turbosquid: 3d models for games, architecture, videos. (1483789)
turbosquid
$99

Smilodon 2 Pose 2
... available on turbo squid, the world's leading provider of digital 3d models for visualization, films, television, and games.
turbosquid
$20

Barrel Barricade 2-2
... available on turbo squid, the world's leading provider of digital 3d models for visualization, films, television, and games.
turbosquid
$6

Wall Trophy (2) (2)
... available on turbo squid, the world's leading provider of digital 3d models for visualization, films, television, and games.
turbosquid
free

Tire label 2 of 2
... available on turbo squid, the world's leading provider of digital 3d models for visualization, films, television, and games.
3ddd
$1

Кровать, 2 тумбочки, 2 светильника
...кровать, 2 тумбочки, 2 светильника
3ddd
кровать, 2 тумбочки, 2 светильника
нормальное качество
формат 3ds max
без текстур
3ddd
free

Кровать, 2 тумбочки, 2 светильника
...кровать, 2 тумбочки, 2 светильника
3ddd
кровать, 2 тумбочки, 2 светильника
нормальное качество
формат 3ds max
без текстур