Thingiverse
SMuFF - Servo Variant
by Thingiverse
Last crawled date: 4 years, 2 months ago
Here we go again...
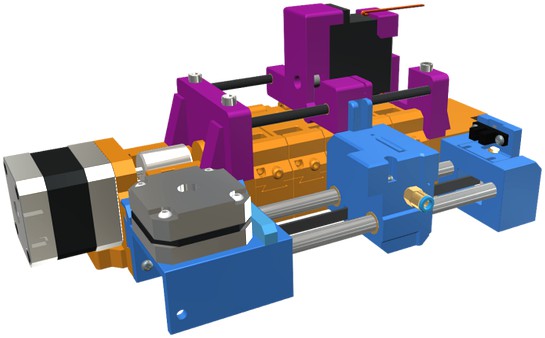
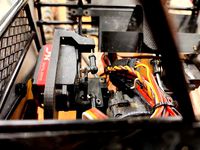
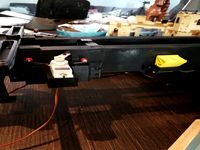
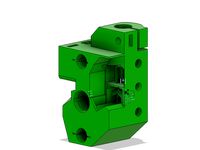
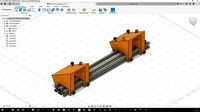
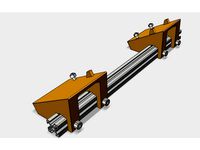
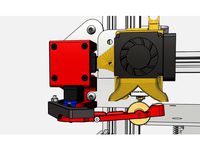
This is a new option (or variant) of the SMuFF Revolver.
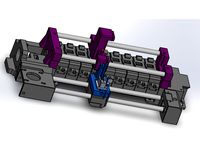
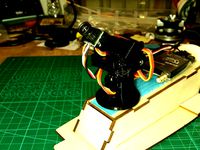
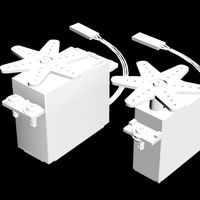
The first pictures above depicts the complete SMuFF with this new option.
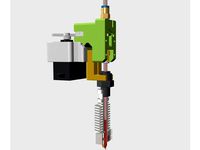
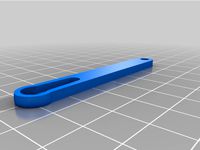
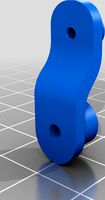
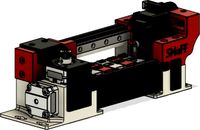
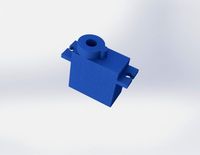
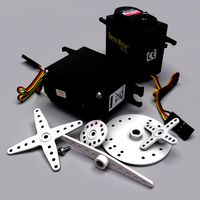
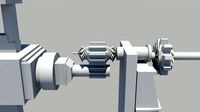
In the 2nd, 3rd and 4th picture you'll see all the new parts needed.
If you don't know what a SMuFF could possibly be, head over to the main project and read all about it.
What's the gist?
Using a servo instead of the original Revolver comes with some benefits:
Less parts to print and assemble
easier to maintain if something gets stuck
more precise pressure point on the upper Bondtech gear (means less interlocking and binding)
not restricted to "only" 9 materials (make it as big as you need)
Here you can see it in action:https://youtu.be/uA2HJwa0xys
I've been stress testing the whole unit, just to make sure it's worth posting. The test ran continuously for 32.5 hours (whereas 24 hours was my goal), as you can see in the screenshot above.
In this time it performed a mind blowing 7383 tool (filament) changes. In real life, this would compare to a almost 1.5 meter tall 3D printed something with one tool change per layer (at 0.2 layer height).
BOM
To build this thingy, you'll need:
The printed parts
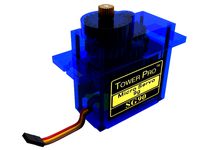
A standard size servo
A servo horn (preferably Aluminium) with an overall length of 27 mm
An step down converter (to generate the 5-7V needed to drive the servo)
Two rods, 5mm in diameter (either steel, brass or - the preferred one carbon fiber)
4 self tapping screws 2.9 x 9.5 mm (for the servo)
2 self tapping screws 2.2 x 6.5 mm (for the lid)
A M3 x 6mm screw to mount the servo horn to the servo
the latest firmware version for the SMuFF (on Github)
What else?
The parts are named the same way as the parts in the main project (SMuFF). R stands for Revolver with a "-Servo" suffix (whereas this - from a technical perspective - isn't a Revolver anymore but I'll keep the term just to confuse you). So it's pretty easy to spot which parts are to be replaced.
If you're going to build the SMuFF, or you already have built one, please notice that you'll need the "new controller", based on the SKR mini V1.1, which is shown here.
Assembly
Not much to say here. Connect all parts together, screw the servo to its position and place it on top of the Feeder-Assembly.
Hints
For a better motion, I've used a brass tube, 6 mm OD / 5.1 mm ID as a bushing on the rod facing the selector. The rear hole has no bushing but I've drilled it out to around 5.5 mm.
It seems a bit wiggly but it doesn't bind while the Selector moves left/right.
The step down converter is needed, because the SKR mini V1.1 doesn't deliver enough power to drive the servo directly. Since the controller itself runs on 12/24V, it's easy enough to split the power input and feed the step down converter too.
Set the output of the step down converter to a decent voltage, according to your servos specs (i.e. 7V). Keep in mind, the higher the voltage on the servo, the faster it moves and the more torque it has.
Firmware setup
To switch from the default Revolver to the servo version, go to the Settings->Steppers->Revolver menu and set Use Servo to Yes. Also, you have to define the On/Off positions of the servo in degrees in Servo open and Servo closed
Testing
After you've assembled this variant, go to the Testrun menu and select the Selector test script to make sure everything is running smoothly and there's no binding between Selector and servo carriage.
Update 1
I've added the parts for the mini servo version of this thingy.
I wasn't convinced at all, that a mini servo has enough force to work as expected but, as you can see in the video, I proved myself wrong in a test run of over 24 hours.
The main benefit - beside it's not as bulky as the other one - is that the cable management is better by far.
If you'd like to switch from the standard sized servo to the mini servo version, you only have to print the new 3 parts and you're ready to go.
The servo horn shoe I've added helps to put more pressure onto the lid as well as to get the right distance between servo horn and lid. I've glued mine onto the servo horn with a distance of 8.5 mm measured in between the top of the horn shoe and the bottom of the servo carriage.
To get the right distance of the horn shoe, you may have to shave off a bit of the servo horn.
This is a new option (or variant) of the SMuFF Revolver.
The first pictures above depicts the complete SMuFF with this new option.
In the 2nd, 3rd and 4th picture you'll see all the new parts needed.
If you don't know what a SMuFF could possibly be, head over to the main project and read all about it.
What's the gist?
Using a servo instead of the original Revolver comes with some benefits:
Less parts to print and assemble
easier to maintain if something gets stuck
more precise pressure point on the upper Bondtech gear (means less interlocking and binding)
not restricted to "only" 9 materials (make it as big as you need)
Here you can see it in action:https://youtu.be/uA2HJwa0xys
I've been stress testing the whole unit, just to make sure it's worth posting. The test ran continuously for 32.5 hours (whereas 24 hours was my goal), as you can see in the screenshot above.
In this time it performed a mind blowing 7383 tool (filament) changes. In real life, this would compare to a almost 1.5 meter tall 3D printed something with one tool change per layer (at 0.2 layer height).
BOM
To build this thingy, you'll need:
The printed parts
A standard size servo
A servo horn (preferably Aluminium) with an overall length of 27 mm
An step down converter (to generate the 5-7V needed to drive the servo)
Two rods, 5mm in diameter (either steel, brass or - the preferred one carbon fiber)
4 self tapping screws 2.9 x 9.5 mm (for the servo)
2 self tapping screws 2.2 x 6.5 mm (for the lid)
A M3 x 6mm screw to mount the servo horn to the servo
the latest firmware version for the SMuFF (on Github)
What else?
The parts are named the same way as the parts in the main project (SMuFF). R stands for Revolver with a "-Servo" suffix (whereas this - from a technical perspective - isn't a Revolver anymore but I'll keep the term just to confuse you). So it's pretty easy to spot which parts are to be replaced.
If you're going to build the SMuFF, or you already have built one, please notice that you'll need the "new controller", based on the SKR mini V1.1, which is shown here.
Assembly
Not much to say here. Connect all parts together, screw the servo to its position and place it on top of the Feeder-Assembly.
Hints
For a better motion, I've used a brass tube, 6 mm OD / 5.1 mm ID as a bushing on the rod facing the selector. The rear hole has no bushing but I've drilled it out to around 5.5 mm.
It seems a bit wiggly but it doesn't bind while the Selector moves left/right.
The step down converter is needed, because the SKR mini V1.1 doesn't deliver enough power to drive the servo directly. Since the controller itself runs on 12/24V, it's easy enough to split the power input and feed the step down converter too.
Set the output of the step down converter to a decent voltage, according to your servos specs (i.e. 7V). Keep in mind, the higher the voltage on the servo, the faster it moves and the more torque it has.
Firmware setup
To switch from the default Revolver to the servo version, go to the Settings->Steppers->Revolver menu and set Use Servo to Yes. Also, you have to define the On/Off positions of the servo in degrees in Servo open and Servo closed
Testing
After you've assembled this variant, go to the Testrun menu and select the Selector test script to make sure everything is running smoothly and there's no binding between Selector and servo carriage.
Update 1
I've added the parts for the mini servo version of this thingy.
I wasn't convinced at all, that a mini servo has enough force to work as expected but, as you can see in the video, I proved myself wrong in a test run of over 24 hours.
The main benefit - beside it's not as bulky as the other one - is that the cable management is better by far.
If you'd like to switch from the standard sized servo to the mini servo version, you only have to print the new 3 parts and you're ready to go.
The servo horn shoe I've added helps to put more pressure onto the lid as well as to get the right distance between servo horn and lid. I've glued mine onto the servo horn with a distance of 8.5 mm measured in between the top of the horn shoe and the bottom of the servo carriage.
To get the right distance of the horn shoe, you may have to shave off a bit of the servo horn.
Similar models
thingiverse
free
Filament-Cutter by technik_gegg
...'ll need an arduino (nano) attached to a stepper driver via step / dir / enable interface and at least one pin for the servo.
thingiverse
free
Remix of servo Variant...Removed IFC and Skr mini
...g on this for a few weeks now.
@technik_gegg im pretty sure you can make this an even better project with the skill you posses :)
thingiverse
free
MG90 / SG90 Servo Horn Arm Assortment by crashworks3d
...e" servo horn that comes with your servo, then trim it to fit into the arm
the hole on the non-servo side is 4mm in diameter
thingiverse
free
Easy small compact strong pan tilt by JPH
... and put the servo screw in the servo.
and your done!.
thanks for making and please let me know wen it isn't working for you!
thingiverse
free
Steering servo first axel by Pka78
...t have calibrated printer i really suggest that you enlarge this model something like 2%.
"servo horn, for t25-servo".
thingiverse
free
Yet Another Combination Lock (Changeable Combination) by jpan
...ase the pin.
about the scad files for the gears: i used a public domain gear library that i cannot find now... sorry about that.
thingiverse
free
New Electronics Case for SMuFF (E3 Edition) by technik_gegg
... adapter.
again: there's an all files.zip included, just in case thingiverse doesn't upload/provide the stl files itself.
cg_trader
$3
TRX-4 Standard Servo Differential Lock
... you may find the outside easier. trx 4 trx4 radio control rc scx10 scx10 2 servo differential standard vehicle part vehicle part
thingiverse
free
Dump truck elektronic switches
...s).
i've drilled the wholes manually in the chassis, so you could even instal it underneath if you find a nice spot to do it.
thingiverse
free
MMU2 Selector (Stock Magnet, opened canal, R2 Blade depth)
...;d share it anyway).
print the same as the standard part, you'll also need the updated official blade "clamp" part.
Smuff
thingiverse
free
SMuFF Mount for 2040 Extrusion by Bananaweizen
...of the smuff mount for 2020 extrusion (https://www.thingiverse.com/thing:4662753) now for 2040 extrusion.
nothing else.
have fun!
thingiverse
free

SMUFF (Splitter version) by Feav
...o cody cato for the smuff macros) but it works as expected, just some more testing to do. anyway will update as things progress.
thingiverse
free
SMuFF Mount for 2020 Extrusion by technik_gegg
...adays (i.e. creality, biqu, anycubic, artillery).
not much else to say here...
for the step file, please visit my grabcad library
thingiverse
free
SMuFF (LINEAR RAIL SPLITTER VERSION) by Feav
...rse
this is still a work in progress. i will upload my klipper configuration after testing. still waiting on the rail to turn up
thingiverse
free

SMuFF - BMG Endstop Cover by technik_gegg
...t much travel of the gear-lever when filament is loaded, you may have to adjust the model. hence i've included the step file.
thingiverse
free
SMuFF V6 - Smart Multi Filament Feeder with Bondtech Gears by technik_gegg
...d in this youtube-video.
the bom can be found here.
please notice: the stl files are packed into one zip file (v6-all-files.zip).
thingiverse
free
SMuFF - DDE (BIQU-H2) mount with integrated Filament-Cutter for Ender-3 by technik_gegg
...es to maker 3de2016, who did an excellent job creating and publishing this model, which can be found here on thingiverse as well.
thingiverse
free
New Electronics Case for SMuFF (E3 Edition) by technik_gegg
... adapter.
again: there's an all files.zip included, just in case thingiverse doesn't upload/provide the stl files itself.
thingiverse
free
SMuFF Wiper + Purge Bin for Ender-3-Pro by technik_gegg
...of maker wingforce. so if you're planning to equip your ender-3 with an v6 as well, head over to this thingy and have a look.
Servo
turbosquid
$30

Servo
...d model servo for download as obj, blend, dae, stl, and sldpr on turbosquid: 3d models for games, architecture, videos. (1394011)
3d_export
$5

servo motor
...tor
3dexport
it's a simple part of servo motor 0.75kw for used in machines assembly to show specified motor in own project.
turbosquid
$1

Servo Moter
...quid
royalty free 3d model servo moter for download as blend on turbosquid: 3d models for games, architecture, videos. (1650816)
turbosquid
free
Motor/Servo
...osquid
royalty free 3d model motor/servo for download as obj on turbosquid: 3d models for games, architecture, videos. (1522522)
turbosquid
$60

Servo Skull
...
royalty free 3d model servo skull for download as ma and fbx on turbosquid: 3d models for games, architecture, videos. (1318573)
3d_export
$5
Servo 3D Model
...rvo 3d model
3dexport
servo
servo 3d model download .c4d .max .obj .fbx .ma .lwo .3ds .3dm .stl pasqualesiciliano 104590 3dexport
turbosquid
$50
Servo Motor
... available on turbo squid, the world's leading provider of digital 3d models for visualization, films, television, and games.
turbosquid
$49
Servo Motor
...model servo motor for download as 3ds, max, obj, fbx, and stl on turbosquid: 3d models for games, architecture, videos. (1324153)
turbosquid
$29
Servo Set
... available on turbo squid, the world's leading provider of digital 3d models for visualization, films, television, and games.
turbosquid
$10
machine servo
... available on turbo squid, the world's leading provider of digital 3d models for visualization, films, television, and games.
Variant
turbosquid
$6

M10 Variant
... available on turbo squid, the world's leading provider of digital 3d models for visualization, films, television, and games.
design_connected
$27

Delta Variant 01
...delta variant 01
designconnected
zanotta delta variant 01 computer generated 3d model. designed by progetti, emaf.
design_connected
$20

Delta Variant 02
...delta variant 02
designconnected
zanotta delta variant 02 computer generated 3d model. designed by progetti, emaf.
3d_export
$5

Shade - Variant A
...shade - variant a
3dexport
shade model that can be used in hospitals and clinics.
turbosquid
$3
Crowbar Grip Variant
...oyalty free 3d model crowbar grip variant for download as fbx on turbosquid: 3d models for games, architecture, videos. (1315114)
turbosquid
$7
AK47 variant - Hpoly
... model ak47 variant - hpoly for download as obj, dae, and fbx on turbosquid: 3d models for games, architecture, videos. (1545025)
3d_export
$5

Virus - Variant A
...rus - variant a
3dexport
virus model that can be used in a variety of situations, medical animations, posters, movies and so on!
turbosquid
$50

M1A2 Abrams Variant
... available on turbo squid, the world's leading provider of digital 3d models for visualization, films, television, and games.
turbosquid
$10
Shelf, Shelves Variants
... available on turbo squid, the world's leading provider of digital 3d models for visualization, films, television, and games.
turbosquid
free

Minoan Column (variant A)
... available on turbo squid, the world's leading provider of digital 3d models for visualization, films, television, and games.