Thingiverse

Smallest possible Raspberry Pi camera mount for Anet A8 (AM8) by Klimpen717
by Thingiverse
Last crawled date: 3 years, 1 month ago
Intent
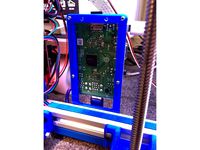
I was looking for a camera mount that attached to the bed of my Anet A8 but all I found was either bulky or just bad looking.
So here is the smallest possible and nice looking mount that I came up with.
It's absolutely small but if it's nice looking is up to you to decide.
I included the actual camera in the mounting process. It's a part of the mount of sort.
Since I'm not actually covering the camera 'inside' the mount but rather let is be a part of it I can keep the size even smaller. There is only a .5 mm clearence on the inside to a few of the components on the camera board.
Obstacles
Because I wanted the construction to be as small as possible and also make the camera a part of the mounting I had
to make the walls very thin. Make sure you adjust your slicer to handle this.
Also take note when you mount it, that at least one component on the board touches the side wall ever so slightly.
Parts List
Bed triangle.stl
Lower arm link.stl
Upper arm link.stl
Pi Back Cover.stl
Pi Front cover.stl
Required Hardware
Small camera mount craves small hardware...
4 x M2x12 mm screws (case around camera)
4 x M2 nuts (case around camera)
3 x M3x16 mm screws (arms)
3 x M3 nuts (arms)
2 x M4x12 mm screws (mount to bed)
2 x M4 nuts (mount to bed)
Assembly
Putting this together won't be a problem for you.
First of you have this to look at - https://www.youtube.com/watch?v=MDPupf1ro4M
You also need a 2, 3 and 4 mm drill bit to clean out the holes unless your printer prints perfect holes.
Drill out the holes carefully. I used my fingers for the 2 mm holes on the case.
Use the Bed Triangle part to mark the two holes to drill in the bed "H" on your printer and drill the holes with 4 mm.
Pre-assemble the whole thing before mounting it to the bed and tighten the nuts carefully so you can still move the arms and adjust everything.
The Bed Triangle has a slot for the ribbon cable to pass through so remember to put the cable though there.
Footnote
I have realised that this can be used for other mounting purposes than the particular printer.
One would just need another base so I have done what I think more people should do.
I have included the whole Fusion 360 file so you can either change or use parts of the construction as you please.
Please please let me know if you come up with a re-make of my creation.
I would also consider making other bases for it if you need one, please ask!
Similar models
thingiverse
free

pi camera holder mount base by bwilber
... t-nut for the center hole for the base. you will need to drill two small holes in the pi mount and supply two bolts for it also.
thingiverse
free
Raspberry Pi 3 Mount for 2020 Extrusion by minko
...ead of m2. i tapped the holes in the mount for m3 (so don't need nuts) and drilled the mounting holes in raspberry pi to 3mm.
thingiverse
free

Ender 3 LCD Case for Raspberry Pi 4 with hexagon nut for drill arm by petemagnusson
...dded a hole for the pi camera to go out the back and added a hexagon nut fitting for my drill arm where i have a web cam mounted.
thingiverse
free

Fixed-yaw Raspberry Pi camera mount for Printrbot Simple Metal by WaveSupportApparatus
...ia screw threads.
i strongly recommend a long rpi camera cable so that you have more flexibility in where you put the rpi itself.
thingiverse
free

Modular Raspberry Pi Camera v2 mount + X-motor cable clip by MariusHornberger
...the holes a special shape, that prints really well.
the whole assembly is also covered in this video:https://youtu.be/ifhvsmmzolg
thingiverse
free

Ender 3 Camera Mount by chindocaine
...ry pi camera module. you can either stick the camera to it using double sided tape or drill some small holes and use some screws.
thingiverse
free

Raspberry Pi Camera v2 Universal Mount by Kosiru
...ur own balljoint. the size of the sphere is 9.5mm. i used this to attach a pi camera to my print bed, for those sweet timelapses.
thingiverse
free

Prusa Mini - Pi Camera Mount by PLAcki
...ired to mount the arm to the print bed.
i recommend using supports for printing the camera ball other supports are not necessary.
thingiverse
free

Raspberry Pi v2.1 Camera Mount by Zingabopp
... also a slot on the end of the arm to guide the ribbon cable.
non-printed parts:
1xm3x12 and nut
1xm3x20 and nut
2xm2x16 and nuts
thingiverse
free

USB camera mount by igng
...b camera.
p.s. arm's cones do not fit perfectly in the case; a shorter arm or a different design for the cones should fix it.
Klimpen717
thingiverse
free

Cable hole through table or wall by Klimpen717
...n my girlfriend wants a hole cut in the desk i can't just leave it looking like that so a few minutes later this is produced.
thingiverse
free

PSU and RPi mount for AM8 by Klimpen717
...any standard pc psu
the parts prints separetly and is screwed together. print it as one unit would take insane amount of support.
thingiverse
free

Spool holder for Clas Ohlsson filament by Klimpen717
...ide faced down.
threads run smooth when printed with 0.1 height on anet a8.
i have them made with some clearence for smoothness.
thingiverse
free

Paper roll holder by Klimpen717
...'t come loose when you unscrew and change the roll.
footnote
please let me know if you come up with a re-make of my creation.
thingiverse
free

AM8 Display mount for Anet A8 LCD2004 by Klimpen717
...rsunk screws on the side.
files:
instruction.pdf - instructions with pictures
am8_display_mount.zip - 29 pictures of the project.
Am8
evermotion
$12
armchair 055 am8
...f armchair with all textures, shaders and materials. it is ready to use, just put it into your scene.. evermotion 3d models shop.
evermotion
$12

armchair 051 am8
...f armchair with all textures, shaders and materials. it is ready to use, just put it into your scene.. evermotion 3d models shop.
evermotion
$10
chair 012 am8
...l of chair with all textures, shaders and materials. it is ready to use, just put it into your scene.. evermotion 3d models shop.
evermotion
$10
chair 011 am8
...l of chair with all textures, shaders and materials. it is ready to use, just put it into your scene.. evermotion 3d models shop.
evermotion
$10
chair 017 am8
...l of chair with all textures, shaders and materials. it is ready to use, just put it into your scene.. evermotion 3d models shop.
evermotion
$10
desk 079 am8
...el of desk with all textures, shaders and materials. it is ready to use, just put it into your scene.. evermotion 3d models shop.
evermotion
$10

chair 027 am8
...l of chair with all textures, shaders and materials. it is ready to use, just put it into your scene.. evermotion 3d models shop.
evermotion
$10

chair 015 am8
...l of chair with all textures, shaders and materials. it is ready to use, just put it into your scene.. evermotion 3d models shop.
evermotion
$10

chair 037 am8
...l of chair with all textures, shaders and materials. it is ready to use, just put it into your scene.. evermotion 3d models shop.
evermotion
$10

chair 013 am8
...l of chair with all textures, shaders and materials. it is ready to use, just put it into your scene.. evermotion 3d models shop.
Smallest
turbosquid
$50

Marvelous Designer and 3DS Max: Curtains01 Smallest
...designer and 3ds max: curtains01_smallest for download as max on turbosquid: 3d models for games, architecture, videos. (1477759)
turbosquid
$50

Marvelous Designer and 3DS Max: Curtains01 Variation Smallest
...nd 3ds max: curtains01_variation_smallest for download as max on turbosquid: 3d models for games, architecture, videos. (1477768)
3d_export
$10

house
...details in bleneder, everything is thought out to the smallest detail, the house is suitable for both live construction...
3d_export
$58
CriCri 3D Model
...model models 3d 3ds max mesh new aircraft aeroplane smallest twin ultralight microlight lod detail cricri 3d model zarday321...
3d_export
$10

violin
...in the archive). the violin is made in the smallest details. it is already ready for import into your...
3d_export
$10

Defender move
...3dexport drone strike vehicle is a bundle of the smallest swiftest vehicles ever used for global travel.<br>drone strike vehicle...
3d_export
$49

Bee Hummingbird Mellisuga Helenae 3D Model
...model 3dexport bee hummingbird mellisuga helenae zunzuncito north american smallest bird wild animal animals low poly lowpoly bee hummingbird...
3d_export
$5

acoustic guitar cort ad810 op
...ad810 op 3dexport to produce this product, even the smallest details have been paid attention to! to have the...
3d_ocean
$25
Stationary Presentation Kit
...filled with all kind of stationary items, from the smallest to the biggest, all beautifully aligned and positioned and...
3ddd
$1

Вытяжной вентилятор Airflow ICON 15
...ceiling, it is stylish and unobtrusive, even in the smallest space. the quiet, powerful axial fan has been designed...
A8
turbosquid
$47

Car A8
...
turbosquid
royalty free 3d model car a8 for download as max on turbosquid: 3d models for games, architecture, videos. (1196060)
turbosquid
$50

Audi A8
...yalty free 3d model audi a8 for download as 3dm, obj, and fbx on turbosquid: 3d models for games, architecture, videos. (1580187)
turbosquid
$15

Audi A8
...lty free 3d model audi a8 for download as obj, fbx, and blend on turbosquid: 3d models for games, architecture, videos. (1387519)
turbosquid
$500

Audi A8
... available on turbo squid, the world's leading provider of digital 3d models for visualization, films, television, and games.
3d_export
$5

Audi A8 3D Model
...audi a8 3d model
3dexport
audi a8 cars car
audi a8 3d model ma 20351 3dexport
3d_export
$5

Audi A8 3D Model
...audi a8 3d model
3dexport
3d model of audi a8
audi a8 3d model badyaka 12136 3dexport
3d_ocean
$89

Audi A8 2010
...usiness car car class class f f german german luxury luxury s s s8 s8 sedan sedan vehicle vehicle
new audi a8 2010 detaled model.
turbosquid
$39

A8 2018
...a8 2018 for download as 3ds, obj, wrl, c4d, fbx, dae, and stl on turbosquid: 3d models for games, architecture, videos. (1345349)
turbosquid
free

audi a8 l
...rbosquid
royalty free 3d model audi a8 l for download as obj on turbosquid: 3d models for games, architecture, videos. (1663016)
3d_ocean
$45

Audi A8 restyled
...our door vehicle was created in blender3d 2.62.realistic renderings were created with yafaray 0.1.2 realistic plugin.rendering...
Anet
thingiverse
free

Anet by derbodesign
...anet by derbodesign
thingiverse
logo anet
thingiverse
free

Anet e10 , Anet v1.0 by jonathan_943D
...anet e10 , anet v1.0 by jonathan_943d
thingiverse
soporte de ventilador de 80mm, para controladora anet v1.0
thingiverse
free

Anet A8 Anet AM8 Y belt holder
...anet a8 anet am8 y belt holder
thingiverse
anet a8 anet am8 y belt holder
thingiverse
free

Anet A8 Probe Bracket for anet sensor by chelrix
...anet a8 probe bracket for anet sensor by chelrix
thingiverse
anet a8 probe bracket for anet official sensor and marlin firmware
thingiverse
free

Anet logo by JUST3D_PRNTNG
...anet logo by just3d_prntng
thingiverse
anet logo
thingiverse
free

Fan nozzle for Anet A8 with original Anet levelsensor by peteruhlmann
...et levelsensor by peteruhlmann
thingiverse
here is an improved fan nozzle for the anet a8 with original level sensor from anet.
thingiverse
free

Anet Et4 Box
...anet et4 box
thingiverse
tool box for anet et4
thingiverse
free

Anet Logo by Superflex_Plastic_Fantastic
...anet logo by superflex_plastic_fantastic
thingiverse
anet logo to incorporate into designs.
thingiverse
free

Box for Anet ET4
...box for anet et4
thingiverse
this is a simple box for tool of anet et4
thingiverse
free

Anet V1.0 Board Kühlung (80mm Lüfter) / Anet A8 by MadCre8
...anet v1.0 board kühlung (80mm lüfter) / anet a8 by madcre8
thingiverse
anet v1.0 board kühlung (80mm lüfter) / anet a8
Raspberry
3d_export
free

raspberry
...raspberry
3dexport
3d model of a raspberry. i tried to make it realistic.
turbosquid
$27

Raspberries
...y free 3d model raspberries for download as max, obj, and stl on turbosquid: 3d models for games, architecture, videos. (1354176)
turbosquid
$14

Raspberries
...y free 3d model raspberries for download as max, obj, and fbx on turbosquid: 3d models for games, architecture, videos. (1364663)
3d_export
$5

raspberry pi
...raspberry pi
3dexport
carcasa para la raspberry pi
turbosquid
$99

Raspberry
... available on turbo squid, the world's leading provider of digital 3d models for visualization, films, television, and games.
turbosquid
$10

raspberries
... available on turbo squid, the world's leading provider of digital 3d models for visualization, films, television, and games.
archive3d
free

Raspberries 3D Model
...raspberries 3d model archive3d raspberries raspberry raspberries n300911 - 3d model (*.3ds) for interior 3d...
3d_export
$5

raspberry fruit
...raspberry fruit
3dexport
3d_export
$5

raspberry
...y different sizes. their color ranges from light burgundy to pink. there are formats: obj, 3ds, blend, dae, fbx, mtl.<br>:)
evermotion
$12

raspberries 23 am130
...evermotion raspberries 23 am130 evermotion key 23 food fruit raspberry fruits am130 raspberries highly detailed 3d model of raspberries...
Pi
design_connected
$11

Pi
...pi
designconnected
ligne roset pi chairs computer generated 3d model. designed by thibault desombre.
3d_export
$5
raspberry pi
...raspberry pi
3dexport
carcasa para la raspberry pi
turbosquid
$18

pied
... available on turbo squid, the world's leading provider of digital 3d models for visualization, films, television, and games.
3ddd
$1

Emme pi light
...emme pi light
3ddd
emme pi light
люста emme pi light
3ddd
$1

Emme pi light
...emme pi light
3ddd
emme pi light
бра классическое emme pi light
3ddd
$1

Emme Pi Light
...emme pi light
3ddd
emme pi light
3ddd
$1

Emme Pi Light
...emme pi light
3ddd
emme pi light
design_connected
$16

Pi-Air
...pi-air
designconnected
living divani pi-air lounge chairs computer generated 3d model. designed by harry & camila.
3d_ocean
$15

Manneken Pis
...picting a naked little boy urinating into a fountain’s basin. (wikipedia) the model was sculpted in blender 2.70a rendered wit...
3ddd
$1

Emme pi light
...emme pi light
3ddd
emme pi light
люстра классическая фирма: emme pi light
артикул: 3595/5/cot/12/wh
Possible
turbosquid
$6

Button Pack: 6 Shapes, Endless Possibilities
...6 shapes, endless possibilities for download as blend and obj on turbosquid: 3d models for games, architecture, videos. (1596436)
turbosquid
$5

Door or window - Possibility to add side by side - Revit Family
...ssibility to add side by side - revit family for download as on turbosquid: 3d models for games, architecture, videos. (1678627)
3d_export
$6

button pack 6 shapes endless possibilities
...; the button in a <br> way. the <br> displayed in the thumbnail are all available in the associated <br> file.
3d_export
$5

intro
...intro
3dexport
animated intro or outro, with the possibility of replacing the text
3d_export
$16

The Knight
...the knight 3dexport 3d model the knight possible for animation, for games, for unity and...
3d_export
$5

Retsepshin
...retsepshin
3dexport
reception, created in solidworks, with the possibility of changing the design and changing the dimensions.
3d_export
$5

eyes green
...eyes green 3dexport procedural eyes in eevee. possible to change color of...
3d_export
$5

Ring
...ring
3dexport
ready to print with the possibility to be scaled. perfect for gold and silver jewelry.
3d_export
$5

Cottage
...cottage 3dexport wooden cottage. photo 2 shows a possible variant with...
3d_export
$1

balance table
...table balancing on chains... export to other formats is possible ...
Camera
archibase_planet
free
Camera
...base planet
camera surveillance camera video camera
camera surveillance n090211 - 3d model (*.3ds) for interior 3d visualization.
archibase_planet
free
Camera
...hibase planet
camera security camera video camera
camera security n210515 - 3d model (*.gsm+*.3ds) for exterior 3d visualization.
archibase_planet
free
Camera
...se planet
camera web camera webcam
camera butterfly usb pc camera n090713 - 3d model (*.gsm+*.3ds) for interior 3d visualization.
archibase_planet
free
Camera
...mera
archibase planet
surveillance camera video camera camcorder
camera n011211 - 3d model (*.3ds) for exterior 3d visualization.
archibase_planet
free
Camera
...camera
archibase planet
camera digital camera
camera canon digital n041211 - 3d model (*.3ds) for interior 3d visualization.
archibase_planet
free
Camera
...camera
archibase planet
camera film camera phototechnique
camera n100214 - 3d model (*.gsm+*.3ds) for interior 3d visualization.
archibase_planet
free

Camera
...amera
archibase planet
camera video camera camcorder
camera video n070315 - 3d model (*.gsm+*.3ds) for interior 3d visualization.
archibase_planet
free
Camera
...rchibase planet
camera video camera camcorder
camera studio n101213 - 3d model (*.gsm+*.3ds+*.max) for interior 3d visualization.
archibase_planet
free
Camera
...ibase planet
digital camera camera phototechnique
camera canon ixus 400 n310311 - 3d model (*.3ds) for interior 3d visualization.
archibase_planet
free
Camera
...ase planet
photocamera video camera camera
camera sony t300 black n291010 - 3d model (*.gsm+*.3ds) for interior 3d visualization.
Mount
3d_export
free

mounting bracket
...mounting plate is the portion of a hinge that attaches to the wood. mounting plates can be used indoors, cabinetry and furniture.
turbosquid
$2

MOUNTING
... available on turbo squid, the world's leading provider of digital 3d models for visualization, films, television, and games.
turbosquid
free

Mounts
... available on turbo squid, the world's leading provider of digital 3d models for visualization, films, television, and games.
turbosquid
free

Mount Fuji
...fuji
turbosquid
free 3d model mount fuji for download as obj on turbosquid: 3d models for games, architecture, videos. (1579977)
3d_export
$5

Headphone mount LR
...headphone mount lr
3dexport
headphone mount l+r
turbosquid
$39

Mount rainier
...quid
royalty free 3d model mount rainier for download as fbx on turbosquid: 3d models for games, architecture, videos. (1492586)
turbosquid
$5

pipe mounting
...quid
royalty free 3d model pipe mounting for download as obj on turbosquid: 3d models for games, architecture, videos. (1293744)
turbosquid
$3

Mounting Tires
...uid
royalty free 3d model mounting tires for download as fbx on turbosquid: 3d models for games, architecture, videos. (1708511)
3d_export
$5

Magnetic GoPro Mount
...pro mount
3dexport
cool magnetic mount for gopro. allows you to mount the camera on flat metal surfaces and get exclusive shots.
turbosquid
$5

Stone Mount
...ty free 3d model stone mount for download as ma, obj, and fbx on turbosquid: 3d models for games, architecture, videos. (1370306)