GrabCAD
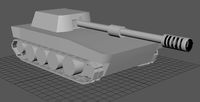
SISTEMA DECENTRAMENTO PCB ESTRUSORE ARTILLERY X1 - PCB DECENTRALIZATION SYSTEM EXTRUDER ARTILLERY X1
by GrabCAD
Last crawled date: 1 year, 11 months ago
Chiariamo per chi avesse timore di fare danni apportando questa modifica, che il sistema è adatto sia ad utenti che fanno uso della X1 come mezzo di apprendimento effettuando modifiche hardware avanzate, ma anche per quel bacino di utenti nella media che si limita solo ad un semplice cambio estrusore. La modifica comporta il decentramento del pcb montato sul gruppo estrusore, portandolo sul lato sinistro dell’asse X, e vantaggi quali sono?
• Installazione componenti di terze parti quali termistori, cartucce riscaldanti, ventole (anche più di una) escono di fabbrica con cavi abbastanza lunghi specie per la nostra stampante, ciò comporta il dover creare mazzetti di cavi cercandogli una sistemazione adeguata dove non diano fastidio e ballino in fase di stampa, quindi cavi disordinati e penzolanti;
• Evitare il taglio di cavi per portarli alla misura giusta, non tutti sono in grado di effettuare saldature e innesti di connettori, tantomeno hanno a disposizione gli attrezzi adatti allo scopo;
• Eliminazione (in parte) del cavo flat montato sul profilo X. Molti utenti lamentano usura del cavo dato dal continuo movimento del carrello e sono portati a creare un sistema di bloccaggio per evitare piegature anomale;
• Il cavo flat se non originale, sul mercato non si trova sempre a buon prezzo, quindi un ricambio in meno;
• Manutenzione più semplice specie dal lato visivo, e cambio componenti molto più veloce (questo usando una guaina per cavi apribile e non chiusa).
Quindi i vantaggi anche se sembrano pochi, sono di quelli importanti.
Passiamo al kit. Si compone di 2 gruppi essenziali, custodia porta scheda e supporto guida cavo montato sul carrello.
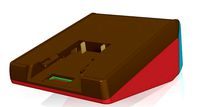
La custodia porta pcb, è apribile verso il basso grazie ad una cerniera montata sul lato inferiore, lo sportello si aggancia alla sua metà tramite piccoli magneti N52 posti su entrambe le parti, l’incastro è favorito dal modo in qui sono posti i magneti nelle loro sedi. Nel retro è situata una finestra per agganciare il flat del pcb. Questa è agganciata all’ asse X tramite dei supporti montati uno sul profilato di alluminio e l’altro sulla piastra del motore step. Nel mezzo c’è un braccio che permette la rotazione e posizionamento della custodia in modo che non sia d’intralcio, esempio (il mio caso) la stampante posta in un enclosure con poco margine ai lati, quindi basta allentare i perni del braccio, posizionare e ristringere, Inoltre il braccio è dotato di un foro situato all’altezza del cavo flat e ne permette il passaggio dell’eccedenza. Ricordo che il flat non viene eliminato ma messo su di un lato, potrebbe essere lungo ma posizionato come nelle foto non dà fastidio.
Secondo gruppo, supporto agganciato sulla testa del carrello, questo da 3 componenti, una parte posteriore che poggia sui supporti delle ruote allineata al posteriore del carrello, una parte (coperchio) posta sul frontale del carrello che è unita al posteriore in 3 punti, una vite al centro, e i dadi che fissano le ruote al carrello. In ultimo c’è un collare che serve a tenere la guaina.
Entro nel dettaglio su alcuni punti. Ho creato 2 versione delle coperture frontali del carrello, uno per chi ha il gruppo estrusore e piastra stock, e una versione per chi monta il mio supporto universale per aggancio “Nano 1” e “Nano 2”. In entrambi i casi bisogna cambiare i 2 perni delle ruote superiori del carrello. Quelle stock sono M5x25mm, dato lo spessore della copertura, serviranno 2 M5x30mm.
Le bocche superiori dove escono i cavi sono dotate di viti per fissare la guaina ai collari. Usate guaine apribili con diametro 16mm, usate guaine (metto il link nella lista materiali in fondo) semirigide per evitare che il peso le porti giù. Ho previsto (in caso usiate guaine morbide) l’innesto di un pezzo di filamento che segue la guaina dall’interno (o dall’esterno come preferite) usando 2 fori diametro 1.9mm situati sulla parte superiore delle bocche del carrello sia su quella della porta scheda.
La minuteria, che serve per effettuare la maggior parte del montaggio hanno tutte dimensioni “M3” compresi tra 6 e 12mm, gli inserti sono M3, i chiodi per la cerniera porta scheda sono da 1.4mm (potete giocarci voi,) per il braccio porta scheda ho usato 2 pezzi di barra filettata M5, 1x50mm e 1x 70mm chiusi da dadi,
8 magneti in neodimio N52 4x2mm, (attenzione al posizionamento), 2 dadi per profilati sempre M3, ed infine della guaina semirigida 16mm.
Ho cercato di armonizzare tutti i componenti del sistema dando anche una parvenza visiva con linee pulite. Il tutto è stato stampato con un semplice ABS Amazon basic (dati a fondo articolo).
Fatto questa introduzione cercherò di riportare in dettaglio con delle foto la fase di montaggio del sistema senza soffermarmi sulla misura delle viti da usare (si vedono molto chiaro quali servono) tenendo conto che fisicamente ho effettuato le prove di tolleranza Prego chi riscontrasse problemi, di avvisarmi per apportare le modifiche. Grazie buona lettura.
---------------------- ENGLISH ----------------------------------------------
We clarify for those who are afraid of doing damage by making this change, that the system is suitable both for users who use the X1 as a means of learning by making advanced hardware changes, but also for that average user base that is limited only to a simple extruder change. The modification involves the decentralization of the pcb mounted on the extruder unit, bringing it to the left side of the X axis, and what are the advantages?
• Installation of third-party components such as thermistors, heating cartridges, fans (even more than one) come out of the factory with cables long enough especially for our printer, this involves having to create bundles of cables looking for a suitable accommodation where they do not bother and dance in the printing phase, then messy and dangling cables;
• Avoid cutting cables to bring them to the right size, not everyone is able to weld and plug connectors, nor do they have the tools suitable for the purpose;
• Elimination (in part) of the flat cable mounted on the X profile. Many users complain of wear on the cable due to the continuous movement of the carriage and are inclined to create a locking system to avoid abnormal bending;
• The flat cable, if not original, on the market is not always at a good price, therefore one spare part less;
• Easier maintenance especially on the visual side, and much faster component changes (this using an openable, non-closed cable sheath).
So the advantages, even if they seem few, are important ones.
Let's move on to the kit. It consists of 2 essential groups, card holder case and cable guide support mounted on the trolley.
The pcb case can be opened downwards thanks to a hinge mounted on the lower side, the door is hooked to its half by means of small N52 magnets placed on both sides, the joint is favored by the way in which the magnets are placed in the their locations. In the back there is a window to hook the flat of the pcb. This is hooked to the X axis by means of supports mounted one on the aluminum profile and the other on the plate of the step motor. In the middle there is an arm that allows the rotation and positioning of the case so that it is not in the way, for example (my case) the printer placed in an enclosure with little margin on the sides, so just loosen the pins of the arm, position and tighten. Furthermore, the arm is equipped with a hole located at the height of the flat cable and allows the passage of the excess. I remember that the flat is not eliminated but put on one side, it could be long but positioned as in the photos does not bother.
Second group, support attached to the head of the trolley, this of 3 components, a rear part that rests on the wheel supports aligned with the rear of the trolley, a part (cover) placed on the front of the trolley that is joined to the rear in 3 points screw in the center, and the nuts that secure the wheels to the trolley. Finally, there is a collar that serves to hold the sheath.
I go into detail on some points. I created 2 versions of the front covers of the trolley, one for those who have the extruder unit and stock plate, and a version for those who mount my universal support for hooking “Nano 1” and “Nano 2”. In both cases it is necessary to change the 2 pins of the upper wheels of the trolley. Those stocks are M5x25mm, given the thickness of the cover, 2 M5x30mm will be needed.
The upper openings where the cables come out are equipped with screws to fix the sheath to the collars. Use openable sleeves with a diameter of 16mm, use semi-rigid sleeves (put the link in the material list at the bottom) to prevent the weight from bringing them down. I have foreseen (in case you use soft sheaths) the insertion of a piece of filament that follows the sheath from the inside (or from the outside as you prefer) using 2 1.9mm diameter holes located on the upper part of the mouths of the trolley and on that of the card holder.
The small parts, which are used to carry out most of the assembly, all have "M3" dimensions between 6 and 12mm, the inserts are M3, the nails for the card holder hinge are 1.4mm (you can play with them) for the door arm board I used 2 pieces of M5 threaded rod, 1x50mm and 1x 70mm closed by nuts,
8 neodymium magnets N52 4x2mm, (pay attention to the positioning), 2 nuts for profiles always M3, and finally the semi-rigid sheath 16mm.
I tried to harmonize all the components of the system while also giving a visual semblance with clean lines. Everything was printed with a simple Amazon basic ABS (data at the end of the article).
After this introduction I will try to report in detail with photos the assembly phase of the system without dwelling on the size of the screws to use (you can see very clearly which ones are used) taking into account that I physically carried out the tolerance tests. to make the changes. Thanks good reading.
• Installazione componenti di terze parti quali termistori, cartucce riscaldanti, ventole (anche più di una) escono di fabbrica con cavi abbastanza lunghi specie per la nostra stampante, ciò comporta il dover creare mazzetti di cavi cercandogli una sistemazione adeguata dove non diano fastidio e ballino in fase di stampa, quindi cavi disordinati e penzolanti;
• Evitare il taglio di cavi per portarli alla misura giusta, non tutti sono in grado di effettuare saldature e innesti di connettori, tantomeno hanno a disposizione gli attrezzi adatti allo scopo;
• Eliminazione (in parte) del cavo flat montato sul profilo X. Molti utenti lamentano usura del cavo dato dal continuo movimento del carrello e sono portati a creare un sistema di bloccaggio per evitare piegature anomale;
• Il cavo flat se non originale, sul mercato non si trova sempre a buon prezzo, quindi un ricambio in meno;
• Manutenzione più semplice specie dal lato visivo, e cambio componenti molto più veloce (questo usando una guaina per cavi apribile e non chiusa).
Quindi i vantaggi anche se sembrano pochi, sono di quelli importanti.
Passiamo al kit. Si compone di 2 gruppi essenziali, custodia porta scheda e supporto guida cavo montato sul carrello.
La custodia porta pcb, è apribile verso il basso grazie ad una cerniera montata sul lato inferiore, lo sportello si aggancia alla sua metà tramite piccoli magneti N52 posti su entrambe le parti, l’incastro è favorito dal modo in qui sono posti i magneti nelle loro sedi. Nel retro è situata una finestra per agganciare il flat del pcb. Questa è agganciata all’ asse X tramite dei supporti montati uno sul profilato di alluminio e l’altro sulla piastra del motore step. Nel mezzo c’è un braccio che permette la rotazione e posizionamento della custodia in modo che non sia d’intralcio, esempio (il mio caso) la stampante posta in un enclosure con poco margine ai lati, quindi basta allentare i perni del braccio, posizionare e ristringere, Inoltre il braccio è dotato di un foro situato all’altezza del cavo flat e ne permette il passaggio dell’eccedenza. Ricordo che il flat non viene eliminato ma messo su di un lato, potrebbe essere lungo ma posizionato come nelle foto non dà fastidio.
Secondo gruppo, supporto agganciato sulla testa del carrello, questo da 3 componenti, una parte posteriore che poggia sui supporti delle ruote allineata al posteriore del carrello, una parte (coperchio) posta sul frontale del carrello che è unita al posteriore in 3 punti, una vite al centro, e i dadi che fissano le ruote al carrello. In ultimo c’è un collare che serve a tenere la guaina.
Entro nel dettaglio su alcuni punti. Ho creato 2 versione delle coperture frontali del carrello, uno per chi ha il gruppo estrusore e piastra stock, e una versione per chi monta il mio supporto universale per aggancio “Nano 1” e “Nano 2”. In entrambi i casi bisogna cambiare i 2 perni delle ruote superiori del carrello. Quelle stock sono M5x25mm, dato lo spessore della copertura, serviranno 2 M5x30mm.
Le bocche superiori dove escono i cavi sono dotate di viti per fissare la guaina ai collari. Usate guaine apribili con diametro 16mm, usate guaine (metto il link nella lista materiali in fondo) semirigide per evitare che il peso le porti giù. Ho previsto (in caso usiate guaine morbide) l’innesto di un pezzo di filamento che segue la guaina dall’interno (o dall’esterno come preferite) usando 2 fori diametro 1.9mm situati sulla parte superiore delle bocche del carrello sia su quella della porta scheda.
La minuteria, che serve per effettuare la maggior parte del montaggio hanno tutte dimensioni “M3” compresi tra 6 e 12mm, gli inserti sono M3, i chiodi per la cerniera porta scheda sono da 1.4mm (potete giocarci voi,) per il braccio porta scheda ho usato 2 pezzi di barra filettata M5, 1x50mm e 1x 70mm chiusi da dadi,
8 magneti in neodimio N52 4x2mm, (attenzione al posizionamento), 2 dadi per profilati sempre M3, ed infine della guaina semirigida 16mm.
Ho cercato di armonizzare tutti i componenti del sistema dando anche una parvenza visiva con linee pulite. Il tutto è stato stampato con un semplice ABS Amazon basic (dati a fondo articolo).
Fatto questa introduzione cercherò di riportare in dettaglio con delle foto la fase di montaggio del sistema senza soffermarmi sulla misura delle viti da usare (si vedono molto chiaro quali servono) tenendo conto che fisicamente ho effettuato le prove di tolleranza Prego chi riscontrasse problemi, di avvisarmi per apportare le modifiche. Grazie buona lettura.
---------------------- ENGLISH ----------------------------------------------
We clarify for those who are afraid of doing damage by making this change, that the system is suitable both for users who use the X1 as a means of learning by making advanced hardware changes, but also for that average user base that is limited only to a simple extruder change. The modification involves the decentralization of the pcb mounted on the extruder unit, bringing it to the left side of the X axis, and what are the advantages?
• Installation of third-party components such as thermistors, heating cartridges, fans (even more than one) come out of the factory with cables long enough especially for our printer, this involves having to create bundles of cables looking for a suitable accommodation where they do not bother and dance in the printing phase, then messy and dangling cables;
• Avoid cutting cables to bring them to the right size, not everyone is able to weld and plug connectors, nor do they have the tools suitable for the purpose;
• Elimination (in part) of the flat cable mounted on the X profile. Many users complain of wear on the cable due to the continuous movement of the carriage and are inclined to create a locking system to avoid abnormal bending;
• The flat cable, if not original, on the market is not always at a good price, therefore one spare part less;
• Easier maintenance especially on the visual side, and much faster component changes (this using an openable, non-closed cable sheath).
So the advantages, even if they seem few, are important ones.
Let's move on to the kit. It consists of 2 essential groups, card holder case and cable guide support mounted on the trolley.
The pcb case can be opened downwards thanks to a hinge mounted on the lower side, the door is hooked to its half by means of small N52 magnets placed on both sides, the joint is favored by the way in which the magnets are placed in the their locations. In the back there is a window to hook the flat of the pcb. This is hooked to the X axis by means of supports mounted one on the aluminum profile and the other on the plate of the step motor. In the middle there is an arm that allows the rotation and positioning of the case so that it is not in the way, for example (my case) the printer placed in an enclosure with little margin on the sides, so just loosen the pins of the arm, position and tighten. Furthermore, the arm is equipped with a hole located at the height of the flat cable and allows the passage of the excess. I remember that the flat is not eliminated but put on one side, it could be long but positioned as in the photos does not bother.
Second group, support attached to the head of the trolley, this of 3 components, a rear part that rests on the wheel supports aligned with the rear of the trolley, a part (cover) placed on the front of the trolley that is joined to the rear in 3 points screw in the center, and the nuts that secure the wheels to the trolley. Finally, there is a collar that serves to hold the sheath.
I go into detail on some points. I created 2 versions of the front covers of the trolley, one for those who have the extruder unit and stock plate, and a version for those who mount my universal support for hooking “Nano 1” and “Nano 2”. In both cases it is necessary to change the 2 pins of the upper wheels of the trolley. Those stocks are M5x25mm, given the thickness of the cover, 2 M5x30mm will be needed.
The upper openings where the cables come out are equipped with screws to fix the sheath to the collars. Use openable sleeves with a diameter of 16mm, use semi-rigid sleeves (put the link in the material list at the bottom) to prevent the weight from bringing them down. I have foreseen (in case you use soft sheaths) the insertion of a piece of filament that follows the sheath from the inside (or from the outside as you prefer) using 2 1.9mm diameter holes located on the upper part of the mouths of the trolley and on that of the card holder.
The small parts, which are used to carry out most of the assembly, all have "M3" dimensions between 6 and 12mm, the inserts are M3, the nails for the card holder hinge are 1.4mm (you can play with them) for the door arm board I used 2 pieces of M5 threaded rod, 1x50mm and 1x 70mm closed by nuts,
8 neodymium magnets N52 4x2mm, (pay attention to the positioning), 2 nuts for profiles always M3, and finally the semi-rigid sheath 16mm.
I tried to harmonize all the components of the system while also giving a visual semblance with clean lines. Everything was printed with a simple Amazon basic ABS (data at the end of the article).
After this introduction I will try to report in detail with photos the assembly phase of the system without dwelling on the size of the screws to use (you can see very clearly which ones are used) taking into account that I physically carried out the tolerance tests. to make the changes. Thanks good reading.
Similar models
thingiverse
free

Cable chain MK4 modding I3 mega M/S by VSLab
...drawing a hook that could slide the cables inside the chain.. i hope i've done something that's pleasing to all of you...
thingiverse
free
Prusa i3 Y-motor stabilizzatore by Giovannicmr
...pendendo di allentare la cinghia del carrello.
il blocco è facilmente chiedibile con un dado m3 e un vite m3 circa lunghezza 15mm
3dwarehouse
free

Santo Sepolcro, Atrio di Pilato e Martyrium
...tazione del santo sepolcro di gerusalemme, così come lo ricordavano i crociati bolognesi che tornarono dalla terrasanta. #bologna
3dwarehouse
free

Parrocchia di San Bartolomeo
... augurio e auspicio per i roveredani di cui il santo è patrono... (http://www.sanbartolomeo-roveredopn.it/parrocchia/) #cathedral
thingiverse
free

Arco di Costantino by Astraz
...r terminare il progetto sono stati impiegati 7 incontri da 2 ore e mezza ciascuno.
lavoro di: arcione, biasi, bocchetti, catalano
thingiverse
free

Block USB Cable 3,5mm by Devilkit
...le vostre esigenze di bloccaggio, è comunque una buona idea per partire con un progetto e sopratutto non avere cavi volanti.. :-)
thingiverse
free

earphone cable separator - separatore per cavetti audio by marcottt
...i si inseriscono dalla parte inferiore, meglio se aiutati con un piccolo cacciavite piatto.
pensato per un cavo piatto 3mmx 1.2mm
3dwarehouse
free

Letto con testiera inclinabile 2 (dynamic)
...cedere ad altri vani di contenimento. #cabecera_basculante #cama #letto #rete_poliestere #testiera_reclinabile #tilting_headboard
3dwarehouse
free

Porta San Zeno
... muratura, che attraversava parte del fossato magistrale. ristrutturata, è ora sede del comitato promotore del bacanal del gnoco.
3dwarehouse
free

Tavolo sega EINHELL RT TS 920
...a casetto a una sola estenzione ,si deve tagliare la parte che blocca il fine corsa per rendere la guida ambo i lati estensibili.
Decentramento
grabcad
free

KIT ATTACCHI PER GUIDE LINEARI SU ARTILLERY X1 E GENIUS
...stock, piastra stock con collare (vedasi lavoro fatto su decentramento pcb), piastra nano, e piastra nano con collare, quindi...
3dwarehouse
free

PALAZZO DELLE POSTE ROMA OSTIENSE
...rientrava nel piano dello sviluppo dell'urbe, che prevedeva il decentramento dei servizi in zone esterne al nucleo storico della...
Decentralization
3ddd
free

Tolomeo Suspension Decentralized SOLO DIFFUSORE ANELLO
... anello
светильник tolomeo suspension decentralized solo diffusore anello из новой коллекции artemide
thingiverse
free

Decentred square piv pot
...decentred square piv pot
thingiverse
any time the square potentiometer is decentred.
3d_sky
free

Tolomeo Suspension Decentralized SOLO DIFFUSORE ANELLO
...lo
3dsky
artemide tolomeo suspension
lamp tolomeo suspension decentralized solo diffusore anello from the new collection artemide
thingiverse
free

Decentralized Attendance-Taking Token Generator by adamgolding
...e are any tokens left over, someone's missing! while helping students, verify that the token they have matches who they are.
thingiverse
free

SIA Key Chain by WiN_XuP
...win_xup
thingiverse
this can be used as a key chain. it represents the logo of sia.
a decentralized cloud storage (www.sia.tech)
thingiverse
free

Eccentric Nut by dionnel
...d.com. in fact, 6 of those eccentric nuts, if you also use the back plate on the carriage for extra rigidity on the kumu design.
thingiverse
free

Gems decorative lamp / toy / light /keychain by mmakaj
...n be used as decorative lamp, or as a toy. you decide ;) ... the coins are designed to be used as a keychain :)
https://gems.org/
thingiverse
free

Storj Raspberry Pi Case by RedSecond
...atform. you can create your own storj node and start earring storj tokens following this handy tutorial i found on their website.
thingiverse
free

D.Buzz Logo by Holovision
... mm with a maximum height of 8 mm. on my 3d printer using my settings it took around 2 hours and 6.5 meters of filament to print.
thingiverse
free

"V" ceiling or wall cable hook by AllyouneedisGNU
.../12554-decentralizer-white-ceiling-hook-and-stop-for-fabric-cable-8057730536486.html
a little pin is provided to block the cable.
Estrusore
thingiverse
free

copri estrusore by Albertop
...copri estrusore by albertop
thingiverse
copri extruder
thingiverse
free

Raccordo Estrusore-Tubo_M5.stl by SergioPapagni
...raccordo estrusore-tubo_m5.stl by sergiopapagni
thingiverse
raccordo estrusore-tubo_m5
thingiverse
free

Boton de Estrusor anet A8 by dante81358
...boton de estrusor anet a8 by dante81358
thingiverse
es un boton del estrusor en donde se coloca el hilo
thingiverse
free

Sapphire PRO, supporto estrusore Orbiter by andreabonuc
...iter by andreabonuc
thingiverse
supporto estrusore orbiter per sapphire pro. richiede doppia foratura m3 sul supporto esistente.
thingiverse
free

condotto ventola estrusore pla by Ganzissimo
...condotto ventola estrusore pla by ganzissimo
thingiverse
uno dei tanti condotti...
thingiverse
free

Bocchetta per ventola estrusore Prusa I3 Hesine by Leoscanner
... i3 hesine by leoscanner
thingiverse
bocchetta per ventola estrusore prusa i3 hesinehttps://www.youtube.com/watch?v=lyl9i4mg2mq
thingiverse
free

Convogliatori d'aria per estrusore by EletroLaix
... più ingombri e di conseguenza ho dovuto tagliarlo di più, spero che questo progetto possa servire a qualcuno :) buona stampa !!!
thingiverse
free

Supporto ventola 25x25 estrusore hexagon by ThePieWalker
...essure per inserire due fascette per assicurare in modo sicuro il supporto ventola al corpo di raffreddamento dell'estrusore.
thingiverse
free

Ventola 30mm doppia per estrusore E3D-V6 by depri51giu
...ri51giu
thingiverse
progetto di ventola doppia raffreddamento estrusore e oggetto in stampa. ventola 30mm. disegnato con skethup
thingiverse
free

condotto ventola estrusore by Ganzissimo
...o per incanalare l'aria generata dalla ventola direttamente sulla plastica estrusa tutto intorno all'ugello di estrusione
Artillery
turbosquid
$10
Artillery
...rbosquid
royalty free 3d model artillery for download as max on turbosquid: 3d models for games, architecture, videos. (1324795)
turbosquid
$10
Artillery
...rbosquid
royalty free 3d model artillery for download as fbx on turbosquid: 3d models for games, architecture, videos. (1580617)
turbosquid
$1

Artillery
...rbosquid
royalty free 3d model artillery for download as fbx on turbosquid: 3d models for games, architecture, videos. (1708575)
turbosquid
$1

artillery
...d
royalty free 3d model artillery for download as ma and fbx on turbosquid: 3d models for games, architecture, videos. (1628190)
3d_export
$65

artillery
...artillery
3dexport
simple rendering of the scene file
turbosquid
$15

Artillery Cannon
...
royalty free 3d model artillery cannon for download as blend on turbosquid: 3d models for games, architecture, videos. (1361953)
turbosquid
$5
Artillery Tank
...uid
royalty free 3d model artillery tank for download as fbx on turbosquid: 3d models for games, architecture, videos. (1169122)
3d_export
$7

middle artillery
...eavy, and high maneuverability, that have wide range of shells, and high accuracy. suitable for support as well as quick punches.
turbosquid
free

WW1 Artillery
...del ww1 artillery for download as blend, obj, x, fbx, and stl on turbosquid: 3d models for games, architecture, videos. (1609805)
3d_export
$10
artillery turret
...artillery turret
3dexport
3d model created by blender 2.90 render eevee.
X1
design_connected
$11

X1
...x1
designconnected
dränert x1 chairs computer generated 3d model. designed by oswald mathias ungers.
3ddd
$1

Leica X1
...leica x1
3ddd
leica , фотоаппарат
leica x1 profi
turbosquid
$15
sofa x1
...turbosquid
royalty free 3d model sofa x1 for download as max on turbosquid: 3d models for games, architecture, videos. (1283096)
3ddd
$1

Francis Francis X1
...francis francis x1
3ddd
кофемашина
кофемашина francis francis x1
3d_export
$5

X1 3D Model
...x1 3d model
3dexport
x1
x1 3d model download .c4d .max .obj .fbx .ma .lwo .3ds .3dm .stl gorgsalvatore 106035 3dexport
turbosquid
$55

Nokia X1
... available on turbo squid, the world's leading provider of digital 3d models for visualization, films, television, and games.
turbosquid
$13

Nokia X1
... available on turbo squid, the world's leading provider of digital 3d models for visualization, films, television, and games.
turbosquid
$1
X1 Airplane
... available on turbo squid, the world's leading provider of digital 3d models for visualization, films, television, and games.
3d_export
$55

Nokia X1 3D Model
...nokia x1 3d model
3dexport
nokia x1 phone smartphone mobile
nokia x1 3d model fedia 45159 3dexport
3ddd
$1
Wood x1
...wood x1
3ddd
размер 1024-1024 бесшовная 8-)
Sistema
3ddd
free

Calligaris Sistema cs_485
...a cs_485
3ddd
calligaris , sistema
модельки выполнены в размер по каталогу. без текстур.
3ddd
$1

Rossi di albizzate - Sistema Lobby
... sofa , круглый
rossi di albizzate - sistema lobby
3ddd
$1

Occhio, Sento, Sistema quattro
... шина
http://www.occhio.de/en/products/occhio-system/sento/suspended-lamps/sistema-quattro/
3ddd
$1

Унитаз и биде Catalano Sistema Zero
... биде , унитаз
унитаз и биде catalano, серия sistema zero. 36k полигонов
3d_export
$15

Snaidero Sistema ES 3D Model
...snaidero sistema es 3d model
3dexport
snaidero kitchen furniture
snaidero sistema es 3d model 3dstudent 366 3dexport
turbosquid
$20

Sistema M1 Kit Plus
... available on turbo squid, the world's leading provider of digital 3d models for visualization, films, television, and games.
turbosquid
$12

M1 Sistema Kit Cyborb
... available on turbo squid, the world's leading provider of digital 3d models for visualization, films, television, and games.
3ddd
$1
davide groppi spot sistema, spot 1
...davide groppi spot sistema, spot 1
3ddd
davide groppi
davide groppi spot sistema, spot 1
corona+vray
turbosquid
$10

LBS Sistema Pendant Lamp Lucifero
...d model lbs sistema pendant lamp lucifero for download as max on turbosquid: 3d models for games, architecture, videos. (1561588)
turbosquid
$15

Cappellini Sistema Lotus LS-1
...del cappellini sistema lotus ls-1 for download as max and fbx on turbosquid: 3d models for games, architecture, videos. (1255737)
Pcb
turbosquid
$19

PCB assembly line.
...mbly line. for download as 3ds, max, ige, obj, stl, and sldas on turbosquid: 3d models for games, architecture, videos. (1330649)
3ddd
$1

GRAMERCY HOME - CARMELA ARMCHAIR 602.023-PCB
...gramercy home - carmela armchair 602.023-pcb
3ddd
gramercy home
gramercy home
carmela armchair
602.023-pcb
www.gramercy-home.ru
3d_export
$150
auto pcb board loder inspection machine
...auto pcb board loder inspection machine
3dexport
auto pcb board loder & inspection machine --> only step file
3d_export
$7
turning mechanism drawing pcb board turnover machine
...turning mechanism drawing pcb board turnover machine
3dexport
turning mechanism drawing pcb board turnover machine
turbosquid
$9

Stereo Jack 3.5mm for soldering to a PCB
... available on turbo squid, the world's leading provider of digital 3d models for visualization, films, television, and games.
3d_export
$5
LED Right Angled PCB Mounting
...m led. step and igus files. multiple led colors: blue, purple, red, green, and yellow. dimensions case w 4,5mm , h 7,3mm l 6,4mm.
3d_export
$20
automatic pcb loading and unloading dispensing test automatic line
...ment structure is very complex. it is a very practical equipment for smt industry. the equipment is mature application equipment.
3d_export
$18
an automatic line for fct function test of pcb
... drawings are downloaded, you can directly watch and edit the contents. welcome to download and learn from your favorite friends.
3d_export
$5
USB Micro B connector
...step and igus for 3d import into ecad tools, pcb footprints. added also a altium designer pcb component library...
3d_export
$15
plastic housing with dewalt battery holder
...case measures 155x106x60. inside the case there are two pcb of 130x98 and 98x42...
Extruder
3ddd
$1

Extruded Chair
...extruded chair
3ddd
extruded , tom dixon
inspired by tom dixon extruded chair
turbosquid
$15

Extruded Table
... extruded table for download as blend, dae, fbx, obj, and stl on turbosquid: 3d models for games, architecture, videos. (1634137)
turbosquid
$2

3D Printer Extruder
...d
royalty free 3d model 3d printer extruder for download as on turbosquid: 3d models for games, architecture, videos. (1537359)
turbosquid
$1

Zombie extruded text
...oyalty free 3d model zombie extruded text for download as obj on turbosquid: 3d models for games, architecture, videos. (1322198)
turbosquid
$4

Extruder conical screw
...el extruder conical screw for download as sldpr, ige, and stl on turbosquid: 3d models for games, architecture, videos. (1524433)
turbosquid
$50

3d PRINTER - Extruder
... available on turbo squid, the world's leading provider of digital 3d models for visualization, films, television, and games.
turbosquid
$15

Extruded Table 2
...xtruded table 2 for download as blend, dae, fbx, obj, and stl on turbosquid: 3d models for games, architecture, videos. (1621846)
turbosquid
$10

Maya Extrude Tool
... available on turbo squid, the world's leading provider of digital 3d models for visualization, films, television, and games.
3d_export
$5

world earth extrude map
...world earth extrude map
3dexport
3ddd
$1

Simply Elegant Extruded Tree Coffee Table Design
...ble by link studios. the silhouette of a tree is visible at one angle, extruded from the surface to create the support structure.
System
archibase_planet
free

System
...m
archibase planet
fire alarm system fire alarm box
security light system - 3d model (*.gsm+*.3ds) for interior 3d visualization.
archibase_planet
free

Spider system
...stem spider glass system
spider system to fix glass stefano galli n050912 - 3d model (*.gsm+*.3ds) for interior 3d visualization.
3ddd
$1

Euforia System
...euforia system
3ddd
euforia
euforia system
3d_export
$50

Roof system Truss system 3D Model
...oof system truss system 3d model
3dexport
roof system truss truss stage
roof system truss system 3d model aleksbel 38970 3dexport
3ddd
$1

DVD System
...dvd system
3ddd
dvd , schneider
dvd system
design_connected
free

Seating system
...seating system
designconnected
free 3d model of seating system
3d_export
$5

solar system
...solar system
3dexport
solar system in c4d, with 8k nasa textures
3ddd
$1

Quanta System
...quanta system
3ddd
медицина
quanta system.
лазерное оборудование для медицинских центров
3d_export
$15

solar system
...nd the other the sun, the earth and the moon, the latter has an animation with camera movement included, the files are in spanish
3d_export
$14

missile system
...missile system
3dexport