Thingiverse
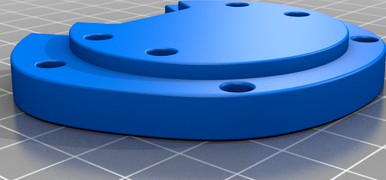
SiriusXM AMPS XDPIV2 or SXVD1 Adapter Plate for Bully Dog 50mm Gauge Pod A Pillar Housing - 2010-2016 RAM 1500 by BustedChain
by Thingiverse
Last crawled date: 3 years, 3 months ago
This is a mount plate adapter for my aftermarket Bully Dog A-Pillar Gauge Pod housing that goes over the lower portion of my existing A-Pillar "ohshit handle". I am not affiliated with Bully Dog brand in any way, that's just the housing I ended up buying some years back.
Update:
I overtightened the screws going into my SiriusXM Onyx mount. The backing crumbled to pieces, literally pulverized. The plastic back there is INCREDIBLY thin. (Way too thin.) Do not overtighten. I bought a replacement dock, but it appears to be the next model up: SXVD1(A) that comes with the Vehicle Kit DV3. Of course this dock is shorter and thus has to be installed even further down in order to have clearance, so my original adapter plate will not work for this without a ton of modification. Yay me. I have added 2 holes in the middle. The idea is that these two will align with the top two holes of the dock. You would need a thin piece of plastic or metal to catch the bottom two holes and bolt it on.
This adapter plate provides me either 2 or 4 mount holes in the AMPS ~38mm x 30mm spacing. (Actual measurements on my SiriusXM XDPIV2 AMPS mount is 37.5mm wide x 30mm vertically, center-to-center.) I will be mounting my SiriusXM Onyx Radio the A-Pillar and this plate. The 4 outer holes can be used or the two inner holes can be used where the bottom of the mount would be free floating / needing to be reinforced by a back-plate and longer screws. I leave some of the figuring out how you want to install yours up to you.
It only took me 4 or 5 years to get around to making this for my 2010 Dodge RAM 1500 truck. Years ago, there were no other options for A-Pillar mounts, so bear with me here as there may be better options available now, I still wanted to share what I made in case anyone else goes this route, or maybe there are other 50mm Pod openings this may be useful for. Heck, even a 50mm circular saw, am-i-right? :)
I don't see any reason this adapter plate couldn't be used with any other truck pod gage mount as long as the gauge pod had a 50mm opening and the adapter plate gave you enough clearance to mount your AMPS style bracket there.
This is how I am installing this adapter / SiriusXM Onyx Radio in my truck:
First you will need a 50mm Gauge Pod A-Pillar Mount, such as the Bully Dog A-Pillar GT Mount w/ Adapter for 2010-2016 Dodge RAM 1500/2500/3500. For my truck, the adapter part number / model is DER-32304 / UPC: 681018323048. If you have a different truck, then you'll need to figure that out, too.
This A-Pillar comes with a ~50mm opening (mine was 51.2mm) on it. This adapter has a 50mm / 2.6mm thick spacer that goes in the gauge pod opening, so there should be some wiggle room / clearance anyway.
Next you will need this printed mount plate thing. This file is provided as-is, not fully tested, and very likely flawed. It would be a good idea to print a cheap material / light infill version to do a test fit before you bother to print. PLA will NOT hold up to car dash temperatures. You have been warned. PETG might be okay, but even then you might want to consider a larger nozzle (0.6mm or larger) and PETG Carbon Fiber, or PolyCarbonate Carbon Fiber, not so much for the strength of carbon fiber itself, but heat properties.
Third, you will need some sort of AMPS 37.5mm wide by 30mm wide (center to center) mountable object. In my case, I designed this mount specifically for a SiriusXM Onyx Receiver that I will be installing there.
Fourth, you will need 4 or maybe 6 each M4 x 12mm or M4 x 16mm Bolts with washers. You also might need some blue loctite since this is going to be bouncing around down the road and it would suck if it came loose while you were driving. I included a couple extra holes near the top of the outside ring if you want to bolt it up there.
Fifth, place the mount plate inside the A-Pillar Housing as low as possible and do a test fit without drilling anything to make sure that your radio will fit. Mine was a little too tight, so I reamed out the bottom two holes so the whole thing could be lower. You made that cheap test-fit version, right? If you are happy with the test fit of 2 out of the 4 bolts, then you can go ahead and mark / drill the 2 bottom holes through the A-Pillar Gauge Pod Adapter. I had to put them low enough to allow room for my radio there. If you are using a different radio, you might not be able to use this file directly.
Alternatively, It might work to make a thicker bracket that sticks out more and use longer bolts so that there is more clearance from the mount.
I have included the Fusion 360 F3D file though so you can remix it into something even more useful / correct for you.
Anyway, with the 2 bottom holes drilled, you should be able to add a single drop of locktite to each nut on the receiver mount you are attaching, bolt it all together, Test Fit the A-Pillar in place to make sure it is going to bolt up, and before you tighten it down, go ahead and pull it back out so you can run your stereo auxiliary audio and satellite antenna cables. I'm using a Chrysler Satellite adapter to whatever the SiriusXM satellite adapter is called so that I can tap into the factory SiriusXM Antenna. I have to check and make sure that the Onyx Antenna doesn't pickup different frequencies though, as I might end up just using that on my dash board near the window instead.
NOTE: The existing Factory A-Pillar bolts are behind a couple of caps. The caps that cover these bolts are "hinged" in that they are attached at one end. The end of the cap nearest the handle itself is the side that opens up and the side of the cap furthest away from the A-Pillar handle is the part that is hinged. It'll be easier to pry these caps up with something thin / gentle nearest the handle. Don't be like me and start prying at the other end.
Similar models
thingiverse
free

Gauge pod RAM mount adapter
...e and cut out for usb to use for charging a phone or data logging.
designed to use a ram-b-202u, holes are threaded for a m4x0.7.
thingiverse
free

Manfrotto to Arca Swiss adapter
...ing.
remove the manfrotto mounting plate, place the adapter and then the arca-swiss mounting plate. you might need a longer bolt.
thingiverse
free

Trailtech Vapor Mount Plate by bipedal
... top fit 5mm leds for whatever indicator lights you wish to put there. i'm using mine for oil, neutral, and fuel on my sv650.
thingiverse
free

Raspberry Pi Model B (Old Version) to Model B+ Mounting Adapter Plate by ksolomon75
...ndoffs for the b screw holes.
screw holes are for m2.5 screws.
i included the 123d design file, so you can modify it if you need.
grabcad
free

Gauge Pod for 2003-2006 Chevy Silverado/GMC Sierra Center Console
...ead cap screws. just drill a hole in the back side of the pocket to route the gauge wires though. holds three (3) 2" gauges.
thingiverse
free

Dial Gauge mount by CNCer
...ed. use a domed head m6 screw to mount the adapter for extra clearance.
this was designed with a front mounted dii cooler fitted.
thingiverse
free

adpater to use 50mm fan on 40mm mount. by xochal
... i used m3 12mm cap screws to mount the plate to the existing housing then m3 13 phillips heads to mount the fan to the adapter.
thingiverse
free

Miata Radio Block off Plate by banana_muffin
...his to replace my current block off plate in my miata. the current one only had provisions for two 50mm gauges and no cubby hole.
thingiverse
free

Gauge Pods for Miata Tombstone (AEM X-Series Gauges) by josh7owens
... back stays are for aem x-series gauges but you could use the front plates for any gauges and come up with a back plate solution.
thingiverse
free

4.3 gram servo mount + needle (gauge) by mitchell_cj
...e for your gauge face print.
i provided a basic svg gauge to print. it's a little small but it's just to get you started.
Bustedchain
thingiverse
free

Fan Duct for CR-10S Pro and SKR v1.4 Turbo by BustedChain
...and tell me what you observe, otherwise i recommend you go with the v1 here. the v1 does work and has a couple of imperfections.
thingiverse
free

Bed Leveling Tool - Mount Adapter for Many Creality Printers (not all) by BustedChain
...04 as a starting point. some can use increments of 0.02. i could have printed this with 0.4mm layer height on my 0.6mm nozzle.
Siriusxm
thingiverse
free

Mount for SiriusXM radio in Toyota Highlander by muckychris
...highlander by muckychris
thingiverse
this thing was made with tinkercad. edit it online https://tinkercad.com/things/905qmknh7q3
thingiverse
free

SiriusXM car dock mount for FZJ80 LandCruiser by SeekOutAdventure
...s in the bottom of the ashtray. use ramped screws and nylock nuts. ashtray still slides out, and can be used for coins, ash, etc.
thingiverse
free

Prius Cable Clip, Mk2 by HunterGreen
...cable being held up by it due to a siriusxm cradle, so i need a bit more force. all...
3dwarehouse
free

2016 Chevrolet Spark (M400) (Low Poly)
...hands-free calling w/ wireless a2dp stereo audio streaming capabilities, siriusxm satellite radio w/ three-month (3mo.) trial subscription, bringo gps...
Bully
turbosquid
$30

Bully
... available on turbo squid, the world's leading provider of digital 3d models for visualization, films, television, and games.
turbosquid
$15

Cat Bully
...rbosquid
royalty free 3d model cat bully for download as stl on turbosquid: 3d models for games, architecture, videos. (1304144)
turbosquid
$149

VW Bulli
... available on turbo squid, the world's leading provider of digital 3d models for visualization, films, television, and games.
3d_export
$80

VW Bulli 3D Model
...dexport
low poly games ready car historical oldtimer bus van bulli pick-up vehicle vw
vw bulli 3d model dropassets 31326 3dexport
3d_export
$5

mjo bulli model
...mjo bulli model
3dexport
mjo urdu
cg_studio
$129

Pisten Bully 400.3d model
...odel
cgstudio
.3ds .c4d .max .obj - pisten bully 400. 3d model, royalty free license available, instant download after purchase.
3d_export
$5

bully rat
...work is saved in 3d max 2018 ,fbx, and obj. the model has a skin . visualization was performed in the marmoset toolbag and v-ray.
3d_export
$129

vw multivan bulli t61 2020
...-------<br>thank you for buying this product. we look forward to continuously dealing with you.<br>creator 3d team!!!
3d_export
$129

vw multivan bulli lwb t61 2020
...-------<br>thank you for buying this product. we look forward to continuously dealing with you.<br>creator 3d team!!!
3d_export
$119

vw multivan and bulli t61 2020
...r>without meshsmooth max,obj,lwo,xsi,c4d: 270 000 polygons<br>collapsed fbx,3ds,obj: 2 990 000 faces/ 1 700 000 polygons
1500
turbosquid
$15

human-1500
...turbosquid
royalty free 3d model human-1500 for download as on turbosquid: 3d models for games, architecture, videos. (1145995)
turbosquid
$6

Wood table 1500
...ee 3d model wood table 1500 for download as max, obj, and fbx on turbosquid: 3d models for games, architecture, videos. (1468481)
turbosquid
$6

Built-in bookcase 1500
...odel built-in bookcase 1500 for download as max, obj, and fbx on turbosquid: 3d models for games, architecture, videos. (1469861)
turbosquid
$83

Conquistador Fort A 1500
... available on turbo squid, the world's leading provider of digital 3d models for visualization, films, television, and games.
turbosquid
$30

Conquistador Cannon A 1500
... available on turbo squid, the world's leading provider of digital 3d models for visualization, films, television, and games.
3ddd
$1

Power controller Mcintosh MPC 1500
...power controller mcintosh mpc 1500
3ddd
mcintosh
mcintosh mpc 1500
3d_export
$14

RAM 1500 TRX 2022
...ram 1500 trx 2022
3dexport
3ddd
$1

NorSap 1500 Series
...norsap 1500 series
3ddd
pilot chair , norsap
maps texture included
3ddd
$1

Norsap TM 1500
...norsap tm 1500
3ddd
norsap
model included texture
кресло оператора
3ddd
free

Смеситель KRAUS KEF-1500 Ventus
... kef , смеситель
смеситель kraus kef-1500 ventus
Pillar
3d_export
free

Pillar
...pillar
3dexport
pillar
3d_ocean
$5

Pillar
...pillar
3docean
pillar stone
pillar stone. 2048* texture 500 polygon
turbosquid
$7

Pillar
...
turbosquid
royalty free 3d model pillar for download as fbx on turbosquid: 3d models for games, architecture, videos. (1192934)
turbosquid
$2

Pillar
...
turbosquid
royalty free 3d model pillar for download as obj on turbosquid: 3d models for games, architecture, videos. (1252936)
turbosquid
$2

Pillar
...
royalty free 3d model pillar for download as , fbx, and obj on turbosquid: 3d models for games, architecture, videos. (1623104)
3ddd
free

Pillar table
...pillar table
3ddd
полка
pillar table
turbosquid
$10

Pillar
...royalty free 3d model pillar for download as 3ds, obj, and c4d on turbosquid: 3d models for games, architecture, videos. (802783)
turbosquid
$1

Pillars
...lty free 3d model pillars for download as blend, fbx, and obj on turbosquid: 3d models for games, architecture, videos. (1593834)
turbosquid
$4

Pillar
...y free 3d model pillar for download as 3ds, obj, fbx, and dae on turbosquid: 3d models for games, architecture, videos. (1197945)
turbosquid
$30

Pillar
... available on turbo squid, the world's leading provider of digital 3d models for visualization, films, television, and games.
Pod
design_connected
$13

Pod
...pod
designconnected
niche modern pod computer generated 3d model. designed by pyles, jeremy.
3d_export
$5

engine pod
...engine pod
3dexport
engine pod
turbosquid
$80
POD
...pod
turbosquid
royalty free 3d model pod for download as 3ds on turbosquid: 3d models for games, architecture, videos. (1234976)
3ddd
$1
Pod 325
...pod 325
3ddd
пуф
pod 325
turbosquid
$4
PODS
...oyalty free 3d model pods for download as blend, fbx, and obj on turbosquid: 3d models for games, architecture, videos. (1563118)
3d_export
$5

coworking pods
...coworking pods
3dexport
private pods for workspaces, offices
3ddd
$1

Pod Meeting
...pod meeting
3ddd
pod meeting , martela
146cm x 205cm
design_connected
$16

Pod 325
...pod 325
designconnected
department pod 325 computer generated 3d model.
3d_ocean
$5

Ariel Power Pod
...model ariel power pod ariel power pod, modeled in cinema 4d r14 and all materials are included. if you like it, please rate this
3ddd
$1

POD 325
...pod 325
3ddd
кресло мешок
кресло мешок pod 325, room 21 85x50x100cm.
Ram
design_connected
$16

Rams
...rams
designconnected
paola lenti rams computer generated 3d model. designed by carrasco, victor.
design_connected
$11

Ram
...ram
designconnected
ligne roset ram computer generated 3d model. designed by kuehne-thompson, barbara.
3d_ocean
$5

ram
...s, chordates, mammals, bovina, ram, toy figurine, netsuke fully configured scene with camera and lighting material. v ray 2.40.04
3d_export
$10

ram sculpture
...ram sculpture
3dexport
ram sculpture
3d_export
$25

Ram
...ram
3dexport
3d_export
free

RAM module
...ram module
3dexport
a model of computer ram memory.
turbosquid
$20

Ram
... available on turbo squid, the world's leading provider of digital 3d models for visualization, films, television, and games.
turbosquid
$15

Ram
... available on turbo squid, the world's leading provider of digital 3d models for visualization, films, television, and games.
turbosquid
$14

Ram
... available on turbo squid, the world's leading provider of digital 3d models for visualization, films, television, and games.
3d_ocean
$8

Ram
... you want. maya 2009 or latest is recommended because it is created in maya2009. you can open obj and fbx in old version of ma...
Gauge
3d_ocean
$10
Gauges
...rim to them. each gauge has an xpresso tag to give them an automatic animation without the need for keyframing and can be chan...
3d_export
$5

pressure gauge
...pressure gauge
3dexport
pressure gauge
3d_export
$5
gauge protector
...gauge protector
3dexport
gauge protector
3d_export
$5
Gauge 3D Model
...gauge 3d model
3dexport
gauge pressure gas air liquid
gauge 3d model fau 71180 3dexport
3d_export
$5

protected pressure gauge
...protected pressure gauge
3dexport
protected pressure gauge
3d_export
$5

hard gauge protector
...hard gauge protector
3dexport
hard gauge protector
turbosquid
$29
Screw Gauge
... available on turbo squid, the world's leading provider of digital 3d models for visualization, films, television, and games.
turbosquid
$29
Marking Gauge
... available on turbo squid, the world's leading provider of digital 3d models for visualization, films, television, and games.
turbosquid
$20

Blade Gauge
... available on turbo squid, the world's leading provider of digital 3d models for visualization, films, television, and games.
3d_export
$5
12 Gauge 3D Model
...12 gauge 3d model
3dexport
shotgun shell gauge 12
12 gauge 3d model pirog 54511 3dexport
50Mm
3d_ocean
$9
50mm Canon lens
...50mm canon lens
3docean
50mm canon foto lens photo
canon lens 50mm 1.8 the most practical affordable lens to start with
3d_export
$20

50mm cal 3D Model
...50mm cal 3d model
3dexport
50mm cal bullet ammo
50mm cal 3d model archer 23592 3dexport
turbosquid
$39

50mm Prime Lens
... available on turbo squid, the world's leading provider of digital 3d models for visualization, films, television, and games.
turbosquid
$1

Base insert - Stone&Wood 50mm
...e 3d model base insert - stone&wood 50mm for download as on turbosquid: 3d models for games, architecture, videos. (1325614)
turbosquid
$7

Grenade Launcher Ammo Type 91 50mm
... available on turbo squid, the world's leading provider of digital 3d models for visualization, films, television, and games.
turbosquid
$19

Lensbaby Composer Double Glass 50mm lens
...lass 50mm lens for download as ma, max, ma, dae, fbx, and obj on turbosquid: 3d models for games, architecture, videos. (1523910)
3ddd
$1

объектив Canon EF 50mm f-1.2L USM
... canon
объектив canon ef 50mm f-1.2l usmhttp://market.yandex.ru/model.xml?modelid=988322&hid;=90613
turbosquid
$5

SOCKET HEAD CAP SCREW M7 LENGTH-50mm
...screw m7 length-50mm for download as sldpr, sldpr, stl, and x on turbosquid: 3d models for games, architecture, videos. (1677023)
turbosquid
$19

Lens Sigma 17-50mm F2.8 EX OS
... available on turbo squid, the world's leading provider of digital 3d models for visualization, films, television, and games.
3d_export
$12

nissan skyline r33 50mm over fenders
...late gtr width<br>model format ready obj, fbx, 3ds, 3ds max 2015-2018<br>poly's - 8790<br>vert's - 7578
Dog
3d_export
$6

Dog
...dog
3dexport
dog
3d_export
$5

a dog
...a dog
3dexport
this is a dog
3d_export
$5

this is a dog
...this is a dog
3dexport
this is a dog
3d_export
$6

Dog
...dog
3dexport
3d model of a dog
3d_export
$5

dog
...dog
3dexport
cartoon plush dog.
3d_export
$5

dog
...dog
3dexport
this is a dog and it haves materials with colors.
archibase_planet
free

Dog
...dog
archibase planet
dog statuette picturesque element
dog - 3d model (*.gsm+*.3ds) for interior 3d visualization.
3d_ocean
$10

Dog
...dog
3docean
base dog mesh model
dog model without textures with the simple stuff. modifiers include: mirror and subsurf.
3d_ocean
$8

dog
...dog
3docean
animal dogmesh lopoly
3d mesh dog lopoly.
3d_ocean
$6

Dog
...dog
3docean
animals comic dogs
3ds max,v-ray
2010
3ddd
$1

Торшер 2010
...торшер 2010
3ddd
ковка
торшер 2010
turbosquid
$15

Human-2010
...turbosquid
royalty free 3d model human-2010 for download as on turbosquid: 3d models for games, architecture, videos. (1175069)
turbosquid
$59

Xm 2010
...id
royalty free 3d model xm 2010 for download as max and obj on turbosquid: 3d models for games, architecture, videos. (1668165)
3ddd
free

South Africa 2010
...south africa 2010
3ddd
статуэтка
south africa 2010
3d_ocean
$8

Mesh_Fence max 2010
...4 vertices: 41,376 =======formats=========== • max (3dstudiomax 2010) • ma (maya 2010) • mb (maya 2010) • cd4 (cinema4d 12) • ...
turbosquid
$99

Chevrolet 2010
... available on turbo squid, the world's leading provider of digital 3d models for visualization, films, television, and games.
turbosquid
$30

2010.max
... available on turbo squid, the world's leading provider of digital 3d models for visualization, films, television, and games.
turbosquid
$20

quattro 2010
... available on turbo squid, the world's leading provider of digital 3d models for visualization, films, television, and games.
3d_ocean
$49

Camaro 2010
...camaro 2010
3docean
camaro camaro2010 car
car,camaro,camaro2010
3d_export
$90

Camaro 2010 3D Model
...camaro 2010 3d model
3dexport
camaro 2010 camaro2010 car
camaro 2010 3d model wakuku 11175 3dexport
Adapter
3d_export
$10
Adapter 3D Model
...adapter 3d model
3dexport
adapter
adapter 3d model mur 20260 3dexport
archive3d
free
Adapter socket 3D Model
...dapter socket adapter
adapter socket n090211 - 3d model (*.3ds) for interior 3d visualization.
turbosquid
$400

cell adaptation
...
royalty free 3d model cell adaptation for download as blend on turbosquid: 3d models for games, architecture, videos. (1701655)
archive3d
free
Adapter 3D Model
...ups pc equipment
adapter extron n180813 - 3d model (*.gsm+*.3ds) for interior 3d visualization.
turbosquid
$5

usb adapter
...royalty free 3d model usb adapter for download as ige and stl on turbosquid: 3d models for games, architecture, videos. (1582234)
turbosquid
$15
Power adapter
...free 3d model power adapter for download as max, obj, and fbx on turbosquid: 3d models for games, architecture, videos. (1510024)
turbosquid
$8
USB adapter
...e 3d model usb adapter for download as max, fbx, obj, and dwg on turbosquid: 3d models for games, architecture, videos. (1713542)
turbosquid
$30
adapter.3ds
... available on turbo squid, the world's leading provider of digital 3d models for visualization, films, television, and games.
turbosquid
$15
Nokia Adapter
... available on turbo squid, the world's leading provider of digital 3d models for visualization, films, television, and games.
turbosquid
$15
Universal adapter
... available on turbo squid, the world's leading provider of digital 3d models for visualization, films, television, and games.
2016
design_connected
$27

Sydney 2016
...sydney 2016
designconnected
poliform sydney 2016 computer generated 3d model. designed by massaud, jean-marie.
turbosquid
$15

Human-2016
...turbosquid
royalty free 3d model human-2016 for download as on turbosquid: 3d models for games, architecture, videos. (1175104)
3d_export
$5

polo sedan 2016
...polo sedan 2016
3dexport
polo sedan 2016 obj
turbosquid
$35

Towel 2016
... available on turbo squid, the world's leading provider of digital 3d models for visualization, films, television, and games.
turbosquid
$26

Kitchen 2016
... available on turbo squid, the world's leading provider of digital 3d models for visualization, films, television, and games.
turbosquid
$6

2016-07
... available on turbo squid, the world's leading provider of digital 3d models for visualization, films, television, and games.
turbosquid
$6

2016-08
... available on turbo squid, the world's leading provider of digital 3d models for visualization, films, television, and games.
turbosquid
$6

2016-010
... available on turbo squid, the world's leading provider of digital 3d models for visualization, films, television, and games.
turbosquid
$6

2016-09
... available on turbo squid, the world's leading provider of digital 3d models for visualization, films, television, and games.
turbosquid
$6

2016-06
... available on turbo squid, the world's leading provider of digital 3d models for visualization, films, television, and games.
Plate
archibase_planet
free
Plates
...plates
archibase planet
plates and dishes plate
plates - 3d model (*.gsm+*.3ds) for interior 3d visualization.
3d_export
$5

plate
...plate
3dexport
plate
archibase_planet
free
Plates
...plates
archibase planet
plates and dishes plate kitchen ware
plates - 3d model (*.gsm+*.3ds) for interior 3d visualization.
archibase_planet
free
Plates
...plates
archibase planet
plate plates and dishes crockery
plates 2 - 3d model (*.gsm+*.3ds) for interior 3d visualization.
archibase_planet
free
Plate
...plate
archibase planet
dinner-plate plate kitchen ware
plate n070808 - 3d model (*.gsm+*.3ds) for interior 3d visualization.
3d_export
$6

plate
...plate
3dexport
design of plate
3d_export
$5

plate
...plate
3dexport
plate lowpoly
archibase_planet
free
Plates
...plates
archibase planet
plate dish kitchen-ware
plate - 3d model for interior 3d visualization.
3ddd
$1

Plates
...plates
3ddd
полка , тарелка
african plates
archibase_planet
free
Plate
...plate
archibase planet
plate kitchen ware
plate - 3d model (*.gsm+*.3ds) for interior 3d visualization.
Housing
archibase_planet
free
House
...t
house residential house private house wooden house
house wooden n290815 - 3d model (*.gsm+*.3ds) for exterior 3d visualization.
archibase_planet
free
House
...use residential house private house wooden house
house wood stone n140815 - 3d model (*.gsm+*.3ds) for exterior 3d visualization.
archibase_planet
free

House
...ibase planet
house residential house building private house
house n050615 - 3d model (*.gsm+*.3ds) for exterior 3d visualization.
archibase_planet
free
House
...ibase planet
house residential house building private house
house n030615 - 3d model (*.gsm+*.3ds) for exterior 3d visualization.
archibase_planet
free

House
...ibase planet
house residential house building private house
house n230715 - 3d model (*.gsm+*.3ds) for exterior 3d visualization.
archibase_planet
free

House
...ibase planet
house residential house building private house
house n240615 - 3d model (*.gsm+*.3ds) for exterior 3d visualization.
archibase_planet
free

House
...ibase planet
house residential house building private house
house n290815 - 3d model (*.gsm+*.3ds) for exterior 3d visualization.
archibase_planet
free

House
...ibase planet
house residential house building private house
house n110915 - 3d model (*.gsm+*.3ds) for exterior 3d visualization.
archibase_planet
free
House
...ibase planet
house residential house building private house
house n120915 - 3d model (*.gsm+*.3ds) for exterior 3d visualization.
archibase_planet
free
House
...ibase planet
house residential house building private house
house n210915 - 3d model (*.gsm+*.3ds) for exterior 3d visualization.
Amps
design_connected
$16
Amp
...amp
designconnected
normann copenhagen amp computer generated 3d model. designed by legald, simon.
3ddd
$1

amp
...amp
3ddd
:-o
3ddd
free
A&X
...a&x
3ddd
a&x
современная кровать фабрики a&x;
3ddd
$1

Molteni & C Night & Day
...molteni & c night & day
3ddd
molteni&c
molteni & c night & day nel248a
3ddd
$1

Molteni & C - Night & Day
...mp;amp; day
3ddd
molteni&c , кушетка
molteni & c - night & day ncl 126/a
3ddd
$1
Villeroy & Boch / Loop & Friends & L'Aura
...op & friends & l'aura
3ddd
villeroy&boch
loop & friends раковина для установки на столешницу
3ddd
free

barovier&toso
...ddd
классическая люстра barovier&toso , barovier&toso
barovier&toso;
3ddd
$1

Стул A&D
...стул a&d
3ddd
a&d
chair a&d;
3ddd
$1

Night&Day
...p;c , night&day
http://www.formul.ru/products/mebel_dlja_spalni/196588
3ddd
$1
B&B
...b&b
3ddd
b&b italia
statue b&b italy