Thingiverse
Simplified Ender 3 Hotend & 5015 Partcooling Duct replacement by raeuberhose
by Thingiverse
Last crawled date: 3 years, 1 month ago
Hello,
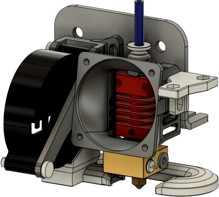
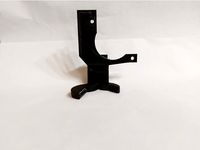
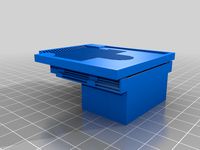
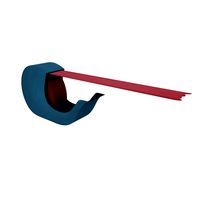
this is my rather simplified hotend and partcooling duct replacement for the Ender 3 (Pro).
After my stock partcooling fan died, I upgraded to a 5015-style blower fan. Beeing not fully satisfied with the selection of 5015-ducts, I started created my own.
Materials needed:
one paperclip, for securing the pins
one screw in case you are using BLTouch (feel free to change the diameter of the bore in the attached .f3d-file to use the screw you have laying around)
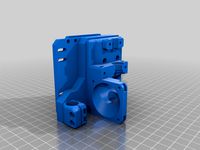
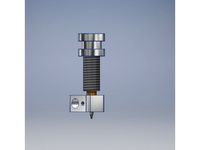
To install the hotend duct, you have to unscrew the hotend. Remove the screws, put the duct over the now loose bowden tube/hotend and slide it down until you can insert the screws into the front of the hotend. Be careful not to break the duct when pushing it over the bowden.
Place the duct between the carrier and the hotend and tighten the screws.
Once finished you can install the axial fan on the hotend duct.
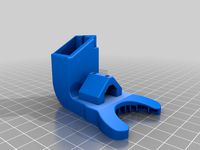
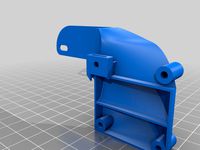
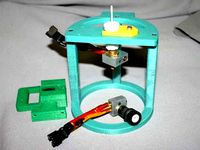
Next, install the "Fan_mount" which carries the 5015 fan. You can use the original fan Ender 3 screws.
The holes are elongated so you can adjust the hight of the partcooling duct to your buildplate.
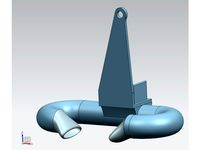
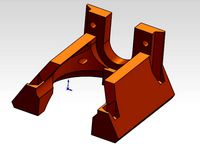
The next step is to clip the partcooling duct on the 5015 fan, before installing it on the mounting arm.
Place the fan with the duct from underneath the hotend into its bracket. Use the long pin and push it from the left side into the top mounting holes and the fan.
The short pin keeps the fan at the bottom in place, feel free to secure the pins with a cut paperclip.
Adjust height if necessary.
I added some pictures from my "water testing" of the partcooling duct at 30% and 100% fan speed.
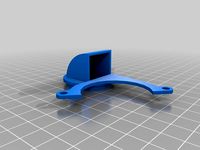
There are two hotend versions available, one with BLTouch and one without. If you are using a BLTouch, you also have to print the "BLTouch_mount". The probe offset is: X=+30; Y-17.
If you encounter any issues, or have improvements, let me know!
Cheers.
this is my rather simplified hotend and partcooling duct replacement for the Ender 3 (Pro).
After my stock partcooling fan died, I upgraded to a 5015-style blower fan. Beeing not fully satisfied with the selection of 5015-ducts, I started created my own.
Materials needed:
one paperclip, for securing the pins
one screw in case you are using BLTouch (feel free to change the diameter of the bore in the attached .f3d-file to use the screw you have laying around)
To install the hotend duct, you have to unscrew the hotend. Remove the screws, put the duct over the now loose bowden tube/hotend and slide it down until you can insert the screws into the front of the hotend. Be careful not to break the duct when pushing it over the bowden.
Place the duct between the carrier and the hotend and tighten the screws.
Once finished you can install the axial fan on the hotend duct.
Next, install the "Fan_mount" which carries the 5015 fan. You can use the original fan Ender 3 screws.
The holes are elongated so you can adjust the hight of the partcooling duct to your buildplate.
The next step is to clip the partcooling duct on the 5015 fan, before installing it on the mounting arm.
Place the fan with the duct from underneath the hotend into its bracket. Use the long pin and push it from the left side into the top mounting holes and the fan.
The short pin keeps the fan at the bottom in place, feel free to secure the pins with a cut paperclip.
Adjust height if necessary.
I added some pictures from my "water testing" of the partcooling duct at 30% and 100% fan speed.
There are two hotend versions available, one with BLTouch and one without. If you are using a BLTouch, you also have to print the "BLTouch_mount". The probe offset is: X=+30; Y-17.
If you encounter any issues, or have improvements, let me know!
Cheers.
Similar models
thingiverse
free

CR-10/Ender 3 Hotend Fan Duct BLTouch Remix by raeuberhose
... my 4020 cooltek silent fan.
printed with fan duct side facing the bed, using supports.
thanks to pixarfanatic95 for making this.
thingiverse
free

Satsana ender 3 5015 fan duct with bltouch mount by Neilprice
...atsana ender 3 5015 fan duct with bltouch mount by neilprice
thingiverse
just an all in one 5015 satsana v80 remix with bltouch
thingiverse
free

Micro Swiss Direct Drive Cyclope Fan Duct by DannyGi
...xtuded filament.
the design of 40x40mm fan duct is for optimize the air flow to the extruded filament
let me know in the comments
thingiverse
free

HotEnd Carriage / Bowden Mount for JGAURORA A5 by tesla_uss
...40x40 blower fan
24v 5015 blower cooling fan
microswitch
some screws and nuts
mportant! support only "touching build".
thingiverse
free

Satsana 5015 Fan Duct for Creality Ender 3 v2 with BLTouch Metal Mount by FalseAlarm
...se of the original bltouch metal mount, this design does not require a bracket print, or changing of offset settings for bltouch.
thingiverse
free

Ender 3 V2 Fan Duct for 5015 Part Cooling Fan with BLTouch Mount by whistleblower
... 40g with 3 perimeters and 15% infill
printing time: usually around 4 hours.
i have uploaded a step-file if you want to remix it.
thingiverse
free

SATSANA ON STEROIDS - BONDTECH - BMG - DIRECT DRIVE -EXTRUDER by MrSonyx3DPrint
...e details
capricorn tube length on my ender 3 with stock hotend is 92mm
feel free to ask me any questions about it.
happy printig
thingiverse
free
Anycubic i3 Mega fan duct for 5015 radial fan by D1_
...tall the fanbox around your hotend. at least with my setup...
don´t forget to choose the "support on build plate only".
thingiverse
free

OmniaDrop 5015 Adapter BLTouch Edition by Nusel
...module for super silent printing while still keeping the hotend cool.
the partcooler is a generic 24v fan. cooling is sufficient.
thingiverse
free

BLTouch Support Ender 3 for Shorter Hotend
... the bltouch retracted and upped at the maximum using the screw.
you can check this video about it : https://youtu.be/e4xdklczwxw
Raeuberhose
thingiverse
free

Honda e wheel hub cap RC-Design RC30 by raeuberhose
...trips that stand out from the backside to fix them in place. finally i spray painted the caps with a couple layers of clear coat.
thingiverse
free
CR-10/Ender 3 Hotend Fan Duct BLTouch Remix by raeuberhose
... my 4020 cooltek silent fan.
printed with fan duct side facing the bed, using supports.
thanks to pixarfanatic95 for making this.
thingiverse
free

Robomow RC wheel adapter by raeuberhose
...r of your robomow. i added both the 17,1mm and 16,8mm adapters, feel free to use the fusion360-file to make the changes you want.
thingiverse
free

RC Wheel Adapter for Robomow by raeuberhose
...e=utf8&psc=1
2x m8x20 screws:https://www.amazon.de/gp/product/b0793mrs8q/ref=ppx_yo_dt_b_asin_title_o02_s00?ie=utf8&psc=1
Partcooling
thingiverse
free
Partcooling BLV mgn Cube, flow optimized Volcano Hotend
...ight from xylenc4's volcano duct. this "should" hopefully be an imporved partcooling for the volcano hotend on blv.
thingiverse
free

Bondtech DDX Dual Partcooler by MightyBlyatman
... 3 with a micro-swiss hotend.
you may use a drill to enlarge the holes (for m3) so you will be able to screw everything together.
thingiverse
free

E3D V6 Universal Partcooling Fan Mount by Quasto
...rt cooling fan for the e3d.
added more mounting points to have mor options on angel and hight for different partcooling fan ducts
thingiverse
free

Flyingbear Ghost4 Partcooling with LED
... an dc-dc buck to split the hotend cooling power for a 12v led stip with 3 single leds.
when the hotted get hot the led turns on.
thingiverse
free

Ender3 / CR10 "The Orbiter" Mount and Partcooling(Remixed from Petsfang Bullseye) by Prymaxx
... by prymaxx
thingiverse
easy and simple mount your orbiter exdruder to your ender3 or cr10
remixed partcooling from the bullseye
thingiverse
free

Anycubic i3 mega standart partcooler fan duct by dan93
...on the best partcooler but only for the 50x15 blower.
i have the original anycubic i3 mega part cooler fan and i needed a adapter
thingiverse
free

Ultimate Hemera Partcooler bl touch fix by Damicske
...ler bl touch fix by damicske
thingiverse
this is a remix so the bl-touch is sandwiched between the hemera and the part cooler ;)
thingiverse
free

Partcooling BLV mgn Cube, flow optimized Volcano Hotend
...lcano hotend
thingiverse
just extended the fins to the bottom for easyer print. thank you @7effrey for the volcano modification!
thingiverse
free

Ultimate Hemera Partcooler With Spaceship Airduct bl-touch sandwich plate by Damicske
...#39;s room to use the hevorts bl-touch mount (https://www.thingiverse.com/thing:4086282).
added the modified airduct, added 11mm.
thingiverse
free

tevo tarantula simple partcooler by XennoNL
...ptional o-ring. you might need longer m3 bolts.
the part cooler duct is also a press fit 15x20 mm so you can fit your own designs
5015
3ddd
$1

Скамья RUGIANO - COPERTINA BRONZA, 5015/130GL
...a bronza, 5015/130gl
3ddd
rugiano , скамья
скамья rugiano - copertina bronza, 5015/130gl
3d_export
$15

3d hair style for girl v94
...: 4811 - edges : 9836 - faces : 5015 - tris : 9642 - uvs : 5364 file...
thingiverse
free

5015 fan duct
...5015 fan duct
thingiverse
5015 fan duct
thingiverse
free

5015 Fan Guard
...5015 fan guard
thingiverse
5015 fan guard
3dfindit
free

294-5015
...294-5015
3dfind.it
catalog: wago
thingiverse
free
40MM to 5015 Adapter by 360alaska
...by 360alaska
thingiverse
this will adapt a 5015 fan to a 40mm fan mount. the 5015 fan mounts at a right angle and rotates fully.
thingiverse
free
Chiron 5015 blower by DK_Davis
...chiron 5015 blower by dk_davis
thingiverse
anycubic chiron 5015 blower
thingiverse
free

single 5015 to 50mnm by Kyledavis417
...single 5015 to 50mnm by kyledavis417
thingiverse
single 5015 to 50mm for tevo controller box
thingiverse
free
Cetus 3D 5015 Duct
...cetus 3d 5015 duct
thingiverse
twisted 5015 fan duct for cetus 3d mk2
thingiverse
free

Dual 5015 to 50mm by Kyledavis417
...dual 5015 to 50mm by kyledavis417
thingiverse
dual 5015 fan adapter for tevo tornado controller box
Simplified
turbosquid
$5

Simplified Trumpet
... available on turbo squid, the world's leading provider of digital 3d models for visualization, films, television, and games.
turbosquid
free

Simplified Bike
... available on turbo squid, the world's leading provider of digital 3d models for visualization, films, television, and games.
3d_export
$5

simplified model of a bundle of dollars
...simplified model of a bundle of dollars
3dexport
a simplified model of a bundle of dollars. models for subdiv
turbosquid
$19

The Simplified model of a telescope
... available on turbo squid, the world's leading provider of digital 3d models for visualization, films, television, and games.
turbosquid
$1

Simplified sports car
... available on turbo squid, the world's leading provider of digital 3d models for visualization, films, television, and games.
3d_export
$5

Simplified male-female base mesh
...simplified male-female base mesh
3dexport
simplified male/female character base mesh in .ztl and .fbx
3ddd
$1

Soane - Simplified quiver klismos chair
...
3ddd
капитоне
модель кресла soane - simplified quiver klismos chair.
- лоуполи геометрия
- мультисаб материал
- fbx + obj + 3ds
turbosquid
$24

Coronavirus 2 COVID-19 simplified model
...irus 2 covid-19 simplified model. for download as c4d and obj on turbosquid: 3d models for games, architecture, videos. (1534962)
3d_export
free
g17
...g17 3dexport glock 17 simplified style,little...
3d_export
$10
biblical altar
...biblical altar 3dexport a simplified model of the altar spoken of in the bible,...
Hotend
thingiverse
free
hotend by fablab_lueneburg
...hotend by fablab_lueneburg
thingiverse
hotend model
thingiverse
free
Hotend for Graber
...hotend for graber
thingiverse
hotend complement pastes for graber printerhttps://youtu.be/0koxhnsuhdy
thingiverse
free
Hotend adapter by antaviana
...hotend adapter by antaviana
thingiverse
hotend adapter
thingiverse
free
hotend fan by mming1106
...hotend fan by mming1106
thingiverse
hotend fan
thingiverse
free

Hotend schema by ione
...hotend schema by ione
thingiverse
hotend project schema
thingiverse
free
Fabtotum XY Hotend holder for E3D Hotend
...s with integrated supports.
more for the project you can see here: https://kf-designs.com/2019/09/07/fabtotum-printer-conversion/
thingiverse
free
HotEnd Stand by onepointdiy
...tend, when you make your new hotend or repair your j-head or mg-plus hotend.
the hole of 16mm, please adjust using a reamer, etc.
thingiverse
free

fast magnetic hotend changer for Chimera Hotend by Draman
...chimera hotend !
and new basis (the hole from original is to small)
it is a remix form skimmy's fast magnetic hotend changer
thingiverse
free

Hotend Fan Adapter for MicroSwiss All Metal Hotend by jo_schi_man
...
thingiverse
little change for the hotend fan adapter to hold the microswiss all metal hotend (slightly longer and sharp edges).
thingiverse
free
Merlin Hotend by Alejanson
...merlin hotend by alejanson
thingiverse
this is a 1:1 drawing of the classic merlin hotend.
Duct
turbosquid
$19
Duct Set
...d
royalty free 3d model duct set for download as max and fbx on turbosquid: 3d models for games, architecture, videos. (1145038)
turbosquid
$10
Duct Tape
...id
royalty free 3d model duct tape for download as ma and ma on turbosquid: 3d models for games, architecture, videos. (1580351)
turbosquid
free
Duct Tape
...
free 3d model duct tape for download as obj, fbx, and blend on turbosquid: 3d models for games, architecture, videos. (1486518)
3d_ocean
$7
Air-duct
... ventilation
high quality industrial air duct ventilation model. created in cinema 4d but comes in various other formats as well.
turbosquid
$20
Air ducts
...lty free 3d model air ducts for download as max, obj, and fbx on turbosquid: 3d models for games, architecture, videos. (1262476)
3d_export
$10

Supply air duct
...supply air duct
3dexport
supply air duct with two axial fans and hangers
turbosquid
$2
Duct Tape
...e 3d model duct tape for download as obj, fbx, blend, and dae on turbosquid: 3d models for games, architecture, videos. (1473972)
turbosquid
free

Duct Tape
... available on turbo squid, the world's leading provider of digital 3d models for visualization, films, television, and games.
3d_ocean
$3
Duct tape
...polys. includes: cinema 4d project. model in 3 formats (obj, fbx, 3ds). 6 .tga texture maps (albedo, ambient occlusion, diffus...
turbosquid
$40
Ventilation Duct PACK
...tion duct pack for download as ma, obj, fbx, and unitypackage on turbosquid: 3d models for games, architecture, videos. (1287068)
Ender
3ddd
$1

Enders / Elegance
...enders / elegance
3ddd
обогреватель
уличный газовый обогреватель enders elegance
высота: 2200 мм
3d_export
free

ender 3 frame cavity covers
... of the creality ender 3 - makes it look a bit more attractive it just slides into the open channels of the aluminium framework
turbosquid
$1

pen support for ender 3
...y free 3d model pen support for ender 3 for download as blend on turbosquid: 3d models for games, architecture, videos. (1611282)
3d_ocean
$9

Ender Dragon Minecraft
...ojang obj poly videogames
ender dragon minecraft created with cinema 4d r15 formats included: max 2013 – fbx 2012 – c4d r15 – obj
3d_export
free

Creality ender enclosure webcam mount
...e creality enclosure. sure is better than a tripod. change it up if it helps. i printed pla with 50% infill on my dd ender 3 pro.
3d_export
free

ender 3 enclosure corners
...er corners and 4 upper corners, using 25mmx25mm angled aluminium pieces that gets covered on inside of the frame with plexiglass
3d_export
free

ender 3 3d print bed clips
...ed + normal aluminium bed frame of the creality ender 3 = 6mm (b) these clips are designed for glass plate + aluminium bed = 4mm
3d_export
$5

GRUMPY CAT
...grumpy cat 3dexport grumpy cat to print in ender ...
3d_export
$5

Logs fire
...with one multi material for corona and vray r ender. albedo, normal, uvmap, roughness format jpg 4096x4096 models:...
3d_export
$42

excavator
...is the original size. 0.12 mm printing surface creality ender5 ...
Replacement
3d_export
$12

replaceable bristle
...replaceable bristle
3dexport
this is 3d printable replaceable bristle toothbrush.
3d_export
$34
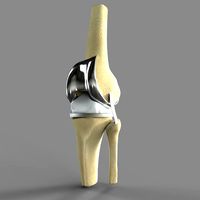
Knee Replacement
...h meets the lower leg. ... during a total knee replacement, the end of the femur bone is removed and replaced with a metal shell.
3d_export
$44
Hip Replacement
...omponents. the damaged femoral head is removed and replaced with a metal stem that is placed into the hollow center of the femur.
turbosquid
$59

Hip replacement
...el hip replacement for download as ma, c4d, lwo, lxo, and obj on turbosquid: 3d models for games, architecture, videos. (1520195)
turbosquid
$10

Module replacment station
...alty free 3d model module replacment station for download as on turbosquid: 3d models for games, architecture, videos. (1271271)
3d_export
$8
tool replacement gearbox
...tool replacement gearbox
3dexport
eccentric lifting mechanism, you can process according to available drawings.
turbosquid
$7

Globe Oil Atomizer Replacement Housing
... oil atomizer replacement housing for download as ige and stl on turbosquid: 3d models for games, architecture, videos. (1253839)
turbosquid
free

SLICE Ceramic Scapel (Replaceable Blade)
... (replaceable blade) for download as obj, fbx, blend, and dae on turbosquid: 3d models for games, architecture, videos. (1363525)
3d_export
$19
Knee Replacement Implant
...ntimeter<br>__________________________<br>poly count :<br>polygon count - 217440<br>vertex count - 108776
turbosquid
$19

(Project) Bad odor filtering sytem with support rail and pulley that assure a comfortable gel filter element replacement.
... available on turbo squid, the world's leading provider of digital 3d models for visualization, films, television, and games.
3
turbosquid
$10

Mountain Bike 3 -3 of 3
...model mountain bike 3 (#3 of 3) for download as fbx and blend on turbosquid: 3d models for games, architecture, videos. (1438752)
turbosquid
$6

Rock 3-3
...urbosquid
royalty free 3d model rock 3-3 for download as obj on turbosquid: 3d models for games, architecture, videos. (1628065)
turbosquid
$29

Books 150 pieces 3-3-3
...books 150 pieces 3-3-3 for download as max, obj, fbx, and stl on turbosquid: 3d models for games, architecture, videos. (1384033)
turbosquid
$3

Genesis 3 Clothing 3
... available on turbo squid, the world's leading provider of digital 3d models for visualization, films, television, and games.
3d_export
$5

hinge 3
...hinge 3
3dexport
hinge 3
3ddd
$1

Розетка 3
...розетка 3
3ddd
розетка
розетка 3
turbosquid
$50

is-3
... available on turbo squid, the world's leading provider of digital 3d models for visualization, films, television, and games.
turbosquid
$10

Mountain Bike 3 -2 of 3
...model mountain bike 3 (#2 of 3) for download as fbx and blend on turbosquid: 3d models for games, architecture, videos. (1438750)
turbosquid
$10

Mountain Bike 1 -3 of 3
...model mountain bike 1 (#3 of 3) for download as fbx and blend on turbosquid: 3d models for games, architecture, videos. (1438743)
3d_export
$5

3 CATS
...3 cats
3dexport
3 cats pen holder