Thingiverse
Simple WLED Powered Night Light by mrspiffy
by Thingiverse
Last crawled date: 4 years, 5 months ago
If you collect this thing, be sure to like it as well. Thanks!
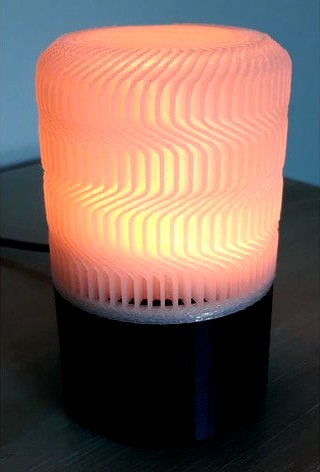
Looking to dip your toe into the WLED light pool? Give this simple yet useful night light a try. I call it a night light, but it could also be an accent light or mood lamp or what ever your need is for a small color changing lamp.
This is based on a WeMos D1 mini, a great little microprocessor for use with WLED, an open source neo-pixel control system. You will need to do little soldering to hook up the simple circuit that powers the light.
If you'd like to use a different esp8266 processor, you will need to adjust(remix) the processor plate to fit your part.
Let's get to it!
New: Honeycomb shade based on the work done at https://www.thingiverse.com/thing:4807723/files
New: Wavy Shade loosely based on the Yeah! lamp design.
Build Instructions
Three pieces to print: shade, base unit, processor plate. The shade should be printed with a translucent filament. The base and plate can be any color you like. Use a raft and supports when printing the base. The other parts can be printed without them.
Once you've printed the 3 parts, Wire up the neo-pixel ring, thread the wires thru the provided hole and glue it down on the base with hotglue. I used a 330 Ohm resistor on the input. This is shown in image A.
TIP: Use long leads on the wires. I used 6' leads which allowed me to solder them to the microprocessor without having to do it inside the base.
Flip the base over and thread your 3 wires up thru the processor plate and solder your leads to the microprocessor and then tuck the microprocessor it into the processor plate. This is shown in image B.
Tip: Put a curl in your leads between the top of the base and the processor plate. Then when you sandwich it all together, the leads will expand out towards the walls of the base and not in a wuzzle.
Now press the processor plate down into the base. I found that plugging in the power cable was enough to hold the plate in the base. You could at this point use some hot glue to further secure the plate to the base. This is shown in image C.
Flip the base LED side up and press the cover on. It should just snug fit, otherwise, hot glue is your friend.
Software Installation
As noted on the WLED installation wiki (https://github.com/Aircoookie/WLED/wiki/Install-WLED-binary) there are a number of approaches you can take to programming the Wemos D1. I found most of the tools for doing that very linuxy flavored and as a windows user, a barrier. There is a windows programming tool, but it requires additional drivers to work. The route I went was to add the esp8266 core to my arduino IDE (since I was already using it for other projects.) and flash an OTA updater to the D1.
Here is how you add the esp8266 core to your arduino IDE: https://randomnerdtutorials.com/how-to-install-esp8266-board-arduino-ide/
Once your IDE has been updated, download the OTA updater from here (https://github.com/Aircoookie/ESP8266MinimalHTTPUpdater) and following the instructions on that page, flash your D1.
Connect to your D1 as indicated above and upload the final binary image -> latest stable release is WLED_0.11.1_ESP8266.bin, download it from here: https://github.com/Aircoookie/WLED/releases/tag/v0.11.1
If you've wired everything up as shown, then using the standard Wemos D1/esp8266 binary from the WLED project should work right out of the box. It will light up orange to indicate success.
You're almost done! Follow steps 3-5 from this page (https://github.com/Aircoookie/WLED/wiki) to access and connect your light to your wifi network. Then use the WLED app to control and program the light. That's it!
BOM:
(links are associate links, thanks for your support)
1 330 Ohm resister
1 12 pixel Neo Pixel Ring: https://www.amazon.com/gp/product/B0105VMUUQ?ie=UTF8&psc=1&linkCode=sl1&tag=ani101mantoo-20&linkId=a2c79c235e481afce3ad353414421c55&language=en_US&ref_=as_li_ss_tl
1 WeMos D1 mini micoprocessor: https://www.amazon.com/gp/product/B0105VMUUQ?ie=UTF8&psc=1&linkCode=sl1&tag=ani101mantoo-20&linkId=a2c79c235e481afce3ad353414421c55&language=en_US&ref_=as_li_ss_tl
Software: https://github.com/Aircoookie/WLED
The Future
New and interesting shades as I find them. WLED natively supports a switch, so V2 will include one.
Remix this!
There's a lot of room for creativity when it comes to the shade. Varying degrees of fill will create different light transmission (depending on how translucent your filament is). Lithopane shade?
A larger 16 pixel ring can be used if the stump that centers the ring is widened.
Post your makes and remakes!